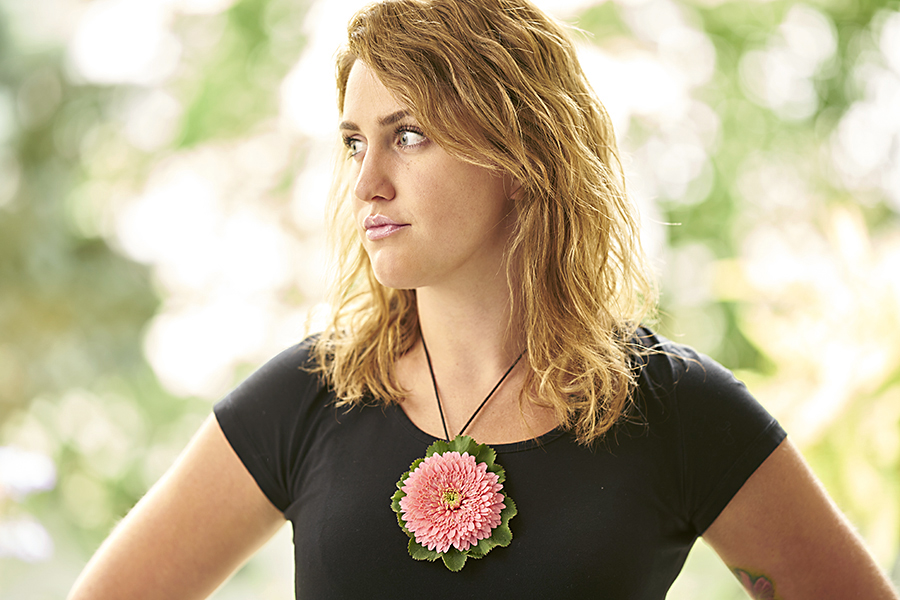
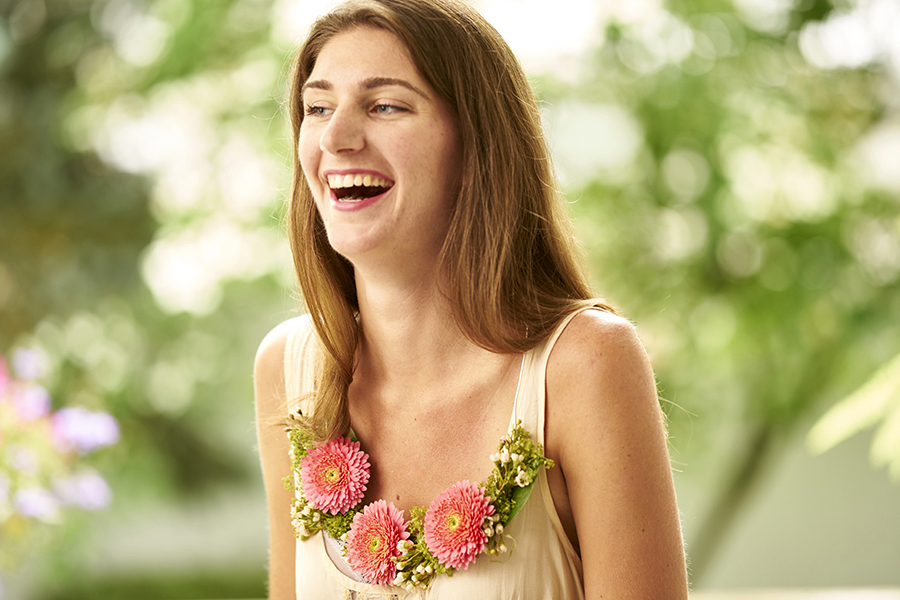
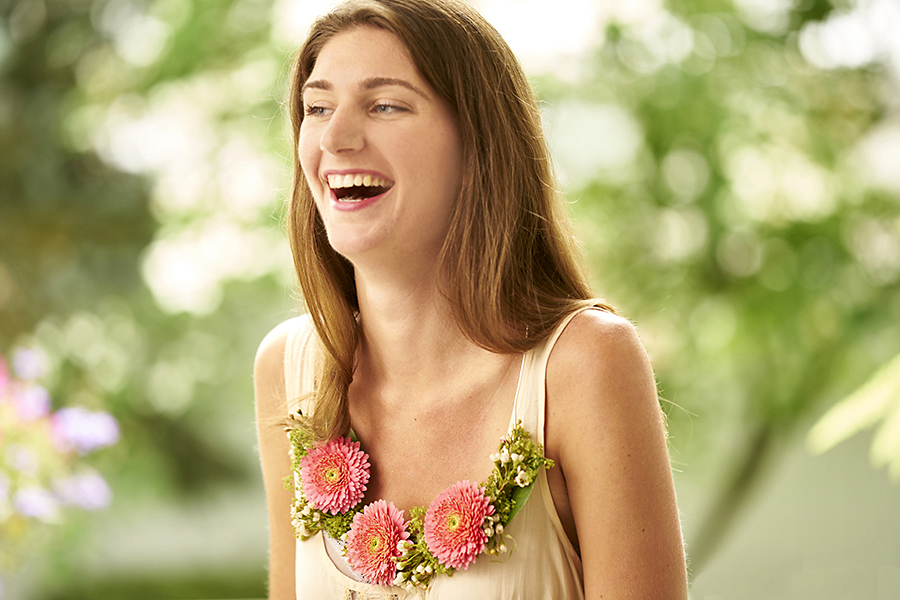
Our series “Get Crafty” gives you the inspiration for creating inventive DIY projects during the holidays and year-round. Learn how to make a gerbera daisy flower necklace in three easy steps daisies and just a few basic materials.
These gerbera daisies are so lovely, you just want to have one on you at all times. So why not make a necklace with not one but three of these gorgeous Gerrondos!
Follow these easy step-by-step instructions to make this fabulous gerbera daisy flower necklace.
Gerbera daisy flower necklace instructions
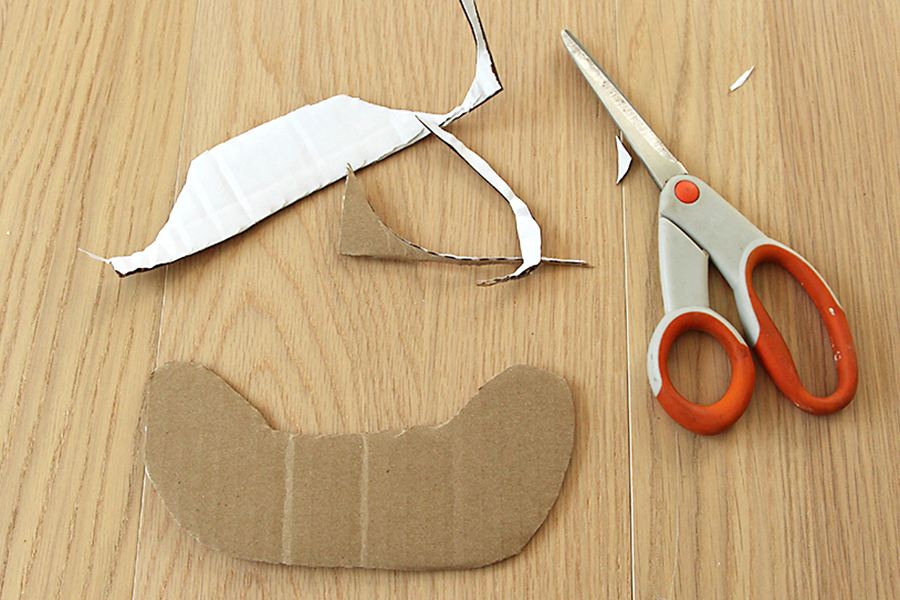
1. Decide on the size you want your necklace to be, and then cut out a base from a piece of cardboard. Attach the material you plan to use as the “chain” for your necklace. I used a 12-gauge aluminum wire in silver. I threaded it through the corrugated cardboard and bent the ends back up behind the cardboard. You could also use ribbon or a jewelry style chain.
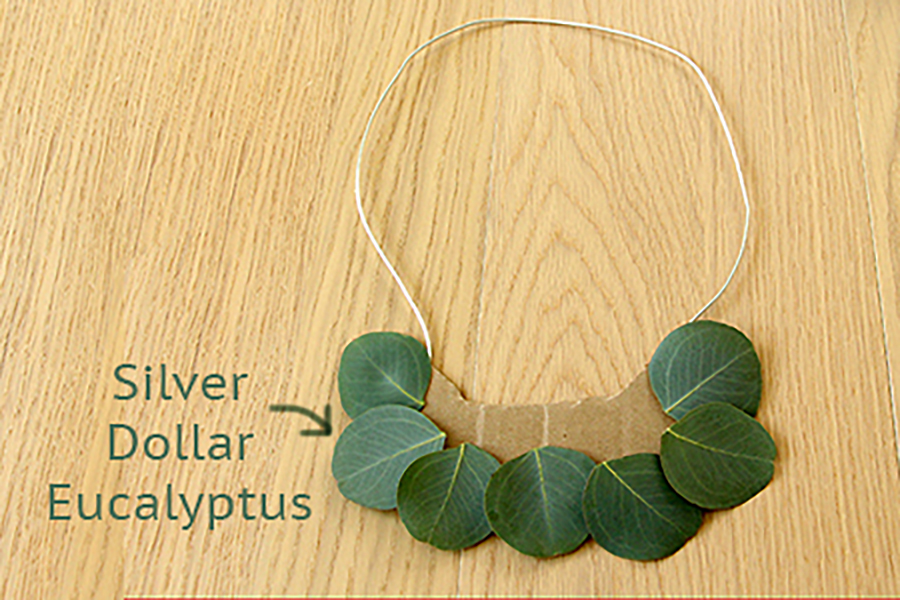
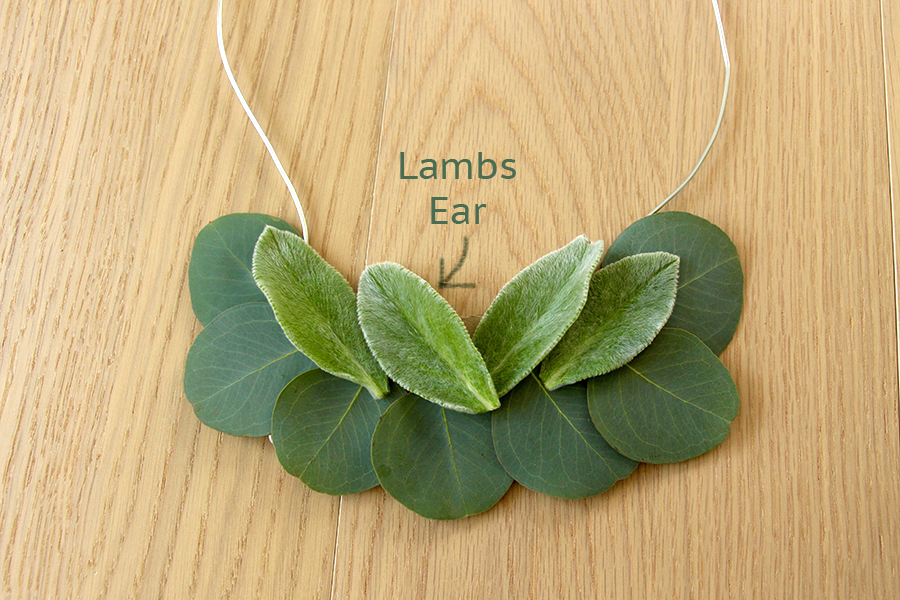
2. Cover the cardboard with flat foliage leaves using either glue dots/dashes, floral adhesive, or hot glue. (Visit this page for more information on various types of adhesive.)
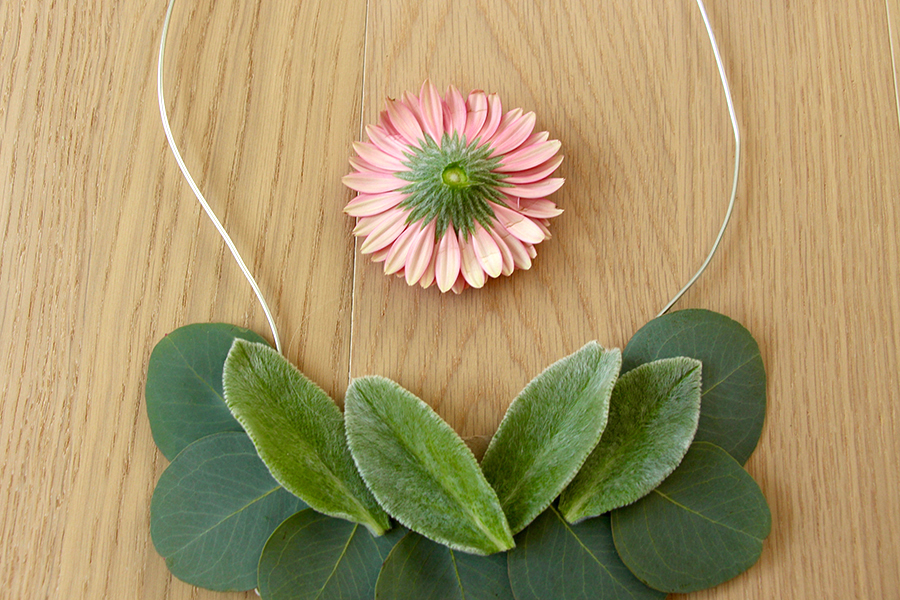
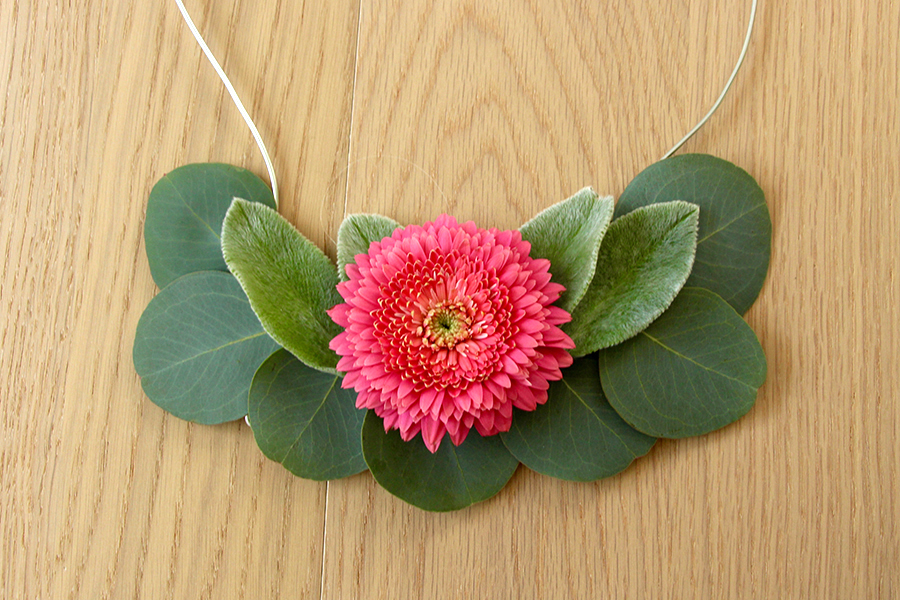
3. Cut the stems off the gerberas and attach them to the foliage base with one of the adhesives.
4. You can add clusters of smaller flowers the same way that you would when making a floral crown, by wrapping the clusters and gluing them to the base.
Above all, use your imagination, and just have fun with it!
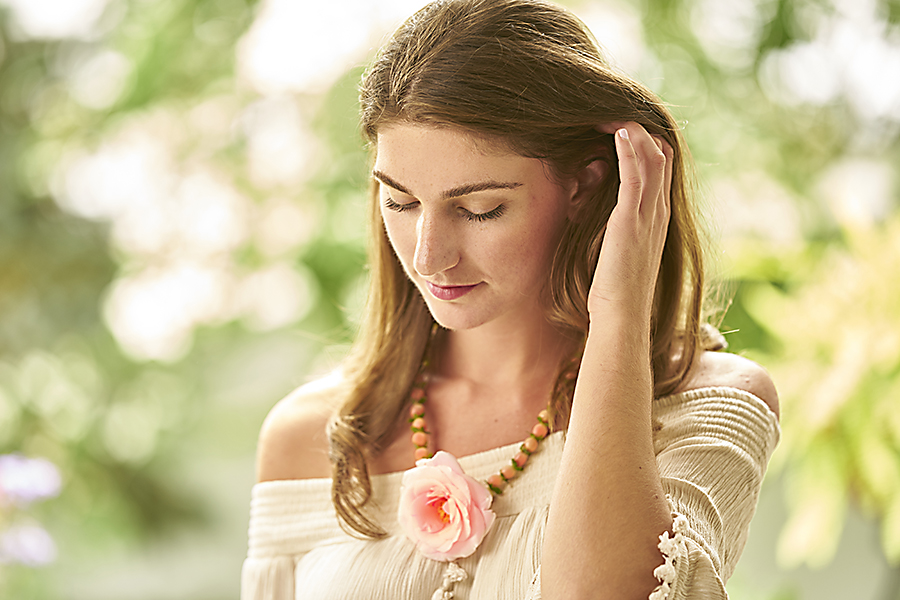
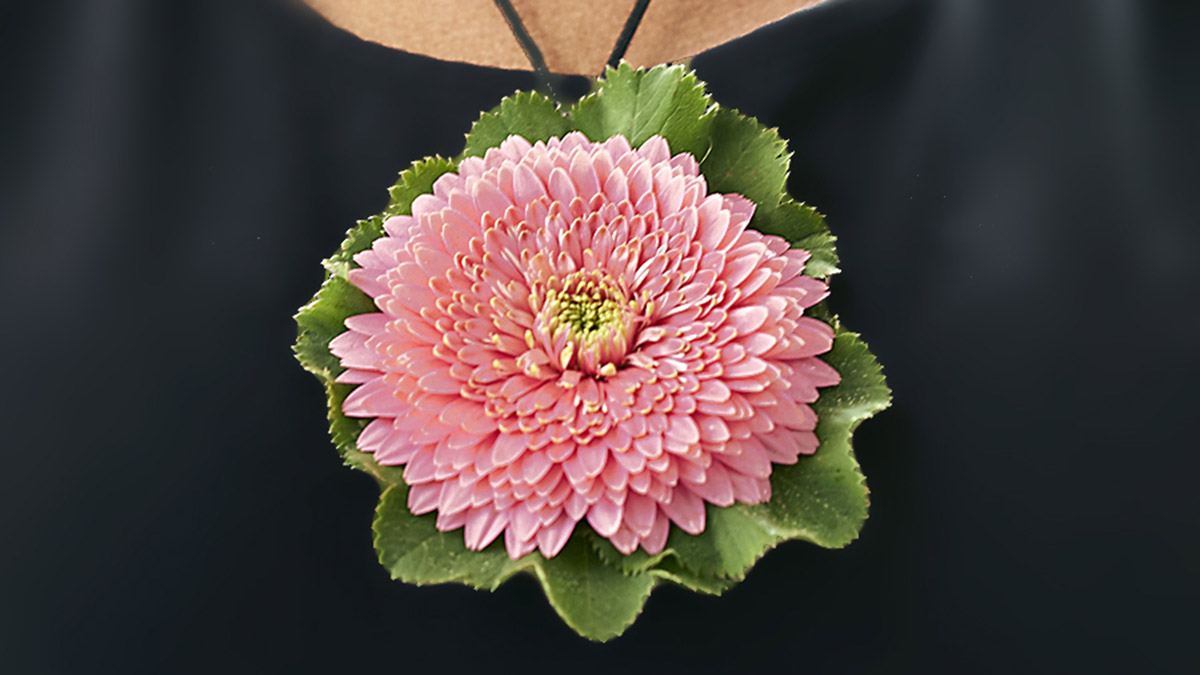
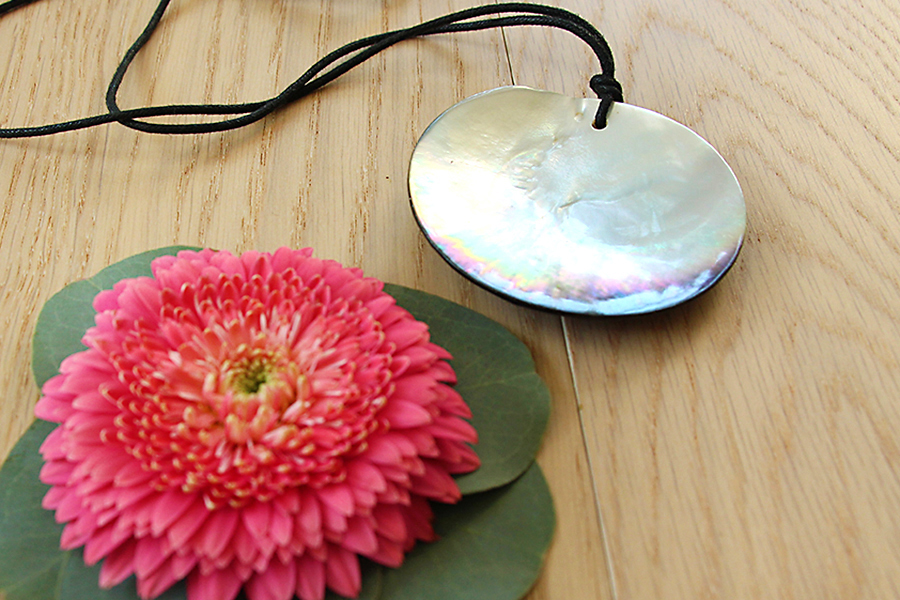
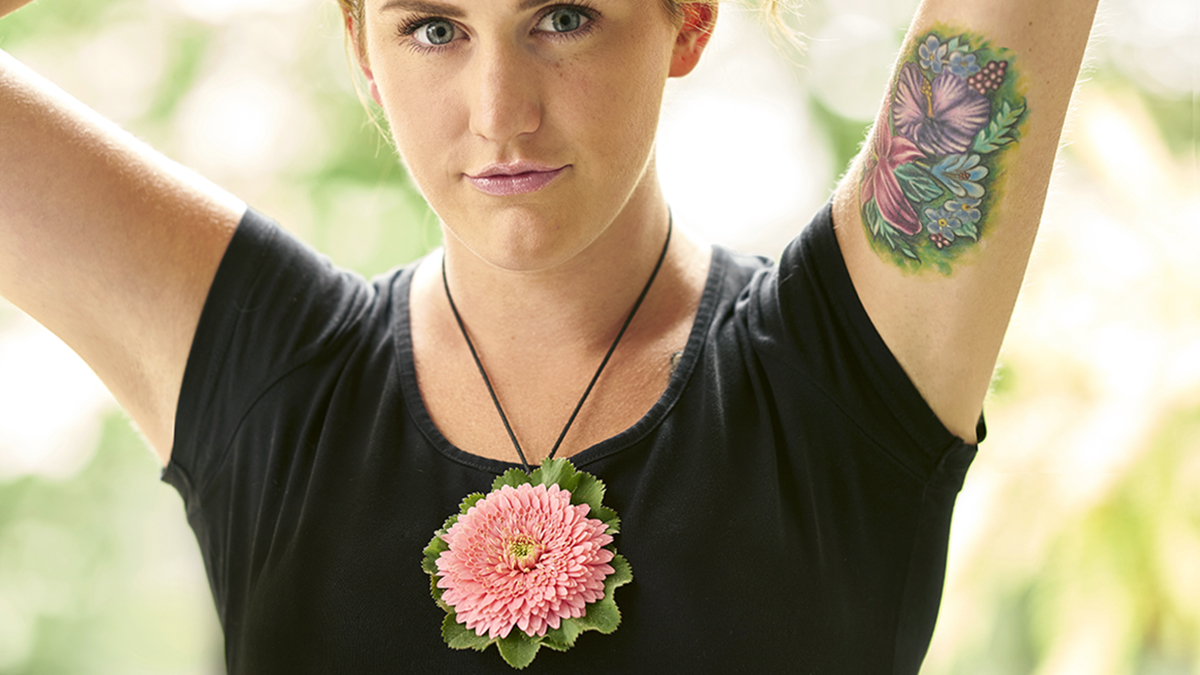
Our series “Get Crafty” gives you the inspiration for creating inventive DIY projects during the holidays and year-round. Lifestyle and floral expert Julie Mulligan teaches you how to make a pendant flower necklace with a little bit of “biker babe” flair.
The beauty of designing your own jewelry is that you can make it fit your unique personality or style — from soft and feminine to bold and dramatic. Even if your vibe is “biker babe,” there’s a piece of flower jewelry for you…like this pendant flower necklace!
Instructions for pendant flower necklace
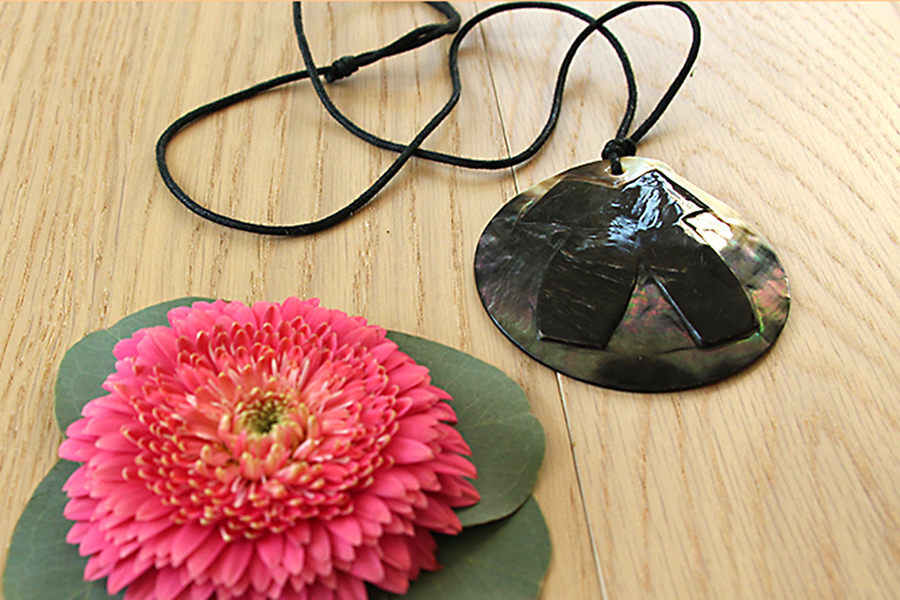
1. Start with a corded single capiz shell necklace.
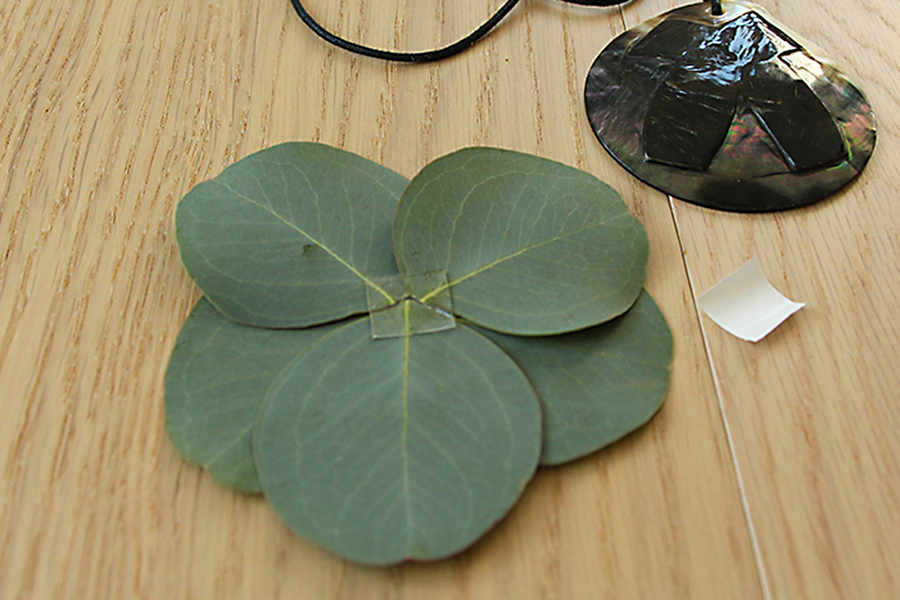
2. Layer multiple pieces of flat leaf foliage (such as eucalyptus) to create a round shape. Secure with uGlue® dashes.
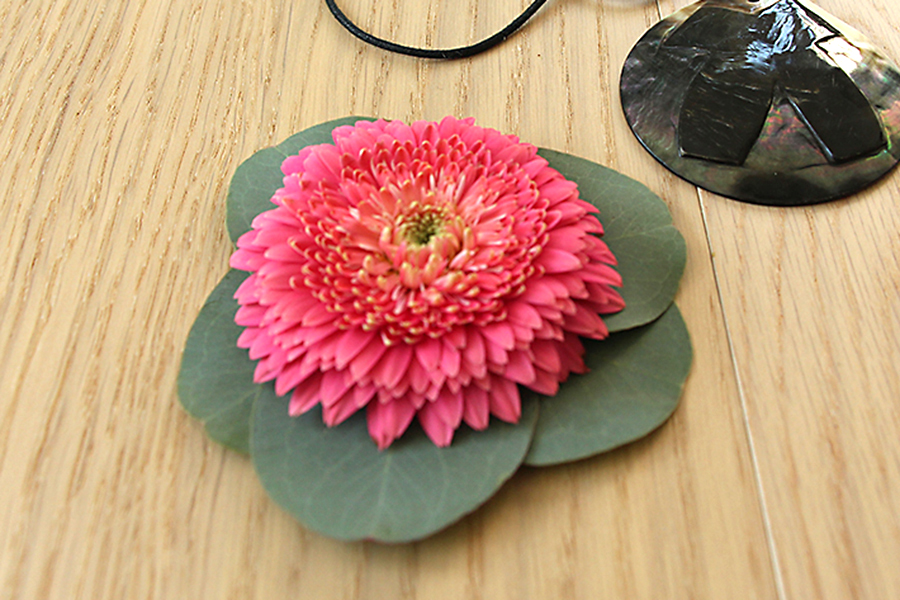
3. Cut the stem off a single gerbera daisy, as close to the flower as possible. Make a glue dash in the center of the leaf foliage and press the flower down.
4. Attach the flower and foliage to the shell using uGlue®. I find that the flower sits better on the back of the shell than the front, so feel free to turn it over.
Final step: Wear your custom jewelry at work, home, or around town, and wait for the compliments to roll in!
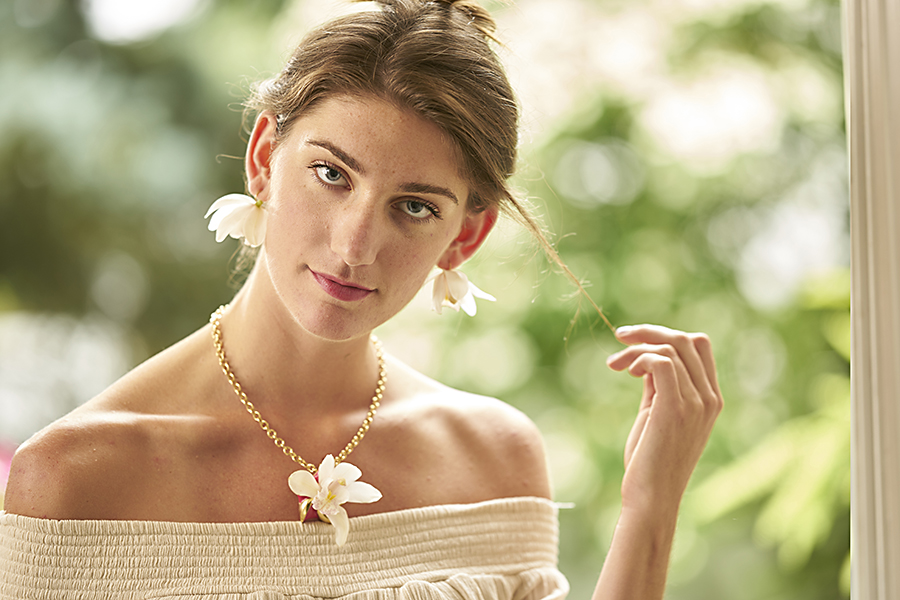
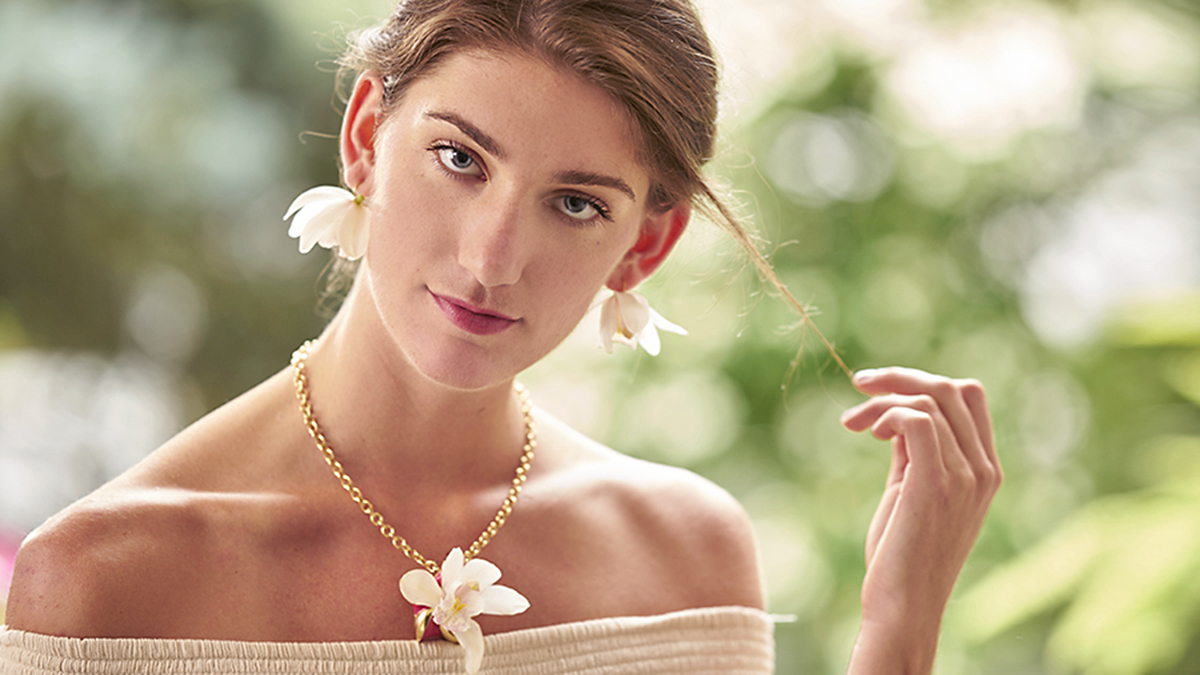
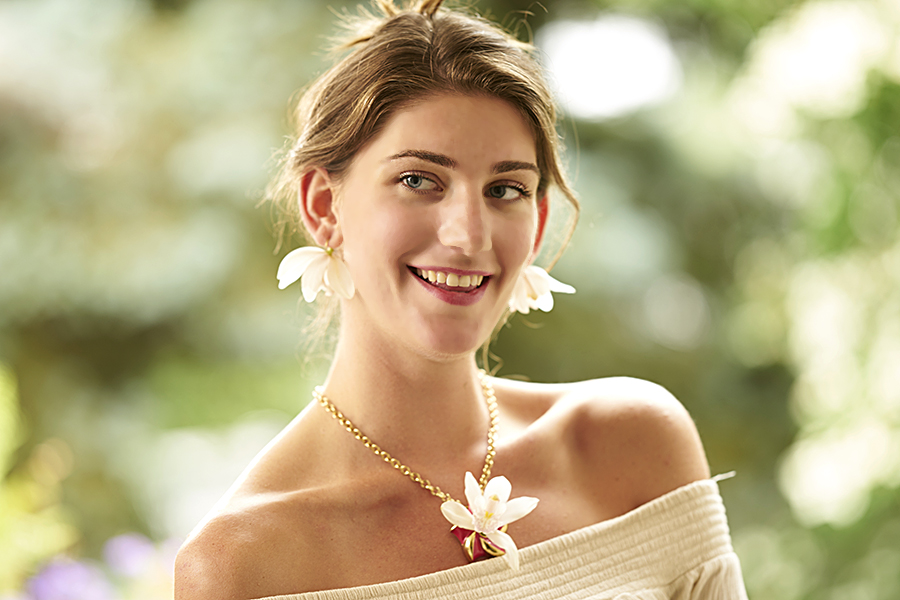
Our series “Get Crafty” gives you the inspiration for creating inventive DIY projects during the holidays and year-round.Learn how to make a super-easy fresh orchid necklace that is sure to turn heads in just a few simple steps.
Orchids are some of the most beautiful and fragrant flowers around. So what better way to accessorize yourself than with an elegant orchid necklace?!
Read on to learn how make one of these stunning pieces.
What you need:
UGlu® Dashes
Mini cymbidium orchids
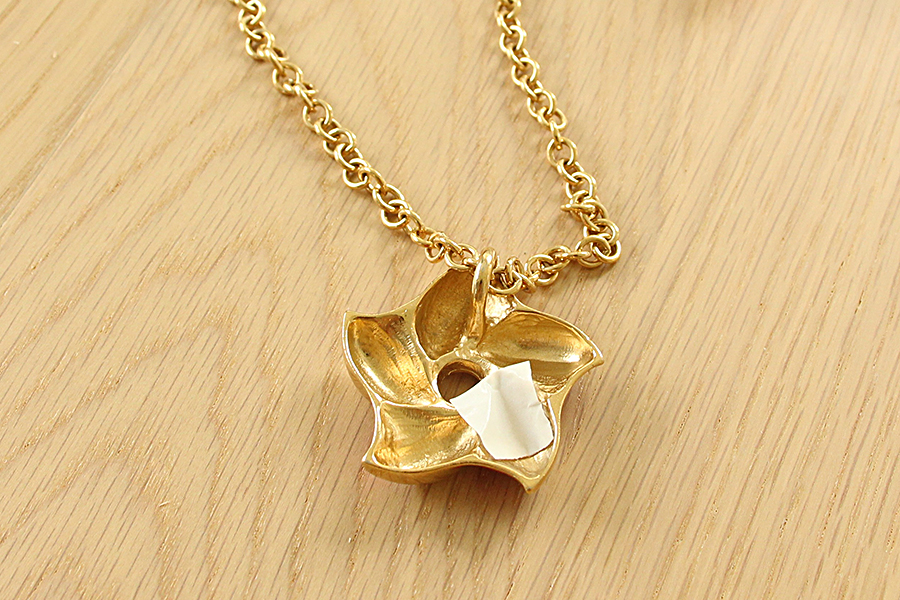
Pendant on a long chain
How to make an orchid necklace
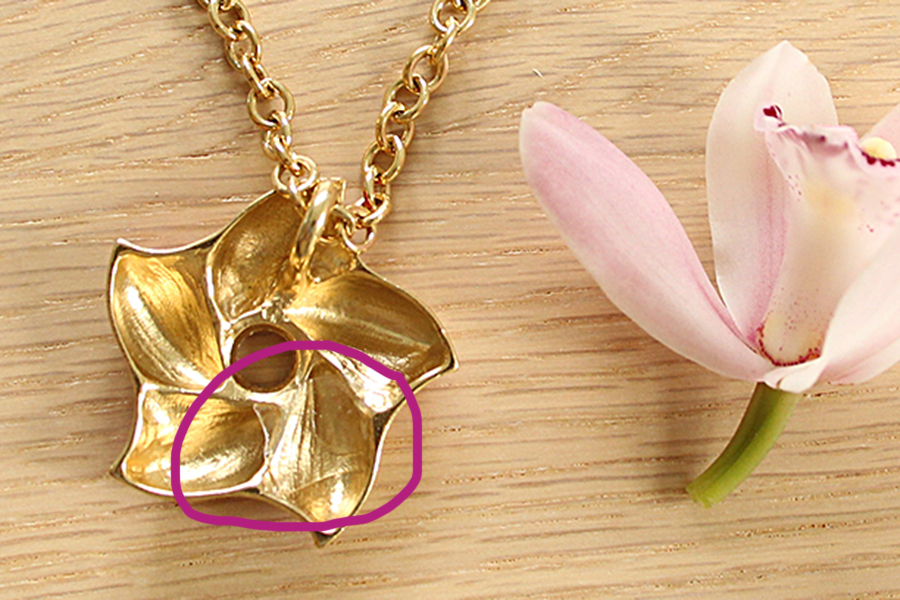
1. I chose this necklace because it had a hole in the middle of the flower pendant. Each piece you work with will be slightly different, so you’ll need to decide the best course of action as you’re creating your piece. Here, I simply put a UGlu® Dash on the back of the pendant.
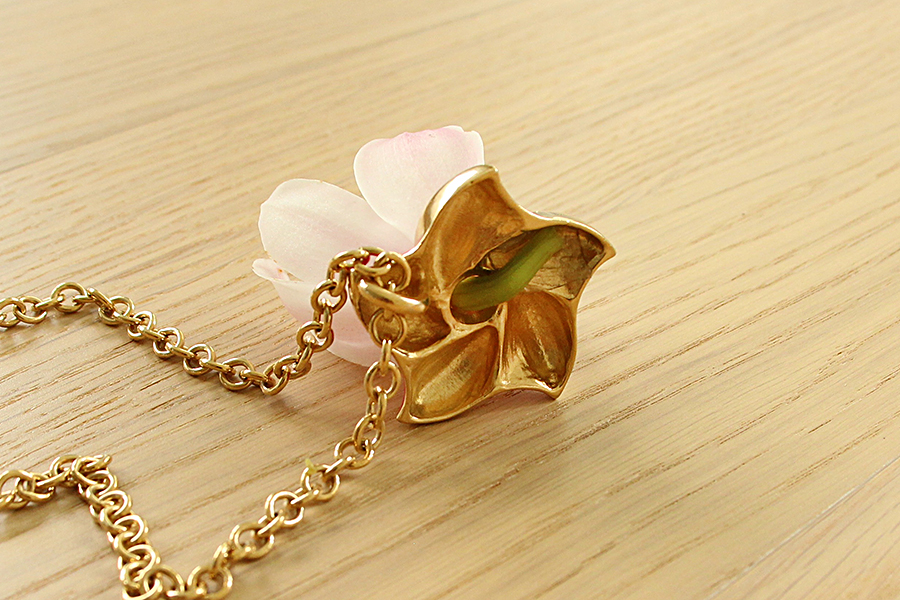
2. Remove the paper from the glue dash and snip a single mini cymbidium orchid from the main stem, leaving as much stem as possible on the individual orchid.
3. Insert the stem through the opening and gently press against the glue dash.
It’s the perfect touch when you’re feeling fresh, fun, and flirty!
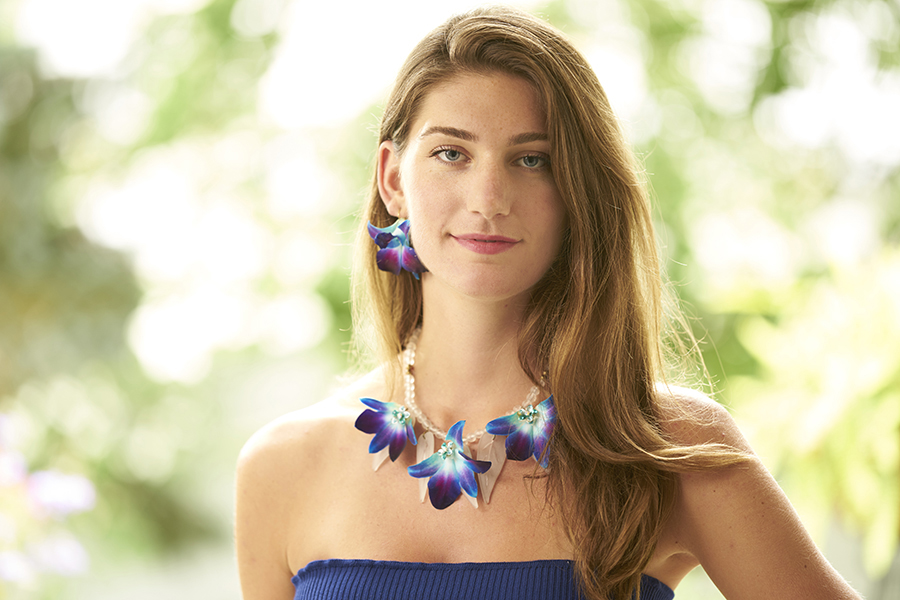
You won’t believe how easy it is to make stunning orchid jewelry with this blue orchid necklace and earring set!
I don’t know about you, but I have tons of costume jewelry. I can’t help myself! When I see a great piece at a great price, I buy it. I find great deals at garage sales in particular. (Maybe after this post, when people see how simple it is to transform these vintage finds into stunning one-of-a-kind accessories, those deals will be harder to find!)
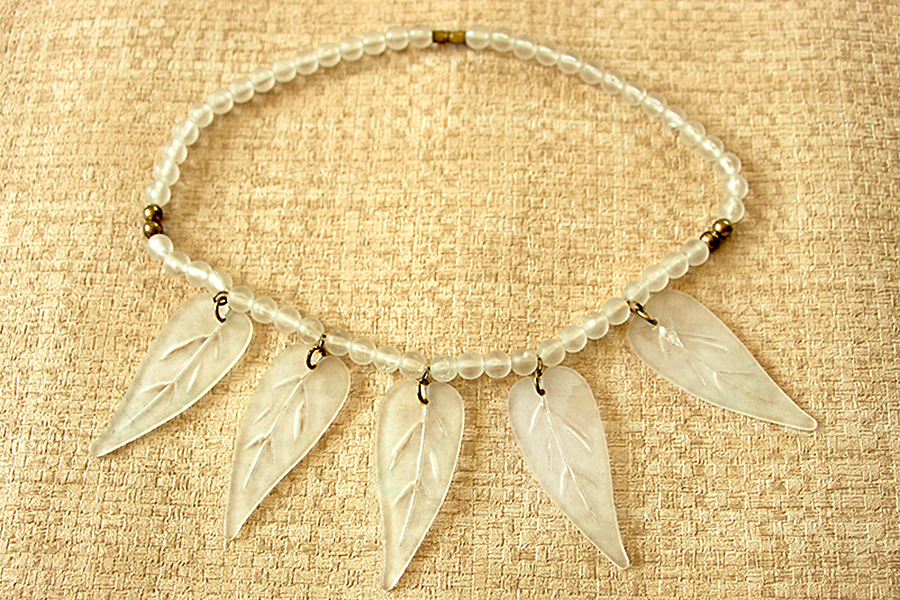
This translucent leaf necklace is a great piece on its own and looks particularly nice against a dark shirt.
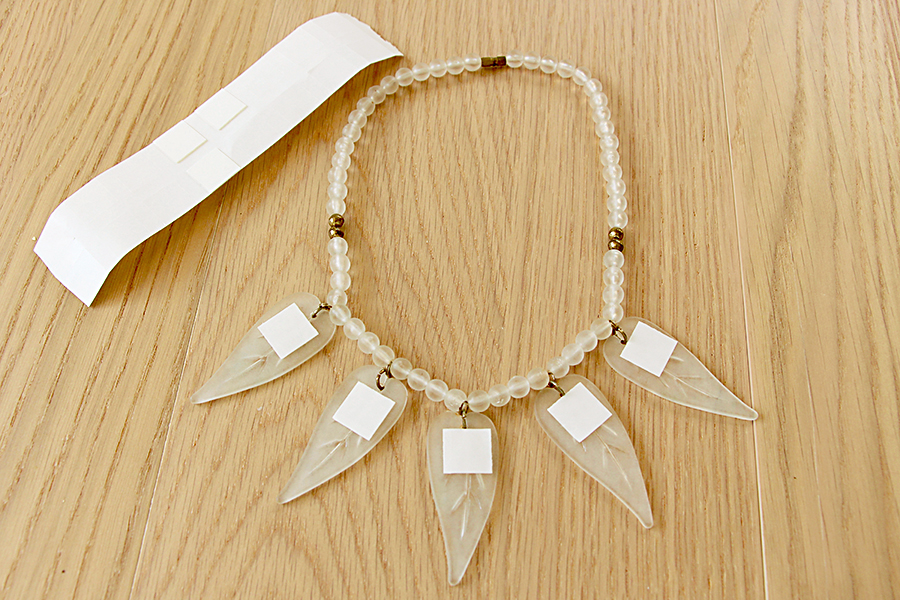
To add lots of drama, start by placing a UGlu® square at the top of each leaf.
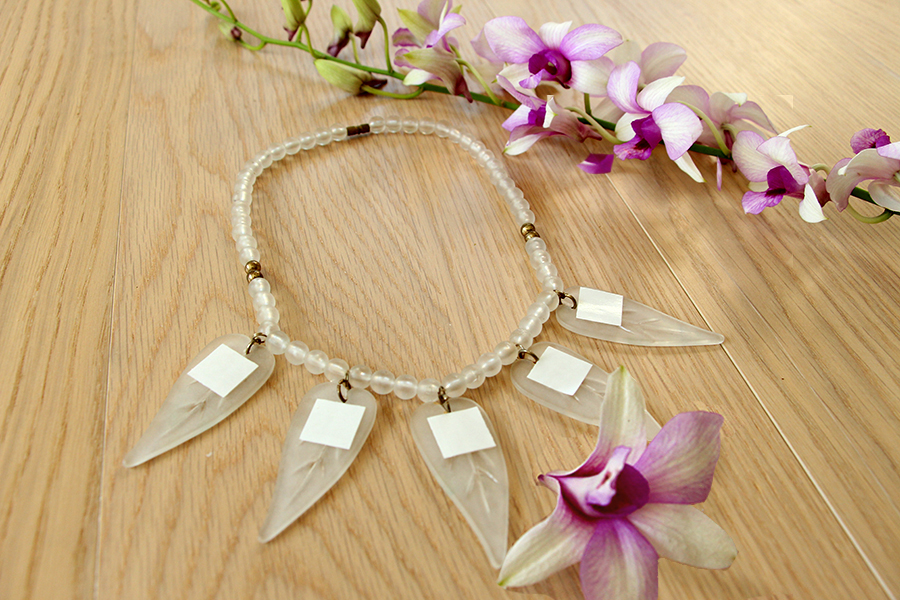
Remove the individual flowers from a stem of Dendrobium orchids. The variety pictured here is the Blue Butterfly. The blue orchids in the beauty shot at the beginning of this post were stem dyed to create that magnificent color. Dyed and painted flowers have become very popular recently. These stunning blue orchids are available in our Orchid Collection.
Remove the paper from the UGlu® square and gently place the orchid. Use gentle pressure to secure the orchid.
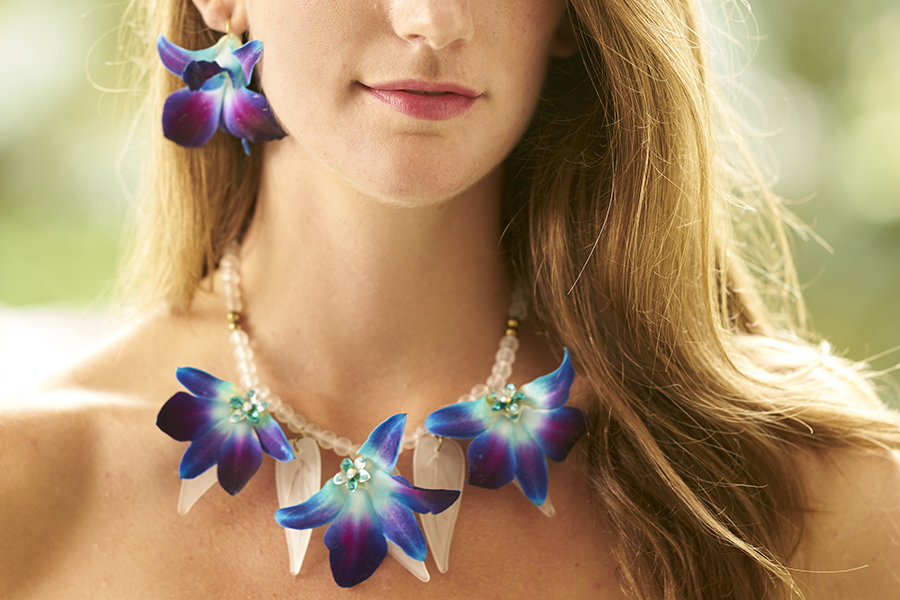
I added a little bling using a small piece of UGlu® and a crystal bead (similar items can be found in the jewelry-making section of your local craft store). To make the orchid sit flatter on the leaf and to highlight the crystal, I removed what is called the lip of the orchid flower.
Orchid earrings anyone? They are as easy as 1-2-3!
All you need to do is insert a simple metal fish hook earring wire into the back of the orchid! (See? I told you it was easy to make orchid jewelry!)
And it just keeps getting better. Next up: Another orchid necklace that’s even easier to make than this one!
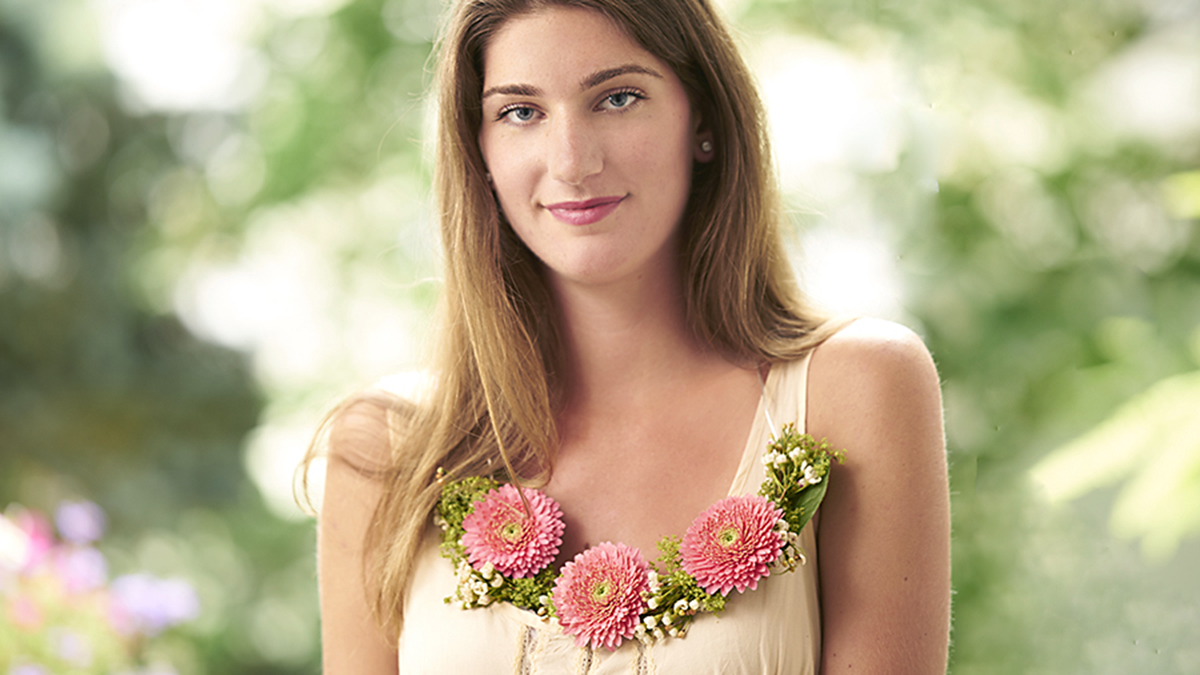
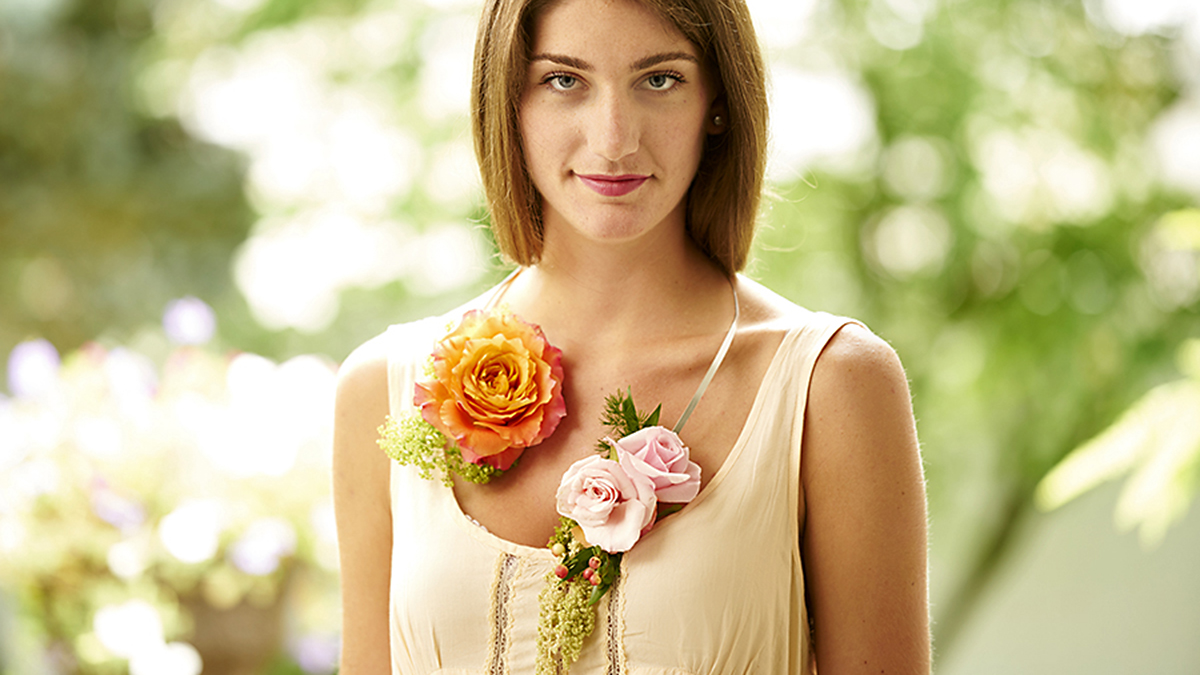
Our series “Get Crafty” gives you the inspiration for creating inventive DIY projects during the holidays and year-round. Lifestyle and floral expert Julie Mulligan explains how to make a fresh flower necklace that is sure to turn heads.
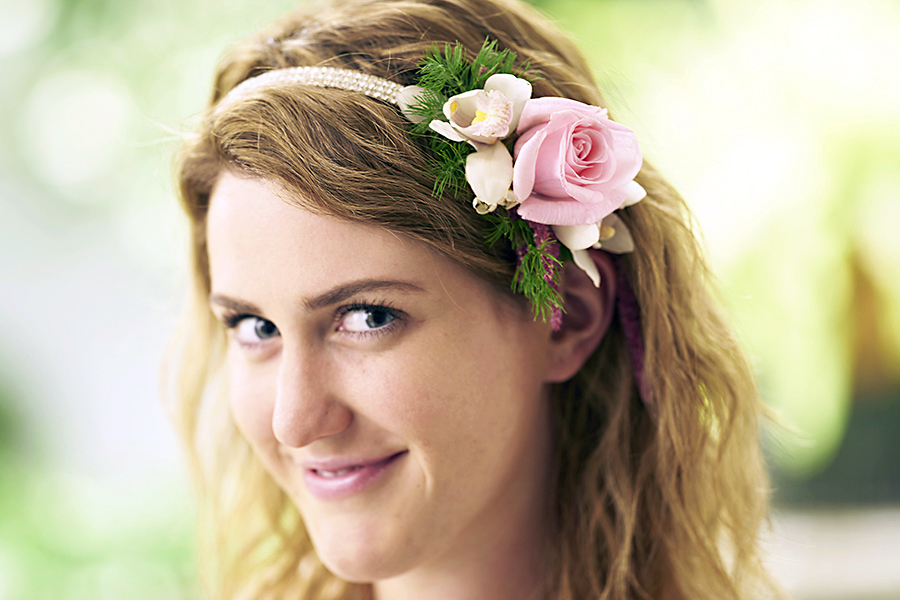
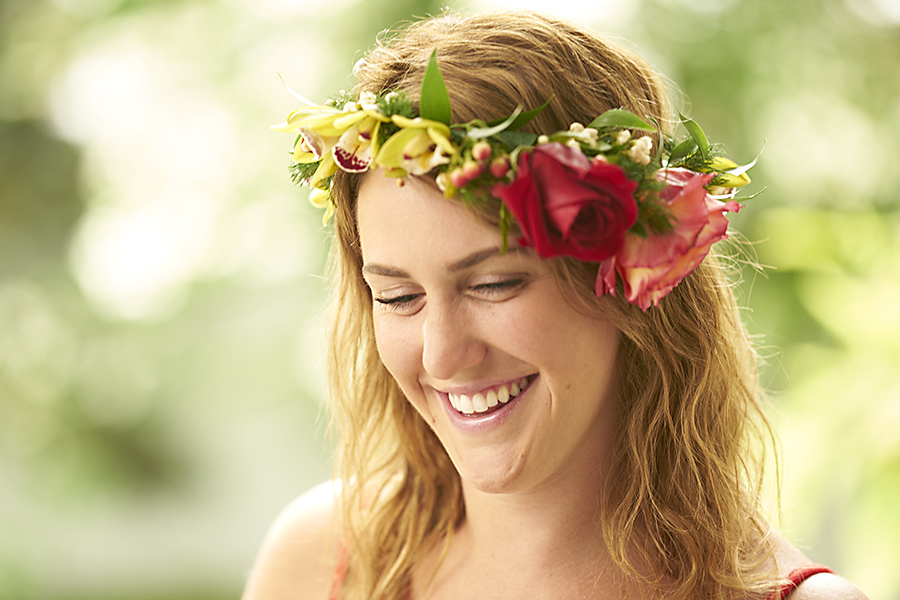
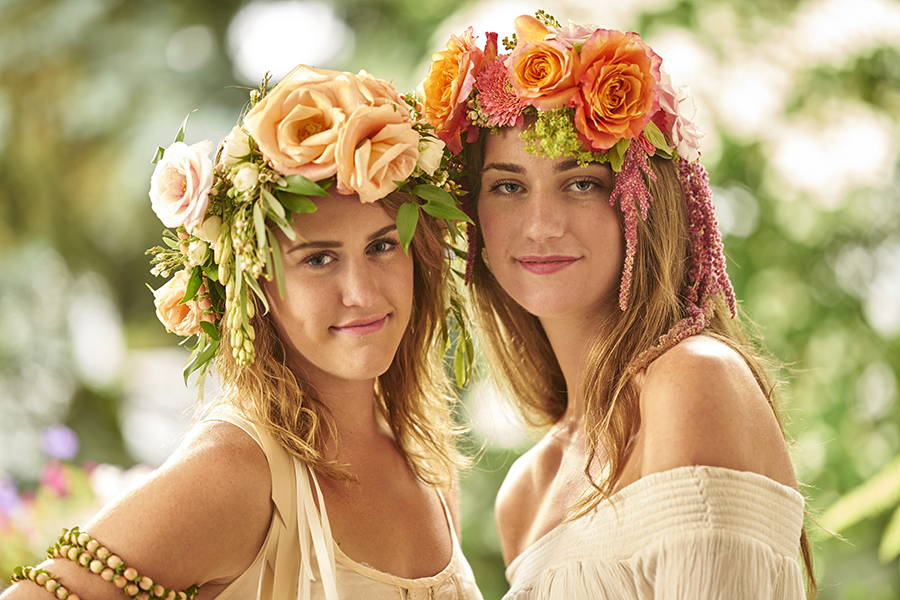
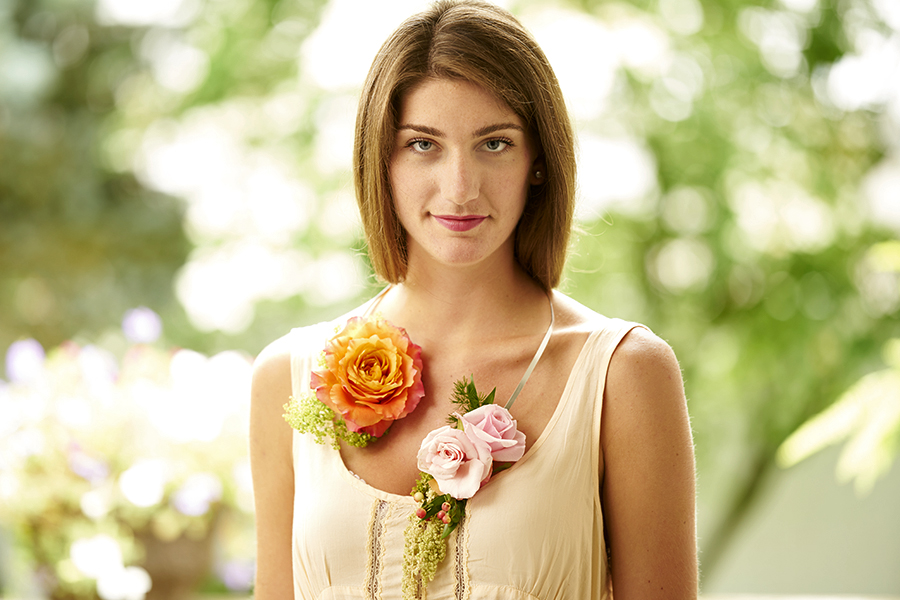
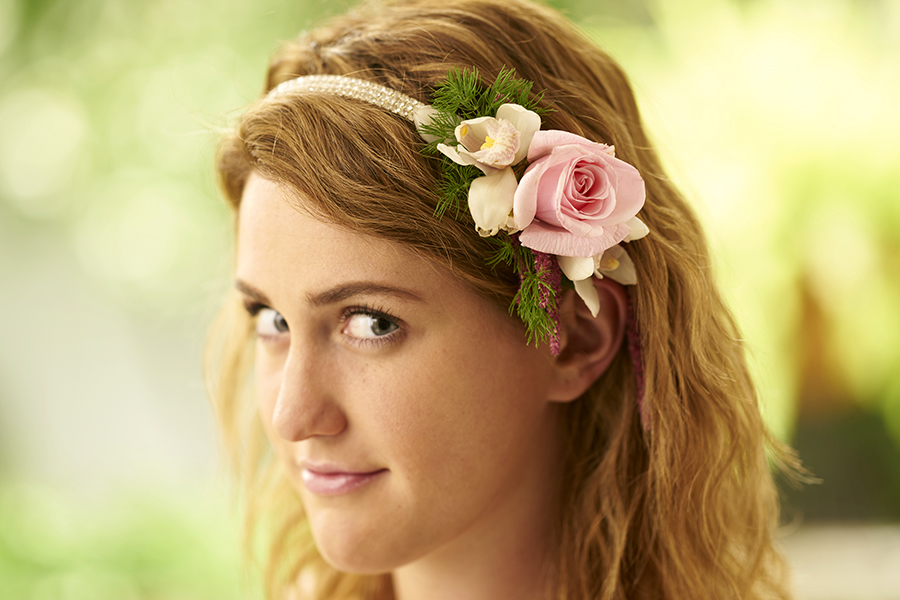
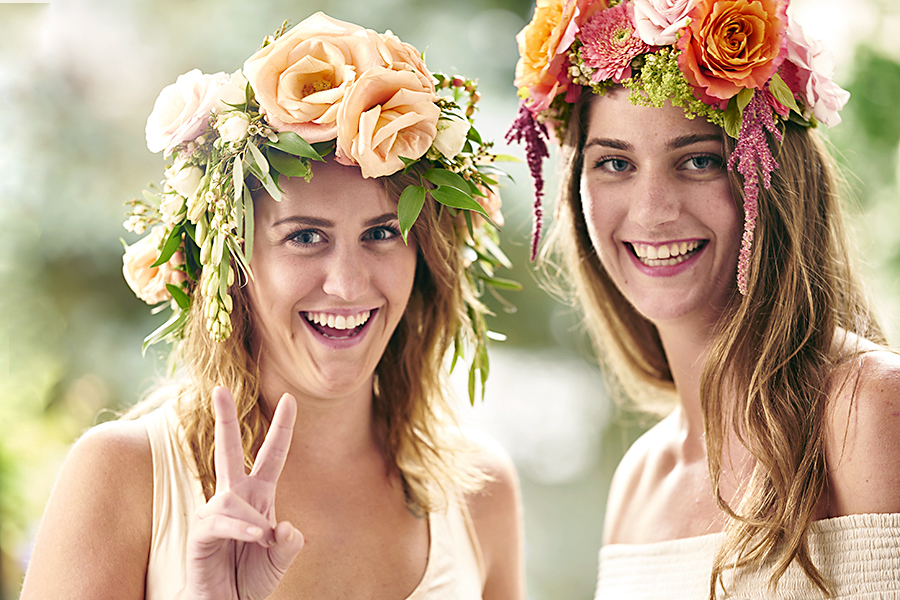
Making jewelry with flowers provides a look with simple elegance that is so right for so many occasions. Whether paired with a headpiece, such as a crown or headband, like the one below, or worn alone, this beautiful floral accessory is a unique and natural way to make a style statement.
All the how-tos I am sharing are for guidance and inspiration. The true beauty of these pieces, though, lies in the personal interpretation. These tips and techniques will give you the basic information and confidence that you need to get started.
Tools and supplies
Flat wire
Floral wires
Stem wrap
Floral adhesive
Wire cutters
Round nose pliers
Flowers used
Hanging amaranthus
Free spirit rose
Majolica spray rose
Hypericum
Lady’s mantle
Assorted foliage
Instructions
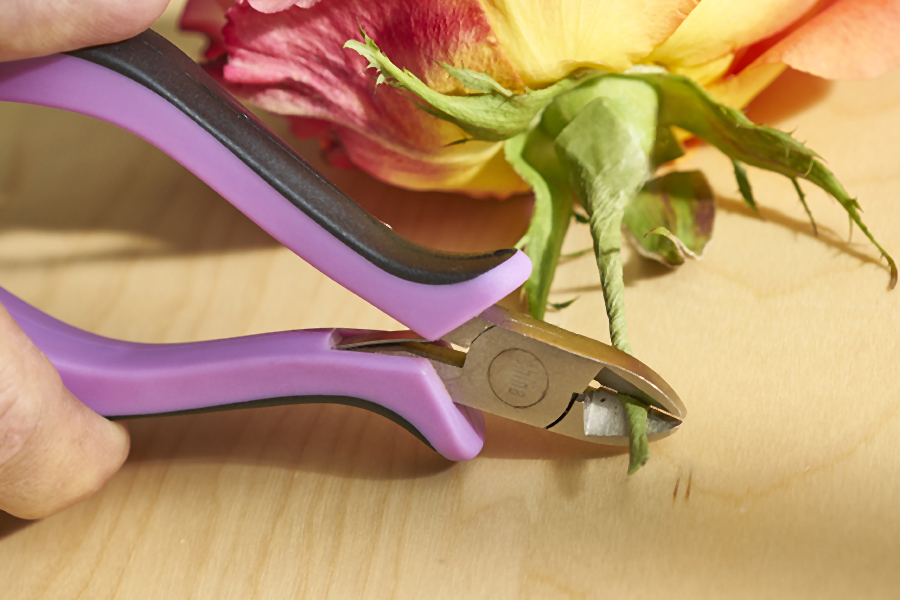
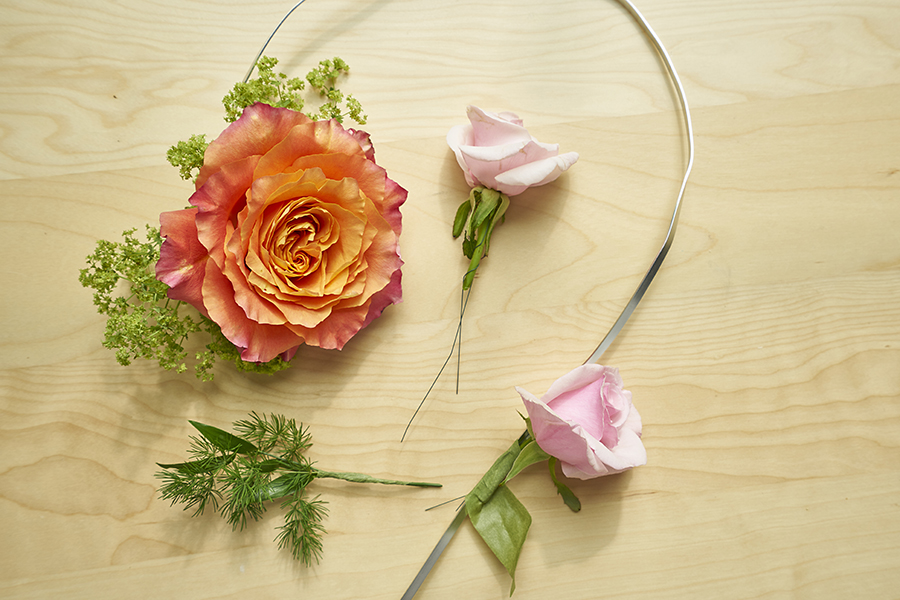
1. Start by determining the length of wire needed by wrapping it (or a string) around the neck. For this asymmetrical style, I needed 27 inches and added another 3 inches to wrap around the stem of the large rose. I used a three-sixteenths Oasis™ Flat Wire in silver.
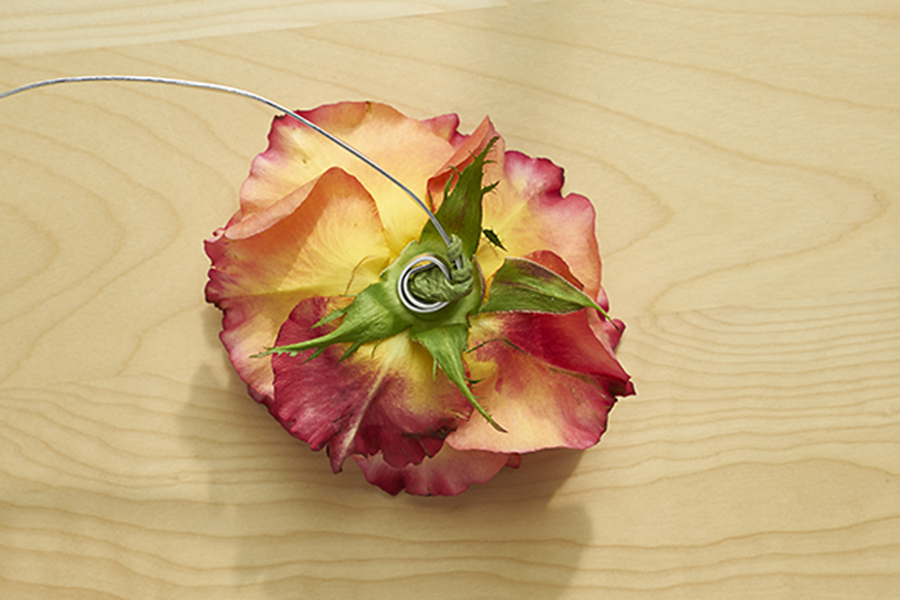
2. Cut a wire for the large open rose.
3. Wrap the end of the rose wire around the end of the flat wire, and then twist the flat wire around the bottom of the rose. You can use a round nose pliers for this, but it is not necessary.
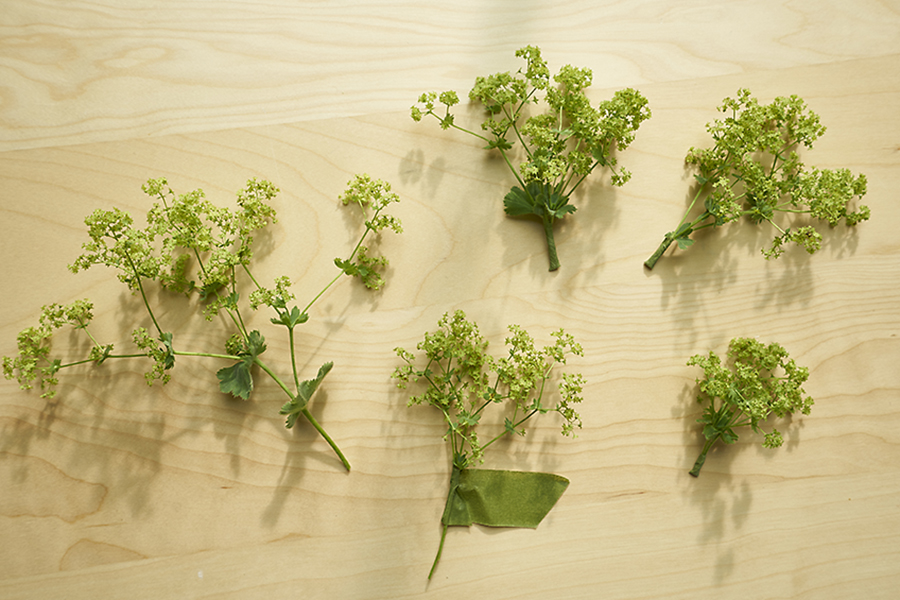
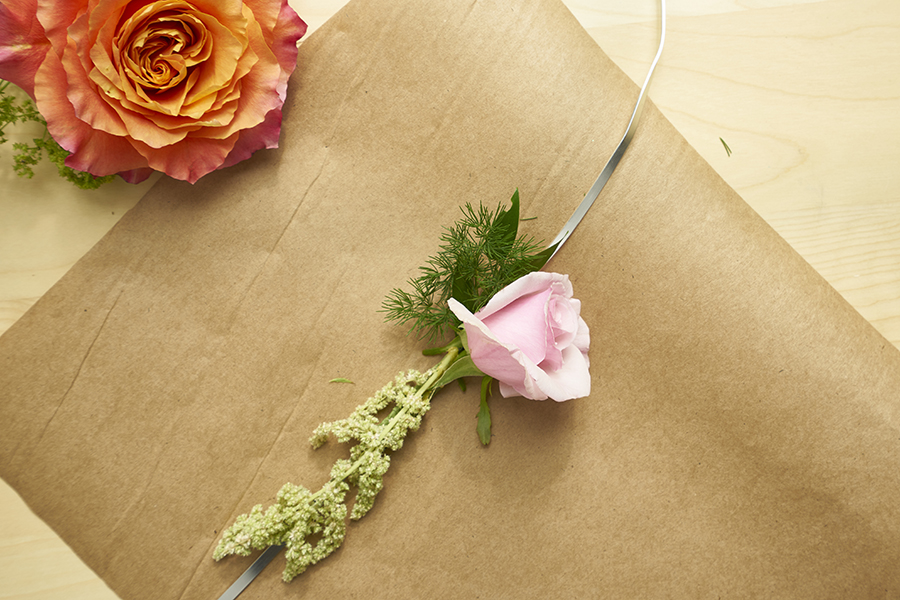
4. Cut a small cluster of a filler flower, such as alchemilla (Lady’s mantle), and gather a few of these together and wrap them with floral stem wrap*.
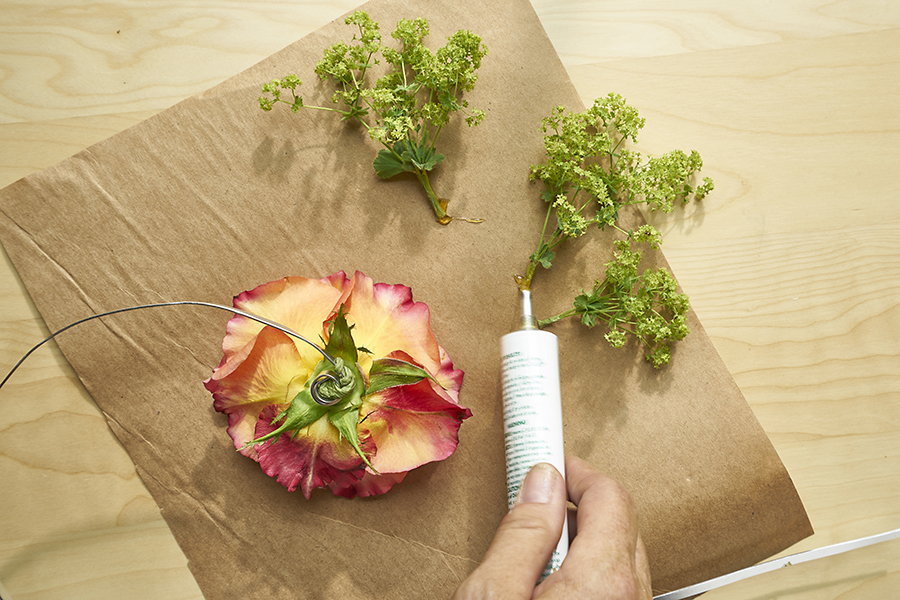
5. Attach these clusters to the back of the rose using floral adhesive*.
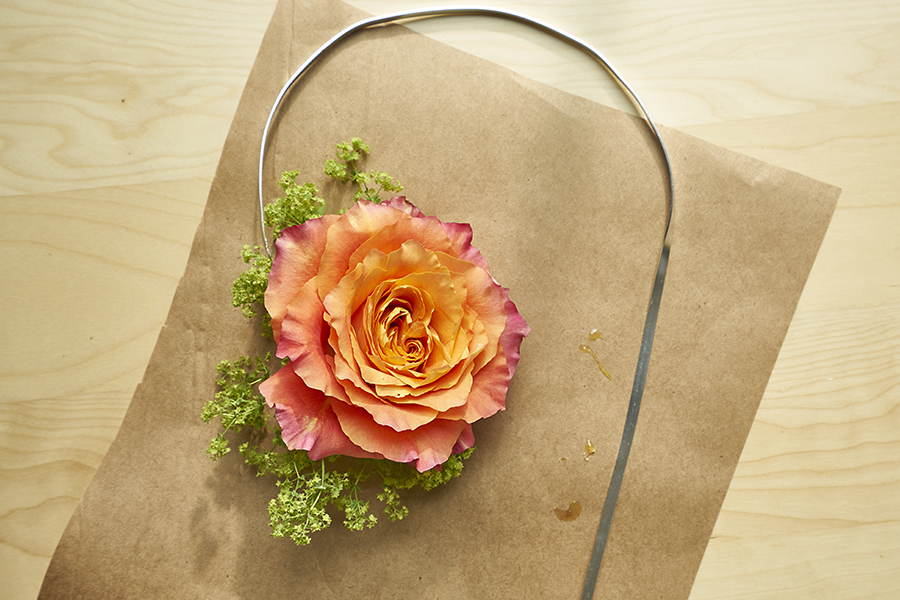
6. Wire two smaller spray roses and attach them to the other end using stem wrap.
7. Add more floral components, such as foliage, berries, and hanging amaranthus, using floral adhesive or hot glue. You can easily cut the flat wire if you find that it’s longer than needed.
8. Slip your flower necklace around your neck, and let the festivities begin!
*Visit this post to learn more about wiring flowers, stem wrapping, and gluing flowers.
Adorning oneself with fresh flowers is an age-old custom that’s been around for centuries and practiced all over the world. There are many examples such as flower crowns, prom & wedding corsages, and Victorian posies. And many famous women, from Frida Kahlo to Billie Holiday, have used flowers to set themselves apart from the crowd. Indian celebrations have always incorporated flowers in their celebrations, not just as décor but also as headdresses, necklaces, rings and bracelets.
I’m so happy to see a new interest in this practice. One of the big influencers of this trend has been music festivals—especially Coachella! But why stop there? With a little imagination and the following tips, tricks and techniques, you just might become the next trendsetter in fresh flower fashion.
There are a few basic techniques that you should be aware of. As you start to create you’ll find that you’ll use these techniques in multiple ways and may vary your style and tools from piece to piece. Taping, wiring and gluing (and even sewing) are all acceptable methods to make shapes and attach flowers.
WIRING
Wiring was once the only way that corsages and boutonnieres were made. It can be very labor-intensive and time-consuming. My method of choice now is gluing with very little wiring. Even if I am mostly using adhesives to hold my creation together I will still wire larger flowers first for extra support. The most common wire size used for this type of work is 18-22 gauge. Here’s an example of how to wire a rose:
1. Using a sharp shears cut the stem short – about 1”.2. Cut your wires to pieces about 4” in length. Insert one wire through the thick area at the base of the rose known as the receptacle.3. Insert another wire crisscrossing the first one.4. Fold the wires down and twist together.5. Wrap the wires with floral stem wrap.6. If the wires are too long just snip them with a wire cutter to the desired length.
TAPING
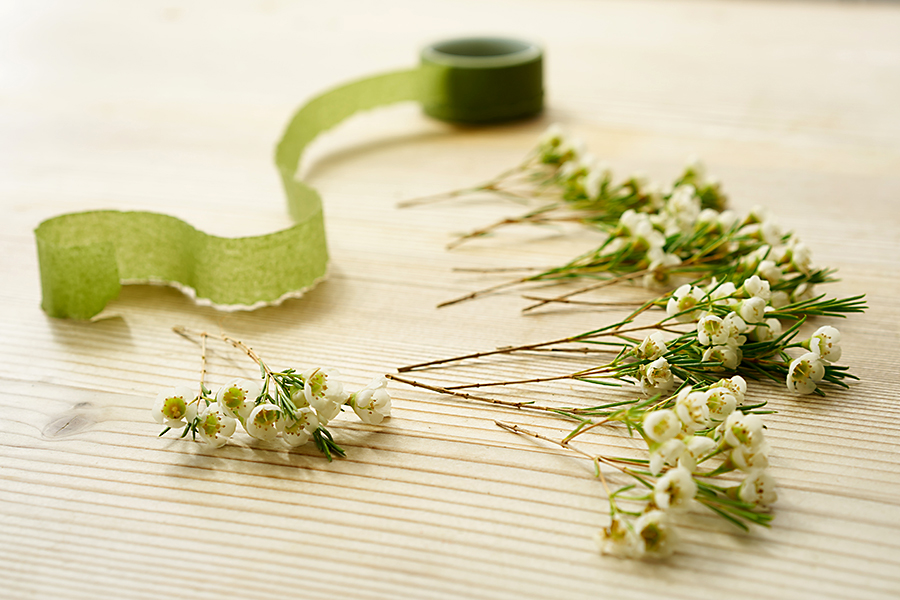
A floral industry supplier, Oasis®, makes Floratape® Stem Wrap which comes in light and dark green as well as white and brown. It’s a self-sealing wrap used for “finishing” corsages and stems. It sticks to itself and flower stems with superior adhesion. I primarily use the taping technique to make small clusters of petite flowers, or if I have a larger flower that I have wired, I usually wrap the wires. You want to hide your “mechanics” as much as possible, and I find that the stickiness of the floral tape around the wires is useful when adding the wired flower to the base or to another flower. Here’s how to use the taping method:
1. Create small clusters of flowers by cutting all of the stems very short – about 1.5” – and strip any foliage from the end of the stems.
I find it easier to pre-cut small pieces of the floral wrap (about 2”) from the roll before starting the wrapping process.2. Using floral stem wrap can take a little getting used to, so don’t get frustrated if you have to practice a little at first. The key is to wrap it tight and overlap it upon itself as you move down the stems.3. Hold the top of the wrap with one thumb while you are twisting, wrapping and moving down the stems with the other hand.4. When you get to the end just pinch or cut off any remaining tape.
GLUING
Oasis® Floral Adhesive:
This is a fast-drying and waterproof liquid adhesive formulated to use with fresh flowers. It provides a time-saving alternative to wiring and taping. And the special formulation will not brown fresh flower petals.
1. Place a dab of floral adhesive on a square of fabric or scrap paper and dip the stem into the glue or place a small amount of the glue directly to the stem.
2. Glue bonds to glue, so in addition to the flower stem, place glue on the area where the flower will sit for extra security.3. Wait a minute or two before placing the stem in your desired position and hold for a few seconds until the glue is tacky enough and staying in place.
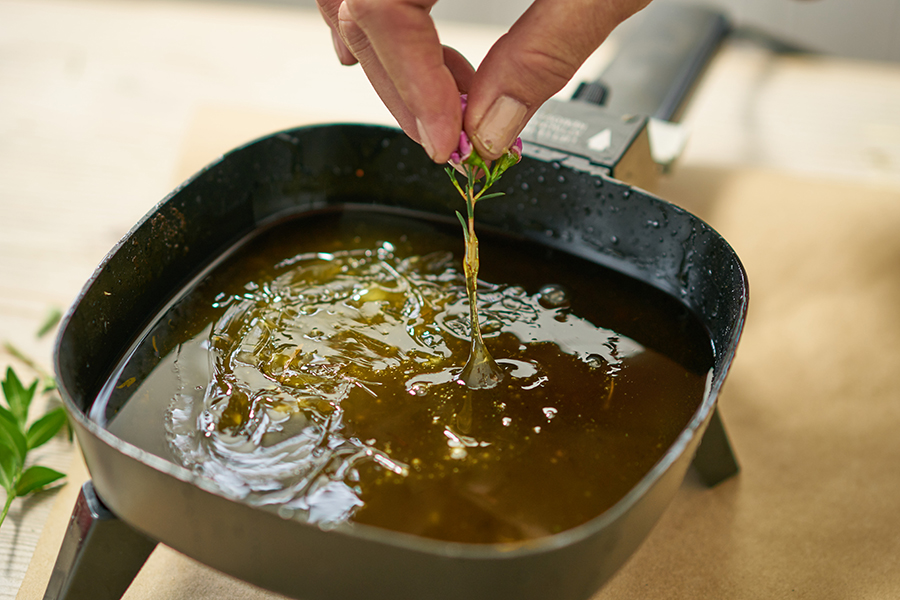
Hot glue:
Believe it or not, you can actually use hot glue to attach fresh flowers to a base or to other flowers. It doesn’t damage the flower. I like to use a glue pan instead of a glue gun because it gives me more freedom and I can work faster–holding the piece that I’m working on in one hand and dipping the flower in the glue with the other hand and placing where needed.
1. Melt the glue just to the point that it starts to melt but is not completely liquefied.
2. Carefully insert the very bottom of the stem into the glue.
3. Remove and insert immediately into your base. It will adhere to the other flowers that are clustered around it.4. This can be done very quickly and is an easy way to add dimension, texture and fullness without adding the weight of a wired and taped flowers.
U-Glu®:
This is one of those products that you just keep finding more uses for! It provides the strength of a powerful adhesive with the convenience of tape. It’s also waterproof and doesn’t damage the flower.
It comes in convenient strips of little squares and I’ve yet to find something that it doesn’t adhere to.What I particularly like is that, although it bonds extremely well, it can still be removed from solid objects by peeling it off (very similar to the adhesive backing on Command™ Strips).
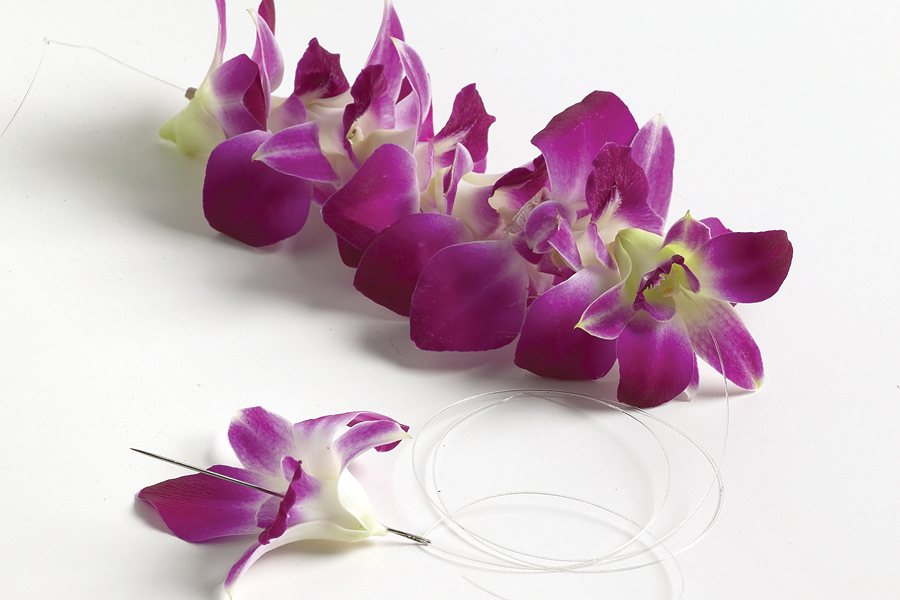
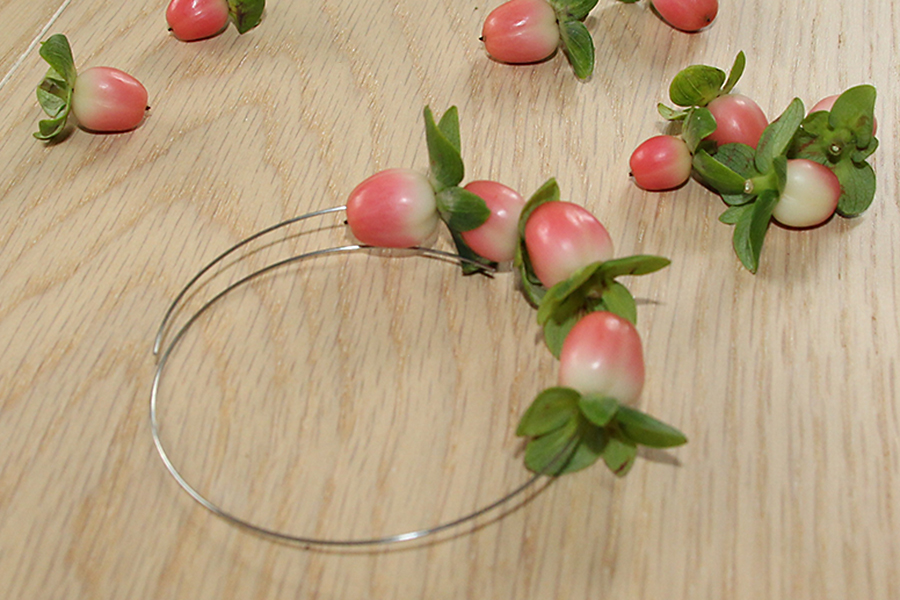
Threading
This technique is exactly what it says. You actually thread the flowers onto thread, wire or mono-filament. The most common use of threading is in the making of floral leis and garlands.
1. Insert the needle through the center of the orchid. Repeat as each single orchid flower is stacked on the previous flower.
2. Continue until you have reached desired length.
Wire Threading
Flowers can be strung together very easily with wire as well as thread.
Florist wire – 22 gauge
Memory wire
This type is typically used in traditional jewelry making. So these are the basic techniques that you should become familiar with if you’re interested in creating unique, one-of-a-kind fresh flower fashion accents. You’ll find what works best for you and probably come up with a few tricks and shortcuts of your own.
In the next few posts I’ll be featuring some beautiful creations to inspire and excite, and I’ll be referring back many times to the techniques and tools mentioned above.
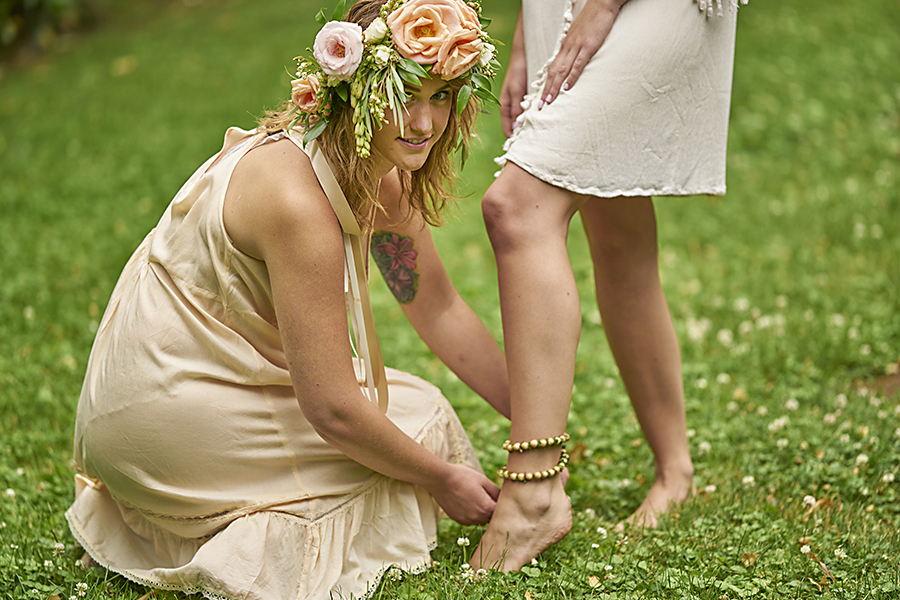
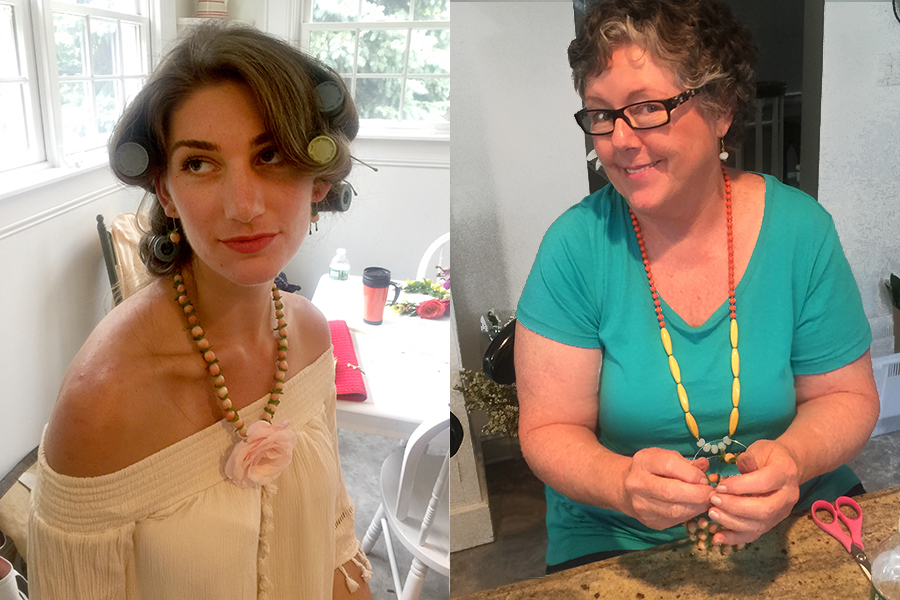
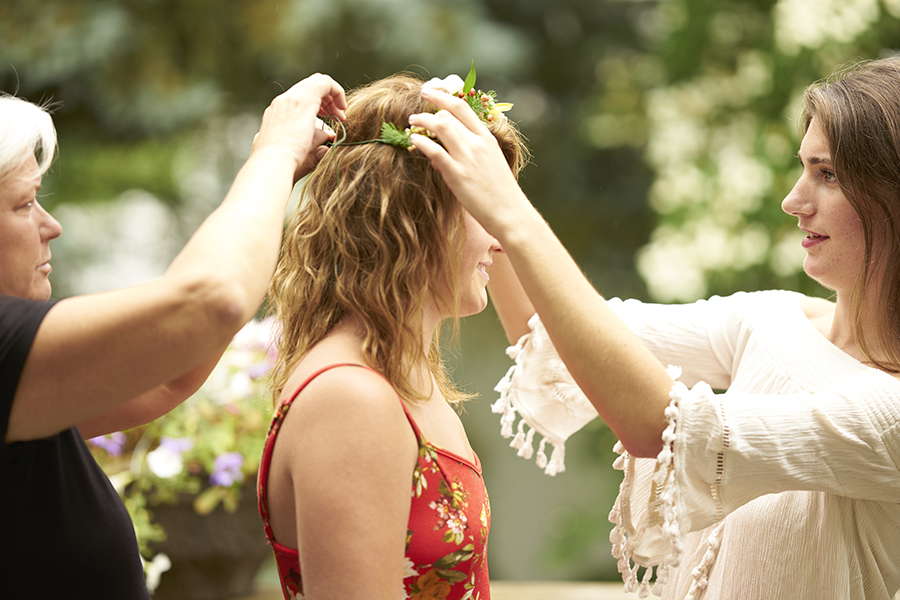
Eloise, on our Public Relations team at 1-800-Flowers.com, recently saw a tweet from Rodarte featuring Kirstin Dunst wearing a pair of fresh orchid earrings, thought it was a really cool idea, and asked if I would do a post about fresh flower jewelry. I also thought it was very cool, so I immediately started brainstorming with a few of the floral designers on staff. I asked a friend of mine who has been making her own jewelry for the last few years to add her skills to the mix… and the results of this collaboration are simply amazing!
We shot everything on location last week, and I can’t wait to share it all with you. It was one of those photoshoots where everything just falls into place—which means I have hundreds of images to go through and so many ideas and how-to’s to share with you that I am going to break it down into multiple posts! Get all the techniques for making flower jewelry here: Flower Jewelry Techniques. Also, here is a sneak peek behind the scenes:
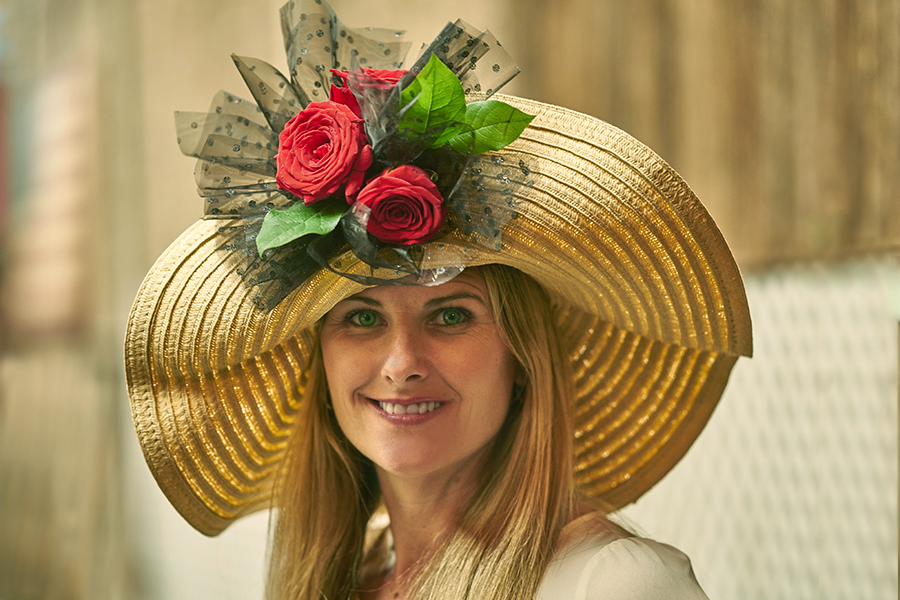
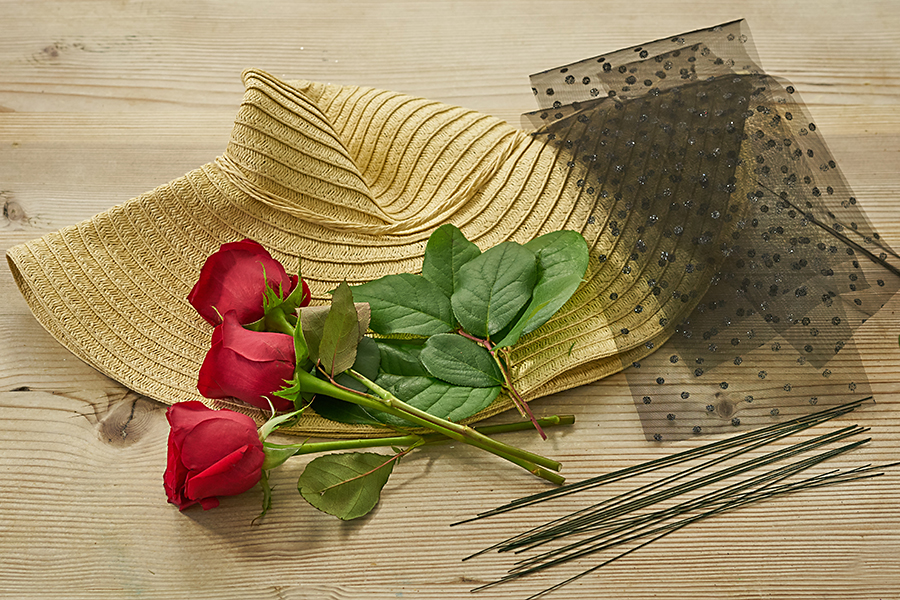
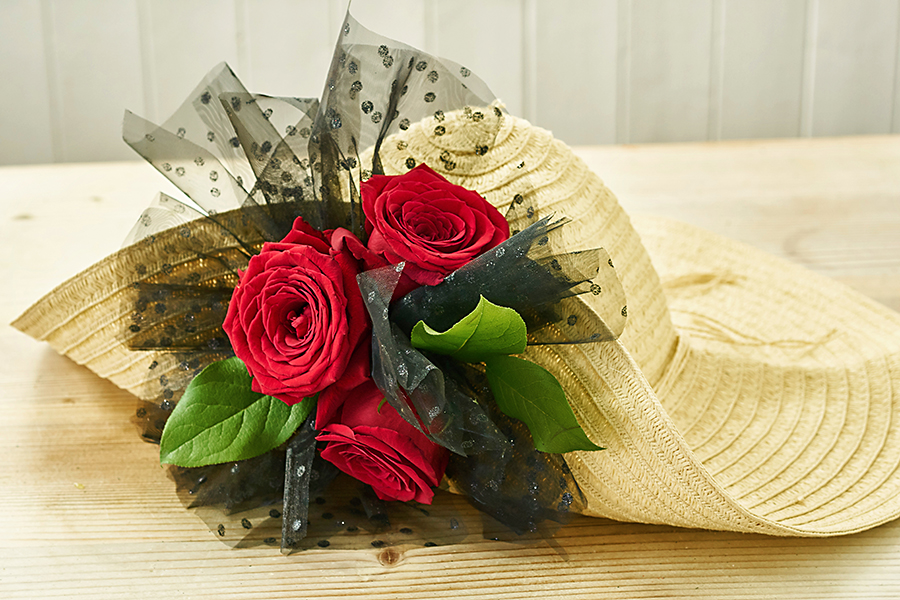
If deep inside you there is a Southern belle just waiting to shine, then the Kentucky Derby is your chance to set her free with a standout statement hat. Even if you can’t make it to Churchill Downs, there are Kentucky Derby parties happening all across the country. If you don’t already have plans, then having the opportunity to strut your stuff like a lady is as good a reason as any to throw your own Derby party.
You can have lots of fun creating your own unique DIY Kentucky Derby hat with a little creativity and very little money. In doing a little research, I learned that a wide brim is key. Not only will it keep the sun off your pretty face, but it adds drama. Adorning your hat with flowers, feathers, lace, or ribbon completes the look and is said to bring luck to gamblers at the race. As this headpiece is for the Kentucky Derby — also known as the Run for the Roses — I chose red roses as the centerpiece for my adornment, with a little black tulle, and finished it off with a daisy crown around the brim. After all, a girl wants to look good both coming and going!
DIY Kentucky Derby hat
Making a Kentucky Derby hat requires three main steps: constructing and attaching the black tulle pouf, adding the flowers, and making a daisy rim. Follow us as we walk you through these steps.
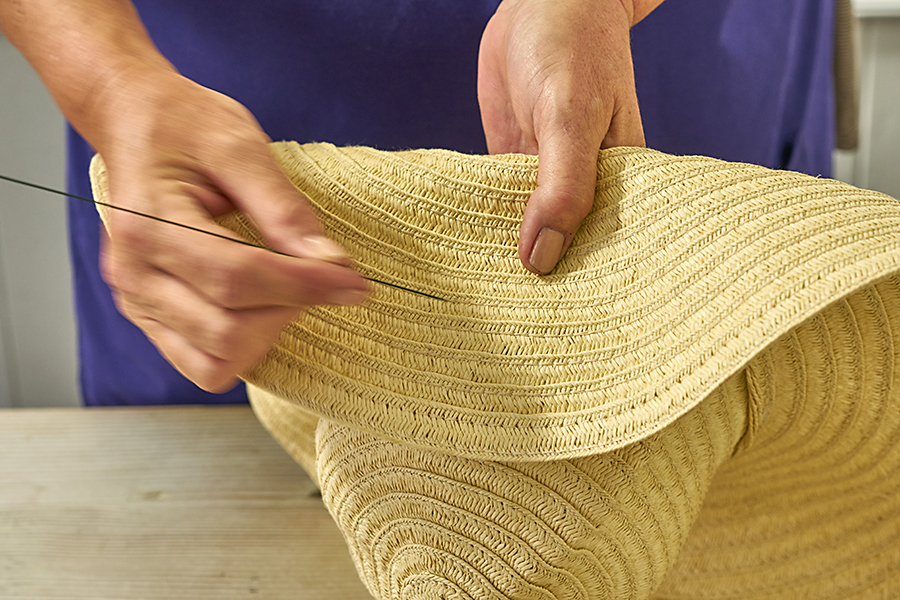
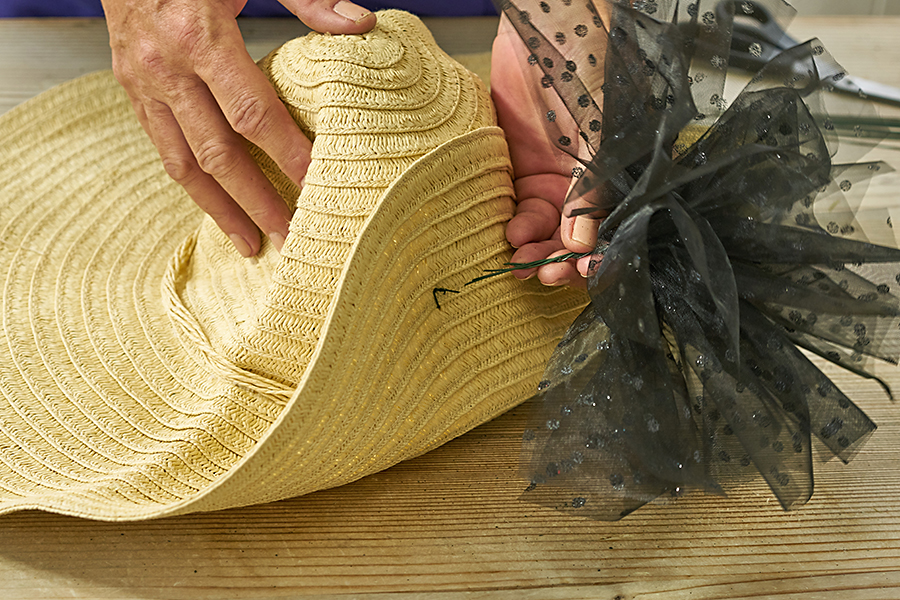
1. Attach the black tulle pouf
I found the perfect wide brim hat at a local Goodwill store for just $8!
I started by lifting one section of the brim and attaching it to the top of the hat using a piece of wire.
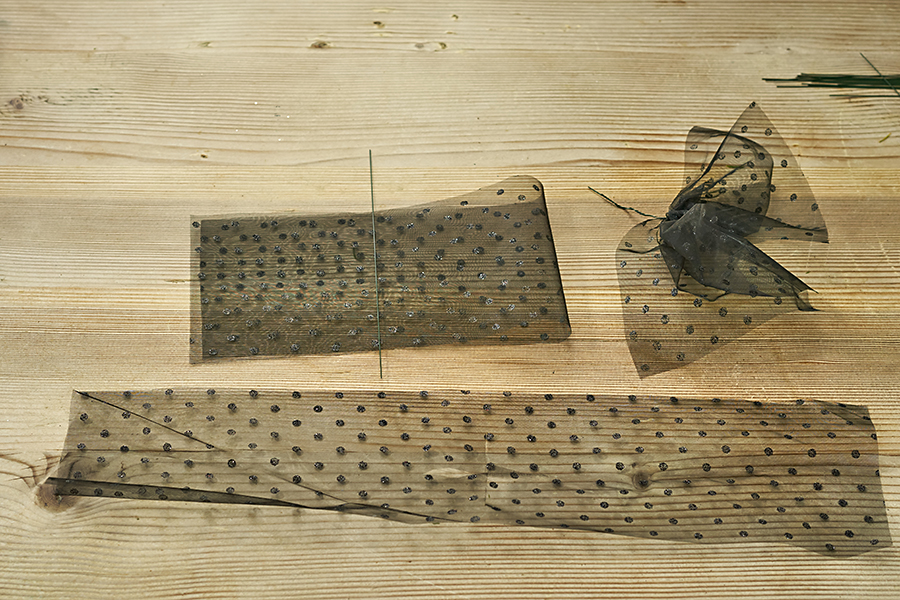
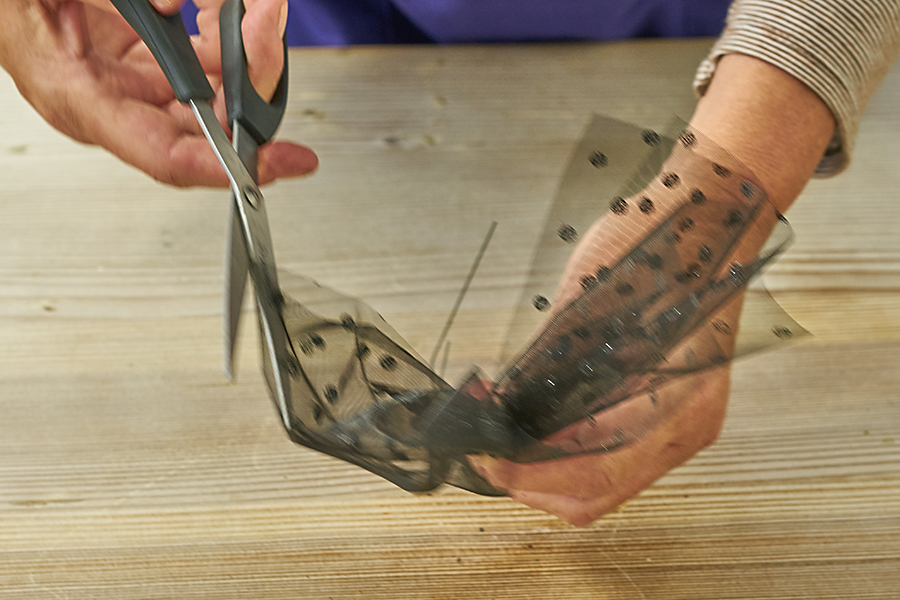
I had the perfect piece of “scrap” tulle left over from a previous project that I cut into five strips approximately 20 inches long each.
I folded each strip in half…
…and twisted a wire around the middle to create a pouf.
Then I cut the side of the tulle that was folded.
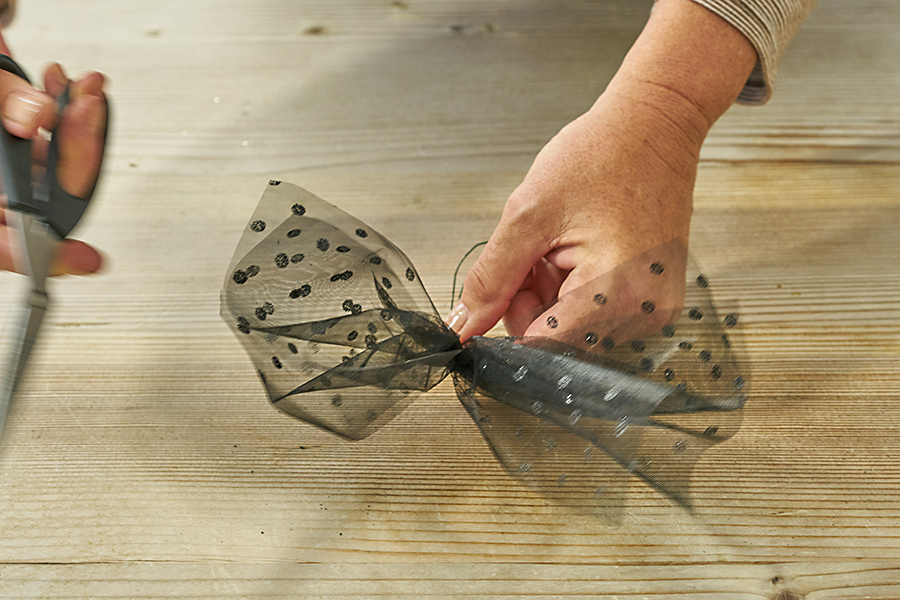
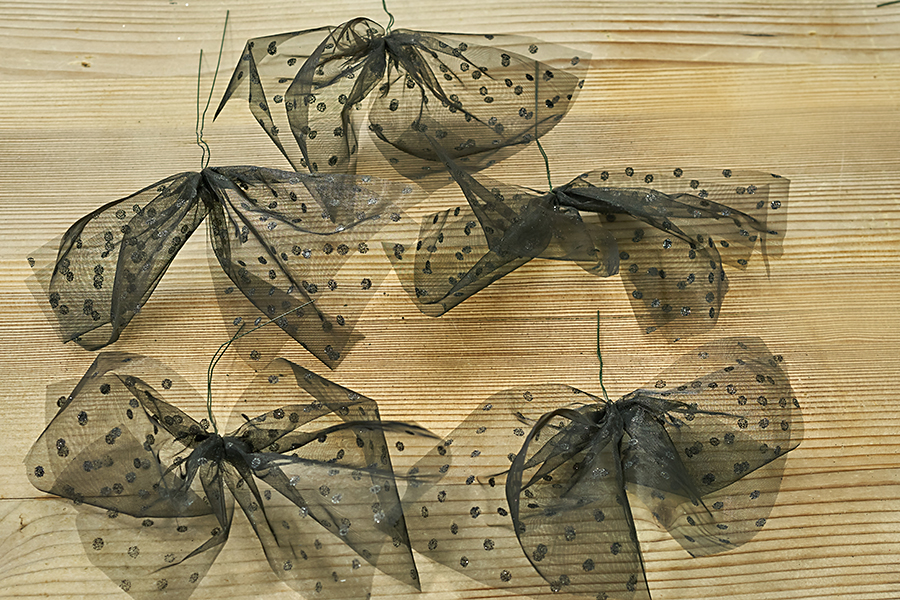
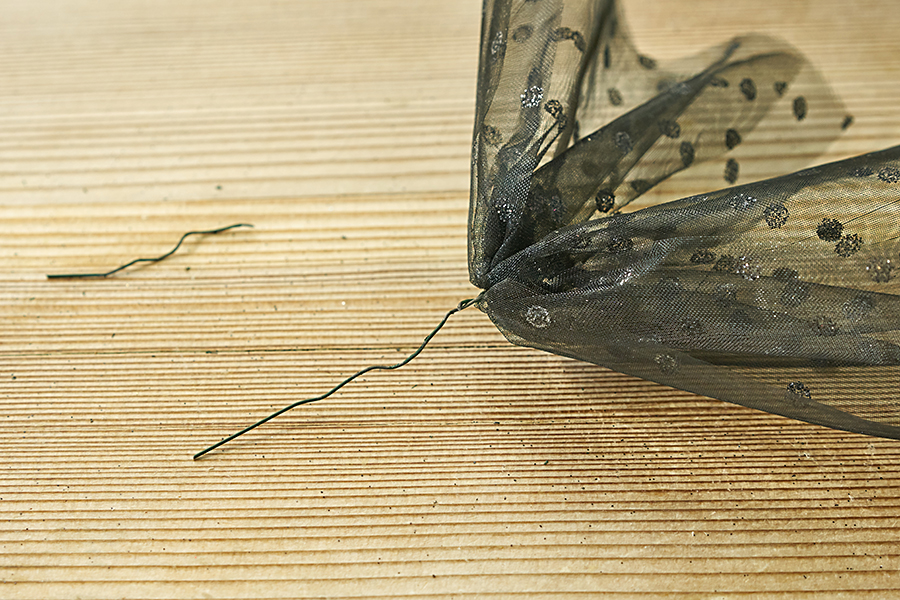
Before gathering all the poufs of tulle together to make the decoration base that will hold the fresh roses…
…I cut one piece of the wire, leaving a single length to work with.
This helps keep the decoration lighter in weight and makes it easier to attach to the hat.
2. Add fresh flowers
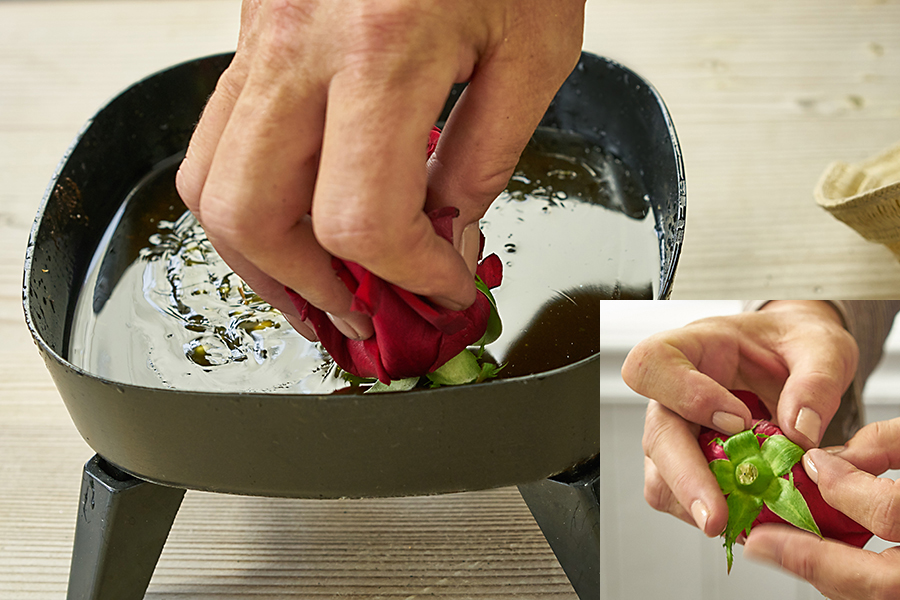
Now it’s time to add the beautiful red roses. The easiest way to add the roses is with hot glue.
Cut the stem of the rose very short and dip the base into a hot glue pan. Or, if you prefer using a glue gun, just dab the glue onto the bottom of the base.
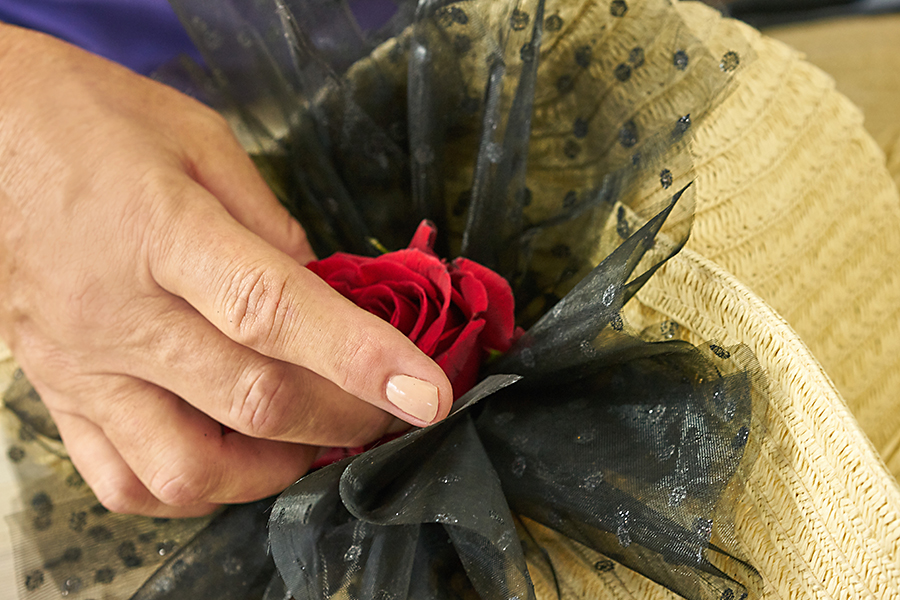
Immediately place the rose in the center of your tulle pouf.
I added two more roses and completed the look with a few stems of salal leaves.
Add the foliage the same way, by dipping the end of the stem into the hot glue and adding to the tulle base.
And that’s it! Remember, you’ll be wearing this hat, so you’ll want to keep your decorations as light as possible so that you’re comfortable in your beautiful new chapeau.
If you find that you have a few strands of “glue strings,” you can easily remove them by quickly going over the area with a hairdryer set on the lowest setting.
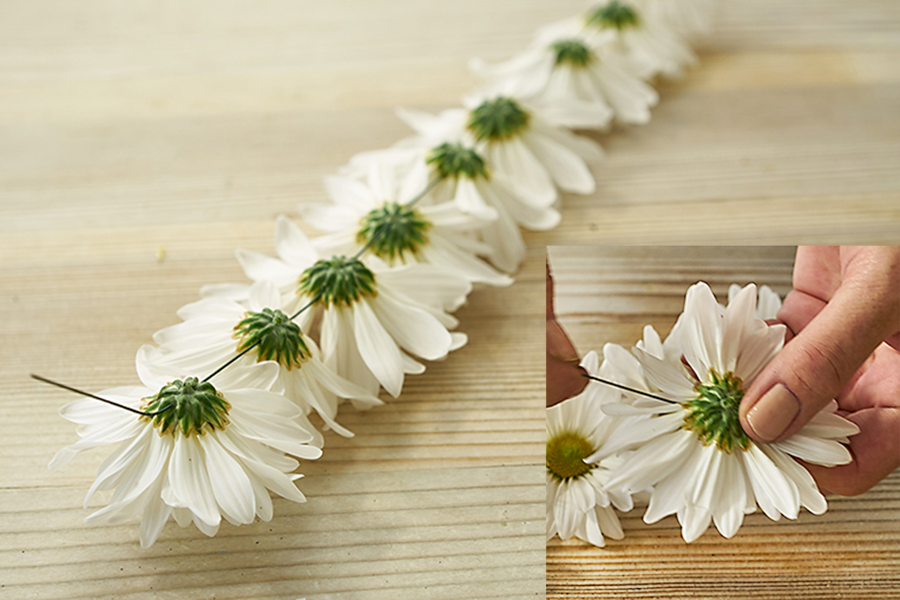
3. Make a daisy rim
Adding the daisies around the brim of the hat is just as easy.
Cut the stems from your daisies. Using a piece of wire that’s 4 inches longer than the length you’ll need to cover the crown of the hat, insert one end of the wire through the base (also know as the receptacle) of the daisy. Slide each daisy to the end of the wire and continue adding as many daisies as needed for your hat.
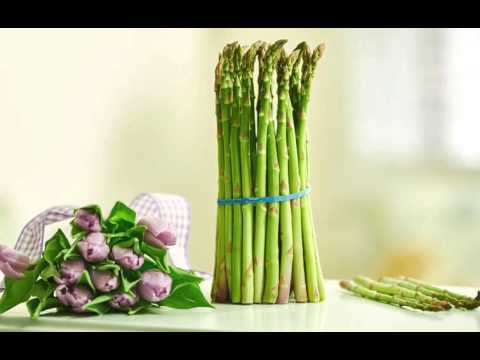
I’m always looking for new unique ways to arrange flowers in a vase and if you remember my Thanksgiving Centerpieces, you know that incorporating fruits and veggies is one fun way to do it! This asparagus vase is super easy to make but looks a lot more impressive, and it gives your guests one of those, “I can’t believe I didn’t think of that!” moments. With just a regular beverage glass or glass cylinder vase, a rubber band, ribbon, asparagus and a bouquet of fresh tulips, you can make this DIY asparagus vase in under 5 minutes!


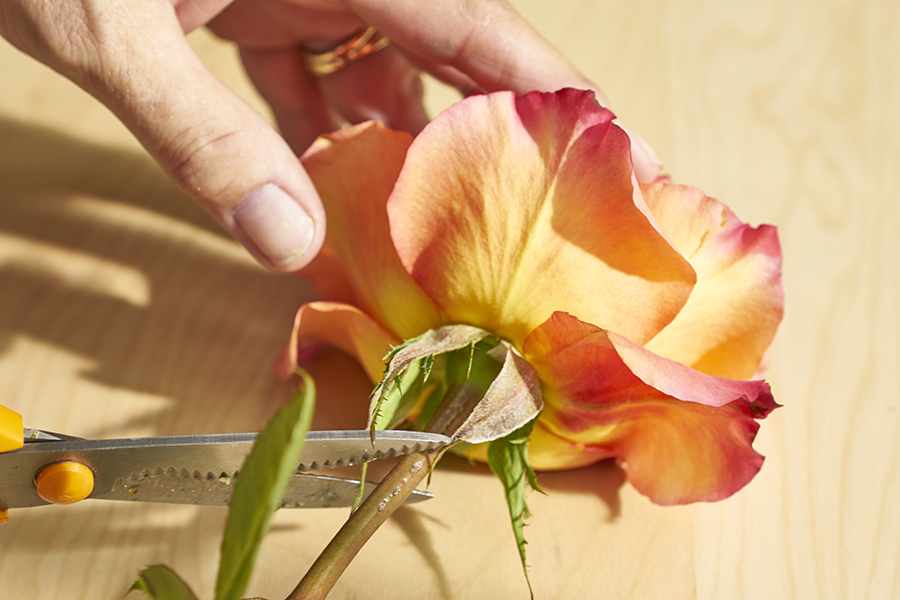 2. Cut your wires to pieces about 4” in length. Insert one wire through the thick area at the base of the rose known as the receptacle.
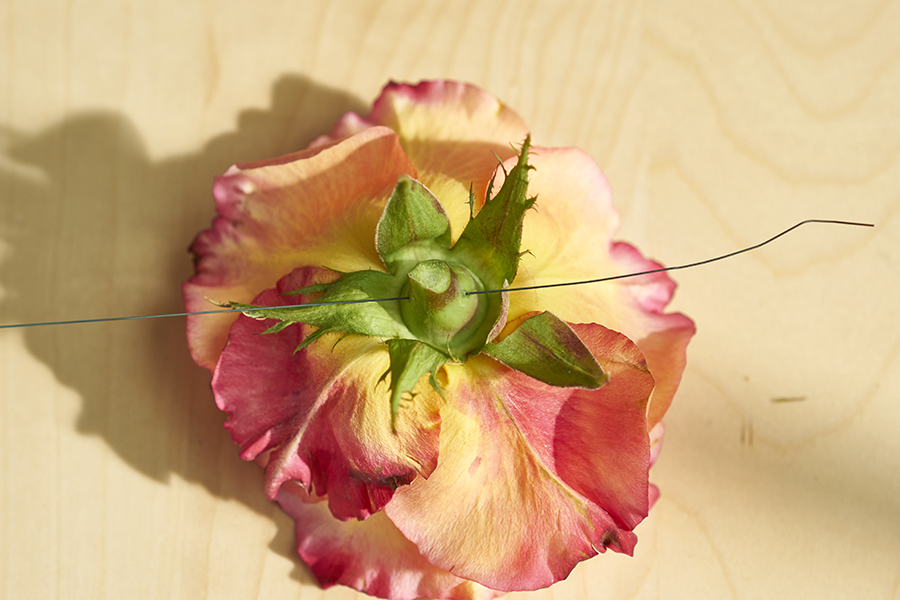 3. Insert another wire crisscrossing the first one.
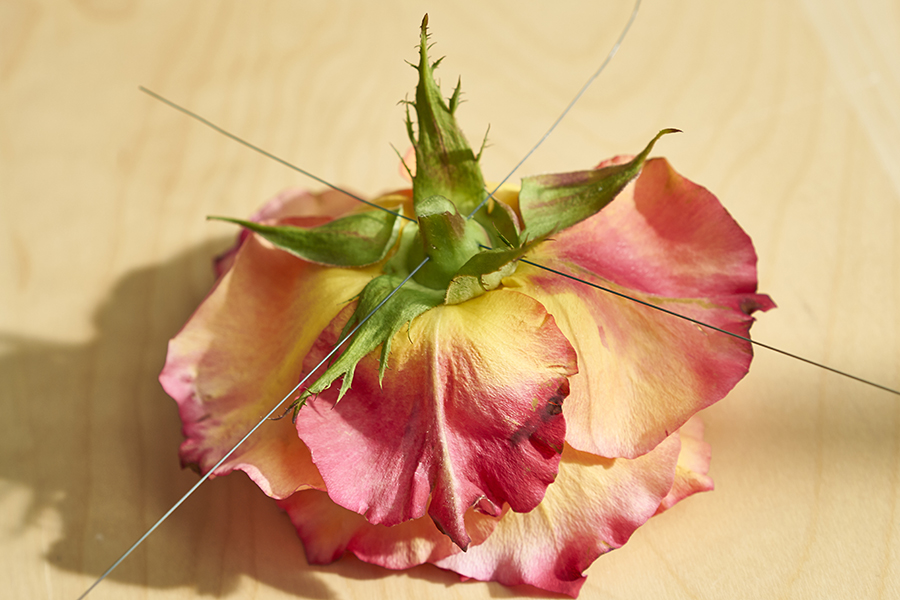 4. Fold the wires down and twist together.
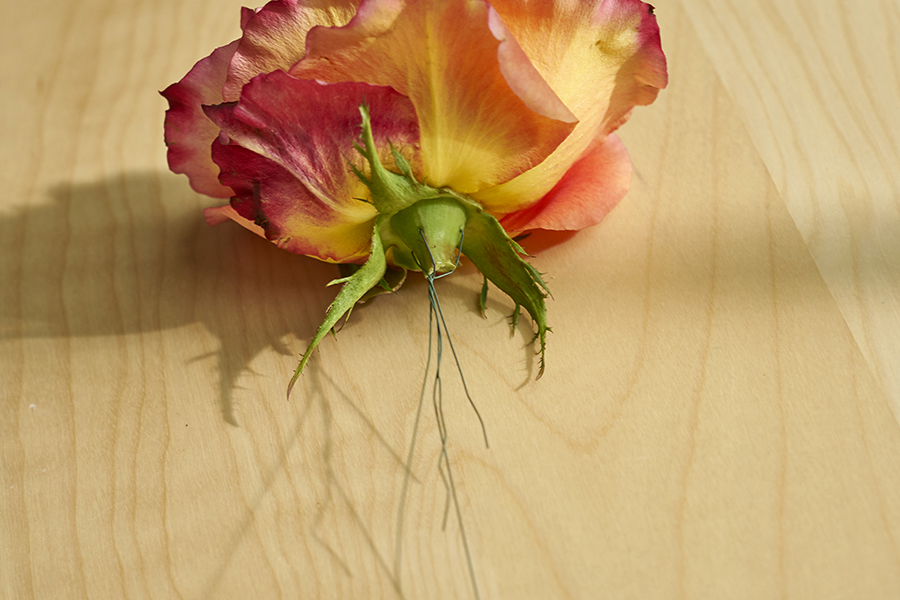 5. Wrap the wires with floral stem wrap.
 6. If the wires are too long just snip them with a wire cutter to the desired length.
 I find it easier to pre-cut small pieces of the floral wrap (about 2”) from the roll before starting the wrapping process.
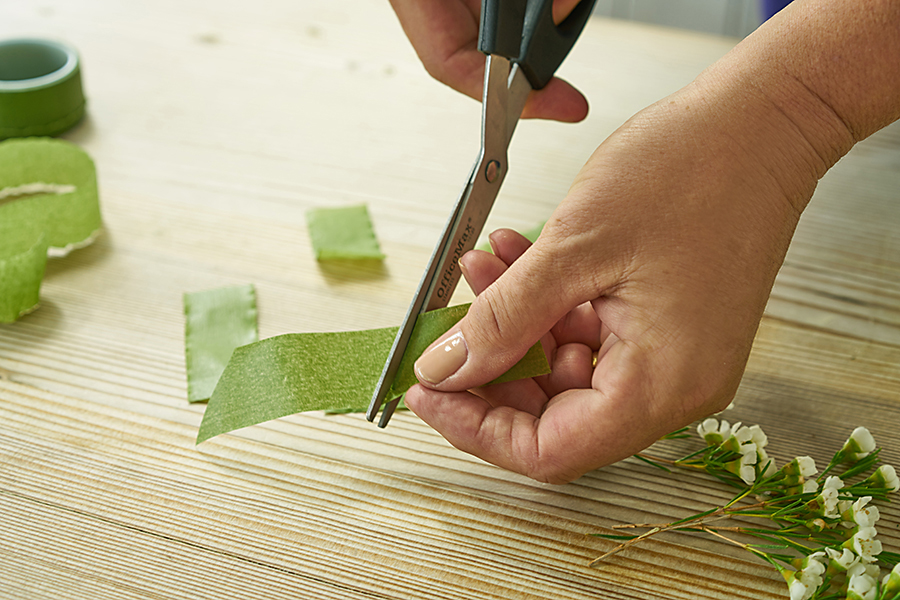 2. Using floral stem wrap can take a little getting used to, so don’t get frustrated if you have to practice a little at first. The key is to wrap it tight and overlap it upon itself as you move down the stems.
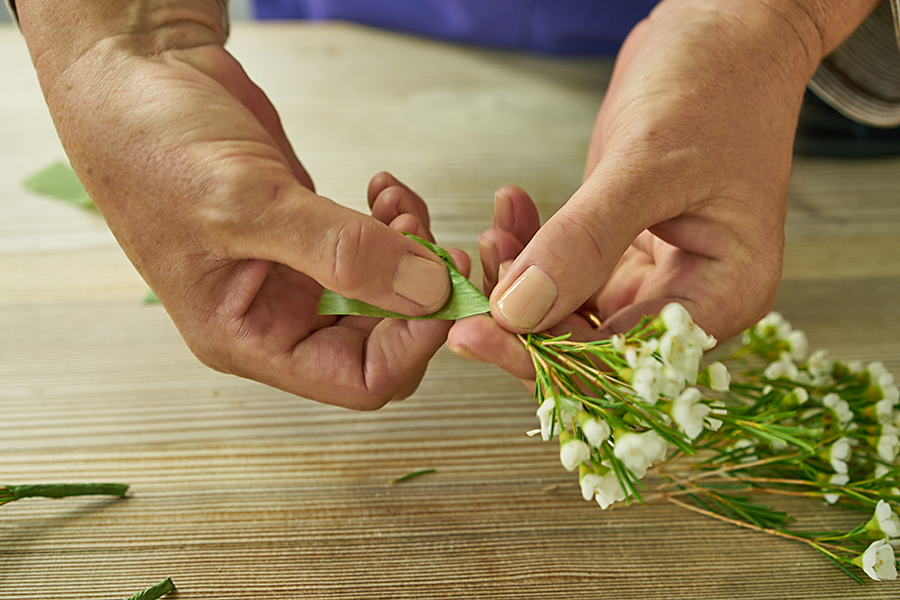 3. Hold the top of the wrap with one thumb while you are twisting, wrapping and moving down the stems with the other hand.
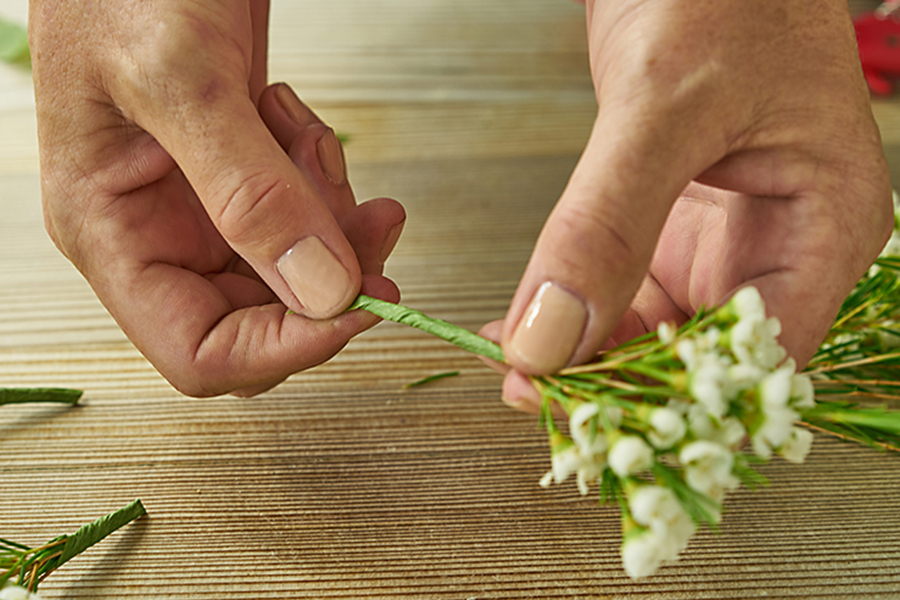 4. When you get to the end just pinch or cut off any remaining tape.
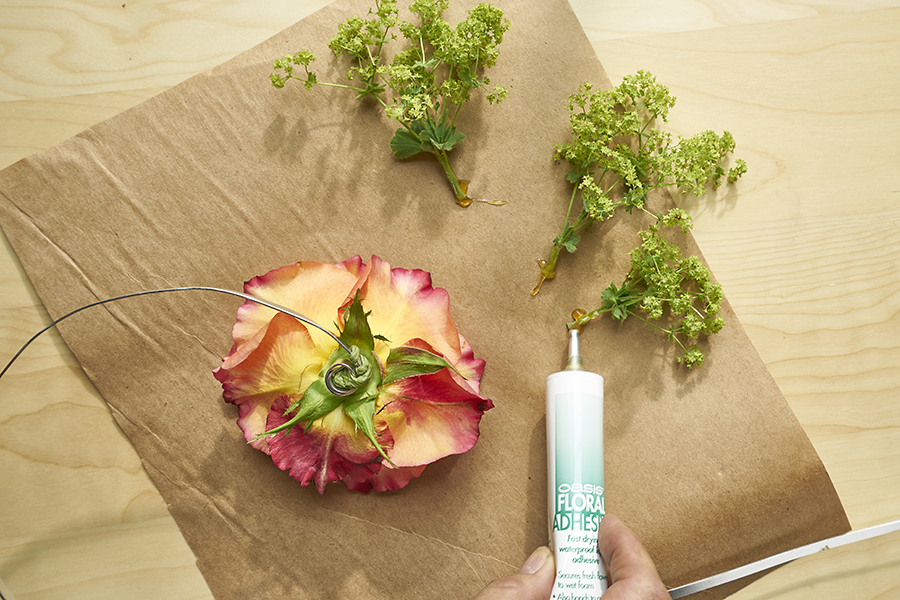 2. Glue bonds to glue, so in addition to the flower stem, place glue on the area where the flower will sit for extra security.
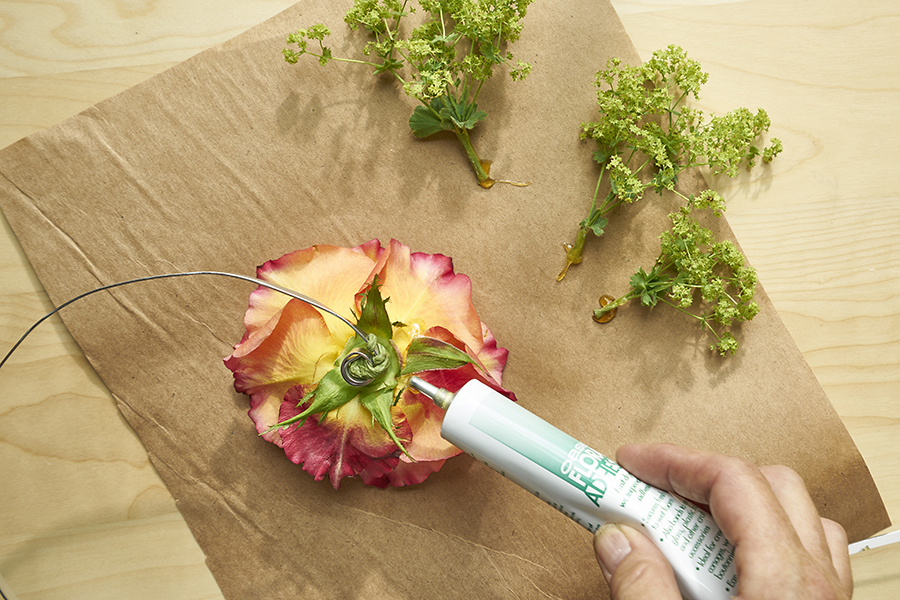 3. Wait a minute or two before placing the stem in your desired position and hold for a few seconds until the glue is tacky enough and staying in place.
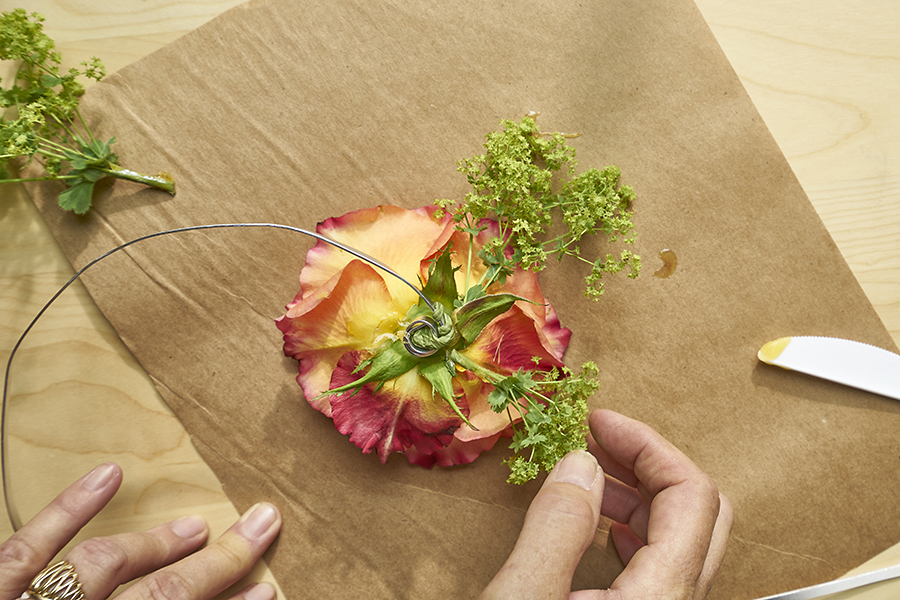
 3. Remove and insert immediately into your base. It will adhere to the other flowers that are clustered around it.
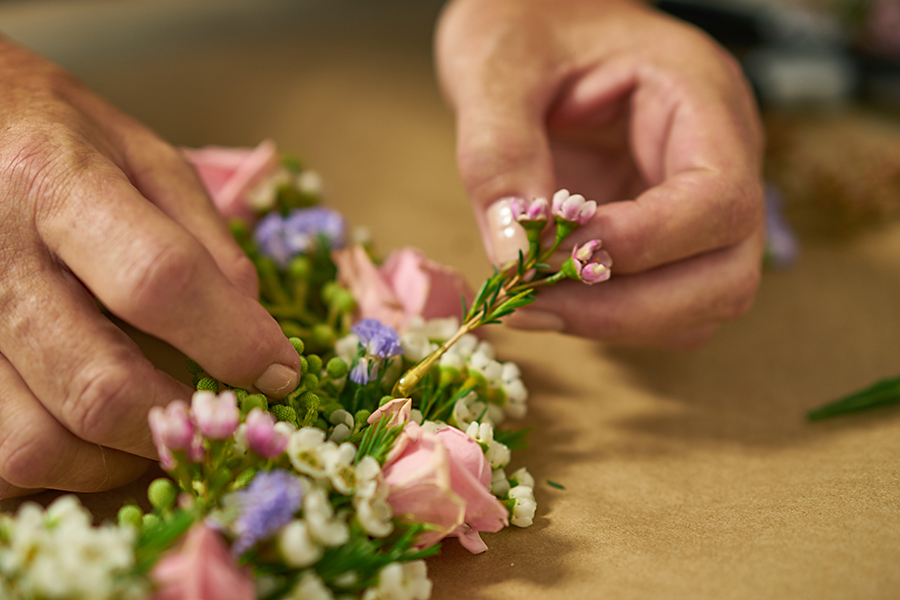 4. This can be done very quickly and is an easy way to add dimension, texture and fullness without adding the weight of a wired and taped flowers.
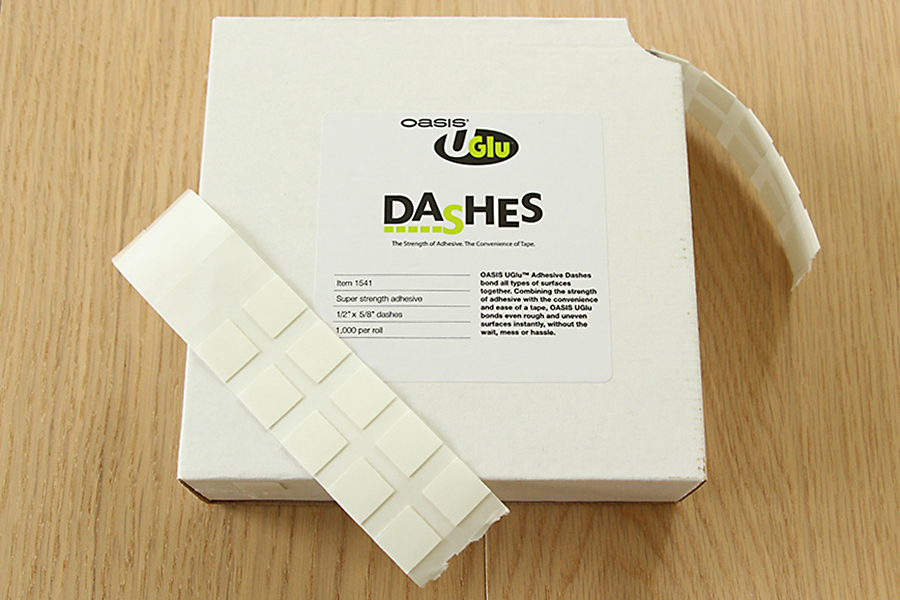 It comes in convenient strips of little squares and I’ve yet to find something that it doesn’t adhere to.
 What I particularly like is that, although it bonds extremely well, it can still be removed from solid objects by peeling it off (very similar to the adhesive backing on Command™ Strips).
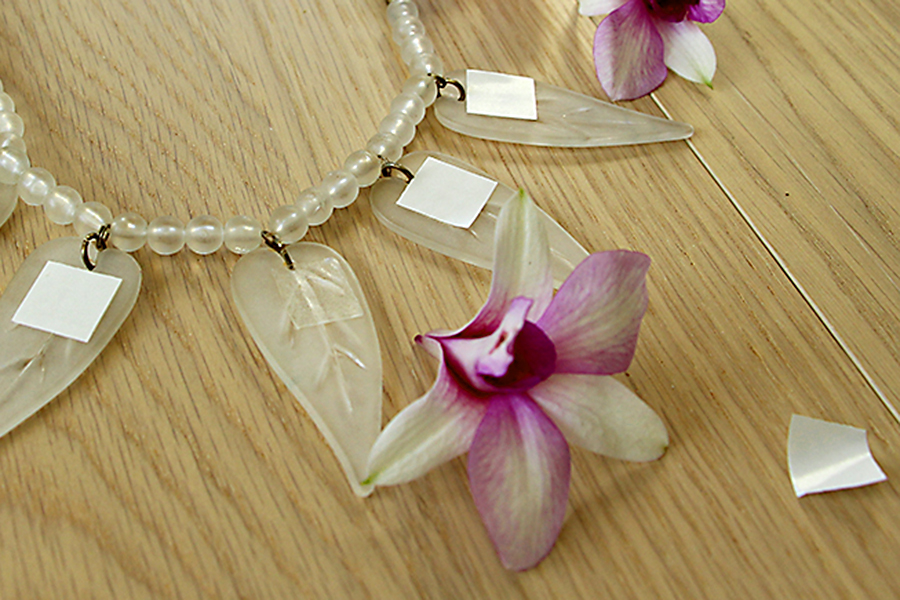
 2. Continue until you have reached desired length.
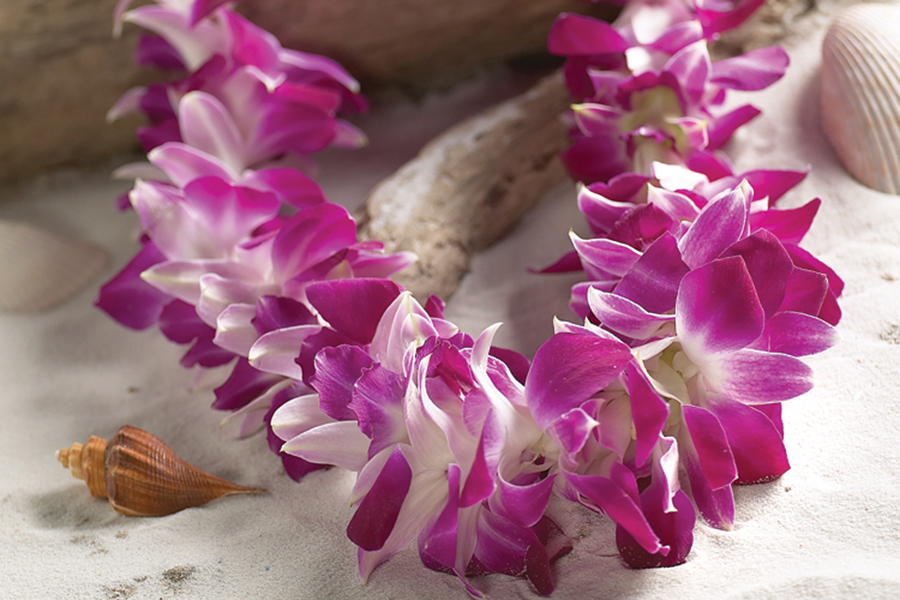

 So these are the basic techniques that you should become familiar with if you’re interested in creating unique, one-of-a-kind fresh flower fashion accents. You’ll find what works best for you and probably come up with a few tricks and shortcuts of your own.