Happy Birthday Snow People

Who better to deliver birthday wishes on a chilly winter day than a happy little snowman? Think about it: Have you ever seen a snowman who didn’t have a smile on his face? Snowmen are a celebration of winter, unexpected snow days, and family fun. And the best part about this snowman (or “snowlady”) craft is that it can stay inside, sharing birthday smiles without melting!

Winter Snowman Setting

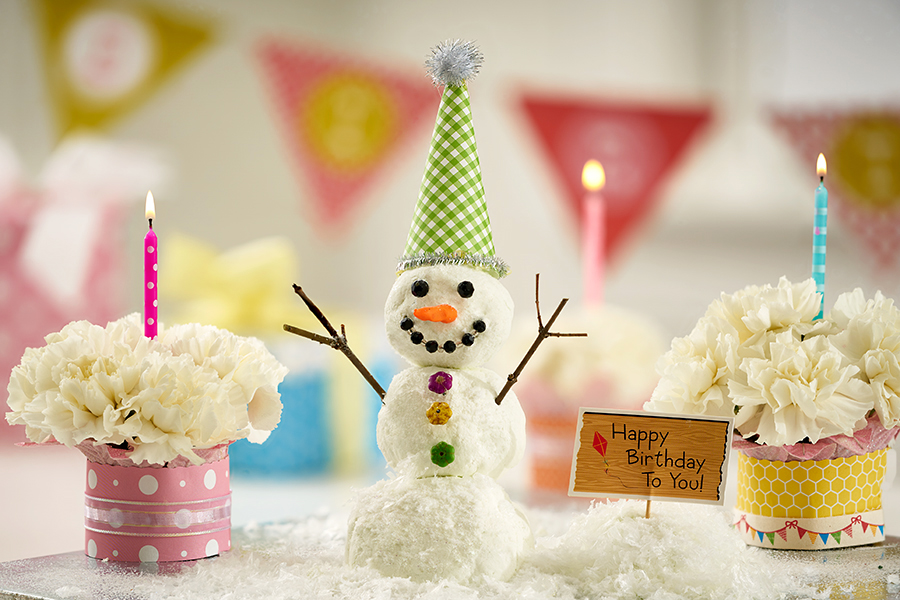
This happy little guy is the finishing touch to a birthday vignette of floral cakes and cupcakes, and I created him with everyday materials found around the home. With a little research online, I found many snowman recipes that called for corn starch and shaving cream. After doing some experimenting, I went with the shaving cream version, but both work great! This snowman craft is a fabulous fun sensory activity to do with kids too.

Make a snowman craft (without snow)

What you need

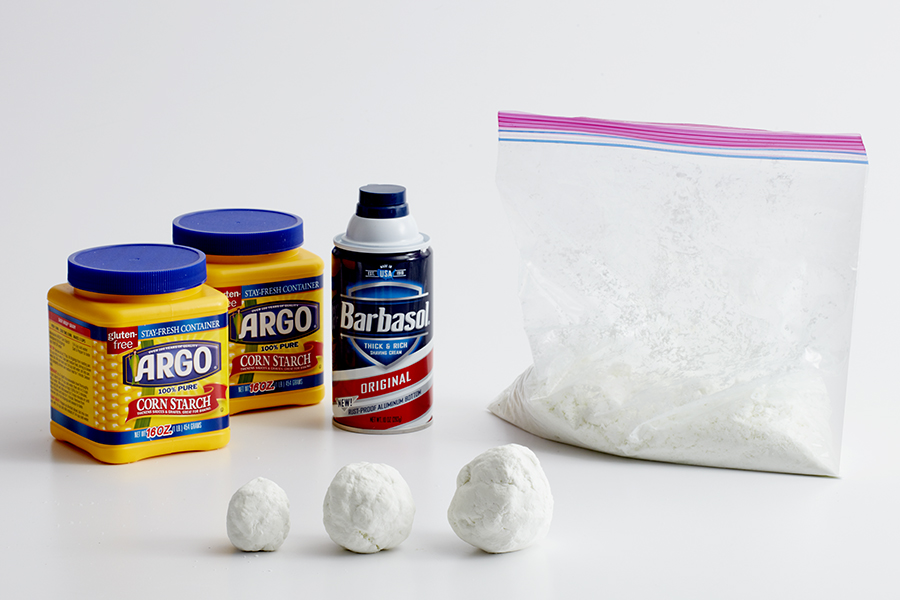
  • Two 16 oz. containers of corn starch
  • One 10 oz. can of shaving cream
Snowman Decoration Supplies- Beads, Hat, Nose, etc.
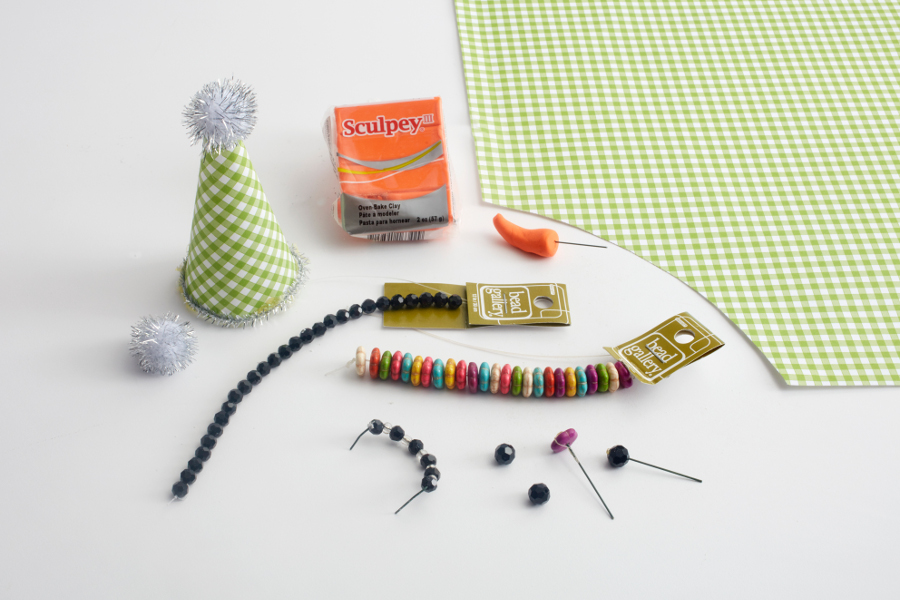
  • Miscellaneous items to dress your snowman and add personality, such as:
    • Decorative beads
    • Sculpting clay
    • Twigs
    • Decorative paper, pom-poms, chenille stems (for birthday hat)
    • Wires
    • Glitter and faux snow

    What to do

    Pour the corn starch into a large bowl and slowly add the shaving cream, mixing it in as you go. Keep working the shaving cream into the corn starch until you can mold the mixture and it feels dry to the touch. You can store the faux snow mixture in a resealable bag, and it will keep for a few weeks.

    How to Mix Snowman Supplies & Roll Into Balls

    Because this was for a birthday, I added a birthday hat that I made from a small piece of decorative paper, and added a silver pom-pom at the top and a silver chenille stem around the base.

    Snowman with Hat and Happy Birthday Sign

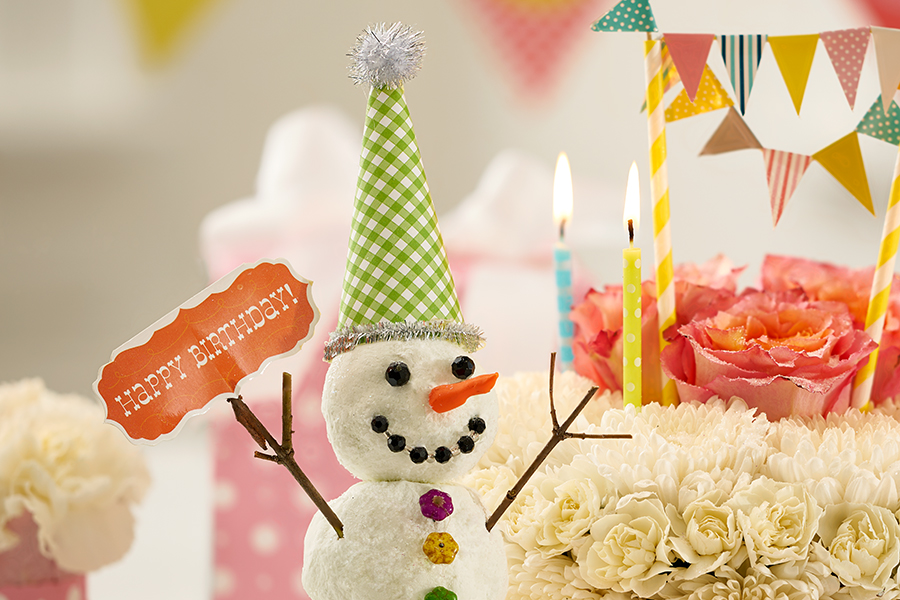
    I also made a little “Happy Birthday” sign and attached it to one of his little twig arms!

    You can also add the sign to a pile of snow made with the cornstarch mixture. I used some faux snow around the snowman, as well as floral cakes and cupcakes, to complete the look.

    Create a floral snowlady

    DIY Flower Snowlady

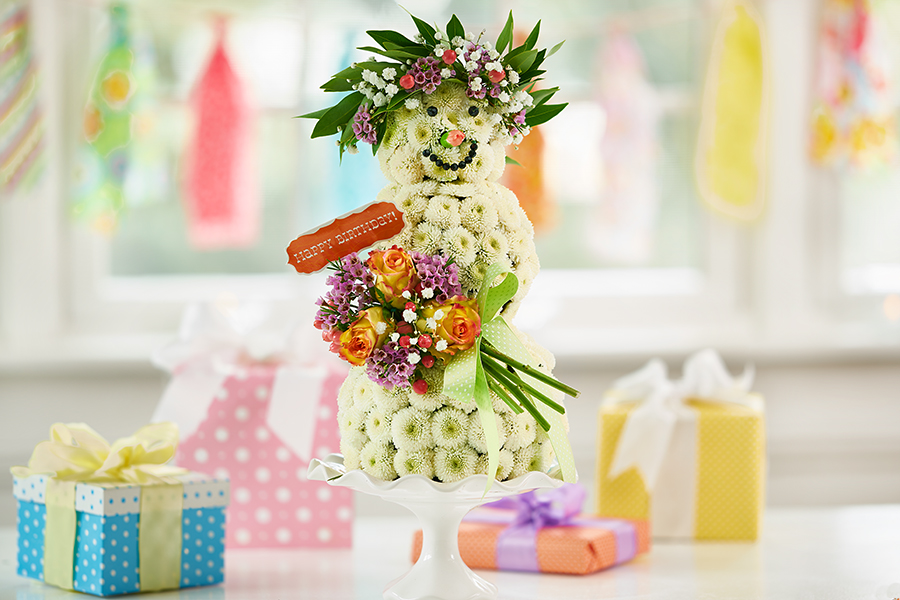
    Another way to make an indoor snowperson is with flowers. If you know someone who has a birthday and deserves to smile, then this is one homemade gift they would be delighted to receive!

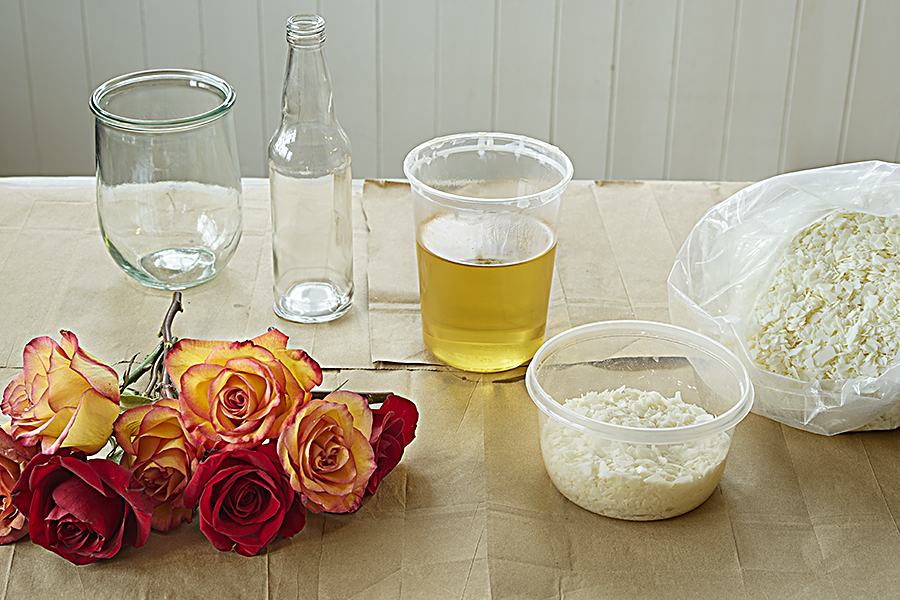
    What you need to make a snowlady

    DIY Floral Snowlady Supplies
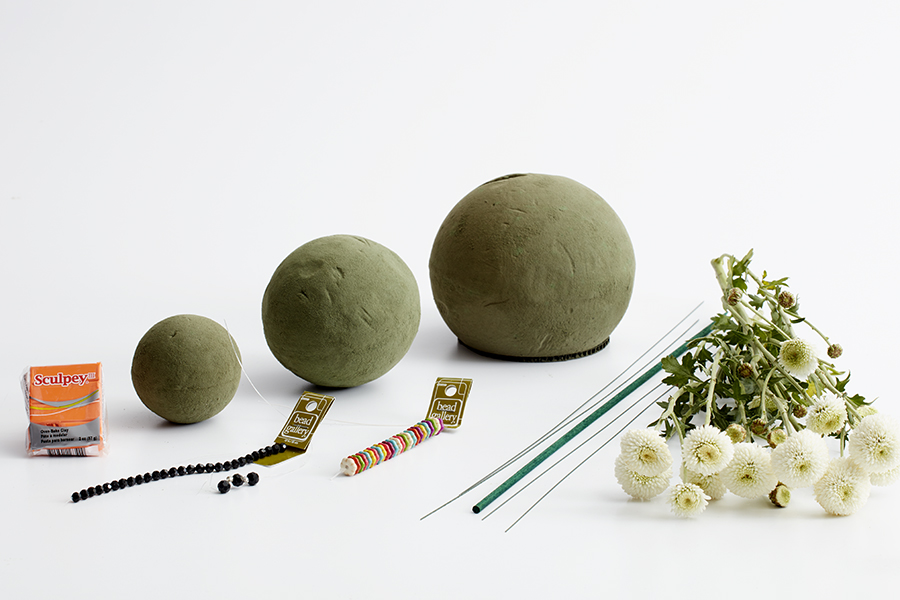
    • 2 or 3 sizes of floral foam spheres
    • A stick
    • White button poms
    • Decorative elements to create the face (beads, sculpting clay, etc.)

    What to do

    1. Thoroughly soak the foam spheres. I used three sizes, but you can use just two.
    2. Place the largest sphere on a flat plate and insert the stick.
    Building Floral Snowman with Foam Spheres
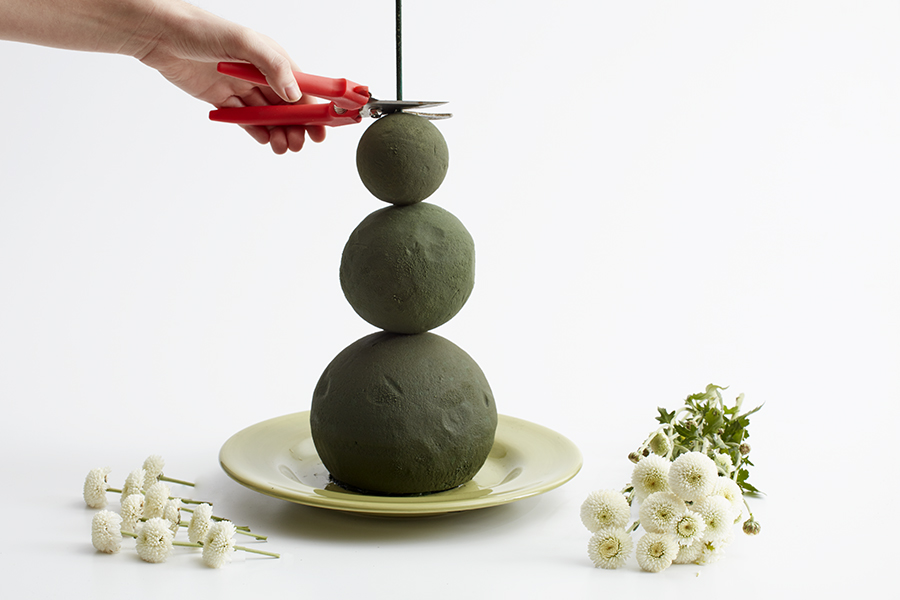
    1. Place the next largest size on top of the larger one, and then the smallest. Cut the stick at the top if it is still sticking out.
    1. Cut all the individual button poms from the main stem, leaving about 1 inch of stem on the flower to insert into the foam.
    Insert Flowers into Flower Foam
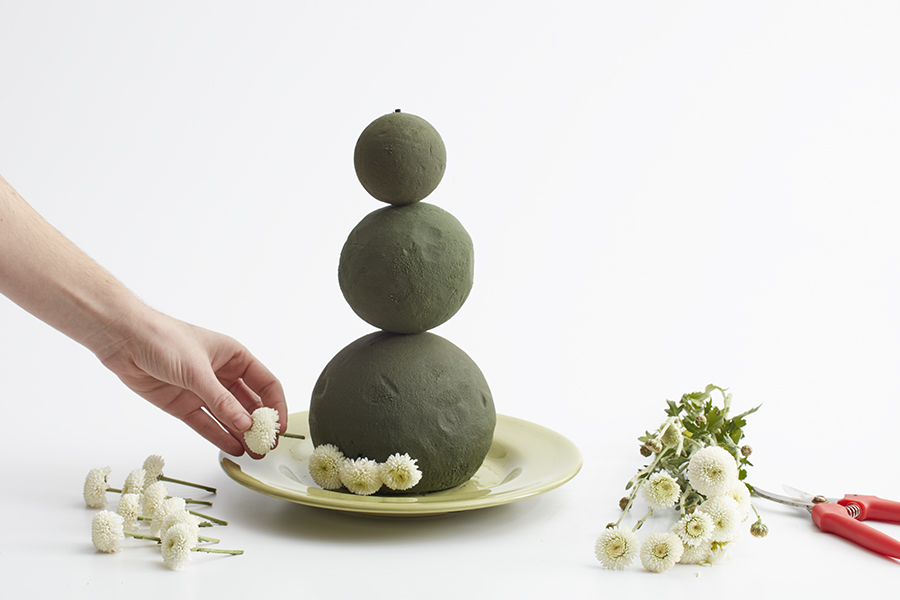
    1. Start at the bottom and insert the button poms until you have covered all the foam.

    This is a large snow lady — she stands a little over a foot tall — so it takes lots of button poms to make. (I used more than 15 stems.) You can create a smaller one using the same method, however.

    Snowlady Bouquet

    For the birthday bouquet, I gathered a few stems in my hand and cut the bottoms short, and inserted them into the foam. I took the parts of the stems I had cut off and inserted them into the foam as well, and added a bow between the flowers and stems to make it look like she was holding a bouquet of fresh-cut flowers! Because I knew I was going to be giving her this bouquet, I didn’t put the button poms in the area where I planned to insert the bouquet.

    Snowlady Flower Crown

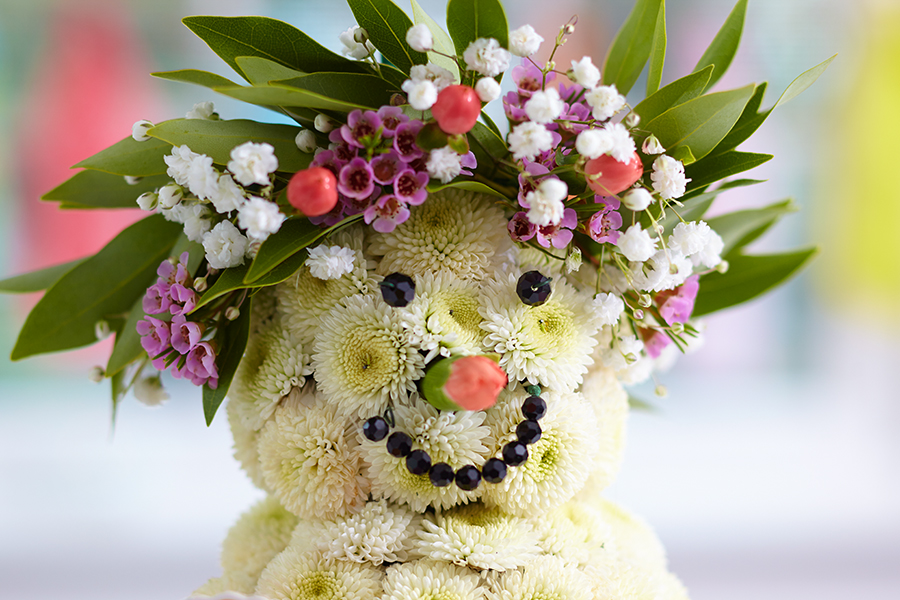
    For the floral crown, I used small sprigs of flowers and greens, and wired them together.

    Creating any of these vignettes is a sure way to let someone know how special they on on their birthday — and every day!

    Halloween Crafts: Candy Corn Garland

    Not everything about Halloween needs to be spooky and scary — it can also just be fun and colorful, and full of sweets and smiles.

    Here is a simple DIY craft idea celebrating that perennial Halloween favorite, the candy corn.

    This project starts off very basic so that even the littlest trick or treater can do it, and can be scaled up and personalized to entertain tweens and beyond.

    Candy corn garland

    Making this Halloween craft keeps the kids entertained and barely costs a thing. And, after Halloween is over, you can recycle the whole thing — no guilt about producing extra waste, and you don’t have to pack it up and find somewhere to store it all year.

    halloween crafts with materials for candy corn garland

    Materials needed for candy corn garland

    • Cardboard boxes
    • Paint or markers
    • String or ribbon
    • Hole puncher
    • Scissors or straight edge cutter

    Instructions for making candy corn garland

    The steps for this candy corn garland are the same as the ones I used for the patriotic-themed garland I made for Memorial Day. The only difference is it is painted differently.

    halloween crafts with Circle
    halloween crafts with Circle
    halloween crafts with Circle
    1. Cut out a large circle from the cardboard box and, using a pencil, draw two smaller concentric circles inside it. (I was fortunate that one of my daughters operated a baking business out of my house and I had corrugated cake boards in my attic. And the fact that the boards were white meant I only had to paint the orange and yellow sections!)
    2. Repeat the process making more circles. You can make them all the same size or mix it up with larger and smaller ones.
    halloween crafts with painted circles
    1. Paint or color the outermost ring yellow, the middle ring orange, and the innermost ring white (if necessary).
    halloween crafts with cut circles
    1. Once the paint dries, cut the circle into triangle — just like a pizza!
    halloween crafts with hole-punched wedges
    1. Use a hole puncher to punch two holes in the wider end of each triangle.
    halloween crafts with yarn strung through wedges
    1. Lace yarn, twine, or ribbon through the holes on the triangular pieces.
    halloween crafts with candy corn garland

    Once you have the basic steps down, you can improvise as you see fit. Let the older kids design their own garlands, adding tassels made from yarn or fabric, or add paper straws cut to the desired length in between the candy corn. The possibilities are only limited by your imagination!

    halloween crafts with candy corn sodas and cocktails

    And when the decorating is done, treat the little ones to a candy corn soda pop and yourself to a candy corn cocktail!

    How to Preserve Flowers with Wax

    How to Preserve Flowers with Wax

    You can make your beautiful fresh-cut roses last longer than you ever imagined by dipping the open blooms in melted wax. The best time to preserve flowers with wax is at the very end of their shelf life — after you have enjoyed their beauty for over a week — when the rose is in full bloom.

    I have waxed roses many times over the years using paraffin wax. Now that soy wax is readily available, I decided to give that I try…and I’m glad I did! Soy wax is a completely natural and renewable resource, has a lower melting point, and cleans up easily, with just soap and water. And soy wax is so versatile that you can melt it in the microwave!

    What you need to preserve flowers with wax:

    • Open roses
    • Microwave-safe container
    • Soy wax flakes
    • Candy thermometer (optional)
    • Empty bottles or vases or wax paper
    a photo of wax flowers with ingredients for wax roses

    Steps:

    1. Cut the stems of your roses to about 8 to 10 inches long to make it easy to dip the heads into the wax. Then, place the stems into your bottle or vase to cool. Be sure to put scrap paper on your work surface, including under the bottles, to catch dripping wax.
    1. Fill the microwavable container all the way to the top with the wax flakes and microwave for 2 minutes. After 2 minutes, take the container out of the microwave and stir the melted wax with a disposable plastic spoon. If there is still any white/un-melted wax, return the container to the microwave for another minute and repeat. Also: As the wax melts, you might find that you need to add more flakes. Go ahead and stir them into the container, and continue the melting process.
    a photo of wax flowers with a wax rose cooling upright in a bottle
    1. Once all the wax is melted, you can start dipping. Place the wax container on a protected surface and have your bottle or vase ready to place the dipped roses in for cooling. You can also place the dipped roses on wax paper to cool, but they will keep their shape better if they cool while upright.
    a photo of wax flowers with a wax rose vs. fresh rose

    Note: Your wax should be at about 100° F. (You can measure the temperature with a candy thermometer.) I found that melting the wax in short increments of time will keep it from getting too hot. I waited a minute or two after removing my wax from the microwave to start dipping. You can tell that your wax is getting too cool if it starts to get cloudy looking and appears cloudy on the rose petals as well. The goal is to make your rose look so lifelike that it’s impossible to tell that it has been dipped in wax!

    If you have many flowers to wax, you can continue to melt as you go along, using the same container and adding more wax flakes as needed. When you’re done, cover the wax container so you can use again at another time. You can preserve many different varieties of flowers and foliage with this method!

    2 ideas for enjoying your waxed roses

    a photo of wax flowers with a wax rose in birds nest display

    After the wax has completely cooled, cut the stem off so that you can cradle the rose in this sweet bird’s nest dish.

    a photo of wax flowers with wax roses and succulents

    I love this arrangement! I simply alternated waxed roses and baby succulents to create a modern centerpiece as carefree as it is beautiful.

    DIY Planter Decor: Everything Doesn’t Have To Be Perfect

    My motto has always been “Just have fun with it.” I believe that the process or the journey is just as important, if not more so, than the end result.  So, I decided to show you how easy it is to just go freestyle.

    wood planter

    Choose the surface or container that you want to personalize.  In this case I am using the same wooden planter from our 1-800 Flowers x Bungalow Bar DIY Workshop series.

    choose font

    Next decide on a message or quote and pick a font.  I chose the font – Return to Sender.

    step 2

    I printed the message out on plain computer paper and trimmed to size to make it more manageable to work with.

    step 3

    Then I taped the paper to the top edge of the container to guide me along and help with the spacing.

    finished planter

    I really love the way that it turned out.  And it looks beautiful filled with pansies and vinca vine.  My husband and I have been making weekly trips to our children homes for social distance visits and to drop off goody bags, especially for the grandkids.

    And we do the same thing for my brother Kevin.  Kevin lives in an Independent Group Home Living home and is a farmer at Smile Farms at IGHL.  Like everyone else he is quarantining at his home and little things like these surprise drop offs definitely help!

    If you can’t get to your loved ones 1-800 Flowers and their family of brands including Harry & David, Cheryl’s Cookies, the Popcorn Factory, and more,  have many great ways to help you stay connected, starting at just $5.

    Watch for the next idea for personalizing a planter – stenciling!

    Personalized Container Gardens

    personalized container gardens

    In addition to the Container Garden DIY Creative Workshop that was scheduled for March 20th at Bungalow Bar, we were also in the planning stages for an April 20th workshop.

    wooden planter

    We were bringing back our favorite wooden planter that served us so well as a base for a stunning autumn centerpiece.

    holiday centerpiece

    We then transitioned into the holiday and winter season with fresh evergreen arrangement accented with pine cones and silver ornaments.

    succulent cactus planter

    And on April 24th we were going to repurpose the planter into a chic and modern succulent garden!  We always like to add additional surprise elements of surprise inspiration to our workshops. For this one we were going to touch on just a few of the creative ways that you could personalize the wooden planter.

    pyrography diy

    While quarantined here at home I have been giving the various methods a try and just having fun with it.

    The first one I did was pyrography –  the art of burning in wood.  I had a beginner’s wood burner pen in my toolbox, from a previous Mother’s Day post.

    pyrography diy

    In that post I personalized birch vases, which made it looked like it was carved in a tree!  It’s pretty easy to do and with adult supervision an older child, like my grandson Manny, would enjoy it.  And my granddaughter Olivia did a beautiful job filling the vase with tulips!  Check out the easy step by step instructions by clicking here.

    I followed the same steps as before – starting with a template. Just decide what you want to say, choose a font, and print it out sized to your container.

    I cut to size and taped the paper to the planter as a guide mostly for positioning.

    I just burn enough spots through the paper, to allow me to feel comfortable removing the paper and just free hand it from there.

    It’s not perfect but I loved the handmade feeling and the simple message.  Perfect for the current environment and complimented beautifully with spring plants from Smile Farms1-800 Flowers.com and Plants.com have a vast selection of plants to choose from to send as a gift or to gift to yourself.  Having flowers and plants in your home can elevate your mood and reduce stress!

    And speaking of free hand style that’s how we do it next.  Check back and see how it turns out.

    Mug o’Blooms for St. Patrick’s Day

    As almost everyone knows, a huge part of the Irish tradition is the enjoyment of delicious stouts, ales, and lagers. And this tradition will no doubt be a part of just about every St. Patrick’s Day celebration around the world. Here’s a way that you can honor this tradition and still be a designated driver!

    Beer Mug Flowers on a table.

    These floral Beer Mug o’Blooms are very easy to make, and are a fun and unexpected way to raise a glass and wish your friends Sláinte!

    Supplies for beer mug flowers

    • Beer mug
    • Acrylic gems, either in a gold/amber color or clear. If you use clear, just add yellow (or green) food coloring to the water.
    • Floral foam
    • Small plastic liner
    • 12 white carnations

    Instructions for beer mug flowers

    Beer mug full of acrylic gems next to flower crafting items.
    1. Put the acrylic gems in the mug, filling it to about 1½” from the top of the glass.
    2. Add water to the top of the gems.
    3. Cut a piece of floral foam the width of the glass and about 2-2½” in height. Soak the foam thoroughly before placing in the plastic liner or directly into the top of the mug.
    Creating Beer Mug Flowers
    1. Cut each carnation stem very short — about 1-2″ — and on an angle (for easy insertion into the foam).
    2. Insert carnations into the foam from both the top and sides, creating a beautiful “head of foam” on your mug of beer!
    Beer mug flowers craft in progress
    1. When inserting the stems on the side of the foam, be sure to insert horizontally so the carnation goes in straight and covers the floral foam.
    2. Keep adding carnations one at a time until you have created a nice mound without any gaps.

    Carnations are very hardy, so this fun beer mug flowers arrangement should last at least a week. Be sure to add water every couple of days to keep the flowers hydrated. An easy way to do this is to simply tuck an ice cube in between the top carnations every other day. The ice cube will slowly melt, keeping the foam nice and wet and the flowers fresh.

    Refurbished Plant Containers: Trash to Treasure

    “One man’s trash is another’s man’s treasure.”  How true!  A discarded or unused canister may actually be the perfect plant container. Take for example these funky succulent gardens that I planted in containers that had been discarded by the previous owner.

    plant container

    This metal container was literally “in the trash” and a garage sale in a box marked “free for the taking”!

    metal plant container

    I immediately knew I could do something with it, and I did!

    plant container completed

    The best part is I already had everything I needed just laying around the house starting with the pretty robin’s egg blue spray paint.  The plants were all in need of replanting – some of them are from my daughter’s wedding last year and had out grown their current containers and others were taken from container gardens that were bursting at the seams.

    succulent garden plant container

    When the planting was done, I remembered the beach glass, that my husband had collected over the years walking on the beach in Rockaway, that wound up stored in the attic after some renovations we did.  How perfect do the pieces look tucked in between the plants?!

    succulent plant container

    If I remember correctly I think I paid $3 for the watering can!  All the plants were salvaged and given another lease on life.  I just thought why not give them a try and let me tell you they are really starting to thrive in their new home with their new plant buddies.

    These are the perfect plants to have in a summer house that you might not be at every day.  They thrive on neglect and just keep looking better and better!

    Check out the new Plant Shop that 1-800 Flowers just launched to find the right plant for you.

    DIY Gold Hoop Wreaths With Flowers

    Flower wreath

    If you’re looking to kick up your home décor game, then I would definitely recommend going with a gold hoop wreath. They are totally on trend and can be created and displayed in so many interesting and unique ways.

    Gold wreath

    Limited supplies are needed to create one of these pretty flower wreaths.  The process is basically the same whether you choose to work with faux or fresh foliage and flowers.  The fresh versions are truly stunning but remember they are usually used for parties and events as they will only stay fresh for a short time.  However, if you are using them to decorate for a special occasion you only need them to look their freshest best for a few hours!

    gold wreath words

    Another way to personalize your wreath is to add a word or message.  I bought the hoops and the words on Amazon.  The “Love” is gold metal and the “hello” is paperboard that I spray painted gold.  Attach with wire or monofilament (fishing line).

    gold w

    I used green floral tape to secure small clusters of mixed greenery directly to the hoop base, making sure to wrap the tape tightly in place as I went.  Keep adding slightly over-lapping clusters until you are happy with your design.

    Gold Wreath

    Fresh flowers and cut succulents can be incorporated into the foliage clusters before attaching to the hoop or worked into the greens securing with wires or glue after all the foliage is in place.

    Why not try making one for yourself or as a gift. Wreaths make fantastic gifts (and one size fits all)!!  Check out the incredible wreath collection at 1-800 Flowers.com and make someone smile today!

    Succulent As Cut Flowers

    One of my favorite cut flowers to incorporate into my bouquets and arrangements isn’t even a flower – it’s a succulent plant, particularly the variety known as Echeveria.

    1-800 Flowers.com offers this new bi-color variety called devotion.  It’s stunning and the name makes it perfect for Valentine’s gifting!

    Not only do succulents look beautiful mixed with other fresh cut foliage and flowers, they last for weeks. In fact, after everything else in the bouquet has made it to the compost pile, your succulents will have started to produce new roots and can be replanted!  They are the flower that keeps on giving!

    There are a few ways that you can convert a cut succulent into a cut flower, and using wooden skewers is the easiest way and therefore my favorite way.

    HOW TO:

    Remove the succulent from the pot.

    Remove the stem at the base of the flower.

    Insert the pointed end of a wood skewer into the base of the plant.

    Add your new succulent flower to your bouquet or arrangement!

    I used to preserve the root and stem so that I could replant the succulent after the flowers have passed their prime.  However, I find that the plants that I cut the stem from last just as long and develop new roots.  That’s why in most cases I just use a skewer.

    Remove most of the dirt from the roots.

    Cover the roots with a small piece of plastic and add wire or a stick such as a skewer.

    Wrap the roots and wire or stick with green floral tape to cover your mechanics.

    And again, just insert your cut flowers into your bouquet of fresh cut flowers and other foliage, for a modern and unique look.

    What could be a better addition to a pretty fresh cut flower bouquet for Valentine’s Day then an unexpected Hoya Heart cut succulent?  After enjoying your bouquet for a week or more you can replant the heart as an everlasting token of the love that you share!

    Exit mobile version