DIY Friendship Bracelet With Flower Beads

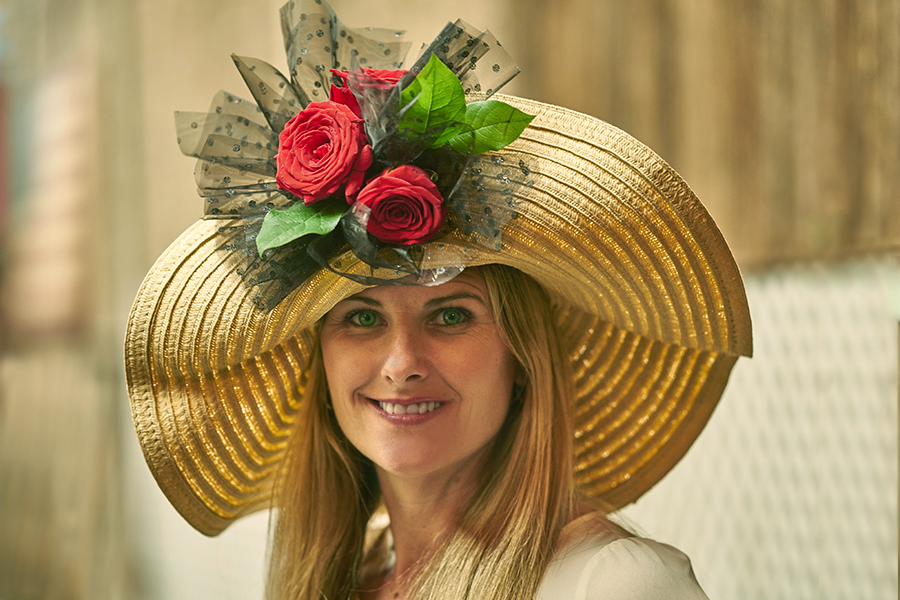
In honor of friends everywhere and Friendship Day, we decided to celebrate our BFFs with the timeless tradition of friendship bracelets. Consisting of a series of tied knots, friendship bracelets represent the strong and unbroken bond between two friends…and they look pretty, too!

friendship-bracelet-final-image

Whether making a friendship bracelet as a gift for your closest friend or organizing a party to make bracelets with a group of friends, the sentimental value of handmade bracelets is priceless. Just like every friend, each bracelet is unique and can be made to fit your bestie’s personality. So, take out your string and let’s get crafty with these easy-to-follow instructions!

Supplies needed to make a friendship bracelet

  • Embroidery floss
  • Scissors
  • Tape
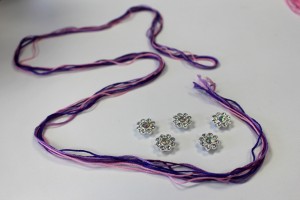
  • Flower beads (Make sure the holes of the beads are large enough.)
  • Flower for inspiration

Instructions for making a friendship bracelet

1. Choose bracelet colors your bestie will love

Decide which colors you want to use for your bracelet. For ours, we used pink, lavender, purple, and dark purple. The more strings you use, the wider the bracelet will be.

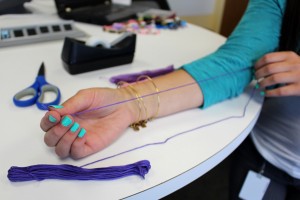
2. Measure and cut the string

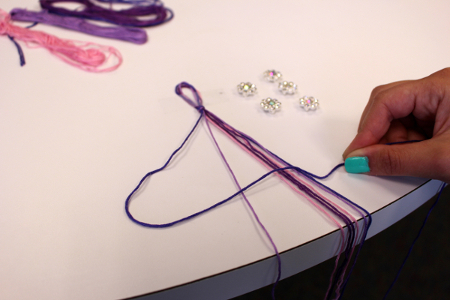
Measure out one string using your forearm as a guide, from your wrist to your elbow. If you are making the bracelet for your friend, consider the size of their wrist, and increase or decrease the size as needed. Cut the string to four times the length of your forearm, leaving a few extra inches for safe measure. (It is better to have more string than not enough.) Use your first cut string as a guide to measure the rest of your strings. All strings should be the same size. When you have finished cutting all your strings (we used four total, one for each color), place all the strings together and then fold your strings in half. This should leave you with two of each color.

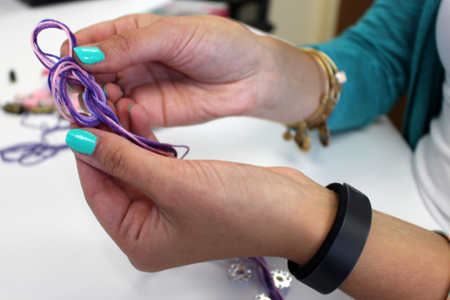
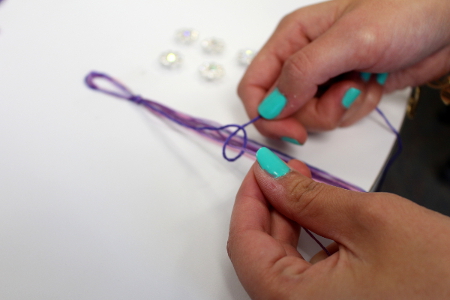
3. Create a loop and get started

After folding the strings in half, create a loop. Tie the loop into a knot.

friendship-bracelet-loop-knot

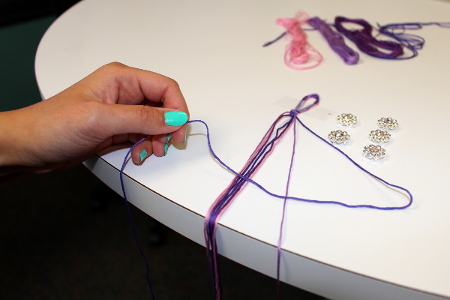
4. Create a sturdy and organized workplace

friendship-bracelet-setup

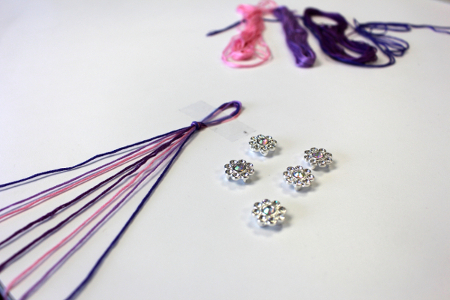
Tape your loop onto a flat working surface, such as a table. Spread out your strings so the colors are symmetrical.

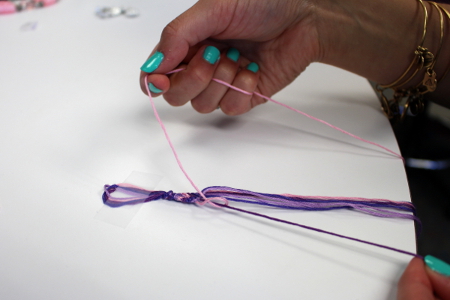
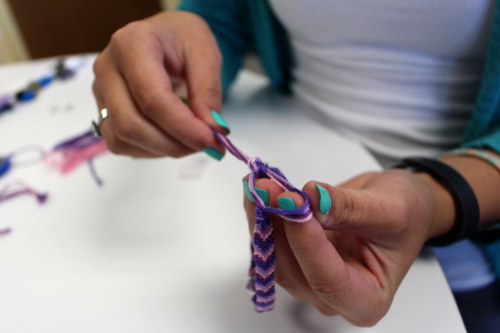
5. Master the forward knot

To make the chevron stitch “V” shape, start from your left side (stitched from left to right) until you reach the middle, then work from your right side (stitched from right to left). The right and left side of the “V” stitch is completed by tying the two middle strings together, which should be the same color. Start with the left outermost strand (we used dark purple) and make a forward knot by crossing it over the next string (to the right) in a “4” shape, and looping it under and through the opening.

Pull the string up to tighten the knot. Repeat this step again using the same string (in our case, dark purple). One stitch consists of two forward knots per string. Make two forward knots per string, until you reach the middle.

6. Master the backward knot

Once you’ve reached the middle of the row, move to the right outermost strand. Create a “backward knot” by crossing it over the strand to its left and forming a “P” shape. Loop the strand under and through the opening of the “P.” Do this for each string until you reach the middle.

Tie the two middle strands (which should be the same color) using either a forward or backward knot.

7. Repeat steps 5 & 6

friendship-bracelet-forward-knot-loop-pull

Continue doing forward knots on the left side, and backward knots on the right side, until you are halfway done with the bracelet. You can check if you are halfway done by measuring with your wrist.

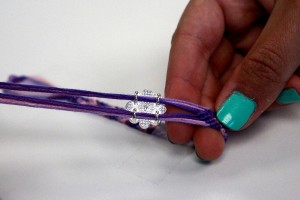
8. Add your flower beads

This step may vary depending on what type of beads you have, how many beads you use, and where you would like to place them. You will want to place all strings through the one bead, so make sure your bead holes are large enough.

9. Repeat steps 5 & 6

Repeat steps 4 and 5 to continue the rest of the bracelet until it fits around your (or your BFF’s) wrist.

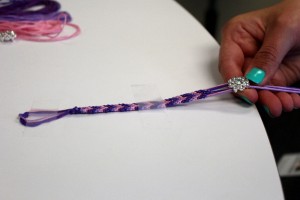
10. Complete your bracelet

Take the remainder of the string and neatly smooth it out into one large strand. Take the large strand of strings and tie it through the end of the loop to make it secure around your (or your friend’s) wrist.

friendship-bracelet-knot-finish

11. Gift your bracelet to your best friend

friendship-bracelet-completed

How to Make a DIY Kentucky Derby Hat with Flowers

If deep inside you there is a Southern belle just waiting to shine, then the Kentucky Derby is your chance to set her free with a standout statement hat. Even if you can’t make it to Churchill Downs, there are Kentucky Derby parties happening all across the country. If you don’t already have plans, then having the opportunity to strut your stuff like a lady is as good a reason as any to throw your own Derby party.

Kentucky Derby Flower Hat

You can have lots of fun creating your own unique DIY Kentucky Derby hat with a little creativity and very little money. In doing a little research, I learned that a wide brim is key. Not only will it keep the sun off your pretty face, but it adds drama. Adorning your hat with flowers, feathers, lace, or ribbon completes the look and is said to bring luck to gamblers at the race. As this headpiece is for the Kentucky Derby — also known as the Run for the Roses — I chose red roses as the centerpiece for my adornment, with a little black tulle, and finished it off with a daisy crown around the brim. After all, a girl wants to look good both coming and going!

DIY Kentucky Derby hat

Making a Kentucky Derby hat requires three main steps: constructing and attaching the black tulle pouf, adding the flowers, and making a daisy rim. Follow us as we walk you through these steps.

1. Attach the black tulle pouf

Supplies for Kentucky Derby Hat

I found the perfect wide brim hat at a local Goodwill store for just $8!

add-wire-to-hat-brim

I started by lifting one section of the brim and attaching it to the top of the hat using a piece of wire.

tulle-strip-sizes

I had the perfect piece of “scrap” tulle left over from a previous project that I cut into five strips approximately 20 inches long each.

Fold strip in half

I folded each strip in half…

Create Pouf with Tulle

…and twisted a wire around the middle to create a pouf.

cut-side-of-tulle

Then I cut the side of the tulle that was folded.

gather-poufs-of-tulle

Before gathering all the poufs of tulle together to make the decoration base that will hold the fresh roses…

Hold pieces of tulle together with wire

…I cut one piece of the wire, leaving a single length to work with.

Attach tulle to hat

This helps keep the decoration lighter in weight and makes it easier to attach to the hat.

Tulle Pouf on Hat

2. Add fresh flowers

Now it’s time to add the beautiful red roses. The easiest way to add the roses is with hot glue.

Dipping Flowers in Hot Glue

Cut the stem of the rose very short and dip the base into a hot glue pan. Or, if you prefer using a glue gun, just dab the glue onto the bottom of the base.

place-rose-in-center-of-pouf

Immediately place the rose in the center of your tulle pouf.

Finished Kentucky Derby Hat with Flowers

I added two more roses and completed the look with a few stems of salal leaves.

Dip foliage in hot glue

Add the foliage the same way, by dipping the end of the stem into the hot glue and adding to the tulle base.

flowers-on-kentucky-derby-hat-roses-leaves-pouf

And that’s it! Remember, you’ll be wearing this hat, so you’ll want to keep your decorations as light as possible so that you’re comfortable in your beautiful new chapeau.

If you find that you have a few strands of “glue strings,” you can easily remove them by quickly going over the area with a hairdryer set on the lowest setting.

3. Make a daisy rim

Kentucky Derby Daisy Brim Side View

Adding the daisies around the brim of the hat is just as easy.

Hot Glue Daisy Flowers

Cut the stems from your daisies. Using a piece of wire that’s 4 inches longer than the length you’ll need to cover the crown of the hat, insert one end of the wire through the base (also know as the receptacle) of the daisy. Slide each daisy to the end of the wire and continue adding as many daisies as needed for your hat.

Glue flowers onto brim of hat

Attach to the hat using the ends of the wire.

kentucky-derby-flower-hat-selfie

You are now selfie ready. It’s time to party!

Tulips For Your Table

Arranging Tulips For Your Table

Tabletop tips for tulip decorations

Sometimes inspiration starts with just a sprinkle of an idea, or some beautiful linens, or heirloom china. Sometimes it’s the season or the special occasion. For me, more often than not, it starts with the flowers…in this case, tulips! My tulips are so bright, fresh, and colorful, you can almost hear them say “Look at me!” so I kept everything else neutral and organic.

Using a burlap table runner instead of a full tablecloth keeps most of the warm wood of the farm table exposed, adding to the rustic feel.

tulip decorations with burlap Table Runner with Tulip Arrangement Centerpiece

Mix & match

I have so many pieces that I have collected over the years, and I use them all the time in different ways. Green Depression glass has just the right amount of color — it’s there but in a soft, gentle way.

tulip decorations with Green Depression Glass

Save the scraps

Small scraps of burlap from a previous project provided just the right touch for these tulip decorations, cradling the crisp white cotton napkin.

tulip decorations with Wired Ribbon Napkin Ring with Burlap and Tulip

Wired ribbon is so easy to use. Just a small piece is all that’s needed to “tie it all together” for each place setting.

tulip decorations with Burlap and Tulip Napkin Holder

Painted Flowers

Painted flowers have become extremely popular of late. There are basically two different methods for painting flowers: stem dying and surface painting. One of the most popular is the stem-dyed, multi-colored rose, also referred to as rainbow, tie dyed, or kaleidoscope roses.

This method, used to achieve a multi-colored rose, is one of the more complicated processes, but the results are stunning. While the flower growers at 1-800-Flowers.com have this process down to a science, it’s also a fun project to try on your own. This was actually the first time I tried it myself, and it was so interesting to see how the petals on each rose accepted the various dyes a little differently, creating a bouquet of roses that is as unique as it is beautiful.

Stem-dyed roses

painted flowers with Stem Dyed Rose

Supplies for stem-dyed roses

painted flowers with Ingredients for Stem Dyed Flowers
  • White roses
  • Stem dye for cut flowers (three different colors)
  • Three plastic cups
  • Sharp knife
  • Large container big enough to hold the three plastic cups

Instructions

  1. Choose white roses that have already begun to bloom and are slightly open. For best results, store your roses out of water and on a shelf in a cooler or cool location overnight.
painted flowers with White Roses for Stem Dying
  1. Remove all foliage from the stem of each rose.
  1. Cut the ends of the stems so that they are as long as you’ll want them to be in your vase. The shorter the stem length, the easier the process will be.
painted flowers with Stem Dying- Splitting the Stem
  1. Place each rose on a flat surface and split the bottom of the stem into three sections (one for each color) using a sharp knife. The split sections should be at least 3 inches in length.
painted flowers with Mixing Color for Stem Dye
  1. Fill three plastic cups with water and add the flower stem dye according to the package directions.
painted flowers with Put Split Roses into Dye
  1. Insert the roses with the split stems one by one into the cups of dye, making sure each section of the stem goes into a different color. (I found it easier, and safer, to put the each cup of dye into a larger container before adding the rose stems.) For added security, I wrapped a pipe cleaner or chenille stem around all the rose stems and taped the ends of the pipe cleaner to the outer vase. If your roses are shorter, then you probably won’t need to do this.
  1. Keep the roses in the dye for 30-60 minutes.
painted flowers with Tie Dye Rose Bouquet
  1. Remove roses from the dye, rinse off the bottom of the stems, and place them in a container with clean room temperature water, and allow to hydrate for 24 hours.
Complete Tie Dye Rose Bouquet

The rose is now completely hydrated, the dye has reached the rose petals, and your rose has been transformed into a beautiful technicolor spectacular!

Surface painting fresh flowers

Spray painting is the easiest way to change the color of most varieties of fresh cut flowers. There are different brands of paint available, as well as various types of paint. There are also a few different methods of painting.

I used paint from Design Master, which has a great site with all kinds of information and inspiration that I recommend checking out.

Exploding firecracker flowers

painted flowers with Firecracker Mums

Decorate your next summer soirée with exploding fireworks! All you need are:

  • White spider mums
  • Red and blue floral spray paint
  • Small piece of cardboard
  • Exacto or sharp knife
  • Newspaper, craft, or any scrap paper
  • Latex gloves (optional)

If you don’t have latex gloves available, you can insert the stem of the spider mum through the center of a piece of scrap paper to protect yourself from getting painted, along with the flower!

Before starting, make sure to read the directions on the paint can. Believe it or not, there are people (like me) who don’t always bother reading the directions…not smart!

Air brushing technique

You can simply spray various spots of the spider mum using the red and blue paint, or, if you want a particular pattern, you can create a template with a small piece of cardboard.

painted flowers with Flower Surface Air Brush Painting

For the “target” effect I was going for, I first cut a small hole the size of a quarter in the center of a square of cardboard that is slightly larger than the spider mum.

painted flowers with Step 3 Spray Red Paint Onto Flower

Put the circle to the side (for later use), place the square template with the circle opening over the mum, and spray into the center hole with the red paint.

painted flowers with Cut Larger Hole in Cardboard

Make a second template using the same size square of cardboard (approximately 5 inches) cutting out a larger circle this time, about 3 inches.

Place the new template with the larger circle opening on top of the same mum and place the smaller circle from the first template over the red center you just painted. You’ll now have a “donut” showing through the template that you can spray using the blue paint.

Tipping technique

With tipping, you are only applying the paint to the end or tips of the petals. I recommend wearing a glove for this method.

painted flowers with Tipping Method Painted Flowers Step 1

Hold the head of the spider mum in one hand, cupping it so the petals close in toward the center. Don’t hold them too tight or you won’t have enough petal surface to apply the paint.

painted flowers with Tipping Method Painted Flowers Step 2

Turn your hand so that you’re also applying the paint to the back of the petals to add more impact.

painted flowers with Spray back of petals

Release the flower and look at it to see if you are satisfied with the effect and amount of coverage. If you want more color, simply repeat the process, holding the flower a bit looser and more open this time.

painted flowers with Open up painted flower

Misting

With the misting technique, you apply a light coat of paint over the entire surface of the flower. Hold the can 15 to 18 inches away from the flower. You can repeat this process a few times, depending on the depth of color you want. It’s amazing how realistic the color looks on fresh flowers, and you can choose whatever color flower you want — whether nature created it or not!

Both methods, stem and surface painting, and all the techniques outlined here, are fun and easy to do, and look great alone or combined within one arrangement.

How to Decorate a Graduation Cap with a DIY Flower Crown

From music festivals to spring picnics, floral crowns are everywhere you look. Now, you can take this popular hair accessory and add it to your graduation cap with a few simple steps.

We found that using fresh flowers versus artificial flowers works best as fresh flowers not only stand out but also give off an intoxicating scent. The flowers we used come from the Floral Embrace bouquet, part of the 1-800-Flowers.com graduation flowers collection.

Materials needed to make DIY flower crown graduation cap

diy-floral-crown-graduation-cap-decoration_supplies
  • Graduation cap
  • Flowers
  • Floral wire
  • Floral tape
  • Scissors
  • Glue gun (optional)

Instructions

graduation cap with decoration wrap
  1. Take your spool of floral wire and wrap the wire twice around the rim of the graduation cap. Cut the piece off, and wrap the ends of the floral wire around the frame shape to secure.
graduation cap with decoration tape

2. Take your flowers and remove most of the stem, leaving about 2-3 inches. Align your flowers on the crown as you want them to look, and wrap the floral tape around the stems and tape to secure.

graduation cap with graduate wearing diy floral crown graduation cap

3. Slip the DIY floral crown over the graduation cap. The crown should stay in place, but if you wish to secure it, you can glue the crown to the cap.

How to Decorate a Graduation Cap with Flowers

Graduation is a special day, and one way to stand out from the crowd is by adding your own personal flair to your grad cap! Here is an easy yet stunning graduation cap decoration idea using artificial flowers and hot glue.

Choose flower varieties and colors that represent your personality. For example, sunflowers represent a sunny and jolly disposition, while lilies are a wonderful choice for someone looking for a softer, more delicate touch. Choose two types of flowers in varying sizes for a visually impressive arrangement. As artificial flowers come in shapes and shades not necessarily found in nature, you can really get creative with the layout and design.

how to decorate a graduation cap with diy grad cap

We used 3D puff paints to personalize the DIY graduation cap decorating, but you can also use glitter pens or 3D fabric markers. Additionally, rather than writing your name, you can personalize the grad cap with a favorite quote, message, or simply your class year (“Class of ___”).

Supplies needed for decorating a graduation cap with flowers

  • Graduation cap
  • Artificial flowers
  • Glue gun
  • Glue
  • 3D paint or similar

Directions for decorating a graduation cap with flowers

how to decorate a graduation cap with flowers cut
  1. Prepare your artificial flowers by cutting off any stems or unnecessary plastic parts that may get in the way of securing them to the graduation cap.
how to decorate a graduation cap with applying flowers to cap with hot glue
  1. Position the flowers on the cap where you want them. Use the hot glue gun to add glue to the bottom of a flower and press it onto the graduation cap, holding it down for 3-4 seconds to secure. Continue doing this until all the flowers are glued down and the glue is dried.
  1. Once the flowers are secured, use the paint to write your name or message of your choice. Let it dry for a few minutes.

Now, your graduation cap is ready to show off and dazzle!

DIY Manischewitz Passover Centerpiece with Purple Flowers

Set the scene for your Passover seder and celebrations with a creative twist on your décor! Taking inspiration from Passover’s most popular wine — Manischewitz — we came up with this creative Passover centerpiece that will add a fun and festive touch to your spread.

passover centerpiece

To celebrate the vino’s robust purple color, we paired a stunning bouquet of purple flowers with an empty bottle of the wine and some juicy dark purple grapes. This centerpiece is simple to make and takes little to no time at all. Throw these together about an hour or two before guests arrive — that way, you can empty the bottles by filling their wine glasses. Or, pour the wine into mason jars and place them in the fridge to chill.

Tip: Make several of these creative arrangements and spread them around the table for a “pop” of fun!

passover centerpiece supplies

Supplies for Manischewitz Passover centerpiece

  • 1 bottle of Manischewitz
  • Purple flowers
  • Purple grapes
  • Matzo
  • Scissors and ruler (optional)

Directions for Manischewitz Passover centerpiece

  1. Prepare your Manischewitz bottle vase by washing out any wine residue from the inside.
  2. Fill the bottle with water and arrange the flowers to your liking. You may need to trim the stems to fit your vessel.
  3. Place your bottle with flowers on top of a stack of matzo, and then arrange the grapes around it for a finishing touch. We recommended you wash (and fully dry) the grapes beforehand in case guests find them irresistible to eat!

Happy Pesach!

DIY Hanukkah Decorations: How to Make a Floral Hanukkah Centerpiece with Dreidels

DIY Hanukkah centerpiece with dreidels and flowers in a vase.

The menorah may be the star of the show, but it is only one of many Hanukkah decorations. Add a simple festive touch to your décor with a DIY Hanukkah centerpiece or accent for your tables with a dreidel-filled vase for your Hanukkah flowers.

We stuck with metallic blue and silver dreidels for a chic and sophisticated vibe, but you can choose dreidels in vibrant colors for a playful look or classic wooden ones for a traditional touch.

Supplies needed

  • Hanukkah flowers
  • 2 similarly shaped vases: 1 large, 1 small
  • Dreidels (40-60, depending on size of vase)
  • Water
  • Floral shears

How to make the Hanukkah centerpiece

  1. Prepare your smaller vase by filling it with water and arranging your flowers how you see fit.
Hanukkah centerpiece with a vase of flowers.
  1. Carefully place the smaller vase inside the larger vase.
Hanukkah centerpiece with a vase full of dreidels and flowers.
  1. Slowly fill the larger vase with dreidels until you are satisfied with how it looks.

We tried this with both square and circular vases, and both looked absolutely stunning!

Make several and place them throughout the room for a beautifully unified look that will also add a sweet scent to your home.

DIY Thanksgiving Craft Ideas the Entire Family Will Gobble Up

Thanksgiving is a time of food, fun, and of course ― family! Get the whole gang excited for the season by spending time crafting some DIY Thanksgiving crafts together.

The best part? Many of these can be used for your Thanksgiving decorating and parties, roll up those sleeves and get ready for some fun and festive crafting!

Fall flower- & foliage-inspired DIY Thanksgiving crafts

thanksgiving crafts with diy autumn leaf table runner

Fall leaves become a wow-worthy table runner with a few simple steps! This DIY autumn leaf table runner craft is a perfect touch to a Thanksgiving spread, or just for adding a sprinkling of the season to your home décor.

thanksgiving crafts with diy flower pumpkins

Turn those fall pumpkins into stunning statement pieces with some fresh flowers and a glue gun. This craft is so easy to do and can be altered to fit your party scheme or home décor. Get the how-to for these flower pumpkins!

thanksgiving crafts sunflower votive

Add some dazzle to your décor with DIY sunflower votives! Perfect for sprinkling throughout your home for a lovely fall touch or for creating an intimate feel at your Thanksgiving celebration.

thanksgiving crafts with diy thanksgiving pumpkin vase

Create a festive and fresh vase to show off your fall flowers with this DIY pumpkin vase from Celebrations.com! Be sure to hold on to your seeds while gutting for the perfect fall snack. Let’s hope this pumpkin doesn’t turn into a carriage at midnight!

thanksgiving crafts with diy glitter leaves garland

Add some dazzle to your decor with this DIY glitter leaf garland craft! This idea is chic and on-trend, sure to put you in the running for host or hostess of the year.

DIY Thanksgiving crafts for kids

thanksgiving crafts with thanksgiving potted plant turkey craft

With a bit of creativity and craftiness, children can turn a regular DIY potted plant into a fun and festive gobbler! Get the how-to for this Thanksgiving turkey craft and watch as a fall plant blooms into something truly unique.

thanksgiving crafts with diy fall leaf vase

Turn any flower arrangement into a wow-worthy Thanksgiving decoration with this DIY fall leaf vase idea! This craft idea is so simple to recreate, making it a great way to get the kids involved with Thanksgiving decorating.

Exit mobile version