Creative Ways to Display ‘Santa and Me’ Photos This Christmas

diy photo display Santa and Me Photo Display

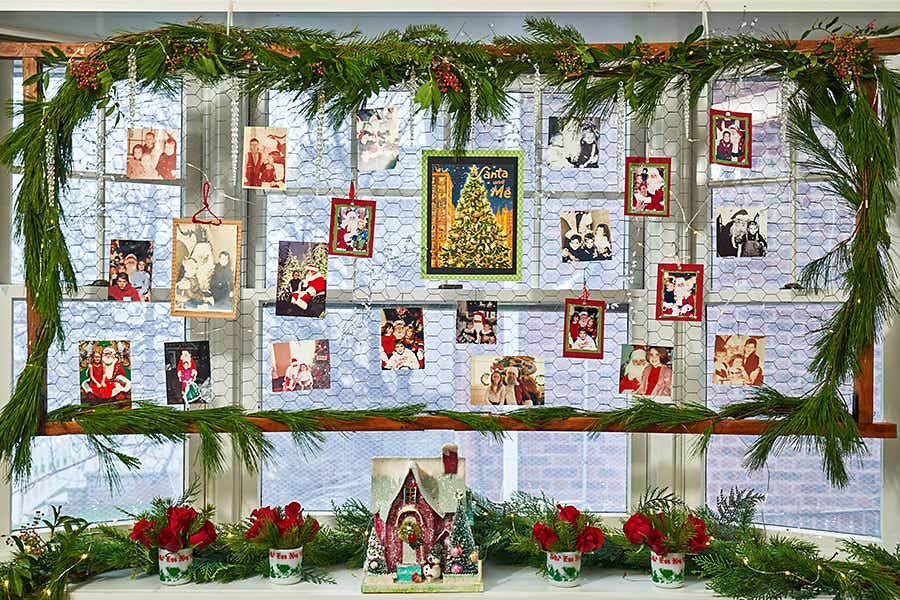
In my home, Christmas decorating is about honoring the past in the most creative of ways. My latest project was a “Santa and Me” DIY photo display that was fun and easy to make. Below I share step-by-step instructions so you can create your own beautiful display to warm hearts and light up the holiday season!

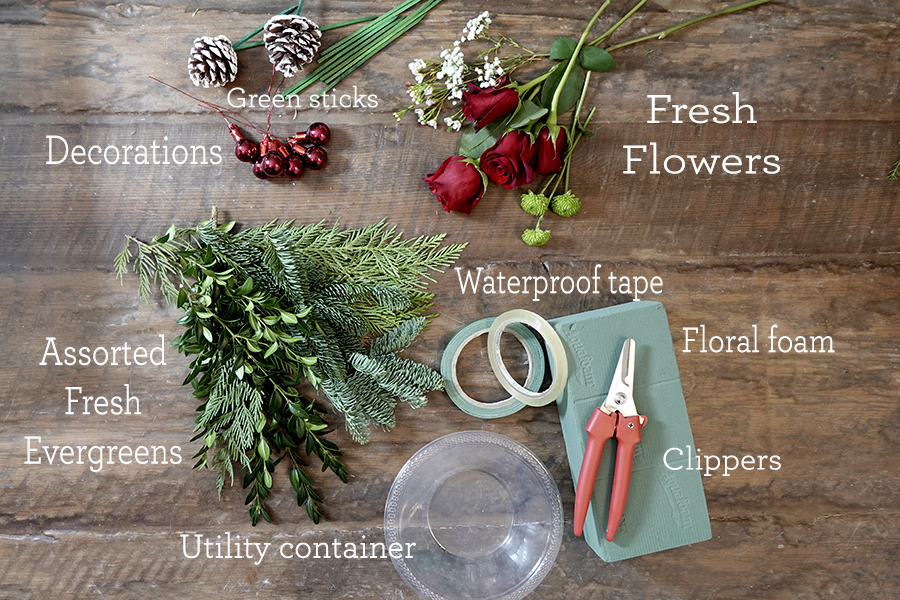
What you’ll need to create your own holiday DIY photo display 

For  me, it all started with an old room divider I found in a barn sale a few years ago. Originally, I bought it to use in the décor for my daughter’s wedding, thinking it would be great for displaying all our family wedding photos.  

Wire on panel

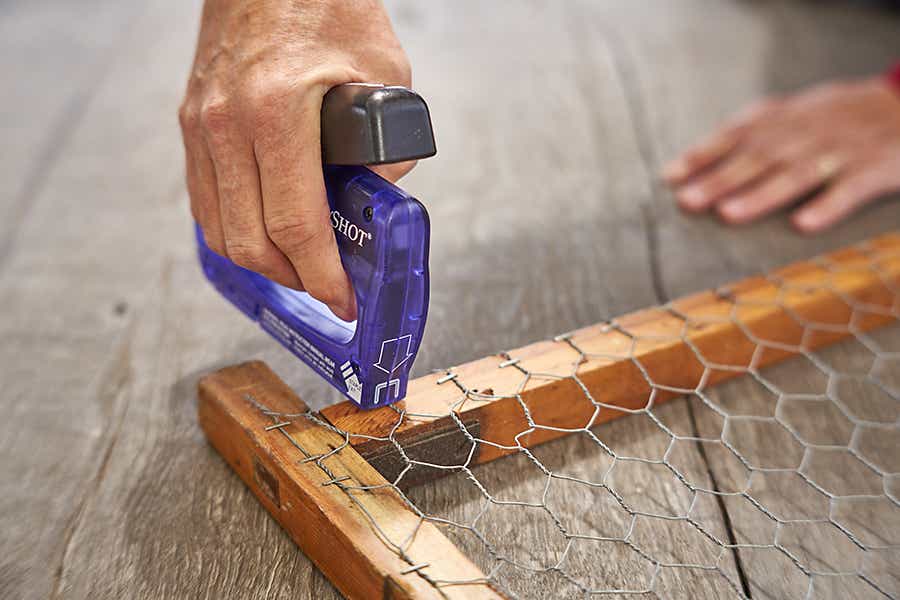
To begin, I ripped off the old fabric on each frame. Next, I attached chicken wire to the back of each panel using a staple gun.  

Staple gun and zip ties

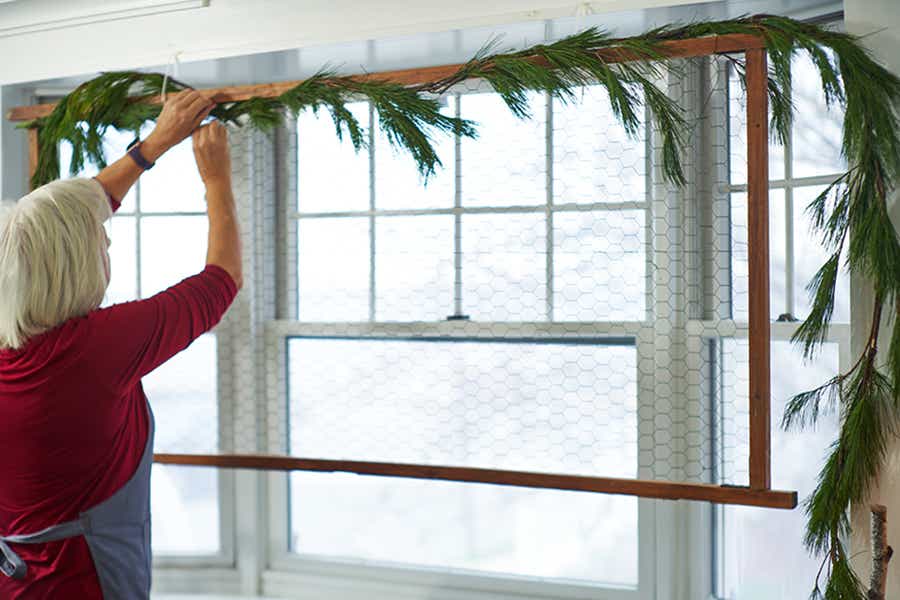
Fortunately, I have a bay window that the panel fit perfectly into when hung horizontally. Because it’s so lightweight, I was able to hang it using zip ties and a staple gun. 

Staple gun and molding

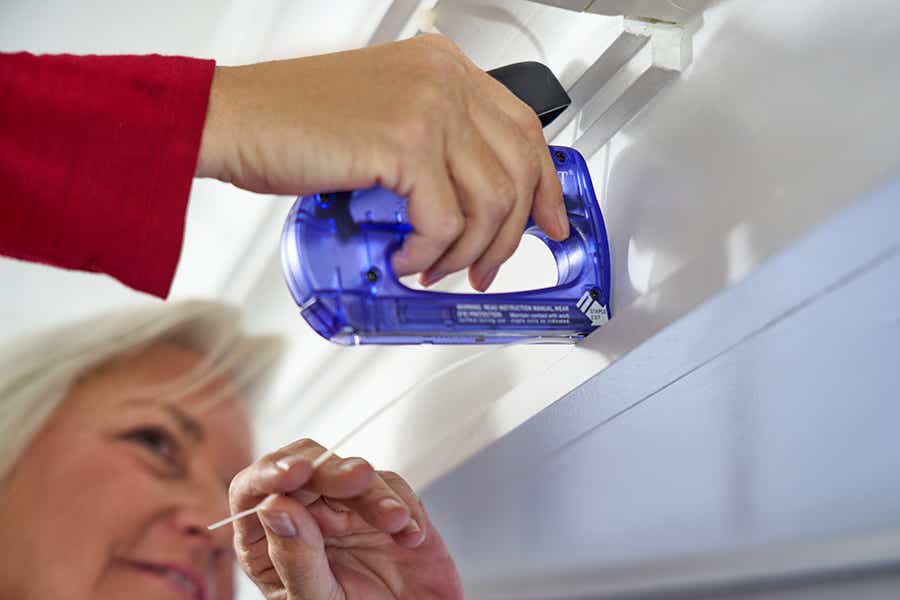
To start this process, I stapled one zip tie into a piece of molding.  

diy photo display Screen

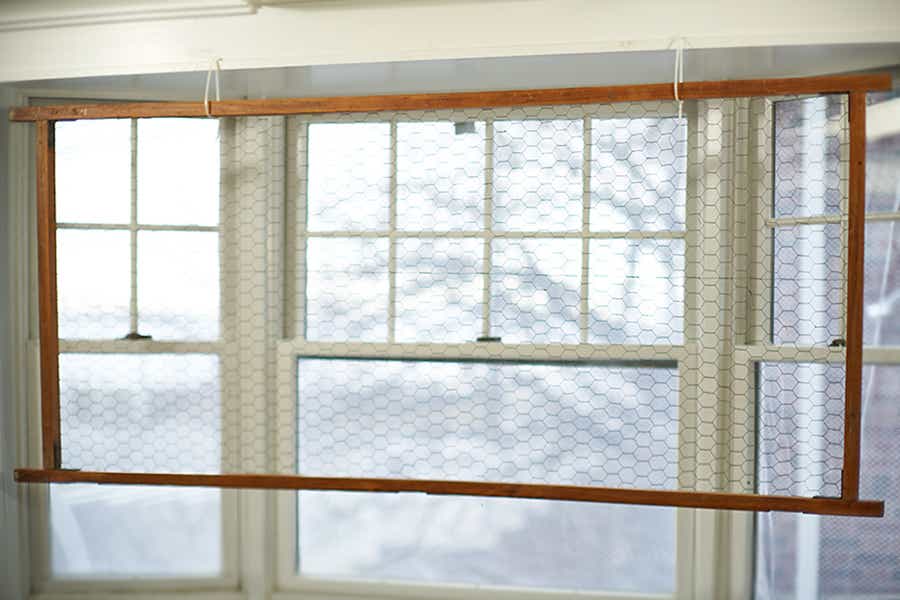
Then, I added another zip tie, and then attached the screen.   

To get a better glimpse of how easy the process is, check out the video below!

Easy Christmas DIY: Santa & Me Photo Display

Now for the fun part… 

Decorating your holiday photo display 

There are so many little details that go into taking this idea from drab to fab. 

Pine roping with tools

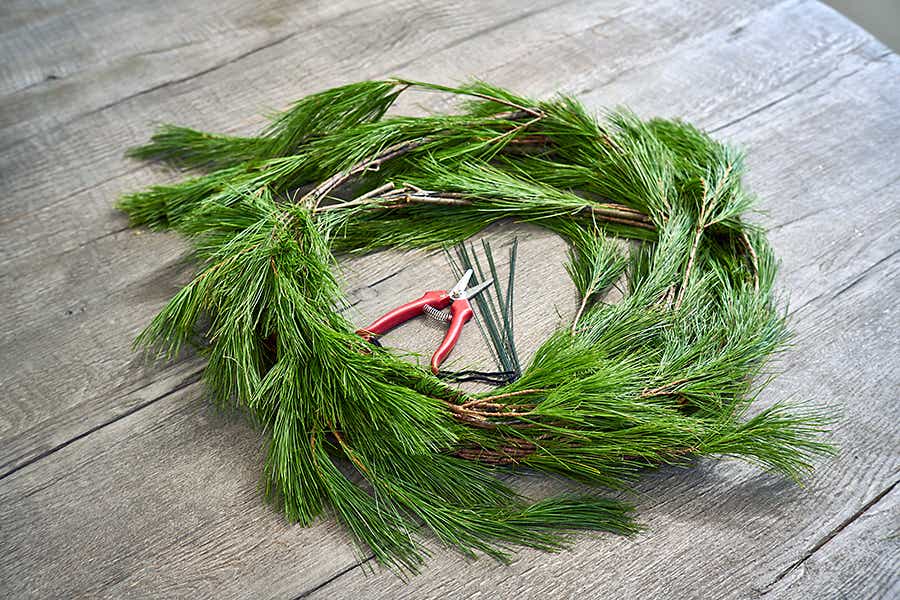
For a festive look, you’ll need white pine roping, or garland.

diy photo display Pine roping

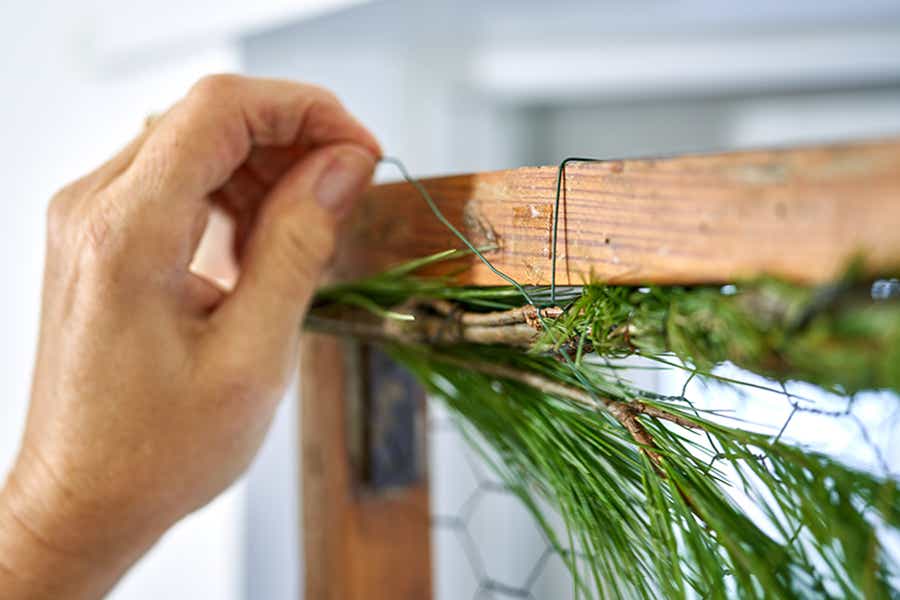
Next, you’ll attach it to the frame with pieces of wire. 

Twisting wire

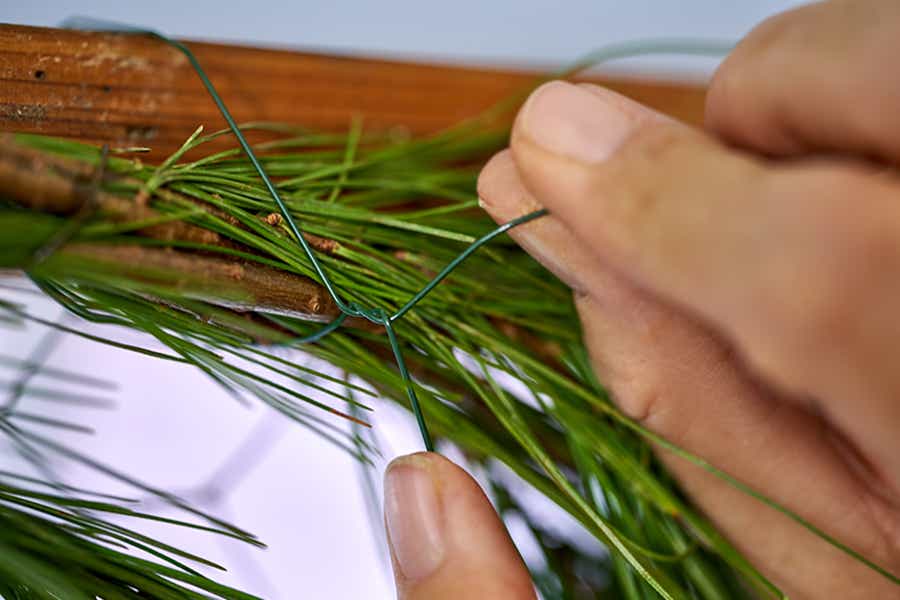
Just a few twists will hold it in place.  

diy photo display Pine rope around frame

Continue attaching the pine roping all around the frame.    

Winter greenery

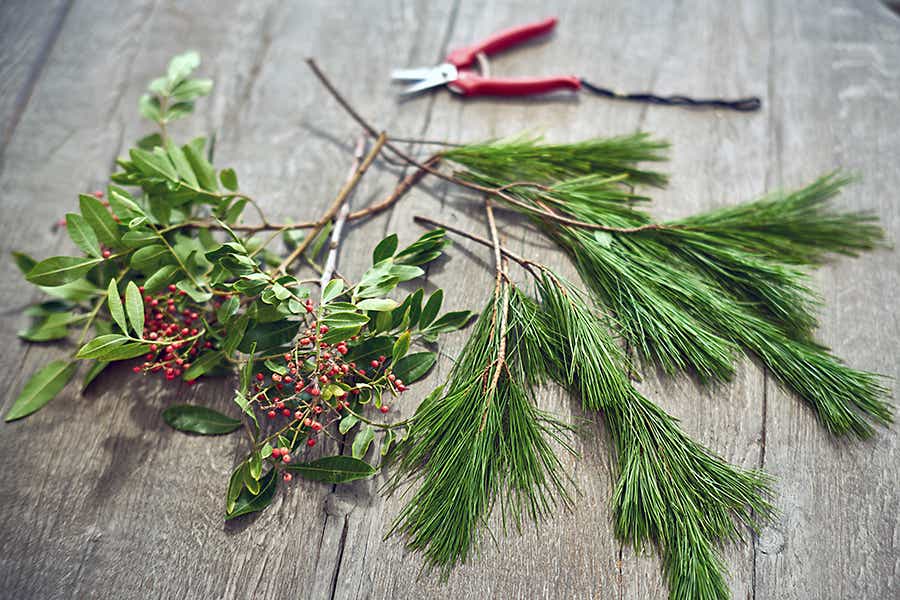
Remember to make it yours! You can add additional sprigs of pine as well as other winter greenery, such as pepper berry and balsam, or fir. 

diy photo display Garland on frame

Just insert the short pieces between the pieces of garland already attached to the frame. 

diy photo display Berries in garland


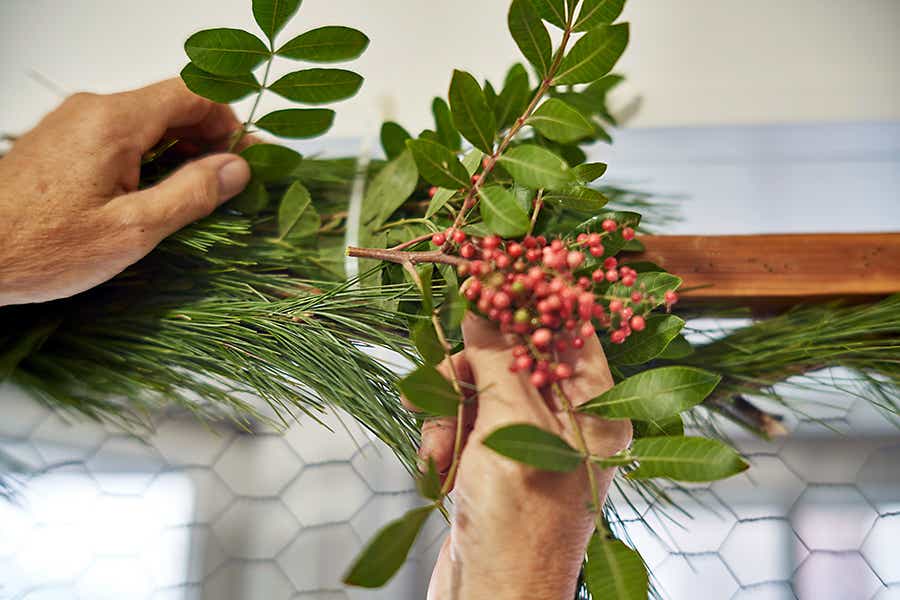
I like using pieces of pepper berry because they add a nice pop of color and texture.  

Christmas cards

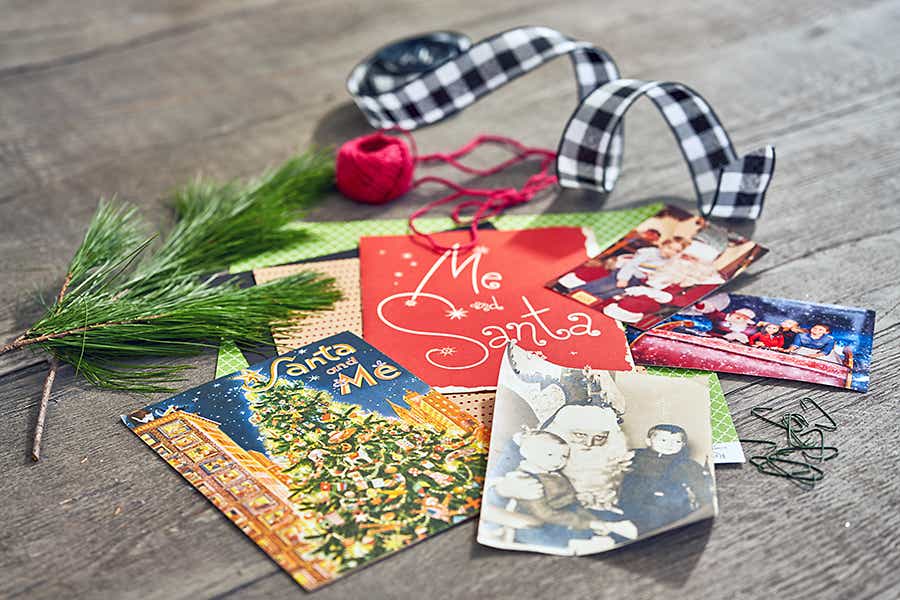
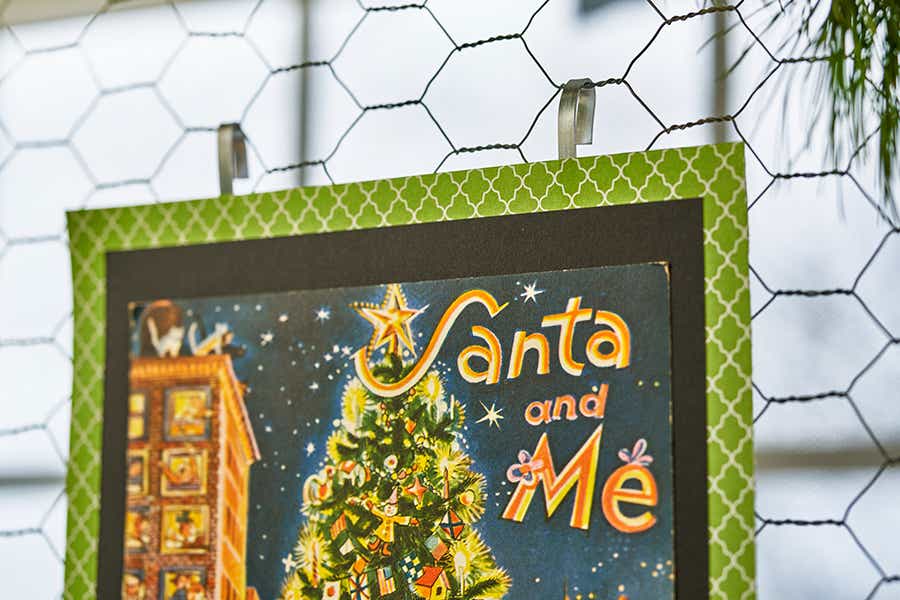
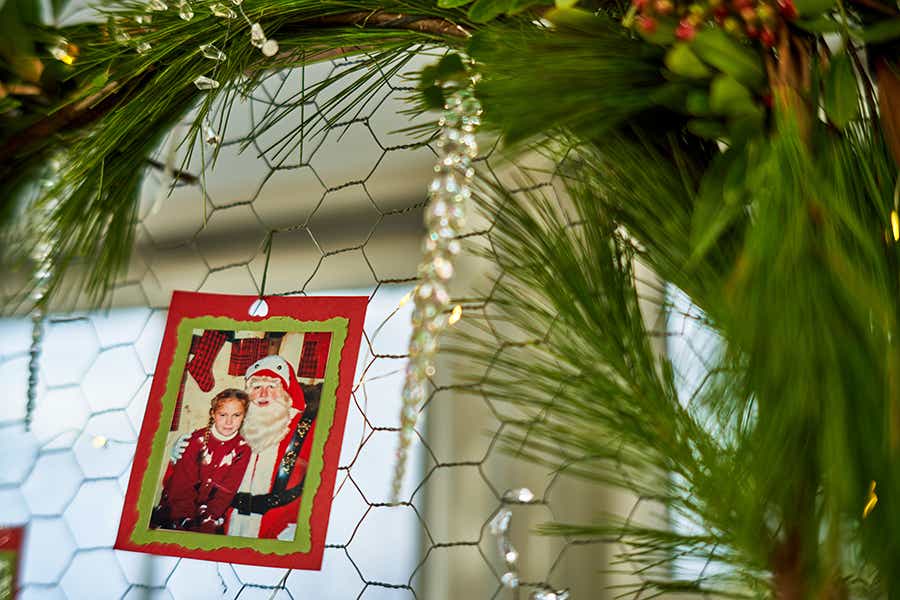
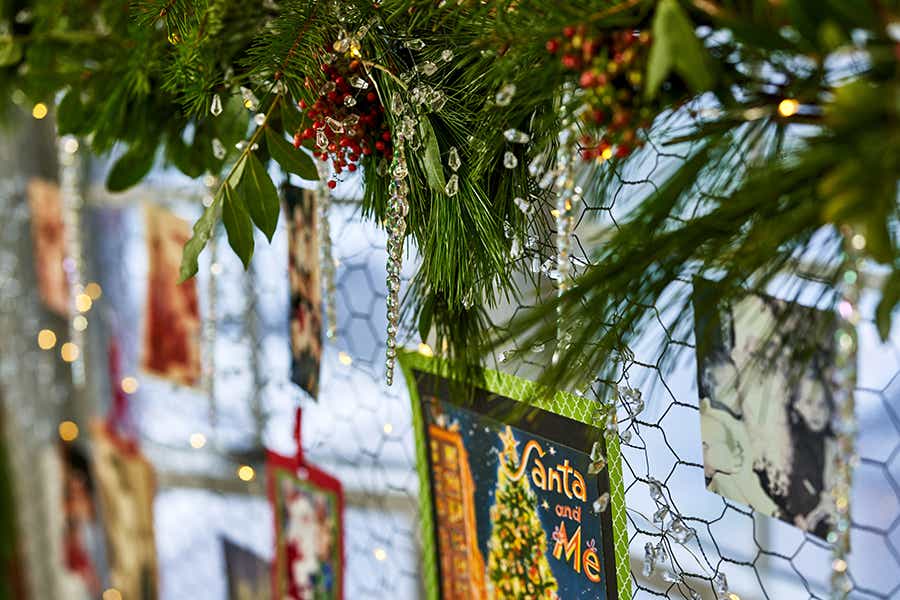
Now for the sentimental value. Gather your family’s “Santa and Me” photos that you have saved all these years.  I even have some of the original card holders that came with the photos back in the day! You’ll need some ornament hooks, but holiday-themed papers and ribbons are nice too. You can do as much or as little crafting with the photos as you want.

diy photo display Hanging Christmas card

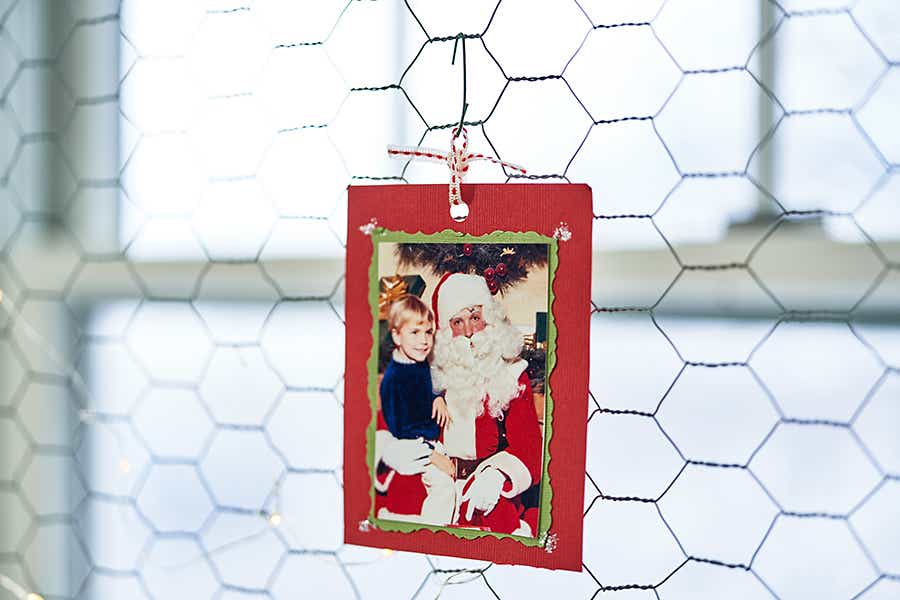
I started attaching each photo to cardstock, decorating it, and using a hole puncher and ribbon before hanging with the ornament hook. After a while, I simply started sticking the ornament hook right through the photo and hanging it up. 

diy photo display Santa and me card

I used larger width bendable wire, cut to size, and glued it to the back of the vintage “Santa and Me” photo holder.  

diy photo display Twinkle lights

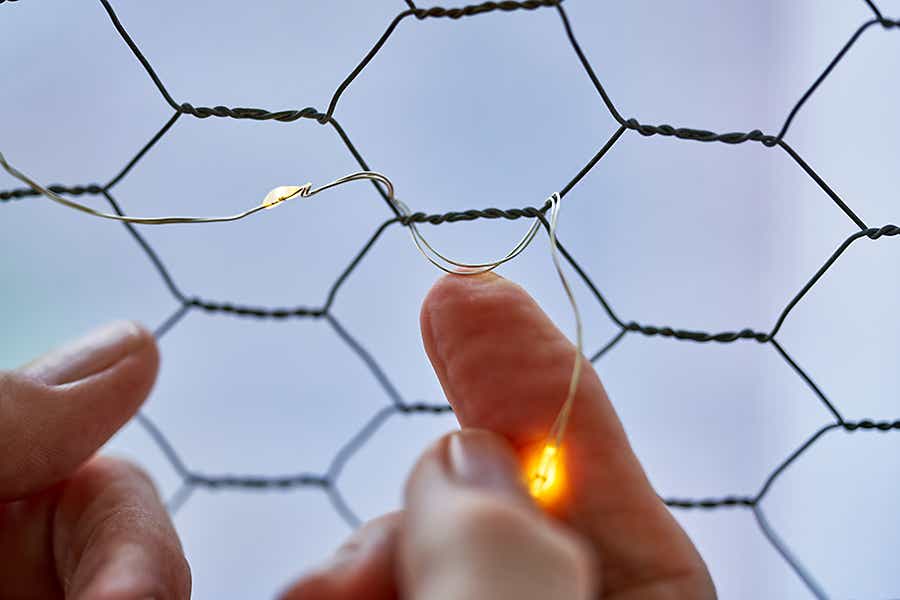
The only other decorations I on my display are small battery-operated twinkle lights and clear crystal acrylic pieces.  

diy photo display Attaching twinkle lights

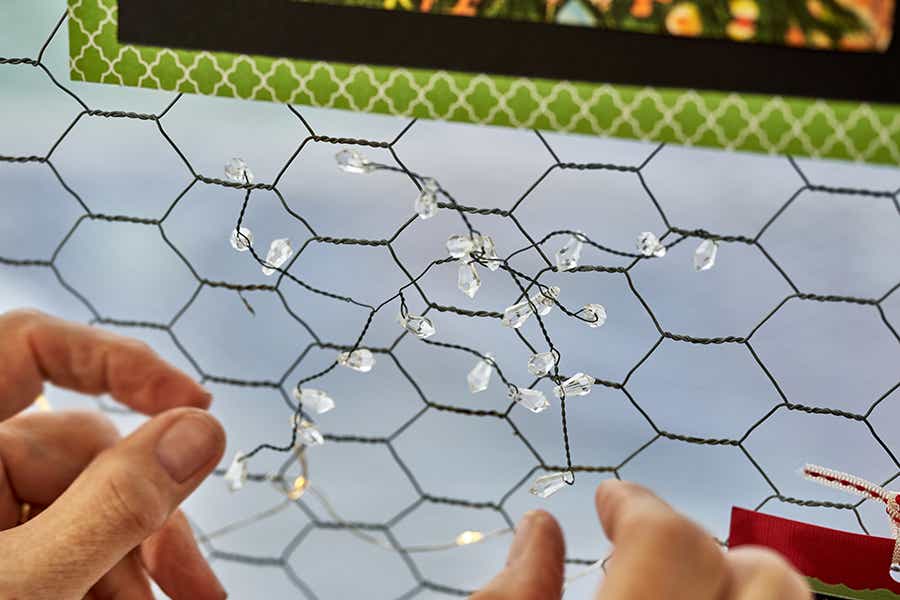
It’s easy to attach these wired elements by just pinching the wire and wrapping it around a piece of the chicken wire base.  

Acrylic icicle

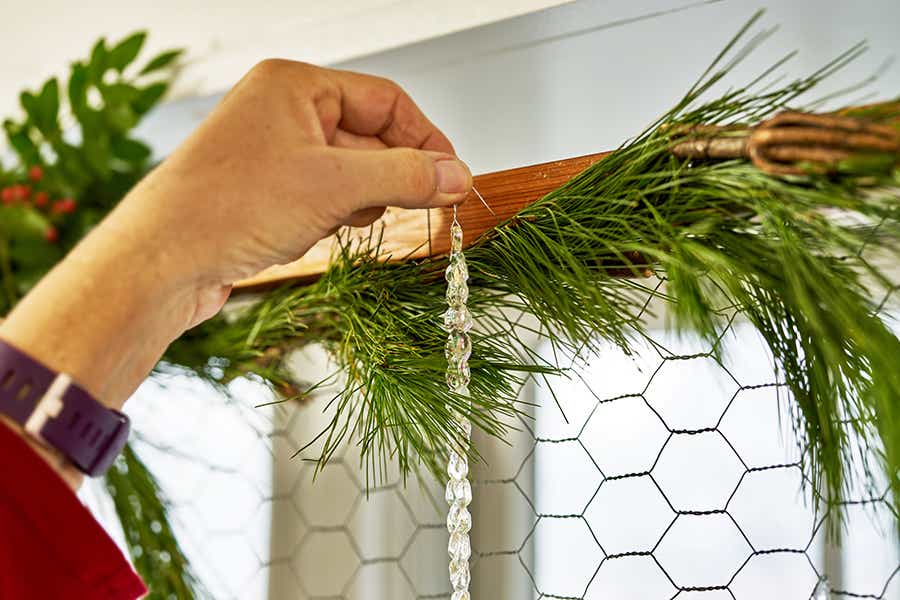
For a fresh wintry look, use ornament hooks or small pieces of wire to hang acrylic icicles across the top of the frame.  

Hanging card

I love the effect you get by adding just a little bit of sparkle.

diy photo display with Hanging Christmas photos

The acrylic icicles add a whimsical, twinkling, charm while keeping everything light and airy.  During the day, the sun shines through, and when the sun sets and the lights come on, it’s magical!

The best part is that you get to enjoy your Christmas memories and are able to share them with all your friends and family during holiday visits. I have photos from my childhood and my husband’s childhood, my children’s visits with Santa through the years, and now my grandkids’ too! As a matter of fact, check out the one of me and my brother, Jim McCann.  Who knew that Jim would one day start a business that would help people connect with all the important people in their lives, not just at Christmas but every day! 

4th of July Crafts: DIY Red, White, & Blue Vases and Table Decoration

Fourth of July celebrations (and decorations) are the best! Whether you’re celebrating America’s birthday with friends and family on the beach or in your backyard, here are some fun DIY floral 4th of July craft ideas to add little patriotic touches of red, white, and blue to your party.

4th of July craft No. 1: Mason jar American flag vase

4th of july crafts with american flag vases

Is there anything you can’t do with a few mason jars? I took three small, clear mason jars and painted them in a stars and stripes tribute to Old Glory. One stem of blue hydrangea in each, and you have a beautiful, fun, inexpensive centerpiece. You could paint a couple more while you’re at it and use them to hold cutlery or straws, or even tea lights, creating a festive look for evening festivities.

What you need

  • Clear mason jars
  • White acrylic spray paint
  • Blue and red acrylic paint
  • Paintbrushes
  • Rubber bands
  • Paper
  • Pencils
  • Scissors

Instructions

4th of july crafts with mason jars spraypainted
  1. In a well-ventilated space, spray paint ONLY the OUTSIDE of your mason jars and let dry thoroughly.
4th of july crafts with drawing stars on mason jar
  1. Using a pencil, draw stars all around the outside of one of the mason jars. You can do this free hand or make a template with a piece of paper first.
4th of july crafts with painting mason jar blue
  1. Paint the rest of the mason jar around the stars with blue paint. Remember, this is not a piece of fine art — it’s a craft project, and imperfections should be embraced!
4th of july crafts with painting red stripes
  1. Use rubber bands to create guidelines for painting red stripes on the other two mason jars.
  2. As soon as the paint is dry, fill with water and add your flowers.

4th of July craft No. 2: Upcycled glass bottles with red, white, & blue flowers

4th of july crafts with glass bottles with red, white, & blue flowers

I picked up all three of these blue and red bottles for under $5. The finishing touch is the U.S.A. hangtags I made using small blackboard hangtags and chalkboard markers. Tie each one around the neck of the bottle with a thin, coordinating ribbon, such as the red and white striped one shown here.

But what I really love are these firework flowers. Don’t the spider mums look like fireworks exploding in the night sky?!

4th of july crafts with red, white and blue spier mums

Look how fabulous they look in a simple galvanized French flower pail. What a perfect arrangement for a summer July 4th celebration!

4th of July craft No. 3: Red, white, & blue mini flag garland table decoration

4th of july crafts with DIY red, white, & blue mini flag garland table decoration

This is an all-out, spare-no-expense WOW of a Fourth of July floral arrangement. As beautiful as the red, white, and blue roses, blue hydrangea, and firework spider mums look in the oversized red enamel container, the mini flag garland really makes it pop!

What you need

4th of july crafts with flag garland supplies
  • Decorative paper (Use at least three different patterns all in the same color way; in this case, I used red, white, and blue.)
  • Ribbon (I used red)
  • Scissors
  • Glue (two-sided tape, adhesives tape runner, glue dots, etc.)
  • Sticks or wires to hold the garland above your arrangement

Instructions

  1. Measure a piece of ribbon to the size you want, and then add a few extra inches to each side.
  2. Figure out how many flags you will need based on the size you want them to be. (My flags were 1 inch wide and the length of the ribbon where I attached the flags is 18 inches, so I needed 18 mini paper flags.)
  3. Glue each flag to the ribbon. Use a ribbon that is narrow but has enough area to glue the flags to. (The ribbon I used was one-eighth inch wide.)
  4. To raise the garland above the arrangement, glue the ribbon to heavy gauge wires or wooden skewers.

This garland can be made in any size that works for your applications. Just adjust accordingly.

Happy 4th of July to all!

DIY Hot Air Balloon Floral Centerpiece

Pink and Orange Floral Hot Air Balloon Place Setting and Centerpiece

Mom does so much for the family throughout the year: No matter how long her to-do list is, you know you can always count on her for anything. Because she means so much, let her sit back and enjoy herself on Mother’s Day, and show her how appreciated she is. Treating your mom to a nice brunch is the best way to make her feel like a queen bee: Since you’ve already taken care of everything, Mom doesn’t have to lift a finger. To make her day even more special, pick a fun and truly original theme for your luncheon: DIY hot air balloon decorations!

This beautiful hot air balloon decoration adds a whimsical take-me-away touch to any Mother’s Day table setting. As soon as she sits down, Mom will feel like she’s floating among the clouds without a care in the world! This Mother’s Day craft is really simple to make, so you can make a big, loving statement with minimal effort. Here’s how to make a DIY hot air balloon decoration for Mom on Mother’s Day!

Materials needed for DIY hot air balloon decoration

  • Basket or container
  • Plastic cup or glass votive
  • Petite flowers, berries, and/or foliage
  • Floral foam
  • Ribbon
  • Balloon

How to make a hot air balloon floral arrangement

How to Make a Hot Air Balloon Arrangement
  1. First, choose a container that you’ll use as the basket for your hot air balloon. A votive or a small can covered in fabric is a great option if you want to make a smaller place setting. For a centerpiece, a basket in the size of your choice works perfectly. For our place setting, we used a rattan votive holder.
  2. If your container isn’t already waterproof, line it with a plastic cup or a glass votive holder so the flowers won’t leak when you water them.
  3. Use a piece of floral foam to arrange some petite flowers, berries, or foliage in the container, or just arrange them right in the container filled with water. Because you’re using a small container, lateral blooms are best to use: One stem has multiple bunches of tiny flowers that you can cut off to create a smaller arrangement. We used spray roses and hypericum berries for our arrangement, and we placed individual hyacinths in between for a fragrant accent.
Butterfly Hot Air Balloon Arrangement
  1. There are two different ways you can make the hot air balloon:
    With helium:
    Fill a balloon with helium and criss-cross some ribbon around the balloon in a netted pattern. Use some adhesive tape to keep the ribbon in place on the balloon. Take the loose ends of the ribbon at the bottom of the balloon and tie them onto the container or around some of the flowers.
    With air: If you don’t have access to helium, blow up the balloon with air and tie a clear straw around the base of the balloon. Anchor the straw into the arrangement, then tie the ribbon around the balloon and tuck the strings into the arrangement or the corners of the container.
  2. Personalize the arrangement just for mom by adding your own unique touches. You can use our design as inspiration! We chose a pink balloon for Mother’s Day because it’s such a beautiful feminine color, and it’s perfect for spring. For the flowers, we went with bold, trendy colors like orange, hot pink, and lavender. This mix of classic and modern hues gives the arrangement a look that’s soft yet vibrant. But you can choose your own color palette, from blues and greens to reds and yellows. Decorating the balloon netting with small accents, such as butterflies or rhinestones, is also a great idea and gives your hot air balloon a sweet finishing touch.

Easy-to-make Santa Hat Treats & Holiday Crafts

Everyone knows Santa’s iconic red and white hat. Put one on and you’ll instantly be in the holiday spirit!

You know what else will put you in the holiday spirit? Making this floral centerpiece and these strawberry treats that are both in the shape of — you guessed it — Santa hats!

Want to learn ho, ho, how to create them? Read on, my little elves.

Santa hat floral centerpiece

DIY Flower Christmas Tree

I decided to have a little fun and make a Santa hat entirely out of fresh flowers. Not only is it creative, but it’s so easy to make and will make you look like the “hostess with the mostess” at your next holiday get-together!

What you’ll need for your Santa hat floral centerpiece

  • Red and white carnations
  • Floral foam (cone shape)
  • Dish
  • Evergreens

Instructions

  1. Thoroughly soak the floral foam by letting it float in a sink full of water until the water is fully absorbed. Then, place the foam on a flat dish or low bowl slightly larger the the foam itself. (I used a 9 x 4 floral foam cone and a 6-inch clear design dish.)
  2. Cut the carnations’ stems to a length of about 3 inches. Insert the stems into the foam starting with the white ones to form the “fur” trim at the bottom of the hat. Leave one carnation for the pom-pom at the top.
  3. Add the red carnations all the way around until the foam is completely covered. Finish by adding the white one on top.
santa-hat-flower-diy
  1. You can add a few sprigs of evergreens to the base and top if you feel it needs a finishing touch.
  2. Keep your Santa hat centerpiece in a cool location, adding an ice cube to the dish every day, and it should stay fresh for at least a week.

DIY Santa hat strawberries

Need the perfect complement to your floral Santa hat? These sweet little pop-in-your-mouth treats are so easy to make, you’ll find yourself wanting to make more — for yourself, your family, friends, co-workers…you get the idea!

What you’ll need to make your Santa Hat strawberries

  • Strawberries
  • White melting chocolate
  • Coconut flakes
  • Mini marshmallows

Instructions

santa-hat-strawberries-diy-1
  1. Remove the stem from the strawberry. Don’t cut it off; just gently pull it away from the strawberry.
santa-hat-strawberries-diy-3
  1. Dip the larger end of the strawberry into the bowl of melted white chocolate, covering about a fifth to a quarter of the strawberry.
santa-hat-strawberries-diy-4
  1. Immediately hold the dipped strawberry over a bowl of shredded coconut and, using a spoon, drop the coconut flakes onto the melted chocolate on the strawberry. Place on a plate dipped side down.
santa-hat-strawberries-diy-5
  1. Dip a mini marshmallow into the melted white chocolate and then place it on top of the strawberry to complete the Santa hat. As the chocolate cools and hardens, it will hold the marshmallow onto the strawberry.

Peppermint hot chocolate

Hot chocolate in mug

Who doesn’t love a nice cup of hot cocoa, especially during the holidays? For me, it’s all about the presentation. I used a regular hot cocoa mix but made it look fancy by serving it in a monogrammed mason jar mug, garnishing the rim with crushed candy canes and topping it off with marshmallows and a candy cane. The candy cane alone will add a peppermint flavor to the hot chocolate, or you could add three drops of peppermint oil per glass. Better yet, include a shot of peppermint schnapps to the hot chocolate to help chase away that winter chill!

Dia de los Muertos: DIY Flower Sugar Skull

Day of the Dead or Dia de los Muertos is a Mexican holiday to honor and celebrate loved ones who have passed.  Originally an Aztec harvest celebration, the Catholic influence of the Spanish conquistadors combined it with the traditions of All Souls’ and All Saints Day, and the celebration now starts the day after Halloween and runs for 2 days (11/1 & 11/2).

There are so many beautiful traditions associated with Dia de los Muertos – the colors, music, sentiment, and a few iconic symbols such as the Sugar Skull!  Whether you’re going big or small this year, here are a few ideas for ways that you can personalize and bring this celebration of loved ones’ past into your Dia de los Muertos.

The most iconic symbol of Dia de los Muertos is the Sugar Skull.  Mexicans choose to celebrate the lives of their dearly beloved and the skull symbolizes death but in a positive way.  Living in a country abundant in sugar production, they began to create beautiful clay molded sugar skulls that were decorated with flowers and colorful icing that represented departed souls.

Here’s an easy way to go from Halloween to Day of the Dead and keep the party going!

flower sugar skull arranged with halloween chocolate covered strawberries

You’ve chosen some spooktacular scary Halloween items like  1-800 Flowers.com ‘s  Spooky Skull Flower Arrangement and Fruit Bouquet’s Monster Berries but Halloween’s over and it’s  Dia de los Muertos !  Time to change that Spooky Skull to a happy Sugar Skull!!

flower sugar skull on wooden table

Start with Spooky Skull Flower Arrangement.  The base of this arrangement is made from floral foam.  All you need to do to add new fresh flower elements is to cut the stem short (about 3”) and insert directly into the foam where you want your new flower to be.

flower sugar skull pink flower eyes

First switch out the eyes to a bright color gerbera daisy.  Flowers are meant to symbolize life.

white flower skull with pink flower eyes with marigold flowers

Next add a single marigold to either side of the mouth.  Marigolds are the flower of death.

flower sugar skull pink flower marigold flower

To make the skull happier add more color with green poms under the mouth.

flower sugar skull red flower eyes marigold flowers

To add even more detail individual hypericum berries are put on toothpicks and placed around the eyes.

flower sugar skull pink flower eyes colorful flowers

Inserting fully bloomed, colorful roses across the top of the skull creates a festive floral crown.

Last but not least, cluster long streamers of bright colored ribbons and attach to either side of the skull at the bottom of the crown of roses.

Isn’t she pretty!

Use your imagination and add whatever flowers or embellishments that you like to create a floral sugar skull to honor someone you have lost.

Next up, no tricks only treats to celebrate Dia de las Muertos!

Candy Corn Decoration & Drinks: Fresh Flower Centerpiece & Beverages for Halloween

Does anyone actually eat candy corn, or is it just for crafts and DIY projects? Whatever people do with candy corn, they do a lot of it: According to the National Confectioners Association, more than 35 million pounds of candy corn are sold annually. That’s a lot of kernels…so plug in those glue guns and get crafty!

Candy Corn Flowers & Drinks

Here is a Halloween decor idea and two candy-corn-inspired beverages for young and old ghouls and goblins alike.

Fresh flower candy corn centerpiece

Candy Corn decorations with candy corn Flower Arrangement

The simple geometric shape of this candy corn creation makes this a very easy DIY. And carnations are available naturally in all three colors, so no spray painting is necessary.

What you need

  • Floral foam
  • Carnations (12 orange, 14 yellow, 10 white)
  • Plate

Directions

  1. Choose a floral foam to use. (I opted for the sculpting sheet with the styrofoam back, as I wanted the candy corn arrangement to be a substantial size, and the styrofoam back gives the foam more support.)
  1. Make a template using a piece of copy paper, and cut out your candy corn shape from the larger piece of foam.
candy corn decorations with floral foam
  1. Drop the foam into a sink filled with water. As the foam absorbs the water, it will slowly fall to the bottom of the sink. Remove and place it standing upright on a plate with a small rim.
candy corn decorations Cutting Stems on an Angle
  1. While the foam soaks, prepare your flowers by cutting the stems to about 2 inches long using a sharp cutting shears and cutting on an angle. (The number of carnations in the supply list is for an arrangement that is approximately 11″ x 8.5”. This is a one-sided arrangement and should be placed in a location where it will be viewed from one side only.)
candy corn decorations with 2 Rows of Yellow Carnations
  1. Starting at the bottom, insert two rows of yellow carnations.
candy corn decorations two rows of orange carnations
  1. Then add two rows of orange carnations.
  1. Finish the top off with the white carnations. Now, your candy corn creation is complete!

Candy corn beverages

Soda Mason Jar Drinks

These adorable candy corn soda pops couldn’t be easier to make. Put a few pieces of cut-up pineapple in a small mason jar, fill the jar to the top with orange soda, and finish with whipped cream and a few pieces of candy corn.

For something with a little more kick, go with a candy corn cocktail served in a martini glass.

Candy Corn Cocktail

Prep Time 5 minutes
Cook Time 5 minutes
Total Time 10 minutes
Servings 1 drink

Ingredients:

  • 1-1/2 ounce whipped cream vodka
  • 3 ounce sour mix
  • 2 ounce pineapple juice
  • ½ ounce grenadine
  • Whipped cream (for topping)

Instructions: 

  • Combine vodka, sour mix, and pineapple juice in shaker with ice, and shake well.
  • Pour mixture into a martini glass.
  • Slowly pour grenadine into mix so it settles to the bottom.
  • Top with whipped cream.
  • Optional: Garnish with coordinating sprinkles.
Course: Drinks

DIY Holiday Flower Tree

Here are the basic step-by-step instructions for making one of 1-800-Flowers.com’s most cherished holiday arrangements, the Holiday Flower Tree (otherwise known as a tabletop tree-shaped arrangement). Once you master the basics, the sky’s the limit as far as creating unique, personalized trees in various sizes and containers.

What you need to make a DIY flower tree

DIY Flower Tree Materials

Instructions for making a DIY flower tree

diy flower tree with floral foam
  1. Tape a brick of floral foam into a waterproof container and place it in water until the foam is thoroughly soaked. Boxwood is the main green I used for the tree, and I accented it, after the main shape was created, filling in with other assorted evergreens such as cedar, pine, and balsam.
diy flower tree with cutting greens
  1. Before starting to construct your tree, cut the greens off the main branch, creating multiple smaller pieces. Clean the bottom of the stems so they can easily be inserted into the foam.
diy flower tree with attaching decorations to sticks
  1. Attach your decorations to small floral sticks or wooden skewers.
diy flower tree with adding boxwood
  1. Start by inserting a taller precut piece of boxwood at the top to create your basic height. Do the same at the bottom and sides. This gives you the base shape of your tree.
diy flower tree with adding greens to floral foam
  1. Continue adding pieces of boxwood, turning the tree as you go, until you have created the basic shape of your tree. Do not totally cover the foam yet.
diy flower tree with adding evergreens to holiday flower tree
  1. I like to add a few sprigs of other evergreens, such as balsam and pine. These greens add that wonderful fragrance, and I find the different textures add visual interest as well.
Add flowers to flower tree
  1. Your tree is now ready to “decorate.” Because this tree is actually a “flower arrangement,” you can easily use fresh-cut flowers as a primary decorating feature. Just give your flowers a fresh cut and insert them directly into the foam, and they will stay fresh for up to two weeks.
  1. Add the non-perishable decorations, such as pine cones and mini ornaments.
Completed DIY Holiday Flower Tree

Now go ahead and give it a try!

A Welcoming Holiday Centerpiece

Here’s a traditional holiday arrangement that has its roots in the south, in Colonial Williamsburg.  The pineapple has long been an iconic symbol of hospitality, welcome, and friendship starting in the Carib and spreading to Europe before coming to Colonial North America.  While the pineapple is a key element in a traditional Colonial Williamsburg style arrangement there are others that are just as important to create the right look.  Here’s a list of just a few that you might want to choose from:

  • Magnolia leaves
  • Assorted evergreens
  • Apples
  • Oranges (especially decorated with cloves)
  • Roses
  • Ribbons
  • Burlap
pineapple holiday centerpiece

Create your arrangement to fit the space in which you plan to display it.  The arrangement in the photo above was created to be viewed from all sides..

Start with a base of wet floral foam.  Insert the flowers and foliage directly into the foam.  Fresh fruit should be secured to a green florist stick first before inserting into the foam.

I love the two-tone color way of the magnolia leaves.  They seem to add a touch of elegance and rustic charm at the same time!  1-800 Flowers has a beautiful preserved magnolia wreath that’s part of a great collection of southern inspired holiday gifts from one of their newest partners – Southern Living™.

Why Are Marigolds the Official Flower for Day of the Dead?

Besides the sugar skull, the marigold is probably the other element that is most associated with the Dia de los Muertos celebration. The marigold, and flowers in general, represent the fragility of life. It is believed that the spirits of our departed loved ones come to visit during the celebration, and marigolds are used to help guide the spirits with their vibrant color.

orange marigolds

Day of the Dead flowers and décor are all about vibrant colors, so just have fun with them when setting your table. Little touches can add up to make a big statement.

  • A colorful patterned table runner
  • Fiesta Ware plates from The Homer Laughlin China Co.
  • A bouquet of marigolds
  • Colorful ribbons with a sugar skull hangtag tied around the mason jar
marigolds in day of the dead centerpiece

To complete these Day of the Dead flower bouquets, I added a few cut succulents, some Mexican sage, and fresh cut stems of rosemary. Rosemary is an herb that has long been associated with death and, specifically, remembrance.

marigolds in day of the dead skull tag centerpiece

One more easy tip to add pizazz: Tie multiple strands of colorful ribbon around the neck of the mason jar.

day of the dead marigolds in centerpiece sugar skull tag

Finish off with a sugar skull hangtag! Many sites offer free sugar skull printables that, with a little imagination, can be used in endless different ways. I downloaded these from Bespoke Bride, cut each one out individually, and glued it to a craft paper hangtag.

I totally love the whole look of this simple yet fun and festive tablescape. What a beautiful setting to honor and celebrate a loved one.

Exit mobile version