Candy Corn Decoration & Drinks: Fresh Flower Centerpiece & Beverages for Halloween

Does anyone actually eat candy corn, or is it just for crafts and DIY projects? Whatever people do with candy corn, they do a lot of it: According to the National Confectioners Association, more than 35 million pounds of candy corn are sold annually. That’s a lot of kernels…so plug in those glue guns and get crafty!

Candy Corn Flowers & Drinks

Here is a Halloween decor idea and two candy-corn-inspired beverages for young and old ghouls and goblins alike.

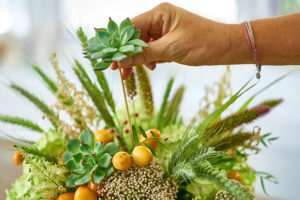
Fresh flower candy corn centerpiece

Candy Corn decorations with candy corn Flower Arrangement

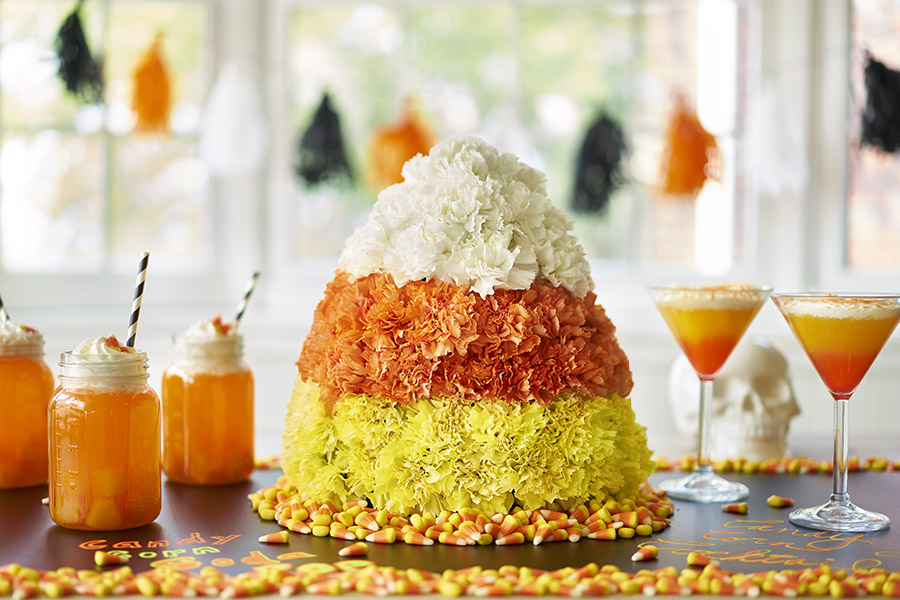
The simple geometric shape of this candy corn creation makes this a very easy DIY. And carnations are available naturally in all three colors, so no spray painting is necessary.

What you need

  • Floral foam
  • Carnations (12 orange, 14 yellow, 10 white)
  • Plate

Directions

  1. Choose a floral foam to use. (I opted for the sculpting sheet with the styrofoam back, as I wanted the candy corn arrangement to be a substantial size, and the styrofoam back gives the foam more support.)
  1. Make a template using a piece of copy paper, and cut out your candy corn shape from the larger piece of foam.
candy corn decorations with floral foam
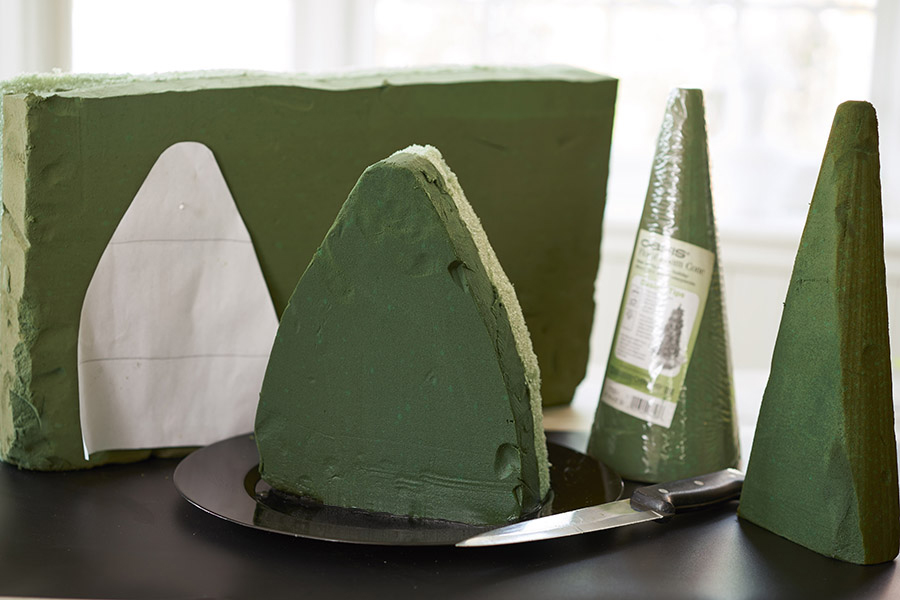
  1. Drop the foam into a sink filled with water. As the foam absorbs the water, it will slowly fall to the bottom of the sink. Remove and place it standing upright on a plate with a small rim.
candy corn decorations Cutting Stems on an Angle
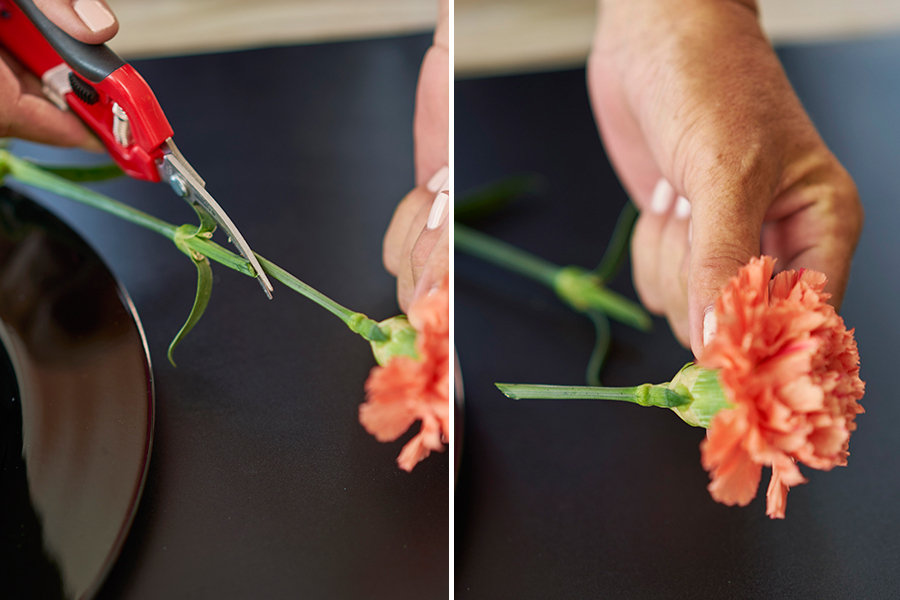
  1. While the foam soaks, prepare your flowers by cutting the stems to about 2 inches long using a sharp cutting shears and cutting on an angle. (The number of carnations in the supply list is for an arrangement that is approximately 11″ x 8.5”. This is a one-sided arrangement and should be placed in a location where it will be viewed from one side only.)
candy corn decorations with 2 Rows of Yellow Carnations
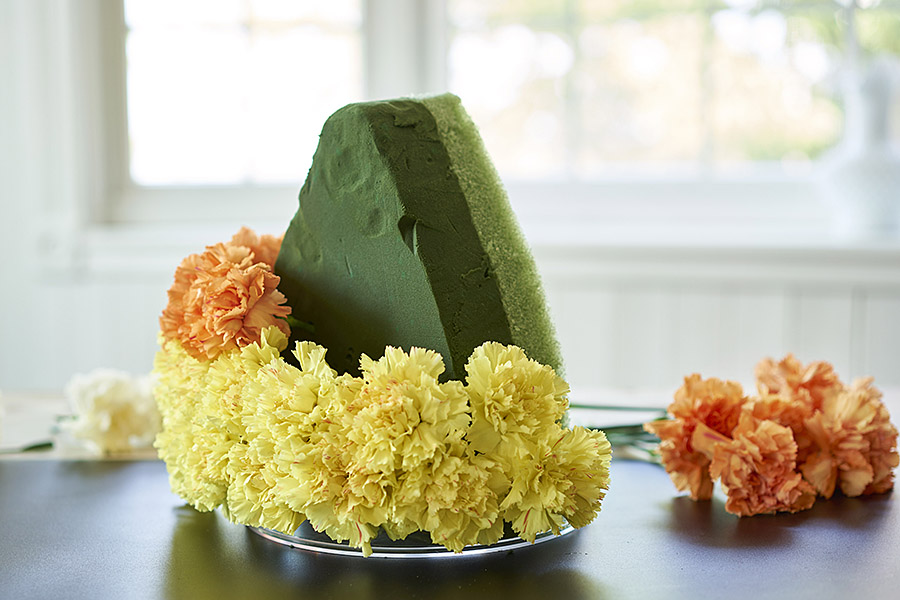
  1. Starting at the bottom, insert two rows of yellow carnations.
candy corn decorations two rows of orange carnations
  1. Then add two rows of orange carnations.
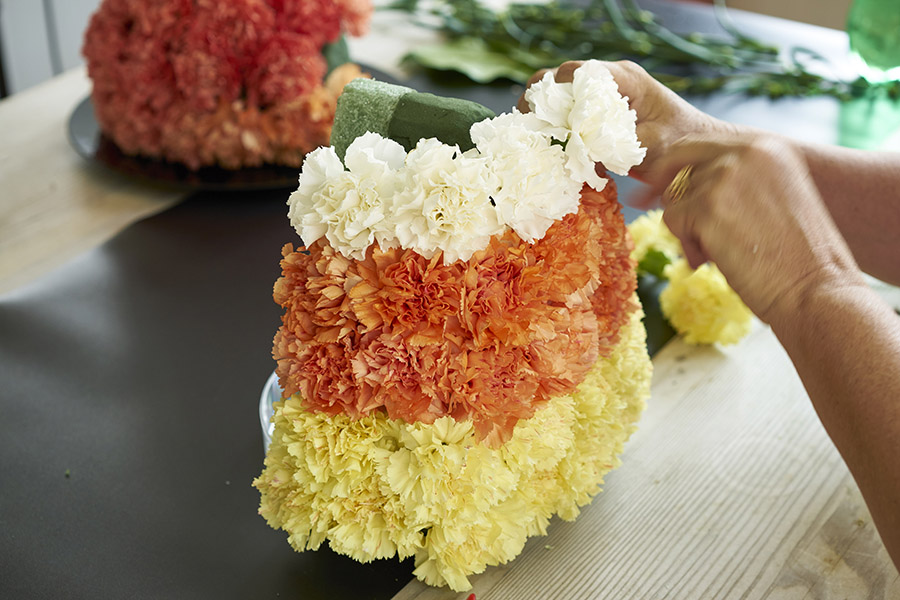
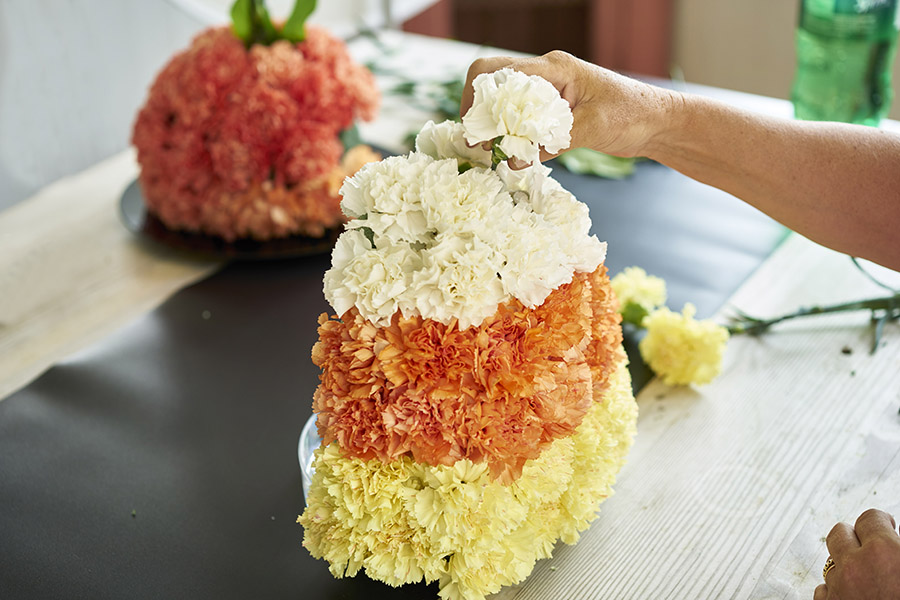
  1. Finish the top off with the white carnations. Now, your candy corn creation is complete!

Candy corn beverages

Soda Mason Jar Drinks

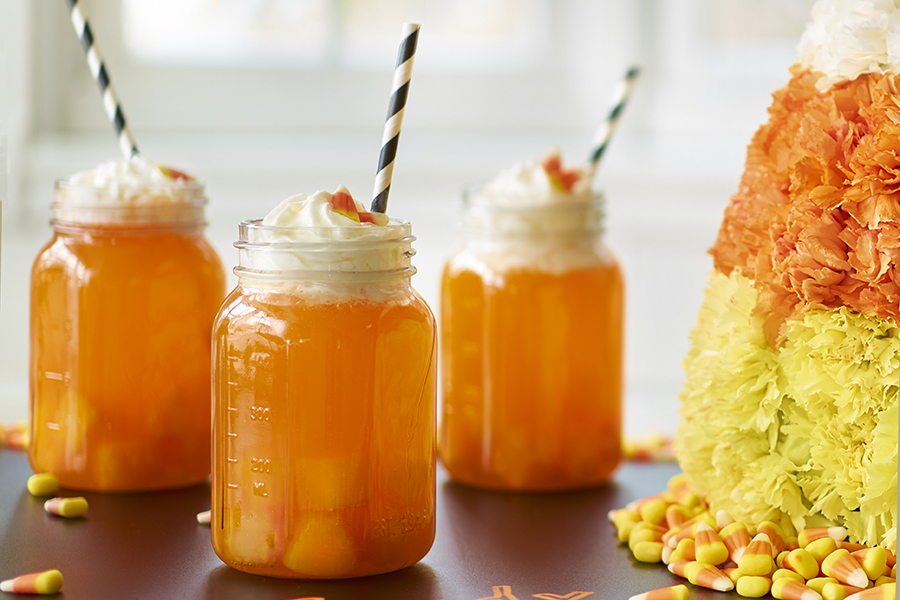
These adorable candy corn soda pops couldn’t be easier to make. Put a few pieces of cut-up pineapple in a small mason jar, fill the jar to the top with orange soda, and finish with whipped cream and a few pieces of candy corn.

For something with a little more kick, go with a candy corn cocktail served in a martini glass.
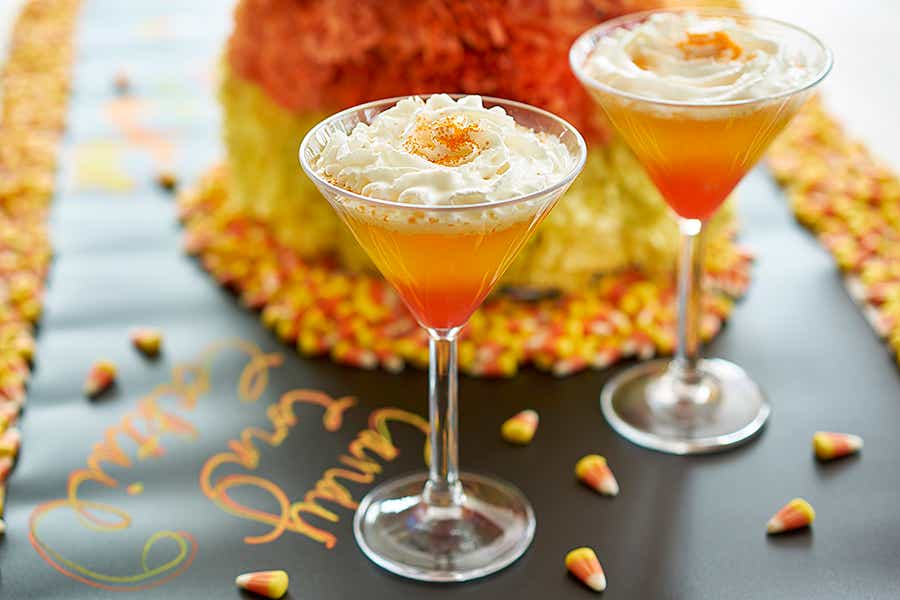
Candy Corn Cocktail

Prep Time 5 minutes
Cook Time 5 minutes
Total Time 10 minutes
Servings 1 drink

Ingredients:

  • 1-1/2 ounce whipped cream vodka
  • 3 ounce sour mix
  • 2 ounce pineapple juice
  • ½ ounce grenadine
  • Whipped cream (for topping)

Instructions: 

  • Combine vodka, sour mix, and pineapple juice in shaker with ice, and shake well.
  • Pour mixture into a martini glass.
  • Slowly pour grenadine into mix so it settles to the bottom.
  • Top with whipped cream.
  • Optional: Garnish with coordinating sprinkles.
Course: Drinks

Refurbished Plant Containers: Trash to Treasure

“One man’s trash is another’s man’s treasure.”  How true!  A discarded or unused canister may actually be the perfect plant container. Take for example these funky succulent gardens that I planted in containers that had been discarded by the previous owner.

plant container

This metal container was literally “in the trash” and a garage sale in a box marked “free for the taking”!

metal plant container

I immediately knew I could do something with it, and I did!

plant container completed

The best part is I already had everything I needed just laying around the house starting with the pretty robin’s egg blue spray paint.  The plants were all in need of replanting – some of them are from my daughter’s wedding last year and had out grown their current containers and others were taken from container gardens that were bursting at the seams.

succulent garden plant container

When the planting was done, I remembered the beach glass, that my husband had collected over the years walking on the beach in Rockaway, that wound up stored in the attic after some renovations we did.  How perfect do the pieces look tucked in between the plants?!

succulent plant container

If I remember correctly I think I paid $3 for the watering can!  All the plants were salvaged and given another lease on life.  I just thought why not give them a try and let me tell you they are really starting to thrive in their new home with their new plant buddies.

These are the perfect plants to have in a summer house that you might not be at every day.  They thrive on neglect and just keep looking better and better!

Check out the new Plant Shop that 1-800 Flowers just launched to find the right plant for you.

This Plant Decor Trend Just Keeps Growing

I don’t know if you have noticed but houseplants are back in a BIG way!  It’s true what they say about everything “old is new again”.  The last time people were this plant crazy was back in the 70’s.  This time around however, there is a new affection for cactus, succulents, and air plants.  If you don’t believe me just do a quick search on Pinterest, where according to Garden Media’s 2019 Plant Trends Report, searches for indoor plants are up 90% compared to previous years. And at the top of that search list is “succulents”.

At the recent International Floriculture Expo – the largest floral B2B trade show in North America – in Miami Beach, this trend was obvious by the increased number of plant focused vendors. And these are not your mama’s old plants!  Here are just a few of the fun, unique, and easy to care for plants that will be coming to a shop near soon!  Or you can go to the plant collection at 1-800 Flowers.com,  where you will find the latest varieties in unique containers to gift yourself or to send to a friend!

If you are super adventurous and want to take your plant collection to the next level, then hop on the “Plants as Art” bandwagon.  Here’s a little inspiration from the Expo to get you started!

Even the lobby of  the hotel that  I was staying at during the Expo was beautifully decorated with “plants as art”!

And in response to all the buzz, around succulents and air plants in particular, the 1-800 Flowers retail location in Carle Place, NY held a Creative Workshop for their customers and friends.  Each attendee made their own succulent garden and air plant drift wood sculpture.  As you can see from the photos below that everyone had a great time while learning new skills and getting some tips from the pros at 1-800 Flowers!

If you’d like to attend a DIY class at 1-800 Flowers, click here – Creative Workshops – to learn about all upcoming events:

DIY Gold Hoop Wreaths With Flowers

Flower wreath

If you’re looking to kick up your home décor game, then I would definitely recommend going with a gold hoop wreath. They are totally on trend and can be created and displayed in so many interesting and unique ways.

Gold wreath

Limited supplies are needed to create one of these pretty flower wreaths.  The process is basically the same whether you choose to work with faux or fresh foliage and flowers.  The fresh versions are truly stunning but remember they are usually used for parties and events as they will only stay fresh for a short time.  However, if you are using them to decorate for a special occasion you only need them to look their freshest best for a few hours!

gold wreath words

Another way to personalize your wreath is to add a word or message.  I bought the hoops and the words on Amazon.  The “Love” is gold metal and the “hello” is paperboard that I spray painted gold.  Attach with wire or monofilament (fishing line).

gold w

I used green floral tape to secure small clusters of mixed greenery directly to the hoop base, making sure to wrap the tape tightly in place as I went.  Keep adding slightly over-lapping clusters until you are happy with your design.

Gold Wreath

Fresh flowers and cut succulents can be incorporated into the foliage clusters before attaching to the hoop or worked into the greens securing with wires or glue after all the foliage is in place.

Why not try making one for yourself or as a gift. Wreaths make fantastic gifts (and one size fits all)!!  Check out the incredible wreath collection at 1-800 Flowers.com and make someone smile today!

Golden Themed Graduation Decor Ideas

Graduation Decorations That Go for the Gold

Graduation truly is a time to sparkle and shine—and using gold in your party décor will also put you right on trend. Gold is everywhere these days and in many different ways: foil, leaf, glitter, tassel, etc. Here are a few easy ways to make your graduation the one that outshines the rest!

Duct tape, you’ve come a long way! One of the simplest ways to customize and add some pizzazz to your centerpieces is to wrap a piece of gold duct tape around the vase and write a message on the tape. This gold duct tape is actually dry-erase as well—what could be easier!

flowers-and-invitation

Black-and-gold is a popular color combo this season, and there are many different invitations available with this look. The glitter on the border and cap are fun, but the simplicity of the design makes it sophisticated at the same time.

I used a few different techniques for this special arrangement, but each one is very easy to do.

gold-glitter-vase-supplies

What you’ll need:

  • 10-12 white roses
  • 6 stems salal leaves
  • Floral tape or rubber band
  • Design Masters Gold spray paint (this is a floral paint)
  • Gold duct tape
  • Adhesive glue tape runner
  • Gold glitter

For the vase:

diy-glitter-vase-step-one

Make several stripes around a clear glass cylinder vase using the tape runner.
Lay scrap paper on a flat surface.

diy-glitter-vase-step-two

Holding the vase over the paper, sprinkle the glitter over the areas where you have applied the adhesive tape. (The glitter that falls on the paper can easily be put back in the jar to use for additional vases or another project.)

Hand-tied bouquet:

  • Remove the foliage from the rose stems.
  • Gather the roses together in your hand starting with the middle rose, adding each additional rose at a slightly lower level.
  • Secure stems with floral tape first to hold them tightly together.
  • Cut the bottom of the rose stems so that the roses will sit just at the top of the vase.
  • Cut salal stems shortly shorter and spray front and back of leaves with Design Masters gold spray paint and let dry for a few minutes.
  • Collar the bottom of the bouquet, just under the roses with the gold leaves.
  • Use floral tape to keep the salal stems in place before wrapping all of the stems with gold duct tape, leaving 1-2″ of the stems exposed.
  • Add 1-2″ of water to the vase before placing your bouquet.

Gold vase with inspirational words:

shine-bright-centerpiece

Use a paint marker made specifically for glass to add an inspirational saying to a gold glass vase. I went with Shine bright like a diamond. Some other possibilities: You sparkle and shine or Twinkle, twinkle, rising star.

gold-tassel-banner

Another hot trend that’s perfect for graduation celebrations is tassels. We made our festive gold tassel banner from a bag of gold shred. Just take individual strands, group them together and secure at the top with a small piece of wire. Attach the tassels to a piece of gold ribbon—that’s it! Easy peasy!

A Very Special Bridal Bouquet Designed by Mom

My daughter Casey got married this past September.  I have created so many events over the course of my career with 1-800-Flowers.com and made more wedding bouquets than I can count.  But the bouquets that I made for Casey and her daughter and maid of honor and my sweet granddaughter Juliette were by far the most meaningful.

Casey and Juliette have lived with me and my husband (dad and papa) since Juliette was born.   Casey meeting a wonderful man who would love them as much as we did was what we had always hoped would happen one day.  And it did.  But that also meant that they would be moving on, leaving our house.  It was time, but that doesn’t mean it was easy!

Their bouquets were a special gift from me to carry as they walked down the aisle and into their new life.   And I knew exactly what I wanted them to look like!

I shared in a past post about the incredible wedding floral design workshop that I attended in Charleston, South Carolina, hosted by Mayesh Wholesale Florist.  The first order of business was creating our own vision board for our event.

Based not only the look but especially the “feeling” of our boards attendees then got to work with the most incredible flowers sourced from around the world to create a dream wedding bouquet!

Casey (and then Juliette) grew up surrounded by flowers, whether it was coming into the office with me, having photoshoots in our house on a regular basis, or taking special trips with me to visit the spectacular flower farms that grow the beautiful flowers for the 1-800 Flowers unique collections of fresh designs.

Being able to source plants, greenery, garlands, and fresh cut flowers grown by people who have become dear friends felt like everything was as it was meant to be.

There were plants from Smile Farms at IGHL, where my brother Kevin is a resident and farmer!

And lush garlands and……

greenery from Sutton Ferneries.

The most exquisite blooms, including tulips. Astible, and snowberries came from Sun Valley Farms based in northern California. And beautiful garden roses from Alexandra Farms, a boutique grower specializing in nostalgic, romantic fresh cut garden roses, high in the Andes Mountains of Colombia.

When you are working with product that is this beautiful it isn’t difficult to make a bouquet that takes your breath away.

I know it took my breath away when I handed Casey her bridal bouquet.

After I gave Juliette her Maid of Honor bouquet it was time to leave the final details of the décor to my 1-800 Flowers team while we headed to a Welcome dinner that kicked off the wedding weekend celebration!

The day of the wedding could not have been more perfect.

It was truly a celebration of love and family.  The family we are born into, the family we marry into, and the family that has just begun.

The morning of the wedding Casey gave me a necklace with three connecting circles representing three generations of women – mother, daughter, granddaughter.  I’ve worn it every day since!

And this Mother’s Day we have a new reason to celebrate – Casey and Kyle are having a baby!  Juliette is going to have a baby brother!   Life is good.

1-800 Flowers.com has a Mother’s Day Collection of flowers and gifts to help you connect and show your love and appreciation to your mother, grandmother, daughter, or someone who is like a mother to you.

Some of the images used in this post were taken by EXO Photography.

Succulent As Cut Flowers

One of my favorite cut flowers to incorporate into my bouquets and arrangements isn’t even a flower – it’s a succulent plant, particularly the variety known as Echeveria.

1-800 Flowers.com offers this new bi-color variety called devotion.  It’s stunning and the name makes it perfect for Valentine’s gifting!

Not only do succulents look beautiful mixed with other fresh cut foliage and flowers, they last for weeks. In fact, after everything else in the bouquet has made it to the compost pile, your succulents will have started to produce new roots and can be replanted!  They are the flower that keeps on giving!

There are a few ways that you can convert a cut succulent into a cut flower, and using wooden skewers is the easiest way and therefore my favorite way.

HOW TO:

Remove the succulent from the pot.

Remove the stem at the base of the flower.

Insert the pointed end of a wood skewer into the base of the plant.

Add your new succulent flower to your bouquet or arrangement!

I used to preserve the root and stem so that I could replant the succulent after the flowers have passed their prime.  However, I find that the plants that I cut the stem from last just as long and develop new roots.  That’s why in most cases I just use a skewer.

Remove most of the dirt from the roots.

Cover the roots with a small piece of plastic and add wire or a stick such as a skewer.

Wrap the roots and wire or stick with green floral tape to cover your mechanics.

And again, just insert your cut flowers into your bouquet of fresh cut flowers and other foliage, for a modern and unique look.

What could be a better addition to a pretty fresh cut flower bouquet for Valentine’s Day then an unexpected Hoya Heart cut succulent?  After enjoying your bouquet for a week or more you can replant the heart as an everlasting token of the love that you share!

Taco Love

There are at least three reasons to celebrate love and tacos, or just your love for tacos: Valentine’s Day, Galentine’s Day, and Cinco de Mayo. And let’s not forget Taco Tuesday! So, I put my thinking cap on and came up with some easy and inexpensive taco decor ideas that can take any party from “asi asi” to “espectacular!”

taco decor with jars of salsa

Almost everything you’ll need to create these — flowers, salsa, chips, peppers, taco shells, etc. — can be picked up at your local market.

taco decor with salsa jars filled with flowers

And they’re not just easy to make but ingenious too! After pouring your salsa into serving dishes, use the glass jars as vases for the flowers. (I bought the Desert Pepper Cantina brand salsa for the cool labels, but Harry & David carries a fantastic selection of salsas as well.) Then, I placed the festive arrangement next to the coordinating salsa so guests knew what heat level to expect.

Pepper your table with little pepper vases

taco decor with pepper vases

It’s as easy as:

Everybody gets a flower taco

taco decor with flower taco

I like to challenge myself to think outside the box when I am working on a project…and then things like this happen!

taco decor with flower taco materials

Here’s how to make personal size taco bouquets.

  1. Start with a stand-up taco shell.
  2. Cut a small piece of floral foam to fit in the shell.
  3. Soak the foam and then put it into a small plastic sandwich bag.
  4. Place in shell.
  5. Add fresh cut flowers!

Maybe you prefer your tacos “supersized”

taco decor with taco centerpiece

A super-sized flower taco nestled in a wooden planter and accented with a few Coronas, limes, and fresh peppers make a unique centerpiece for a buffet table or DIY taco bar.

taco decor with making co centerpiece

To make the large taco:

  1. Print out two large images of a taco shell.
  2. Cut out the taco shells and glue them to pieces of cardboard.
  3. Cut a piece of floral foam a little smaller than the width of your taco shell.
  4. Soak the floral foam and place it into the liner of a wooden planter (or any container of your choice).
  5. Add one image of the taco shell (facing out) to the one side of the foam and place the other a little higher (facing the same direction as the first one) on the other side of the foam.
  6. Cut fresh flowers so they sit right at the top of the taco shell when inserted into the foam, and arrange accordingly.
  7. Add the additional elements to make it a complete “party in a box!”

Taco Jell-O® shots

While I was putting this together, I thought about how perfectly these taco decor ideas would work for Galentine’s Day, which reminded me of the fun ideas I shared last year for my gal’s party.  One of them was the waffle Jell-O® shots.

taco decor with taco jell-o shots

And a light bulb went off in my head — that pan would make perfect little taco shells!

taco decor with making taco jell-o shots

I changed the recipe a little, combining a gummy and Jell-O® shot recipe, to come up with this.

  1. Add two packets of plain gelatin and one packet of Island Pineapple Jell-O® to a pot.
  2. Slowing stir in a half cup of water until dissolved and let sit for five minutes.
  3. Turn on heat and stir for about five more minutes.
  4. Add a half cup of tequila and another half cup of water, and stir completely.
  5. Dust the pan lightly with corn starch.
  6. Fill each opening half way up.
  7. Place in refrigerator for four hours.
taco decor with taco jell-o shots on plate
  1. To serve, fold each mini waffle in half and stand together on a plate.
  2. Right before serving, add whipped cream and orange rinds or orange sprinkles.

Or set out a DIY taco shot bar. Just put the taco shell Jell-O® shots flat on a plate, along with bowls of small pieces of fruit and whipped cream, and let everyone make their own.

If you like these fun taco decor ideas, check out similar posts with activities, how-to’s, and recipes to help you celebrate all the LOVE you have to give.

Or you can always say “I love you” with a dozen roses. That always works.

Naturally Romantic Flower Arrangements with Wood Burned Planters

OK I have officially moved on from pallet wood to birch as my go to obsession.  Birch fits in so perfectly with my home décor style, bringing in natural texture and personality.  Birch trees and birch bark are in themselves works of art with limitless uses and opportunities for combining with other elements to create even more beauty!I have several different size and shape birch vases and planters and have been dying to try burning a heart into as you would see on a real tree where someone romantically declared their love.  Being a florist in February I am thinking love and romance 24/7 these days.  And my daughter is just starting to plan her wedding which she envisions in a tent with lots of natural décor elements.  So, if not now when?

Continue reading Naturally Romantic Flower Arrangements with Wood Burned Planters
Exit mobile version