Father’s Day Crafts: DIY Gift Bags for Dad

A photo of diy gift bags

Father’s Day is a holiday when Dad finally gets to sit back, spend quality time with his family, and be pampered like the king he is. And no one is more excited to shower their reigning hero with gifts more than his children!

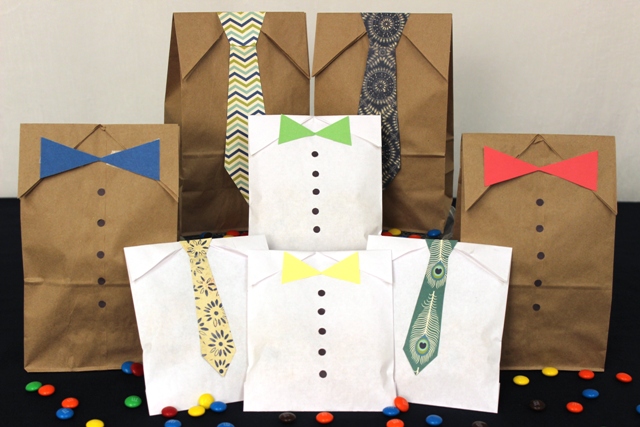
These adorable and easy-to-make DIY gift bags look like Pop’s favorite button-down shirt and necktie — and inside they hold the most delicious Father’s Day snacks. Best of all, with just a little help from you, your kids can make them.

What you need to make Father’s Day DIY gift bags

  • Paper lunch bags or candy bags
  • Patterned cardstock or scrapbook paper
  • Black construction paper
  • Father’s Day tie and bowtie template
  • Scissors
  • Ruler
  • Pen or pencil
  • Double-sided tape
  • Glue stick
  • Dad’s favorite snacks

How to make Father’s Day DIY gift bags

A photo of diy gift bags with Brown Paper Lunch Bags and White Paper Candy Bags
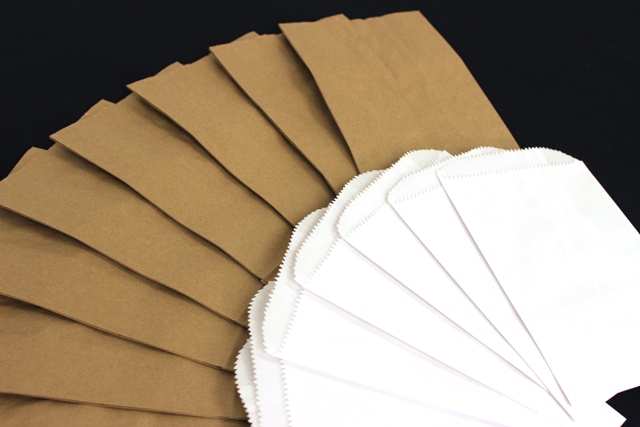
  1. Find the perfect-sized paper bag to hold your Father’s Day treats. Brown paper bags or mini candy bags in any color work just fine, and you can never go wrong when you pick the color of Dad’s favorite button-down shirt! Standard white is a good option, too.
A photo of diy gift bags with Folded Paper Bag to Create a Collared Shirt
  1. Lay a bag flat on the table, with the opening of the bag at the top. Fold the mouth of the bag down about 3 or 4 inches, depending on how big you’d like the collar of the shirt to be.
A photo of diy gift bags with Traced Lines on a Paper Bag to Create a Collared Shirt
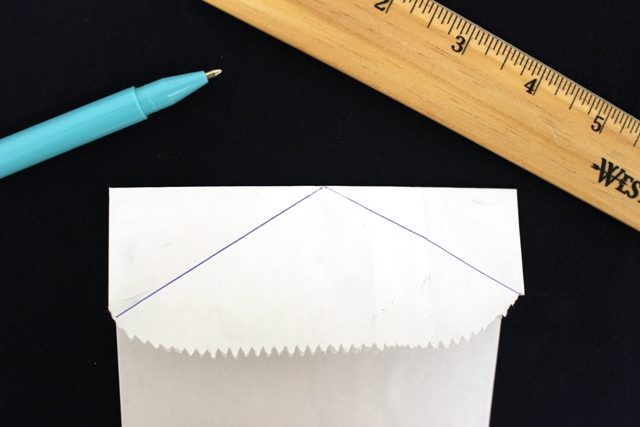
  1. Using a ruler and a pen, draw a diagonal line from the bottom-left corner of the bag’s flap to the center of the top of the flap. Draw another diagonal line from the bottom-right corner of the flap to the same top center point. Once you’re done, the lines will make the shape of an inverted “V” on the flap.
A photo of diy gift bags with Trimmed Paper Bag to Create a Collared Shirt
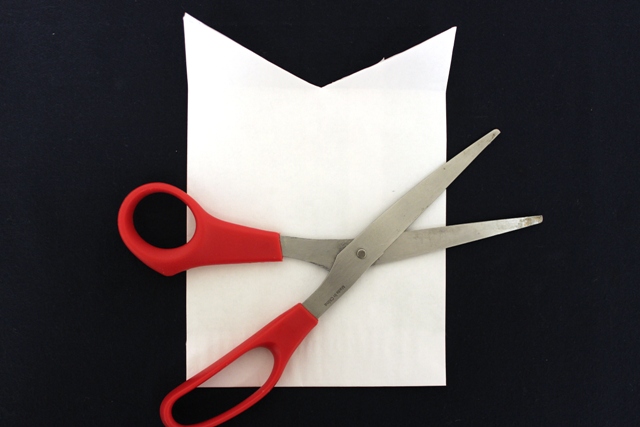
  1. To cut out the triangle shape in the center, take a pair of scissors and follow the lines on the flap.
Ties Cut out From Cardstock
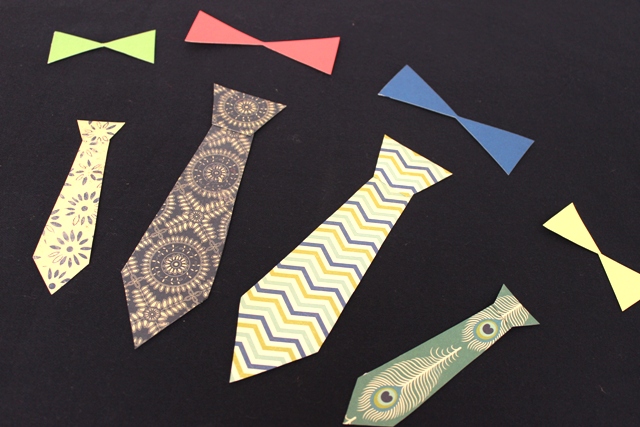
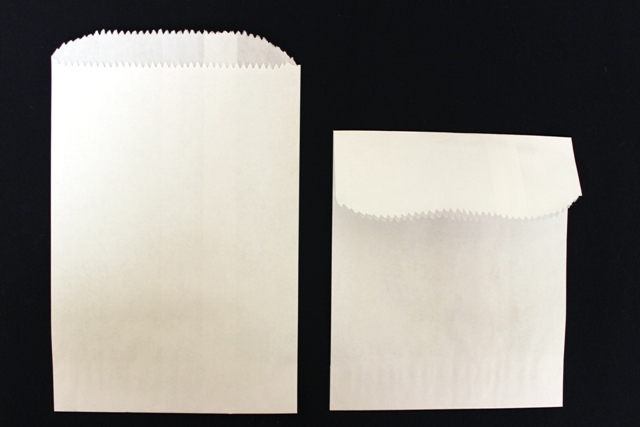
  1. Print this Father’s Day tie and bowtie template onto a piece of patterned cardstock or scrapbook paper. Pick Dad’s favorite tie shape and carefully cut out the shape from the cardstock. (To make sure the tie fits on your paper bag, we gave you two sizes of ties in our template: large ties for lunch bags and small ties for candy bags.) To create the buttons for the shirt, cut out tiny circles from black construction paper.
Candy Bag Filled With Cookies
  1. Open the paper bag and fill it with some of Dad’s favorite snacks, such as gourmet cookies, pretzels, mixed nuts, candy, or popcorn. Fold the collar back down and seal it by placing two pieces of double-sided tape on the inside of the collar and attaching it to the face of the bag.
A photo of diy gift bags with Gift Bags Decorated With Paper Ties and Buttons
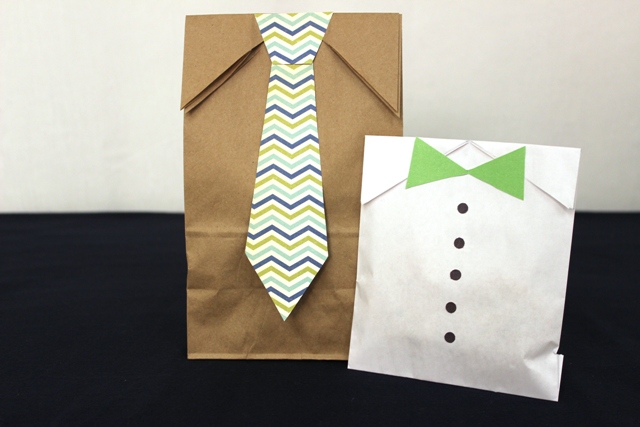
  1. Place a piece of double-sided tape on the back of the cardstock tie cutout and attach it to the bag, right at the top of the collar. Then, using a glue stick, glue the black construction paper buttons in a line going down the center of the bag, right below the tie.

And, finito! Faux formalwear stuffed with Dad’s favorite foods. It’ll be a Father’s Day to remember for Pops!


Father's Day banner

DIY Father’s Day Card for Kids

A photo of diy father’s day card

Store-bought cards are fine, but to show Dad how much you truly care, make him a DIY card for Father’s Day. All you need are paper, glue, and markers to compete this kid-friendly craft that is sure to put a smile on Dad’s face.

Pair this creative card with a delicious homemade brunch or slip it into the amazing Father’s Day gifts you prepared for him. He’ll really appreciate this simple yet sweet statement and will love showing it off to friends and coworkers!

Supplies for DIY Father’s Day card

  • Cardstock or similar weight paper; 2 sheets in one color and 1 sheet in a second color/pattern
  • Glue or tape
  • Pencil
  • Markers
  • Scissors

Directions for DIY Father’s Day card

A photo of diy father’s day card with tracing a hand
  1. Start by tracing your hand on the paper using a pencil. Use the scissors to cut out the shape. Do this for the second sheet of paper as well.
A photo of diy father’s day card with writing an I Love You message
  1. Use a marker to write “I love you” in pencil on one of the paper hands. Then, trace the text with marker and erase any stray pencil lines.
A photo of diy father’s day card with the message inside the card
  1. Now it’s time to create the inside of the card. First, cut a long strip out of the third sheet of paper. Then, fold the strip accordion style. Use a thick marker to write the words “This Much” on the accordion-folded strip.
A photo of diy father’s day card
  1. Using glue or tape, add the adhesive to each end of the accordion strip. Attach the hands to the strip, making sure both hands are facing the same way. Now your card is ready to give to Dad!

Father's Day banner

Father’s Day Crafts: How to Make a DIY Planter for Dad

A photo of father’s day crafts with a DIY Father's Day Planter

It’s always nice to buy dad something for Father’s Day, but making him something you know he’ll love is an extra special touch. If you’re looking for a Father’s Day craft that fits dad’s personality, why not try this unique planter? All you need are just a few plants, soil, and a container!

Materials needed for DIY Father’s Day planter

  • Ceramic container (I used a golf ball planter, but feel free to be creative!)
  • Soil
  • 3-4 plants of different height, preferably a type with vines, such as philodendron.
    • Plants we used include:
      • Tricolor marginata
      • Philodendron
      • Mini palm
      • Spanish moss

How to make a DIY Father’s Day planter

  1. Take your container and fill it one-tenth of the way full with potting soil. (The amount will depend on the depth of the container.)
  2. Place your plants, one at a time, in the container. Use the plant with vines first to one side, the tallest to the back or center of the planter, and the shorter plant to the opposite side.
  3. Add soil, compacting as you go. Compact or compress the soil around the individual plants to get rid of air pockets.
  4. Lightly water the plant.
  5. Add your Spanish moss as a finishing touch to the completed planter.
  6. Give this fun Father’s Day craft to dad and watch him smile with joy!

Note: Plants are easier to work with when the soil is dry. Therefore, if you’re able to, get them a couple of days in advance. If you are not sure how to take care of it, refer to our plant care section.

Hope you and your dad have an amazing Father’s Day!

6 Easter Egg Designs for the Whole Family to Try

We’ll show you how to tap into your passion for making all kinds of fun and inventive creations in our “Get Crafty” series. Use these Easter egg designs to create the most beautiful Easter eggs you ever did see!

Decorating Easter eggs is a time-honored tradition. This activity is a great way to bond with your family members and spend quality time with the ones you love.

But it doesn’t have to be all fun and games. Add a competitive element to your Easter egg decorating this year by staging a contest to see which member of your household can create the most stunning-looking Easter egg designs. All you need are some eggs (bet you didn’t see that coming) and some everyday household items, such as nail polish, Kool-Aid, stickers, and glitter. When you’re done decorating, vote for your favorites and offer prizes (you can’t go wrong with Easter chocolates!) in different categories, such as most colorful, wackiest, most bedazzled, and most original.

Here are some creative recipes for decorated Easter eggs you can use to wow your family.

Polka dot Easter egg designs

A photo of Easter egg designs with polka dot easter eggs

You’ll need:

  • Hard-boiled eggs at room temperature
  • Vinegar
  • White or light-colored crayons
  • Food coloring dye assortment
  • Bowls
  • Tongs or slotted spoon
  • Rubber gloves

Directions:

Start by drawing polka dots on the hard-boiled eggs with the crayons. Next, mix a half cup boiling water, 1 teaspoon vinegar, and 10 to 20 drops of food color in a cup. Repeat this process until you fill all the cups with the desired colors. Use tongs or a slotted spoon to dip the hard-boiled egg in a cup for 5 minutes. Remove the egg from the dye and allow it to dry completely. Repeat until you have a set of polka dot Easter eggs.

Kool-aid Easter egg designs

A photo of Easter egg designs with kool aid easter eggs

You’ll need:

  • Hard-boiled eggs at room temperature
  • Containers of Kool-Aid liquid
  • Paper towels
  • Baking sheet
  • Metal cooling rack

Directions:

Line the baking sheet with layers of paper towels, and then place the metal cooling rack on top. Next, arrange the hard-boiled eggs on the cooling rack. Using one flavor of Kool-Aid at a time, gently squeeze the Kool-Aid liquid over the eggs in a random pattern. Let dry for 10 minutes, and then flip the eggs over on the metal rack to add another layer of color as needed. Allow the eggs to dry completely for another 10 to 15 minutes.

Note: If you use powdered Kool-Aid, mix with less water than the package calls for to create a more concentrated dye. Then, use a spoon to drizzle the Kool-Aid mixture over your eggs.

Marbled Easter egg designs

A photo of Easter egg designs with marbled easter eggs

You’ll need:

  • Hard-boiled eggs at room temperature
  • Whipped cream
  • Food coloring dye assortment
  • Baking sheet
  • Spatula
  • Toothpicks
  • Rubber gloves
  • Paper towels

Directions:

Start by filling your baking sheet with whipped cream until it’s about 1 inch thick. Smooth it out with a spatula. Next, drip food coloring onto the cream. The more colors you use, the brighter your eggs will be. Using a toothpick, swirl and marble your food coloring droplets across the whipped cream.

Put on rubber gloves, and then take a hard-boiled egg and roll it in the cream, coating it completely. Carefully place the egg on a paper towel to dry for at least 20 minutes. When dry, wipe the remaining cream off with a clean paper towel to reveal your colorful marbled patterns!

Stamped Easter egg designs

A photo of Easter egg designs with stamped easter eggs

You’ll need:

  • Hard-boiled eggs at room temperature
  • An assortment of stamps and stamp pads
  • Rubber gloves
  • Hair dryer
  • Floral temporary tattoos
  • Metallic tattoos or stickers
  • Easter-themed stickers

Directions:

Start by putting on rubber gloves. Using a plain hard-boiled egg, press a small stamp evenly across the egg’s surface. Repeat as needed for a patterned design. Set the ink by using a hair dryer and blowing it dry on the lowest setting. You can also swap out the stamps for spring-themed temporary tattoos, metallic flash tattoos, or stickers.

Tie-dye Easter egg designs

A photo of Easter egg designs with tie-dye easter eggs

You’ll need:

  • Hard-boiled eggs at room temperature
  • Disposable coffee filters
  • Twist ties
  • Food coloring dye assortment
  • Spray bottle filled with water
  • Paper towels
  • Rubber gloves

Directions:

Start by putting on rubber gloves. Next, wrap a coffee filter around an egg and secure the filter with a twist tie. Drip a few drops of food coloring on the outside of the filter and let them soak for a minute. Repeat with as many colors as you’d like. Using the spray bottle, wet the coffee filter, making sure it fits snugly around the egg. Place on a paper towel for 15 minutes, and then unwrap the egg and rinse with cold water.

Nail polish Easter egg designs

A photo of Easter egg designs with nail polish easter eggs

You’ll need:

  • Hard-boiled eggs at room temperature
  • A variety of nail polish colors
  • Small bowls
  • Rubber gloves
  • Drying rack or stand
  • Glitter (as needed)

Directions:

Start by filling the bowls halfway with water. In each bowl, add a small amount of a single color of nail polish. Put on the rubber gloves, and then take a hard-boiled egg and swirl it around the water/nail polish mixture. Set on a drying rack until dry. You can re-swirl the dried hard-boiled egg into a different nail polish bowl to add another layer of color. Set back on the drying rack until completely dry. If you don’t have glitter nail polish, you can sprinkle glitter on the eggs as they dry for extra sparkle!

Easter banner ad

Spring into the Season with These Bunny-themed Easter Crafts

We’ll show you how to tap into your passion for making all kinds of fun and inventive creations in our “Get Crafty” series. These Easter crafts are fun for the whole family and will keep everyone’s spirits up for the egg hunt and other Easter activities.

An ad for the 1-800-Flowers.com Easter collection

Bunnies are cute, cuddly…and delicious. No, we don’t mean the kind you put in stew (although we’re not going to stop you from making some if that’s the way you like your rabbit) but the kind you fashion out of pancake batter, like the one in the recipe below.

These Easter crafts are a great way to start Easter morning. Give the kids a set of bunny ears to decorate while you cook up yummy Easter Bunny pancakes for the whole family to eat.

What are you waiting for…hop to it!

Make-your-own bunny ears

Dress up like the Easter Bunny by creating your very own bunny ears to wear! Our custom bunny ears template is easy to download and design any way you want. You can even turn this activity into a decorating contest, with prizes for the most ingenious ears.

You’ll need:

  • A4 printer paper
  • A home printer
  • Crayons, markers, or colored pencils
  • Easters stickers, glitter, and other decorating supplies
  • Scissors
  • Scotch tape
  • Prizes

Directions

Download a copy of our Easter bunny ears template for each member of your family. Decorate the bunny ears and headband strip with crayons, markers, or colored pencils. Add some sparkle with glitter, Easter-themed stickers, and any other decorating supplies you have handy. The only limit is your own creativity!

When you’re finished, carefully cut out your bunny ears and headband along the dotted lines. Wrap the bunny ears around your head like a crown, measuring with the additional headband as needed for extra length. After adjusting the fit of your bunny ears, trim down the headband to the correct length, and then tape it to the bunny ears for a secure it.

Finally, don’t forget to take pictures or videos of you and your family hopping around like the Easter Bunny to post on social media.

‘Ears to a happy Easter!

Easter Bunny pancakes

This recipe for Easter Bunny pancakes is as fun to make as it is to eat. Serve them to the kids on Easter morning or put them out as part of an extravagant Easter brunch.

Easter Bunny Pancakes

Prep Time 15 minutes
Cook Time 5 minutes
20 minutes
Servings 4 bunny pancakes

Ingredients:

  • 2 cups all-purpose flour
  • 2 teaspoons baking powder
  • ¼ teaspoon salt
  • 1 tablespoon sugar
  • 2 eggs
  • 1½ to 2 cups milk
  • 2 tablespoons melted and cooled butter, plus unmelted butter for cooking
  • Whipped cream or butter
  • Fruit to garnish, such as strawberries or blueberries
  • Chocolate syrup
  • Maple syrup

Instructions: 

  • In a bowl, mix together the dry ingredients.
  • Beat the eggs and 1½ cups milk in a separate bowl.
  • Add the eggs, milk, and 2 tablespoons of melted cooled butter to the dry ingredients. Mix the batter enough to moisten the flour. If the batter seems thick, add a little more milk.
  • Heat a skillet to medium heat.
  • Place 1 to 2 teaspoons of unmelted butter on the skillet.
  • When the butter starts to foam, ladle the batter onto the skillet, making various pancake shapes for the bunny ears, head, torso, and paws.
  • Flip pancakes after bubbles rise to the surface, about 2 to 4 minutes. Cook until the other side is lightly browned, about 2 to 4 more minutes.
  • Drizzle chocolate syrup on the plate to form bunny whiskers.
  • Arrange the pancakes on a plate to form your bunny, and then top it off with a dollop of whipped cream or whipped butter for the tail and paw pads.
  • Garnish with fresh fruit, serve with maple syrup, and enjoy your Easter brunch!

Orange Is the New Pastel: 3 Easter Brunch Ideas with Carrots

The series “Get Crafty” gives you the inspiration for creating inventive DIY projects during the holidays and year-round. These Easter brunch ideas include a seasonal cocktail, centerpieces made of spring veggies, and chocolate dipped strawberries that look like carrots.

When I think of things that represent Easter, my favorite spring flower, the tulip, comes to mind. Then there’s the Easter bunny’s favorite food, carrots. And what would Easter be without delicious desserts??? Put them all together and what do you get? A fresh, fun, and creative cocktail, centerpiece, and sweet treat that are perfect Easter brunch ideas.

Signature seasonal cocktail

A signature craft cocktail is always on my holiday entertainment menu. This beverage incorporates the fresh vegetables and flavors of the season, making it perfect for your Easter gathering. And with nearly a full day’s serving of carrot juice in each glass, it’s not only delicious but is packed with vitamins and minerals!

Carrot and Ginger Cocktail

Prep Time 5 minutes
Total Time 5 minutes
Servings 1 drink

Ingredients:

  • 2 thin slices fresh ginger
  • 3 ounces carrot juice
  • 1 ounce apple juice
  • 1 ounce vodka
  • Lime wheel (for garnish)

Instructions: 

  • Muddle the ginger slices in the bottom of a cocktail shaker.
  • Add the carrot juice, apple juice, and vodka.
  • Shake well for about 10 seconds.
  • Pour over ice.
  • Garnish with a lime wedge.

Notes:

Note: You can make fresh carrot and apple juice or buy organic prepared juices.

Fresh spring centerpiece

easter brunch ideas: vegetables

Incorporating seasonal fruits and vegetables into your tablescapes and floral designs takes them from pretty to pretty spectacular! A great starting point is the Baby Vegetable Gift Box or Baby Vegetables Crate from Harry & David. Brimming with the finest seasonal produce available, either one is the perfect gift for the vegetable connoisseur in your life. And if that person is you, get it for yourself!

There’s something about miniatures that gets me every time, and these carrots are no exception. They’re the perfect size to fit around a lowball glass to create one-of-a-kind arrangements. Simply put a rubber band around the glass and insert the carrots between the glass and the rubber band, and continue until the glass is completely covered.

easter brunch ideas: carrot vase

Tie a coordinating ribbon around the vase to cover the rubber band. You can also use a piece of fabric, raffia, or twine.

Creating asparagus vases using this same technique is one of my go-tos in the springtime.

https://www.1800flowers.com/blog/wp-content/uploads/2022/03/Asparagus-Vase_720p.mp4

Everyone is always so impressed with the final arrangement, and they’re even more impressed when they see how easy it is to do!

https://www.1800flowers.com/blog/wp-content/uploads/2022/03/TULIP_STOP-Motion_HR_HBR_SPEED-copy.mp4

Even if you’re pressed for time, you should always have flowers on your table when entertaining. And there is no easier arrangement to make than filling a favorite vase with beautiful, fresh-cut tulips. It’s so easy, it’s almost like the tulips arrange themselves!

Carrot-themed sweet treats

easter brunch ideas: easter carrot treats

I love carrot cake! It’s so decadent, with that delicious cream cheese frosting. But there are many more carrot-themed desserts available this time of year, including Buttercream Frosted Walnut Carrot Cake Cookies and Hoppy Easter Dipped Strawberries.

If you have the time and want to make your own chocolate-dipped strawberries, follow my instructions below. Just don’t expect them to turn out as good as the ones from Shari’s Berries! They’ve been perfecting the art of dipping strawberries into melted candy for over 30 years. Still, it is a fun project to do at home.

‘Carrot’ Strawberries

Prep Time 5 minutes
Cook Time 30 minutes
Chill and assembly time 25 minutes
Total Time 1 hour
Servings 24 berries

Equipment:

  • Double boiler
  • Skewers
  • Candy melting machine

Ingredients:

  • 1-2 dozen medium to large strawberries
  • 12-ounce bag orange candy melts
  • Faux leaves and clippers (optional)

Instructions: 

  • Prepare the strawberries for dipping by rinsing and thoroughly drying them. Lay the strawberries out on a paper towel and place another towel over them and gently press. Let them sit out for a bit before dipping, as it is important that they are completely dry.
  • While the strawberries are drying, melt the chocolate in a double boiler, microwave, or candy melting machine.
  • Start with about a cup of melts, stirring constantly until melted. Turn down or remove from heat and add more candy melts as needed, stirring them in until they are melted. Doing it this way helps to keep your candy from overheating, and breaking down and taking on a thick, chalky consistency.
  • Remove the stems before dipping. Insert a wood skewer into each strawberry, dip the strawberry in the melted candy, and place it on a piece of parchment paper to cool and set. (Note: If you are not adding the faux leaves, you do not need the skewers. Leave the stems on the berries and use them to hold onto as you dip the strawberries in the melted chocolate with your hands.)
  • Take a stem of faux greenery that has multiple stems/leaf clusters and use clippers or wire cutter to cut small sprigs.
  • Once the candy is completely cool, remove the wood skewer and insert a sprig of greenery into the strawberry.
  • Continue doing this until all the strawberries have a "carrot top."
easter flowers ad

DIY Mother’s Day Photo Vase Craft for Kids

Our series “Get Crafty” gives you the inspiration for creating inventive DIY projects during the holidays and year-round. Pair those Mother’s Day flowers with a creative DIY photo vase — the perfect Mother’s Day craft for kids of all ages!

This year, take your Mother’s Day flowers to the next level with a creative and personalized DIY photo vase. The beauty of this vase is in the tiny details that reflect each child’s personality, making it the perfect Mother’s Day craft for kids of all ages.

a photo of a diy photo vase

Depending on how old the child is, you may want to prepare the tissue paper shapes beforehand, as little kids may have trouble cutting the delicately thin material. Be sure to provide them with a smock and clear out an area for crafting, as this project includes liquid adhesive.

Once this DIY photo vase is completed, add mom’s favorite flowers or arrangement for a Mother’s Day gift she’ll treasure always.

a photo of a diy photo vase: materials

Supplies for DIY photo vase

  • Vase
  • Liquid adhesive (Mod Podge, PVA glue)
  • Small paintbrush
  • Tissue paper in a variety of colors
  • Photo
  • Scissors

How to make a DIY photo vase

Use soap and water to clean any residue off the vase. Set aside to dry.

a photo of a diy photo vase: tissue paper hearts

Cut shapes out of the tissue paper. We chose hearts, but you can go with flowers, stars, or diamonds. The homemade touch of this project is what makes it special, so the shapes do not all have to be the same size or shape. Once you have enough shapes, set them aside.

a photo of a diy photo vase: gluing on tissue paper hearts

Pour some of the adhesive into a small bowl. Dip the brush into the adhesive and pick up a tissue paper shape with the brush, and “paint” it onto the vase. You only need a light coat of adhesive, so try to avoid drenching the shapes.

Once you have stuck all the shapes to the vase, it’s time to add the photograph. You may want to trim the photo to fit your particular vase before placing it on. Once you have decided where the photo will go, use the brush to paint the adhesive onto the back of the photo. Apply it to the vase and hold it down for 5 to 10 seconds until it’s secure.

a photo of a diy photo vase: finished vase

Give the vase a few minutes to dry, and then use a cup or pitcher to carefully pour water into the vase. Then, add the flowers, and your DIY photo vase is ready to show off!

A graphic reminding visitors that moms deserve a special celebration on Mother's Day.

Mother’s Day Crafts for Kids: DIY Photo Flowers With Free Printable Template

Our series “Get Crafty” gives you the inspiration for creating inventive DIY projects during the holidays and year-round. Let the children make their own homemade Mother’s Day craft with this creative DIY photo flowers idea that will touch mom’s heart.

a photo of diy photo flowers

Move over macaroni frames, there’s a new DIY Mother’s Day craft in town! And it’s not only fun to make but easy, too.

Using our photo flower stencil template, some scrapbooking paper, scissors, and a bit of glue, we created creative and colorful DIY photo flowers. They’re the perfect kid-friendly complement to those stunning Mother’s Day flowers you plan on getting Mom.

Let the kids get creative by picking out their own patterned paper and colors. They’ll love letting their personalities shine in this personalized Mother’s Day gift idea.

And Mom will think it’s just the sweetest present she’s ever received.

Supplies for DIY photo flowers

  • Photo flower template (download here)
  • Scrapbook and construction paper in various colors and patterns
  • Scissors
  • Glue
  • Floral tape
  • Tape
  • Lollipop sticks or similar
  • Photos

Directions for DIY photo flowers

a photo of dit photo flowers: flower stencil cutout

Load your printer with a sheet of cardstock; download and print the photo flower stencil template. Cut out the shapes to use as stencils. Set aside.

a photo of diy photo flowers: tracing flower shape on photo

Now, prepare the photograph. If are using an existing photo, trace the smaller flower on the photograph and cut out the shape. If you plan on printing your child’s photo, crop the area you wish to use to 3.5 inches by 3.5 inches. Print on high-quality photo paper for best results. Once printed, use the smaller flower to trace the shape and cut out the photo.

a photo of diy photo flowers: cutting out the flowers

Take the larger flower and trace it onto the color/pattern you’d like to appear on the outermost layer of the flower. Cut out and set aside.

Then, take the smaller flower and trace it onto the color/patterned paper you would on the middle layer of the flower. Trace the circle stencil in the middle of the smaller flower shape. Fold in half and cut out the circle shape from the flower to create an open space.

a photo of diy photo flowers: faces in the flowers

Once you have all the shapes cut out, place a few drops of glue onto the largest flower. Take your first photo and glue it down. Once it’s dry, add a few drops of glue to the smaller flower and place it on top of the photo.

a photo of diy photo flowers: making the flower stems

To make the stems, grab your stick and wrap it in floral tape. (The tape is naturally slightly sticky so no further glue is necessary.) Once fully wrapped, tape the stick to the back of the flower.

a photo of diy photo flowers: finished flowers

Optional: Fold a piece of green construction paper in half and cut out a folded leaf shape. Add glue to one half of the leaf and hug it around the newly created stem.

Mother’s Day Flower Craft for Kids: Sunflower Wheel of Appreciation

Our series “Get Crafty” gives you the inspiration for creating inventive DIY projects during the holidays and year-round. Show Mom just how special she is by surprising her with a Sunflower Wheel of Appreciation! Read on to learn how to make this DIY Mother’s Day craft. 

a photo of a sunflower wheel of appreciation

Mom does it all. She cooks, cleans, consoles, and even coaches us through life’s toughest moments. To show Mom just how special she is, make her this Sunflower Wheel of Appreciation to go along with her Mother’s Day flowers. This creative DIY Mother’s Day craft is blooming with compliments that are sure to make Mom smile.

We chose to craft ours to resemble a sunflower, but you can get creative and mix and match colors and shapes to replicate Mom’s favorite flower! Think white and yellow for a beautiful daisy or pink and white for a stunning lily.

Supplies for Sunflower Wheel of Appreciation

  • Cardstock in 2-4 different colors (We used brown, orange, and two shades of yellow)
  • 1 paper plate
  • Scissors
  • Glue
  • 1 fine tip marker
  • Paper fastener

Directions for Sunflower Wheel of Appreciation

a photo of a sunflower wheel of appreciation: tracing paper plate

Trace the paper plate onto the piece of cardstock that will become the bottom of the wheel.

a photo of a sunflower wheel of appreciation: two paper circles

Then, trace a circle shape just a bit smaller than the first shape on a piece of different-colored cardstock. If you need a stencil for this part, bend the paper plate in half and trim the ends just a bit. The result will have scalloped edges but will suffice for creating the general circle shape.

a photo of a sunflower wheel of appreciation: cutting out and tracing rectangle

Use scissors or an X-Acto knife to cut out a rectangular shape on the smaller circle. Take the cut-out rectangle shape and use it to create a border for your text on the larger circle. This will assure your text stays within the boundaries of the box.

a photo of a sunflower wheel of appreciation: writing the messages


Once you draw your rectangular borders, use a pencil to write a message for Mom in each one. Then, use a marker to go over the letters to make the words pop. Erase any stray pencil markings.

a photo of a sunflower wheel of appreciation: petals

Now, take the cardstock you plan to use for the petals and cut out several petal shapes in varying sizes (they don’t need to be perfect). We used two shades of yellow, but you can stick to just one and still come out with a wow-worthy project.

Apply glue to the wide ends of the petals and stick them to the back of the larger circle.

To complete the wheel, position the smaller circle in the center of the larger circle and seal in the middle with the paper fastener.

Now, give your Wheel of Appreciation a spin and let your Mom know why she’s the best in the world!

a photo of a sunflower wheel of appreciation: mom is my hero message

My Mom…is my hero

a photo of a sunflower wheel of appreciation: mom makes the best breakfast message

My Mom…makes the best breakfast

a photo of a sunflower wheel of appreciation: mom is my number 1 fan message

My Mom…is my #1 fan

Exit mobile version