DIY Memorial Day Crafts the Whole Family Can Make

Memorial Day is the unofficial start to summer. It’s a time for families to be outside enjoying the fresh air, sunshine, and freedom we have in this country. This freedom, however, comes at a price. On Memorial Day, we honor all the brave men and women who have served in the U.S. Armed Forces and made the ultimate sacrifice so that we can live free.

Depending on the ages of your little ones, you may be challenged to find things for them to do while also conveying the meaning of this holiday. Here are two simple DIY Memorial Day crafts using recycled materials to keep kids busy and happy on this important day.

Making patriotic-themed red, white, and blue decorations gives you a chance to have some fun while teaching your children about Memorial Day and why it’s important to acknowledge the sacrifices made for our country.

DIY Memorial Day craft No. 1: Memorial Day wreath

DIY Memorial Day Crafts with Memorial Day wreath

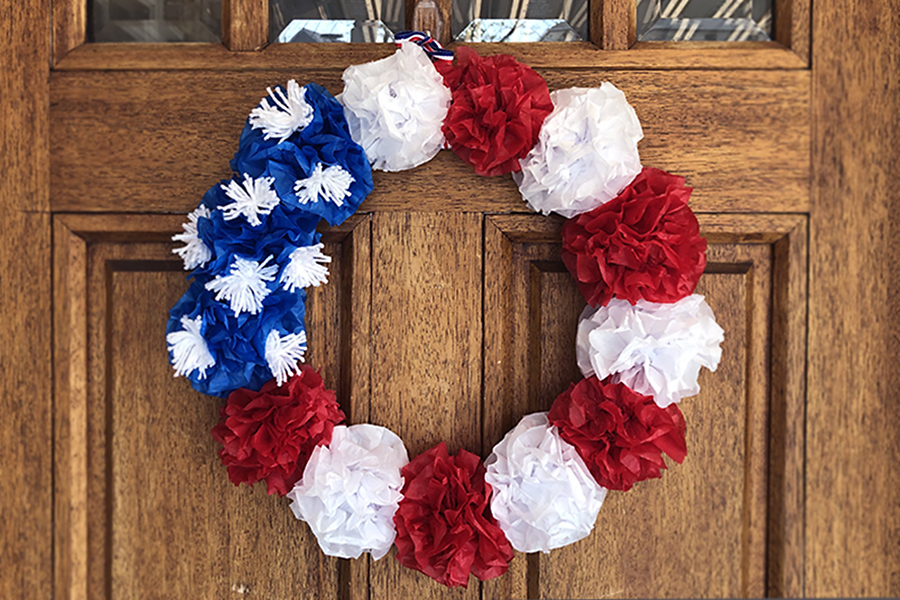
One way to get crafty with all those cardboard shipping boxes you have lying around is to create a red, white, and blue Memorial Day wreath out of them. It’s easy to make, and all ages can get in on the patriotic fun.

Of course, you’ll need more than just cardboard to get started…

Materials needed for Memorial Day wreath

  • Scissors
  • Straight edge cutter
  • A package of red, white, and blue tissue paper
  • White yarn
  • Various size plates
  • A pencil
  • String, ribbon, or yarn to create a hook for hanging
DIY Memorial Day Crafts with cardboard circle cutout

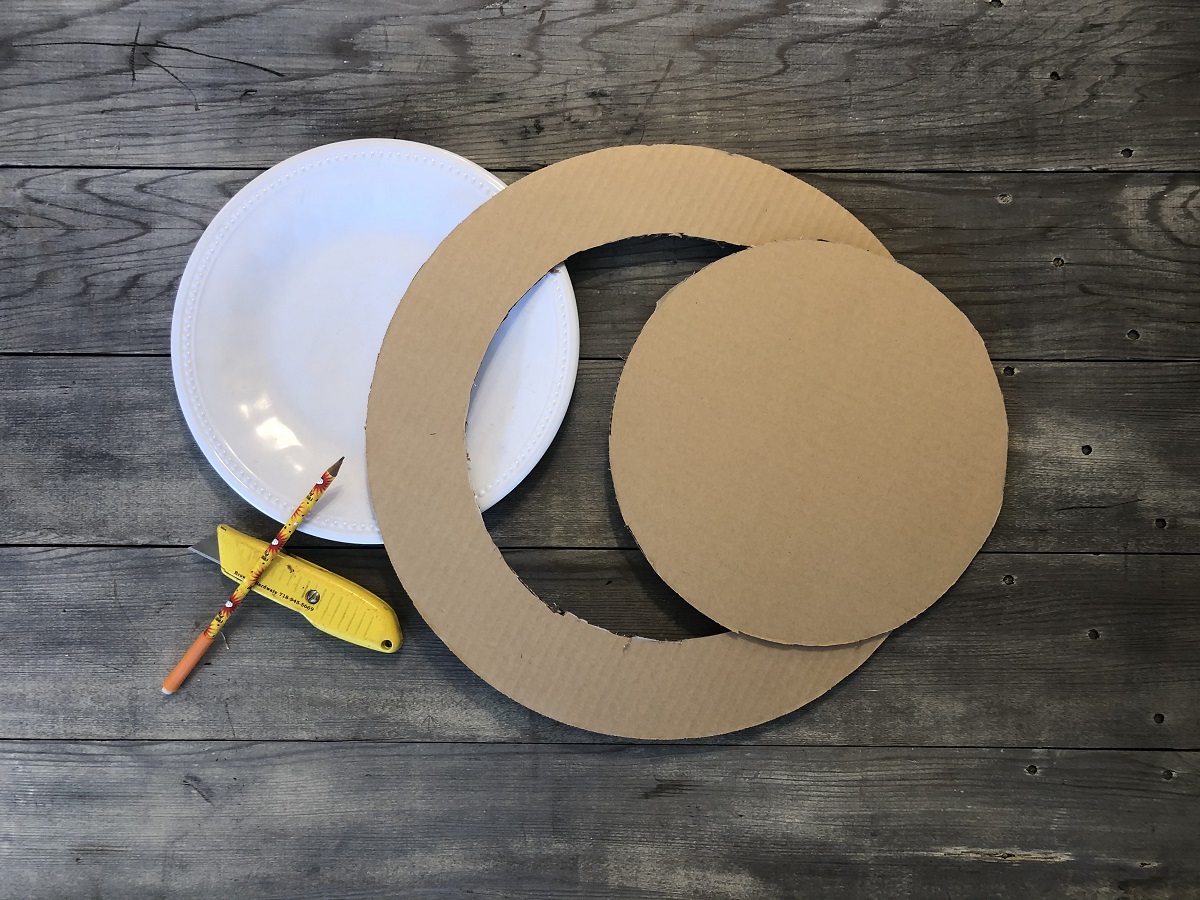
You’ll need two different-sized plates to create your wreath outline. I used a cardboard cake round and a plate to cut out the inside of the circle.

DIY Memorial Day Crafts with medals

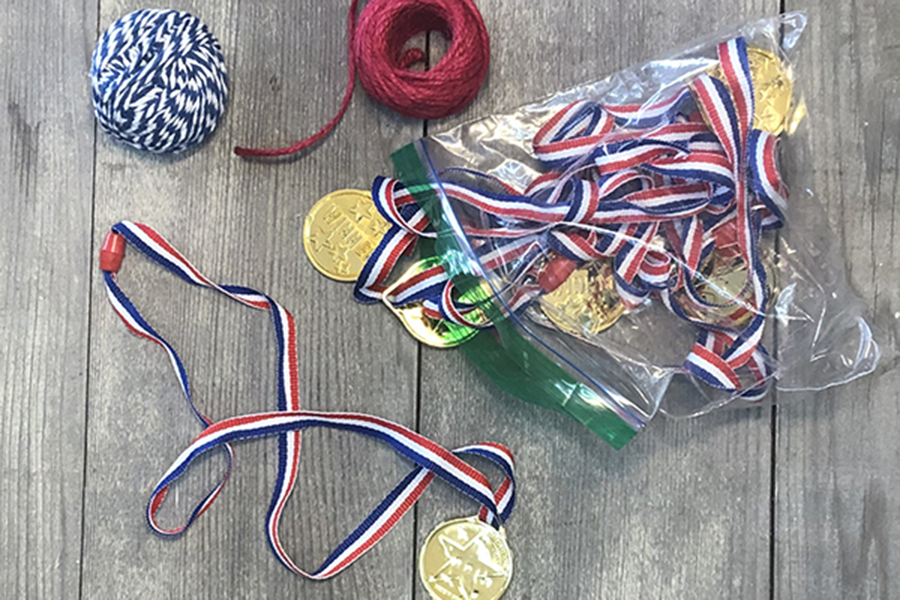
Since I save so many knick-knacks for future projects, I had a few plastic gold medals on red, white, and blue ribbons left over from a “Family Olympics” day. The ribbons were just what I needed for this wreath. If you a have red, white, and blue ribbon, it will add an extra patriotic pop to your Memorial Day wreath.

DIY Memorial Day Crafts with Ribbon on wreath cutout

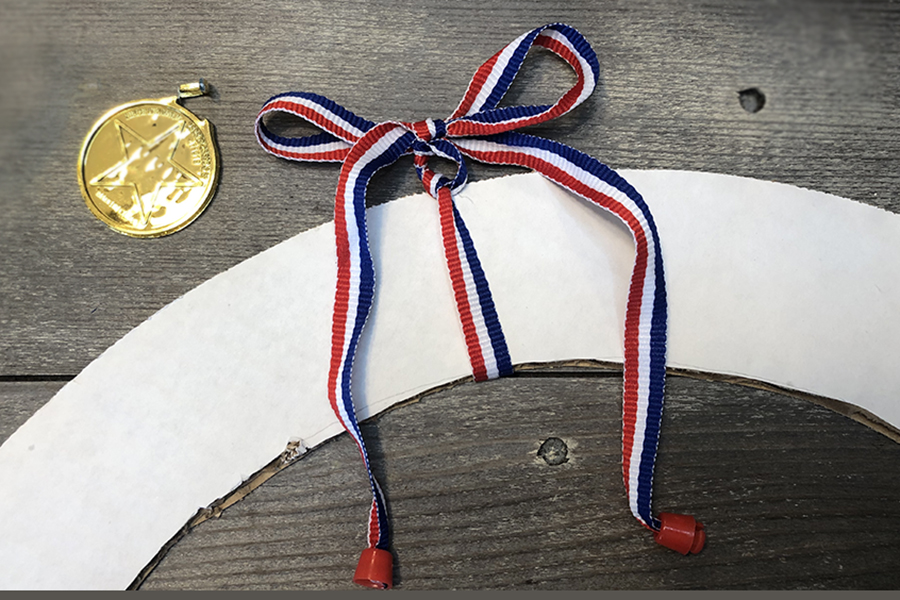
To add the ribbon, I simply cut off the plastic gold metal and tied it around the base of the cardboard wreath before adding the tissue paper flowers.

DIY Memorial Day Crafts with Ribbon on wreath cutout

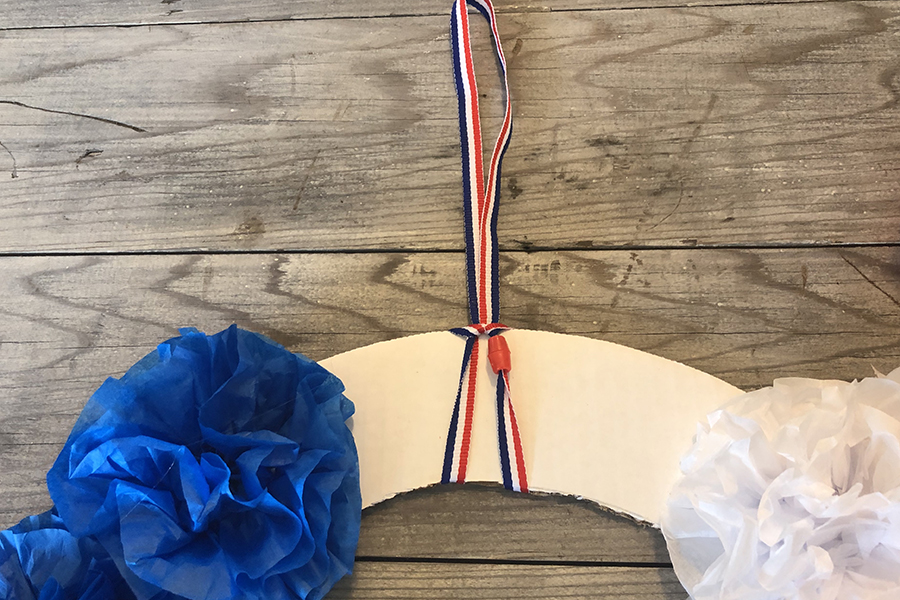
When tying the ribbon, you don’t need to make a bow. Just loop the ribbon around the cardboard to create a loop for hanging.

How to Make a Tissue Paper Flower

To make the tissue paper flowers, take five large pieces of a single-color tissue paper and cut them into layered pieces that are 5 inches wide by 10 inches long. Watch the video above to see how to fold the tissue into an accordion, staple it in the middle, and separate and fan out each individual piece on either side of the staple.

For reference, I made:

  • Three blue tissue paper flowers
  • Five white tissue paper flowers
  • Five red tissue paper flowers
DIY Memorial Day Crafts with Tissue paper flower on wreath cutout

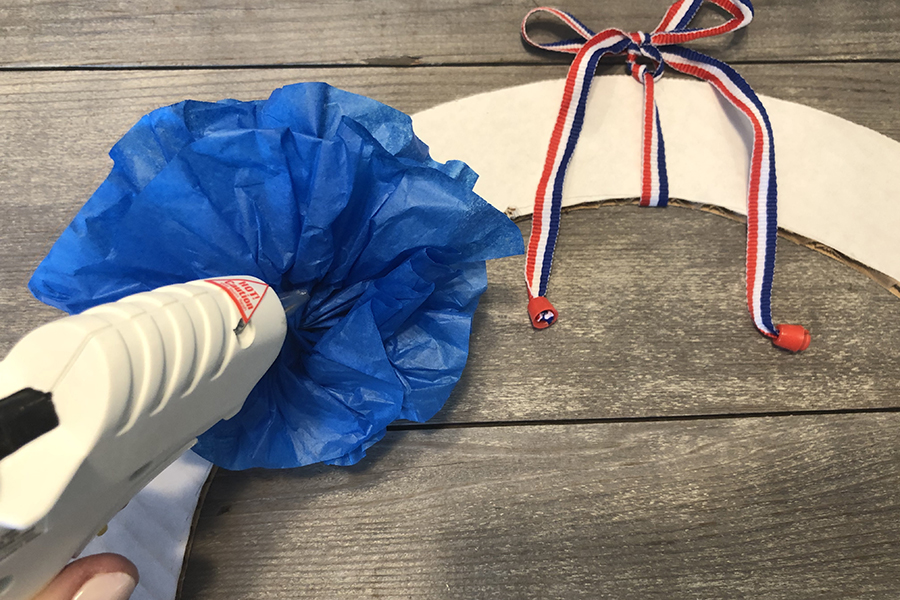
To get the tissue paper flowers to stick, use any type of adhesive that will keep them in place. I used a hot glue gun, as I find it easy and fast to work with. If you are doing this with young children, stick with craft glue or glue dots.

DIY Memorial Day Crafts with Tissue paper flowers on wreath

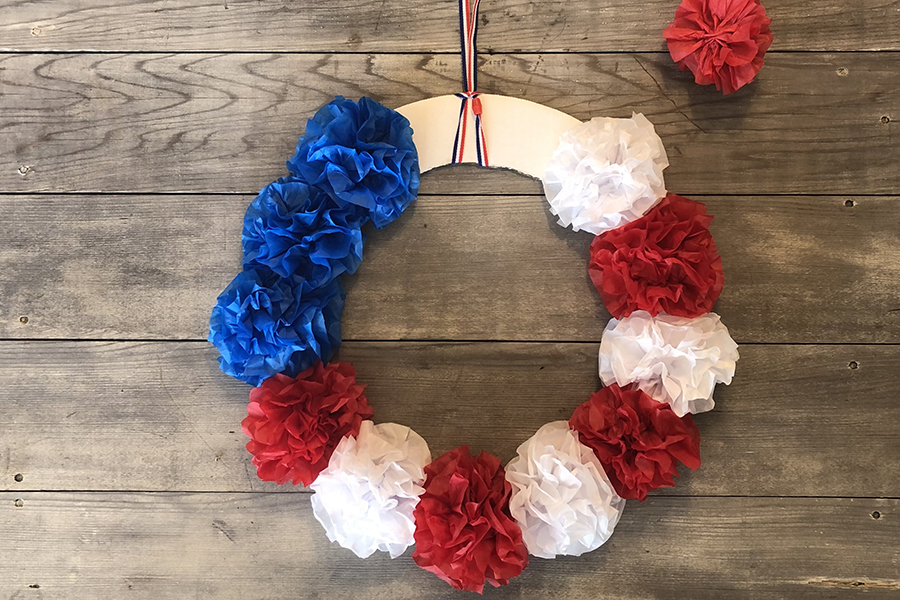
Then, attach the three blue flowers on the top left of the wreath.

Next, add and alternate the red and white flowers to represent the stripes of the American flag.

DIY Memorial Day Crafts with Starbrusts on Memorial Day wreath

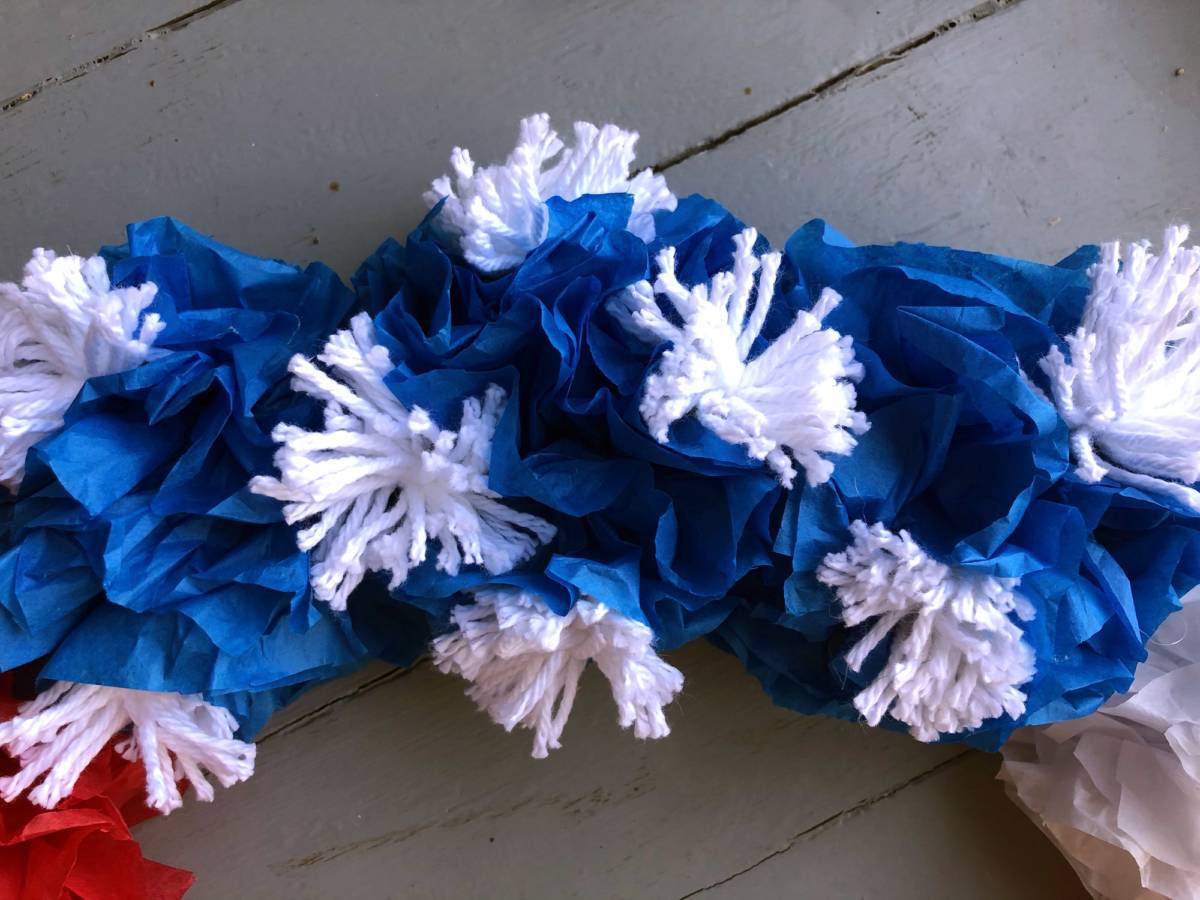
To make the American flag’s stars, use white yarn to create little starbursts that can be nestled and glued into the “petals” of the blue tissue paper flowers.

DIY Memorial Day Crafts with Hanging Memorial Day wreath

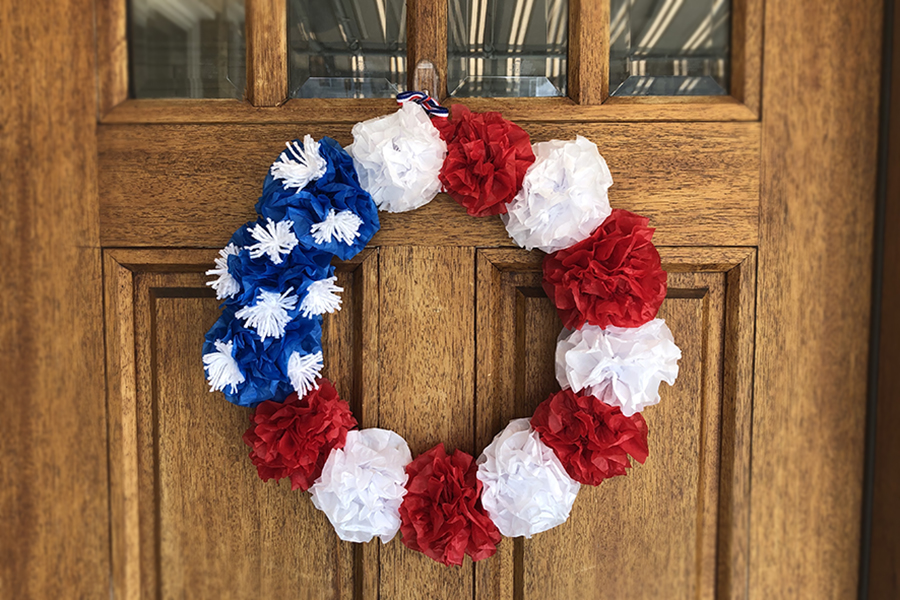
Follow these steps and you’ll have a beautiful homemade Memorial Day wreath. You can hang your wreath on your front door — if it’s protected from the elements — to acknowledge and send a message of thanks to the fallen service members and their families.

DIY Memorial Day craft No. 2: Memorial Day garland

This idea for a festive Memorial Day garland is made from materials that you probably already have around your house.

Materials needed for Memorial Day garland

  • Cardboard boxes
  • Paint or markers
  • String or ribbon
  • Hole puncher
  • Scissors or straight edge cutter

You can make the garland any size you want. I decided to do 4-inch triangles.

diy memorial day crafts with red white and blue triangles

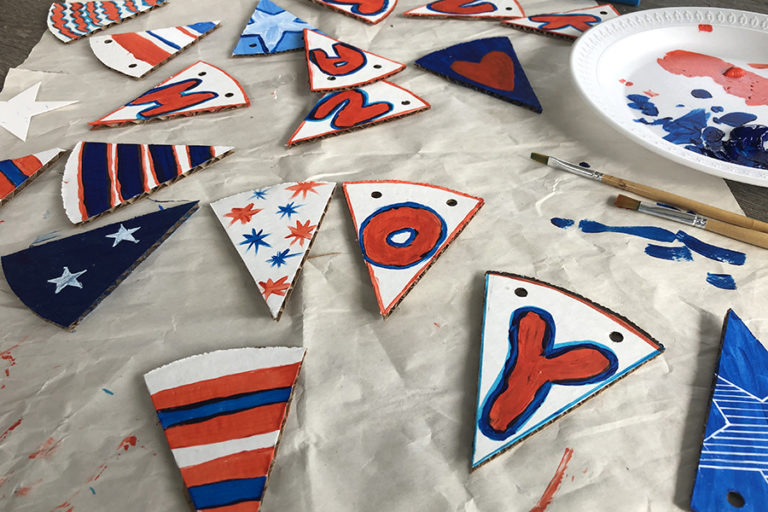
I cut out enough triangles to spell out “Thank You” and added additional triangles decorated in patriotic colors to complete the garland.

This is a great DIY Memorial Day craft for kids. Let them use their imagination to decorate the individual triangles.

diy memorial day crafts with kid painting triangles

It’s also fun to do together, and I like that it can be worked on in stages. Whenever you have the time or feel like chilling out, just sit down and paint or draw a few designs.

Once you have all the triangles decorated and have punched two holes at the top of each one, simply lace a string (twine, ribbon, jute, etc.) through each triangle.

diy memorial day crafts with wrapping string with tape

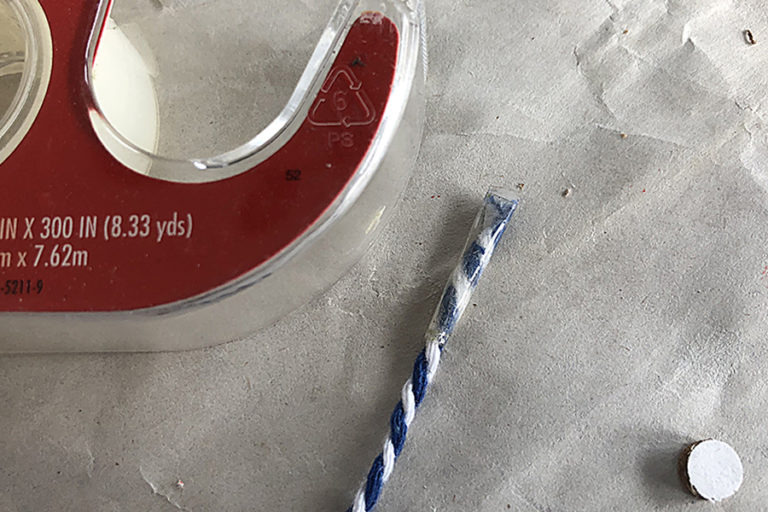
I found it helpful to wrap the end of my string with a piece of Scotch tape; it made it easier to thread through the holes. I also laid out all the triangles on the table in the order they should go in, before starting to connect them to create the finished garland.

diy memorial day crafts with memorial day garland

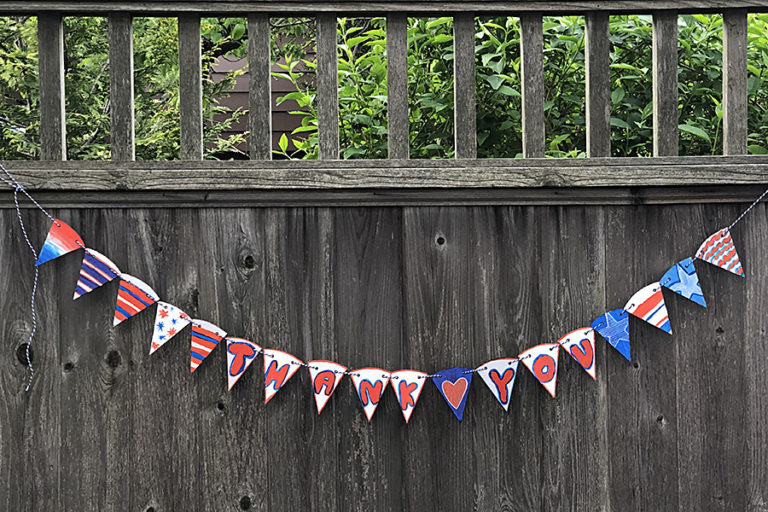
I am thrilled with how this DIY Memorial Day craft turned out and how easy it was to do. And the fact that it created a second life for all the extra cardboard I had makes me very happy. I’ll be doing these garlands for birthdaysFourth of Julyanniversaries, etc.

Take a little time this Memorial Day to reach out to a veteran or a family of a vet with a simple “Thank you for your service.”

Happy Memorial Day!


Memorial Day Banner

St. Patrick’s Day Decor: 2 DIY Ideas with Flowers

St. Patrick’s Day brings together unique colors, and color combinations, that you don’t get to play around with much during the rest of the year. Here, we offer two St. Patrick’s Day decor ideas with flowers: A centerpiece that mimics the Irish flag and a floral arrangement constructed from symbols of the holiday: green carnations, cabbage, and potatoes.

st. patrick's day decor with irish flag made from flowers

Irish flag centerpiece

Creating a centerpiece modeled after the Irish “tricolour” — as the flag of Ireland is frequently referred to — is very easy and will last for a few weeks. This works out great for anyone (like me) who likes to celebrate St. Patrick’s Day for the entire month of March!

The simplicity of the flag’s design of three colors in three equal parts makes it easy to recreate in flowers. The meaning behind it, however, is deep and captures the desire for peace during conflict. Here is what each color of the flag represents.

Green

Green is a color long associated with Ireland and Irish republicanism. Back in the 1700s, the Society of United Irishmen, who were predominantly Catholic, launched a rebellion to end British rule, resulting in the creation of an independent Irish Republic.

st. patrick's day decor with Saint Patrick's Day parade with Irish flag

Orange

Protestant King William III led an army that defeated the Catholics, led by King James, in the Battle of the Boyne in 1690. King William was known as William of Orange because he came from the Principality of Orange. More than 100 years later, the Northern Ireland-based Orange Order, a Protestant supremacy group, was formed. Over time, orange came to represent Protestant British unionists.

White

Between the two opposing colors of green and orange is white, which represents peace and the hope of a lasting truce between the two sides.

The flag represents the ideal that every Irish person has a place in Ireland regardless of political association or ethnicity.

Flowers you’ll need

  • Green button poms
  • White cushion poms
  • Orange spray roses

How to make it

  1. Choose a shallow rectangular container that is either waterproof or can be lined with plastic.
  2. Soak a few bricks of floral foam in a sink or bowl of water.
  3. Cut the foam to fill the entire container. The foam should sit just at the height of the container.
  4. If you’re transporting your centerpiece to another location, use waterproof tape to secure it to the container; otherwise, it’s not necessary.
st. patrick's day decor with irish flag floral foam container
  1. Cut each individual flower from the main stem, leaving only about 1-1½” of stem to insert into the foam.
  2. Measure and mark the foam into three equal parts.
  3. Starting at one side, insert each flower in that colorway, one at a time, directly into the foam. Continue until you have finished the three color sections of the flag.
  4. Spritz your flag with water and add water to the tray/container every few days to keep it fresh.

Tip: An easy way to add water to the container is to slip a few ice cubes between the flowers. They’ll melt and keep the foam moist!

st. patrick's day decor with beer mug flowers

Looking for another fun craft to make for March 17? Nothing says St. Patrick’s Day like a big old mug of “beer”!

St. Patrick’s Day DIY floral arrangement

What better way to decorate your house this March 17 than with this easy-to-make DIY St. Patrick’s Day floral arrangement!

st. patrick's day decor with green floral arrangement

Materials needed

  • 1 large head of cabbage
  • 6 green carnations
  • 6 stems of Bells of Ireland
  • 2 stems of monte casino
  • A small piece of floral foam
  • Paring knife
  • Plastic cup
  • A few red potatoes (optional)

Instructions

  1. Carefully cut out the top of the cabbage (about a 2-by-2 hole) with a paring knife, cutting at least 2 inches deep.
  2. Cut a plastic cup to fit into the hole, making sure it sticks out at least a half inch above the opening in the cabbage.
  3. Place the soaked foam in the cup so it is at least 1 inch higher than the cup. Note: Make sure to use the plastic cup because the floral foam and cabbage together are not aroma friendly.
  4. Starting at the top, place your first Bells of Ireland into the floral foam (about 1-1/2 times the height of the cabbage). Continue to add the bells in a triangular shape.
  5. Add the green carnations.
  6. Complete your arrangement by adding the monte casino as filler.

Optional: We added some potatoes alongside our arrangement, so feel free to accent your St. Patrick’s Day flowers with some spuds at the base of the cabbage.

How to Make a DIY Christmas Stocking to Add Holiday Cheer to Your Home

When I was asked to write an article about making DIY Christmas stockings, the first thing I did was to go to my favorite fabric store and head straight for the clearance remnant table.

diy christmas stocking with fabric remnants

I picked up the holiday color “trinity” — red, white, and green — as well as various prints and florals that just spoke to me. I knew I wanted to show how to make a basic Christmas stocking, but I also wanted to inspire creativity, to make you, the reader, go beyond what’s expected and design a stocking that matches your own personal style.

I started with a basic red stocking with white cuff. I am not a sewer and do not own a sewing machine, so I decided to make the stocking using glue — both hot glue and fabric glue. Easier said than done! Here’s how it went.

Making a basic Christmas stocking

diy christmas stocking with Christmas stocking template
diy christmas stocking with Christmas stocking cuff
Click images to enlarge
DIY Christmas stocking with hemmed cuff

Using an old Christmas stocking, I created a stocking template that you can download here. This stocking measures 7 inches wide at the top and 14 to 16 inches high. Don’t feel like your stocking has to be these same dimensions — make your stocking any size you want!

  1. Trace the stocking template onto your fabric.
  2. Use a sharp scissors to cut out the stocking. You will need two pieces of fabric. Before cutting, fold the fabric so that you can cut both pieces at the same time.
  3. After cutting the two stocking pieces, place them right side together.
  4. Sew or glue the edges together, except for the top, with about a quarter-inch seam.
  5. Cut the material you are using for the cuff. The length should be two times the width of the stocking at the top plus another 1 1/2 inches. The height should be between 3 and 4 inches. If you are using a material that will need to be hemmed, add an additional quarter inch on the top and bottom.
  6. Hem the cuff, if necessary. Glue or sew the cuff with the right side against the wrong side of the stocking along the top edge only. Remember, your stocking is inside out at this point.
  7. Turn the stocking right side out and roll the cuff down.
DIY Christmas stocking finished

This is your basic stocking. However, I felt it was a bit plain looking, so I used a buffalo plaid wired ribbon to add some personality to it.

Embellishing a basic Christmas stocking

diy christmas stocking with buffalo plaid wired ribbon
DIY Christmas stocking with ruffled ribbon
Click images to enlarge
DIY Christmas stocking with name on it

To make a ruffled edge, simply hold the end of one of the wires and keep sliding the ribbon down the wire on that one side. Keep doing this until you have the length of ribbon you need.

I attached the ruffled ribbon all along the edge of the stocking using a glue gun. I also made the loop for hanging from the same ribbon.

At this point, I thought it needed a little more personalization, so I added a name on the cuff. If you want to create your own custom stocking but don’t have the time, you can always order one online.

While making this stocking using only glue was fairly simple, I decided that sewing the stockings would be faster and easier, and make them more secure and functional. However, as I said before, I am not a sewer, so I called my good friend, Ann, who is a master quilter, for assistance. She was happy to help, and it turned out to be a great afternoon of holiday crafting and spending time together.

Making a mini Christmas stocking

We decided to do two stocking sizes: a traditional size and some minis that would be great for gift cards.

DIY Christmas stocking template
DIY Christmas stocking with tracing shape on fabric
Click images to enlarge
DIY Christmas stocking with cutting out shape

No matter the size you choose, you still need to start with a template. I used a credit card/gift card as a guide and drew the finished size that I wanted the mini stocking to be. Next, I created the final template that is a quarter inch larger all around to allow for the seams. Then, I followed the same steps as above.

Place the template on two pieces of fabric and cut both pieces at the same time.

diy christmas stocking with white stockings with black and white buffalo plaid ribbon cuffs

How adorable are these? We went all out on the buffalo plaid, making both red stockings with red and black ribbon cuffs, and white stockings with the black and white buffalo plaid ribbon cuffs. For both versions, we used the same ribbon for the loops.

I will definitely incorporate these mini stocking gift card holders into my wrapping plans this and every year!

More DIY Christmas stocking design ideas

Next, I laid out all the beautiful fabric remnants I bought and had fun putting these fabulous combinations together. Holiday stockings are just one more way to customize your holiday decorating or gift giving. Who said stockings need to be traditional? Why not have them match your style, maybe even using the same fabric as your pillows or curtains?

DIY Christmas stocking hanging from mantle

This stocking would be perfect as a gift bag for my quilting friend, Ann. I love the layering we did using both fabric and ribbon for the cuff.

DIY Christmas stocking modern looking

This version is so pretty and modern looking. Adding the burlap and lace ribbon trim on the cuff adds just a touch of rustic to an otherwise elegant stocking.

DIY Christmas stocking with magnolia leaves

How great does it look on a front door brimming with magnolia leaves?

DIY Christmas stocking with materials

There’s something about all the texture in this combo that just did it for me! Again, it’s all in the details. Braiding the green yarn before gluing it to ribbon edging just brings it to the next level.

Ann and I had so much fun creating these beautiful stockings, and we hope they inspire you to try making some of your own.

I found the right combination for a detailed and structurally sturdy stocking was sewing the main portion and gluing the details. Find the method that’s right for you and remember — just have fun with it!

DIY Thanksgiving Centerpieces and Table Decoration Ideas

Thanksgiving provides us with a cornucopia of ideas for decorating a table…including cornucopias. The flowersplantsdecorative elements — even foods! — of the season offer limitless possibilities when it comes to sprucing up your tabletop and creating a veritable work of art to show off to your guests when they sit down for the big meal.

A beautifully designed table, with its layering of colors and textures, along with personal touches play a part in the delight and ambiance of this special occasion. Thanksgiving, after all, is as much about the feeling that the holiday evokes as it is about the food we eat or the TV programming we consume.

To offer you some inspiration for setting just the right mood for your gathering this year, here are a few easy, creative, and inexpensive Thanksgiving centerpiece ideas to get you started on your tablescape art.

Thanksgiving centerpiece idea No. 1: Fresh flower wreath centerpiece

thanksgiving centerpiece ideas with floral wreath centerpiece close-Up

Wreaths are one of my favorite design styles for a more traditional Thanksgiving centerpiece. Having the center of the wreath open provides endless opportunities for additional personalization. Here, I used a beautiful amber Fenton glass vase as a candleholder; the amber glow is the perfect complement to the rich hues of the seasonal flowers in the wreath.

thanksgiving centerpiece ideas with elements for Floral Wreath Centerpiece

When creating a fresh floral wreath, I like to use flowers that air dry nicely. Using flowers like the varieties featured in this photo — roseshydrangea, celosia, succulents, and more — can extend the life of your centerpiece by weeks.

thanksgiving centerpiece ideas with Succulent Wreath Centerpiece

Some varieties of hydrangeas dry better than others. The variety that dries the best, and is featured in the wreath above, is known as an “antique hydrangea.” It is typically soft moss green with burgundy edging, and works beautifully with all the rich colors of autumn.

thanksgiving centerpiece ideas with Fall Wreath Centerpiece Top-Down View

This wreath is all about the vibrant and saturated hues of the season. To create the perfect backdrop for this intensity, I kept everything else very neutral. A burlap table runner on a natural wood farm table and wooden chargers holding amber depression glass plates let this centerpiece take center stage.

How to make a flower wreath centerpiece

How to Make a Thanksgiving Centerpiece or Fall Wreath DIY

Regardless of your choice of flowers and color combinations, the step-by-step process of constructing the wreath is consistent. Various types and sizes of wreath forms are available. The one I used here has a papier-mâché backing, so I placed it on a charger plate after soaking it to protect my surface.

1. Prepare the floral foam

thanksgiving centerpiece ideas with Soaking the Floral Foam in Water

Thoroughly soak the floral foam wreath base.

2. Add your greens

thanksgiving centerpiece ideas with Adding Greens to Floral Foam

Start with a base of foliage, inserting short pieces around the outside of the form, adding additional sprigs on the inside rim as well as the top. Your foam does not have to be completely covered at this point; you can always go back and fill in any empty spaces after you add the flowers and dried accents.

Step 2 Continued- Add Greens

3. Add your flowers

thanksgiving centerpiece ideas with Adding Hydrangeas

Start with your largest flower. Each hydrangea bloom has multiple stems of flower clusters. Because you are cutting the stems so short and inserting them directly into wet floral foam, you can cut these laterals from the main stem and use them as separate insertions. This allows you to bring the color and texture of the hydrangea all the way around the wreath without overpowering the other flowers.

Step 3 Continued- Add large flowers (hydrangeas) all around

Here, I used only two hydrangeas, but I have six separate insertions that already make my wreath nice and full.

4. Add your décor

thanksgiving centerpiece ideas with Adding Decor

Next, I added the dried pods and burlap roses. These are both substantial and add fullness, especially as the fresh flowers begin to dry. Flowers will lose their vibrant color and shrink in size during the drying process.

5. Fill in any empty spaces

thanksgiving centerpiece ideas with Filling in Empty Spaces

Fill in the spaces with the rest of the floral that you have chosen, cutting as many short stem laterals as possible.

6. Add your finishing touches

thanksgiving centerpiece ideas with adding Finishing Touches

I used rose hips to add dimension to the wreath. To do this, cut the woody stem of the rose hips a little longer than you cut the stems of the flowers. Then, insert the bottom of the stem between the flowers until it is secure in the foam and the berries are positioned just above the flowers.

7. Add colored leaves

Adding the fall leaves, with their touch of gold and rust, is just what this wreath needs to tie it all together. Now, you’ve got a perfect centerpiece for your Thanksgiving table, and all season long!

Keep it green and lean

thanksgiving centerpiece ideas with Green Plant Centerpieces

Plants are a great option for tabletop decorating. They are relatively inexpensive and, if you use seasonal varieties, last for weeks. These millet plants I picked up at Smile Farms are a bit taller than normal for a centerpiece, but they still work. I find that everything gets moved around once the food starts getting placed on the table anyway.

Having small, unexpected accents, such as the green apple candles and fresh cut succulents, on each plate can complete your look and keep your table decorated and festive even after all the food has been served.

Thanksgiving centerpiece idea No. 2: DIY garden trug centerpiece

thanksgiving centerpiece ideas with DIY Garden Trug Centerpiece

This rustic-looking table accent brings in the fruits (and vegetables!) that Mother Earth provides us this time of year. It’s one of those Thanksgiving centerpiece ideas that really adds a touch of nature to the look and presentation of your dining area when you’re entertaining during the fall.

thanksgiving centerpiece ideas with Wooden Garden Trug

First, you want to start with the foundation. I used a wooden garden trug, but you can employ any kind of gathering-style container, such as a rectangle- or oblong-shaped wicker basket.

thanksgiving centerpiece ideas with Gourd Trug Ingredients

Choose materials to nestle into the container that complement your color scheme and vary in shape and texture. Including seasonal elements, such as gourds and bittersweet branches, adds a festive holiday feeling.

thanksgiving centerpiece ideas with Gourd Trug Close-up

Use pieces of floral foam as build-ups to give your display varying heights, and add a few stems of fresh flowers as well. To keep your flowers fresher longer, put a piece of wet floral foam in a small plastic container, or just add water to a small plastic cup, place it in the trug, and then add the flowers.

thanksgiving centerpiece ideas with Gourd Trug with Bittersweet Branches

My favorite part of this design is the addition of the bittersweet branches. These seasonal berry branches do not have to be in water — they dry nicely and, with minimal handling, will hold the berries for weeks.

Thanksgiving centerpiece idea No. 3: Foraged bouquet centerpieces

thanksgiving centerpiece ideas with Foraged Bouquet Centerpieces

This final idea couldn’t be easier — it just requites you to do a little foraging in your garden (or your neighbor’s)! I live at the beach, so my garden is full of ornamental beach grasses and millet…and turning leaves are everywhere! You know I love flowers, but this time of year offers a plethora of branches, berries, and grasses that are beautiful in their own right.

thanksgiving centerpiece ideas with Candle Artichoke

Keep it simple and natural by adding an LED votive candle to the center of a fresh artichoke and placing a single stem of millet and sprig fall foliage on each plate.

How to Make DIY Halloween Centerpieces for the Table

Halloween is arguably the most DIY-friendly holiday on the calendar. Between costumes for kids and adults, spooky décor, and parties decked out with frightfully ghoulish embellishments, there are countless opportunities to express your creativity and craftiness.

One of my favorite ways to celebrate the season is with colorful, over-the-top Halloween centerpieces. And with flowers that show off the vibrant colors of fall and the sugary treats we all have lying around the house this time of year, we have plenty of materials at our disposal to make some eye-catching pieces to be the focal points for our festive tablescapes.

Halloween centerpieces with Halloween M&M arrangement

DIY Halloween candy centerpieces: the candy vase

I love the purple, lime green, orange, and black color combination that’s prevalent for the holiday, so when I saw Halloween M&M’s in the store, I bought a few bags. Just another reason to buy candy!

To create this look, I used a nested vase, which allows the filler to rest between the walls of two containers. You can make your own by putting a narrow vase or glass inside another large glass container. Ideally, both glasses should be the same height, but if they’re not, then the inside glass should be slightly shorter than the outer one. For the floral, I used shamrock spider mums and purple statice. Not only do they look great, but both flowers are hardy and will last about two weeks.

DIY Halloween table décor: papier-mâché pumpkin vase

When I’m going for a more retro look, I break out this original papier-mâché pumpkin from the 1950s — it’s my favorite Halloween table decoration. If you don’t have a decades-old, trick-or-treating pumpkin handy, just reuse one of the plastic baskets your kids take with them around the neighborhood on All Hallows’ Eve. It creates a similar — albeit not quite as spooky — look that positively screams Halloween.

With a few cuttings from your fall garden — here, I used dahlias and asclepias — this old pumpkin becomes the happiest jack-o’-lantern in town!

Halloween centerpieces with Halloween pumpkin centerpiece

DIY candy corn flowers

Planning a kids Halloween party? This candy corn arrangement is a sweet addition. It’s great as a centerpiece or as part of a Halloween-inspired dessert bar! Not only will guests love the final “treat” but the kids can help put this together prior to the festivities.

Halloween centerpieces with candy corn floral arrangement

Materials needed

  • Approximately two dozen yellow carnations, two dozen orange carnations, and a dozen white carnations.
  • 1 brick of floral foam
  • 1 waterproof dish or tray

Instructions

  1. Thoroughly soak the floral foam and stand it up vertically on the tray.
  2. Cut your carnation stems to about 2 to 4 inches in length.
  3. Starting at the base of the foam, insert the yellow carnations all around the sides, using the longest stems at the bottom to make the base of the “candy corn” wider.
  4. Repeat with the orange and white carnations, creating the shape as you move up the foam.
  5. End with a single white carnation at the top to form the point of the candy corn.

You can take the basic directions for this floral candy corn arrangement and scale it up or down depending on your desired finished size. If you plan to display it on a mantle or foyer table, this arrangement can also be done as a one-sided design.

Halloween table decoration ideas: flower arrangement with Halloween candy

Here’s another decoration that’s perfect for a Halloween party table. This DIY Halloween flower arrangement featuring a ceramic pumpkin, your favorite candies, and the best fall flowers will wow your guests (and help satisfy their sweet tooth, too).

Create this festive centerpiece for your own home or as a gift for the hosts of a Halloween party you’re attending this month. Either way, it will help set just the right mood for you to have a monstrously good time!

halloween centerpieces with Halloween flower arrangement with Halloween candy

DIY Father’s Day Gifts for the Beer-loving Dad

Not sure what to plan for Dad this Father’s Day? How about organizing a beer tasting event in his honor! Thanks to an increasing appreciation for quality beer production, new breweries are popping up all over the place. In fact, there’s a good chance you have one right in your neighborhood or close by. Check with your local establishment and see if you can do a DIY Father’s Day gift with an event right at the brewery. Leaving the beer to the experts gives you more time to focus on the decorations and fun details that make Dad feel loved and honored for all he does!

Some places near where I live serve only beer and not food. If that’s the case by you, and you have to bring in your own munchies, I’ll let you in on a little secret: Cheese goes with everything! Harry and David has some fantastic gourmet foods available featuring various artisanal cheeses and other savory snacks in its Father’s Day gift collection. Choose one to bring along to the tasting, or send one to someone special that you can’t be with to let them know how much you care.

DIY Father’s Day gifts: flowers

For me, it’s not a celebration without flowers, and that holds true for Father’s Day, too. It’s a fact that flowers make people feel good, and dads are no exception.

Here are a few DIY Father’s Day gifts to bring the beauty of flowers to your beer tasting celebration.

Upcycled beer bottle vases with sunflowers

A photo of diy father’s day gifts with upcycled beer bottles

How perfect are these sunflowers?! The bright and bold beauties are one of my favorite summer flowers. The individual tin letters are inexpensive and available at craft stores everywhere. Use recycled amber beer bottles for the vases. Wash them out to make sure they are clean of any residue, and then fill them with water. Loop a letter around the neck of each bottle and put a single sunflower in each one, making sure to first cut the bottom of the stem at an angle.

A photo of diy father’s day gifts with a beer bottle vase

A single sunflower and chalkboard hangtag are the perfect decorative touches. They make this bottle of beer a great DIY Father’s Day gift and party decoration!

A photo of diy father’s day gifts with beer bottle vases

An even simpler way to display flowers for Dad is to look for brand names and/or labels that speak to the occasion, such as Big Daddy IPA, or your dad’s personality, like, perhaps, Rebel. There are so many great beer bottles out there to choose from. Use these on a buffet table, as a centerpiece, or anywhere that can use of little pop!

Beer mug o’ blooms

A photo of diy father’s day gifts with mug o' blooms

This beer mug floral arrangement is as easy to put together as it is fun to admire. It incorporates carnations, and is a great decorative idea to make for Father’s Day, St. Patrick’s Day, or any other occasion when beer is on the menu.

Check out the step-by-step instructions for this DIY Father’s Day craft that looks so cold and refreshing you almost want to drink it. (But don’t! It’s made of acrylic ice rock crystals.)

DIY Father’s Day fun and games: How well do you know dad’s taste in beer?

Here’s a game that everyone at the party can play together. It’s a blind taste test and a guessing game, and all you need is these printable beer tasting sheets (and some beer!). Dad uses one tasting sheet to rate each of the special craft beers you get for him, and the rest of the family uses the other to decide how they think their dad will rate each beer.

A photo of diy father’s day gifts with beer, pretzels, and a beer tasting sheet

After the blind taste test, someone gathers the answer sheets and determines, based on the number of matching answers, which family member knows Dad’s taste in beers the best!

DIY Father’s Day gift idea: Beer cap magnets with personal photos

Adding personal touches makes a celebration seem that much more intimate. I love incorporating photos into crafts whenever possible. A cute way to display photos for your dad’s beer tasting is to use galvanized sheets or bulletin boards and magnets made from beer bottle caps.

A photo of diy father’s day gifts with beer cap magnets with photos

These couldn’t be easier to make. You only need three things besides the bottle caps, and everything is available at your local crafts store.

beer cap magnets

What you need

  • Bottle caps
  • ¾” round magnets
  • ¾” cork circles
  • Glue or glue dots

What to do

  1. Put a glue dot on the cork circle and attach it to the bottle cap.
  2. Put a glue dot on the magnet and attach it to the cork circle you just attached to the bottle cap.

That’s it!

Personalized barware

If you don’t fancy yourself the crafty type but still want to get your beer-loving dad something that shows you care, check out the personalized barware items available on 1-800-Flowers.com.

Cheers to all the dads out there!

Orange Is the New Pastel: 3 Easter Brunch Ideas with Carrots

The series “Get Crafty” gives you the inspiration for creating inventive DIY projects during the holidays and year-round. These Easter brunch ideas include a seasonal cocktail, centerpieces made of spring veggies, and chocolate dipped strawberries that look like carrots.

When I think of things that represent Easter, my favorite spring flower, the tulip, comes to mind. Then there’s the Easter bunny’s favorite food, carrots. And what would Easter be without delicious desserts??? Put them all together and what do you get? A fresh, fun, and creative cocktail, centerpiece, and sweet treat that are perfect Easter brunch ideas.

Signature seasonal cocktail

A signature craft cocktail is always on my holiday entertainment menu. This beverage incorporates the fresh vegetables and flavors of the season, making it perfect for your Easter gathering. And with nearly a full day’s serving of carrot juice in each glass, it’s not only delicious but is packed with vitamins and minerals!

Carrot and Ginger Cocktail

Prep Time 5 minutes
Total Time 5 minutes
Servings 1 drink

Ingredients:

  • 2 thin slices fresh ginger
  • 3 ounces carrot juice
  • 1 ounce apple juice
  • 1 ounce vodka
  • Lime wheel (for garnish)

Instructions: 

  • Muddle the ginger slices in the bottom of a cocktail shaker.
  • Add the carrot juice, apple juice, and vodka.
  • Shake well for about 10 seconds.
  • Pour over ice.
  • Garnish with a lime wedge.

Notes:

Note: You can make fresh carrot and apple juice or buy organic prepared juices.

Fresh spring centerpiece

easter brunch ideas: vegetables

Incorporating seasonal fruits and vegetables into your tablescapes and floral designs takes them from pretty to pretty spectacular! A great starting point is the Baby Vegetable Gift Box or Baby Vegetables Crate from Harry & David. Brimming with the finest seasonal produce available, either one is the perfect gift for the vegetable connoisseur in your life. And if that person is you, get it for yourself!

There’s something about miniatures that gets me every time, and these carrots are no exception. They’re the perfect size to fit around a lowball glass to create one-of-a-kind arrangements. Simply put a rubber band around the glass and insert the carrots between the glass and the rubber band, and continue until the glass is completely covered.

easter brunch ideas: carrot vase

Tie a coordinating ribbon around the vase to cover the rubber band. You can also use a piece of fabric, raffia, or twine.

Creating asparagus vases using this same technique is one of my go-tos in the springtime.

https://www.1800flowers.com/blog/wp-content/uploads/2022/03/Asparagus-Vase_720p.mp4

Everyone is always so impressed with the final arrangement, and they’re even more impressed when they see how easy it is to do!

https://www.1800flowers.com/blog/wp-content/uploads/2022/03/TULIP_STOP-Motion_HR_HBR_SPEED-copy.mp4

Even if you’re pressed for time, you should always have flowers on your table when entertaining. And there is no easier arrangement to make than filling a favorite vase with beautiful, fresh-cut tulips. It’s so easy, it’s almost like the tulips arrange themselves!

Carrot-themed sweet treats

easter brunch ideas: easter carrot treats

I love carrot cake! It’s so decadent, with that delicious cream cheese frosting. But there are many more carrot-themed desserts available this time of year, including Buttercream Frosted Walnut Carrot Cake Cookies and Hoppy Easter Dipped Strawberries.

If you have the time and want to make your own chocolate-dipped strawberries, follow my instructions below. Just don’t expect them to turn out as good as the ones from Shari’s Berries! They’ve been perfecting the art of dipping strawberries into melted candy for over 30 years. Still, it is a fun project to do at home.

‘Carrot’ Strawberries

Prep Time 5 minutes
Cook Time 30 minutes
Chill and assembly time 25 minutes
Total Time 1 hour
Servings 24 berries

Equipment:

  • Double boiler
  • Skewers
  • Candy melting machine

Ingredients:

  • 1-2 dozen medium to large strawberries
  • 12-ounce bag orange candy melts
  • Faux leaves and clippers (optional)

Instructions: 

  • Prepare the strawberries for dipping by rinsing and thoroughly drying them. Lay the strawberries out on a paper towel and place another towel over them and gently press. Let them sit out for a bit before dipping, as it is important that they are completely dry.
  • While the strawberries are drying, melt the chocolate in a double boiler, microwave, or candy melting machine.
  • Start with about a cup of melts, stirring constantly until melted. Turn down or remove from heat and add more candy melts as needed, stirring them in until they are melted. Doing it this way helps to keep your candy from overheating, and breaking down and taking on a thick, chalky consistency.
  • Remove the stems before dipping. Insert a wood skewer into each strawberry, dip the strawberry in the melted candy, and place it on a piece of parchment paper to cool and set. (Note: If you are not adding the faux leaves, you do not need the skewers. Leave the stems on the berries and use them to hold onto as you dip the strawberries in the melted chocolate with your hands.)
  • Take a stem of faux greenery that has multiple stems/leaf clusters and use clippers or wire cutter to cut small sprigs.
  • Once the candy is completely cool, remove the wood skewer and insert a sprig of greenery into the strawberry.
  • Continue doing this until all the strawberries have a "carrot top."
easter flowers ad

DIY Tabletop Floral Christmas Tree & Decoration Ideas

I love Christmas, and I love decorating Christmas trees! The main tree in my home tends to be pretty traditional, changing only slightly from year to year, with new ornaments added here and there. So, I’m here to talk about the beauty and versatility of fresh tabletop Christmas trees.

These beautiful arrangements are usually handcrafted by your local florist and make great gifts. In fact, the Holiday Flower Tree has been a bestseller since it was first introduced nearly 20 years ago!

Picture of Christmas tabletop tree for office

Trending mini Christmas trees with lights

If you’ve attempted to decorate a Christmas tree with lights, challenges ranging from broken bulbs to tangled cords are enough to have you scrap the lights for a tree with ornaments. Fear not, for some mini Christmas trees with lights come pre-assembled, such as this Holiday Spruce or Rustic Christmas Tree. Another festive option is the Hand Tied Mini Christmas Tree Bouquet that comes with lights in a rustic mason jar. There are also trees that come with ornaments, if you want the full tree package.

Mini Christmas trees are versatile

Whether you live in an apartment, are an empty nester, or are traveling during the holidays, tabletop Christmas trees are festive additions for those who want to have a tree without the production. You can add a mini Christmas tree to the bedroom, kitchen, foyer, office, or any space that cannot accommodate a larger tree. And the trees, like the Holiday Lavender Tree, are sustainable too, and can be replanted in your garden or kept indoors for natural decorative appeal during the cozy winter months.

Other tree options that can work for the holidays and after are bonsaiolivemagnolia, and, money trees. Simply add a tree skirt or lightweight ornaments, and it’s getting to look a little more like Christmas.

DIY tabletop Christmas tree

Tree with Bird

If you have a little time and want to get creative, these trees are pretty easy to make. The basic instructions are the same for whatever size tree you want. The smaller the tree, the faster and easier it will be to construct. Petite trees are so sweet and can be tucked into so many unexpected spots. Larger trees, on the other hand, allow you to create a completely custom look based on your choice of container, decorations, and color scheme.

How to make a tabletop Christmas tree

What you need:

  • Floral foam
  • Dish/plate
  • Tape
  • Clipper
  • English Boxwood
  • Assorted evergreens

Step 1: Set up your floral foam

Floral Foam for Tabletop Christmas Tree

Cut the corners from one end of the foam as shown; fill your sink with water; and place the foam into the water, allowing it to become totally soaked through. Tape the foam into a plate/dish. You can use any waterproof container as the base and put the foam directly into your chosen container before creating the tree. Or you can create the tree using a smaller base, like the one in the image, and then place the finished tree into a decorative container.

Step 2: Prepare your greens

Boxwood is the main green that I used for the tree, and I accented it after the main shape was created, filling in with other assorted evergreens such as cedar, pine, and balsam.

pre-cutting-greens

Before starting, cut the greens off of the main branch into smaller pieces of varying lengths ready to insert into the foam.

Step 3: Arrange your greens

Add Greens to Tree

Start by inserting a taller pre-cut piece of boxwood at the top to create your basic height. Do the same at the bottom and the sides. This gives you the base shape of your tree.

Keep Adding Greens to Tree

Step 4: Fill in your tree

Fill in tree with greens

Continue adding pieces of boxwood, turning the tree as you go, until you have filled in the whole tree.

Step 5: Accent with various evergreens

Accent Evergreens

I like to add a few sprigs of other evergreens for two reasons. The first is that evergreens such as balsam and pine add wonderful fragrance. I find it adds visual interest as well.

DIY Tabletop Christmas Tree

Tabletop Christmas tree decoration ideas

At this point, your tree is ready to decorate! Because this tree is actually a “flower arrangement,” you can easily use fresh-cut flowers as a primary decorating feature. Just give your chosen flowers a fresh cut and insert them directly into the foam; they will stay fresh for up to two weeks at least. I like to use fresh flowers that will dry nicely too, such as baby’s breath (which looks like snowflakes), pepper berries, and heather.

Here, I nestled my Christmas tree arrangement into a large bird’s nest basket and added white heather, baby’s breath, and pepper berries.

In keeping with the woodsy feeling, this is the same basic tree arrangement placed in a natural birch container. The decorations include dried pods, baby’s breath clusters, vintage silver pine cone ornaments, and burlap ribbon garland.

Closeup of owls in tree

The theme really comes to life with the addition of these faux snowy owls. Owls are on-trend, and this is an easy way to include them in your holiday decorating.

I have created and decorated so many different trees over the years, and I find that I never run out of new ideas. Here are a few more examples to inspire you to create one of your own and start a new tradition. It’s also a great way to give a truly personalized gift!

Thanksgiving Floral Arrangements That Have the Florist’s Touch

Not all of us have the time or materials on hand to make elaborate centerpieces or place settings around the holidays. Never fear: I’m sharing with you some of my favorite ideas for decorating and entertaining this Thanksgiving. Whether you are hosting the big event or just having a few friends over during the long holiday weekend, these ideas are really easy and add that extra touch that your get-togethers always have!

I have a few season-specific decorative pieces that I reuse every year, such as this gorgeous ceramic pumpkin. I filled mine with a farm-fresh palette of flowers, grasses, peppers, and succulents.

thanksgiving decorating ideas with Thanksgiving centerpiece

Staying with the farm-fresh theme, a great way to create a stunning tablescape is to set vintage berry baskets filled with similar floral on each plate. These arrangements look almost good enough to eat! Add a bit of personalization simply by slipping a place card in among the florals and greenery.

thanksgiving decorating ideas with Thanksgiving flower arrangement

I find these little berry baskets to be the perfect size to use as multiples as I did on the dining table or to add just the right festive touch on the dessert or buffet table.

thanksgiving decorating ideas with fall succulents for Thanksgiving

Just line the basket with a small dish, bowl, or can. Cut a piece of floral foam to size and thoroughly soak the foam before placing it in the dish. The foam will make it easy to create your piece, as it holds each insertion in place and provides hydration to keep your flowers fresh.

thanksgiving decorating ideas with foam floral supplies

Guests will be so enamored of these handmade Thanksgiving decorating ideas that you can give them as gifts once the meal is over. It will add to their list of what to be thankful for.

Picture of a 1-800Flowers Thanksgiving ad
Exit mobile version