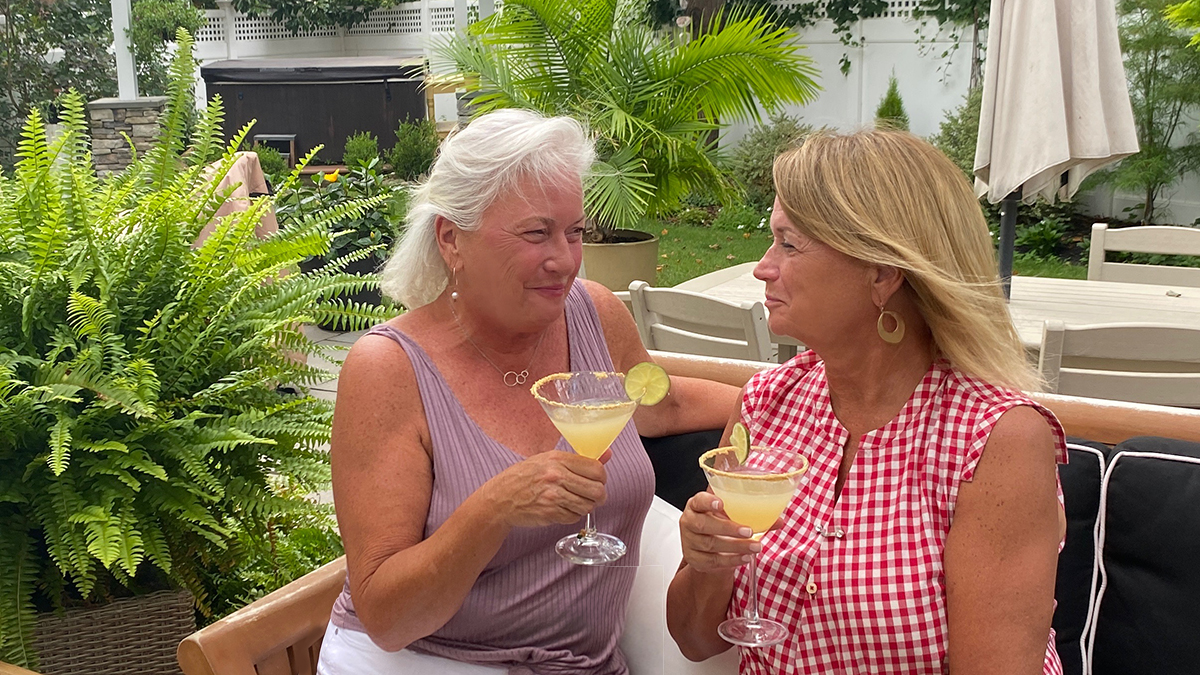
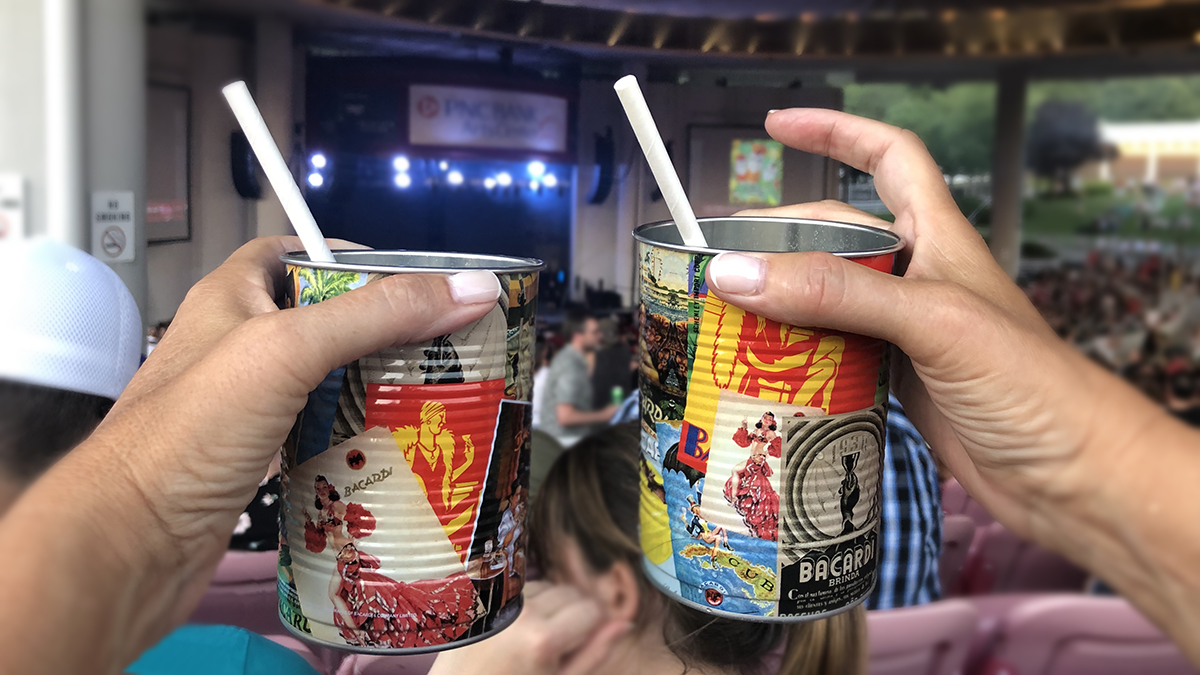
My sister, Peggy, and I could be the poster girls for National Sisters’ Day. We are best friends and, believe it or not, have never had a fight. And we don’t need a reason to laugh — we just laugh all the time when we’re together.
So, when I won two tickets from a local radio station to see Alanis Morrissette, I immediately decided that my sister was going to be my plus one.
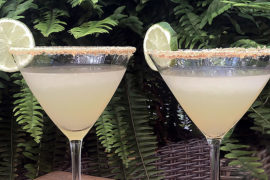
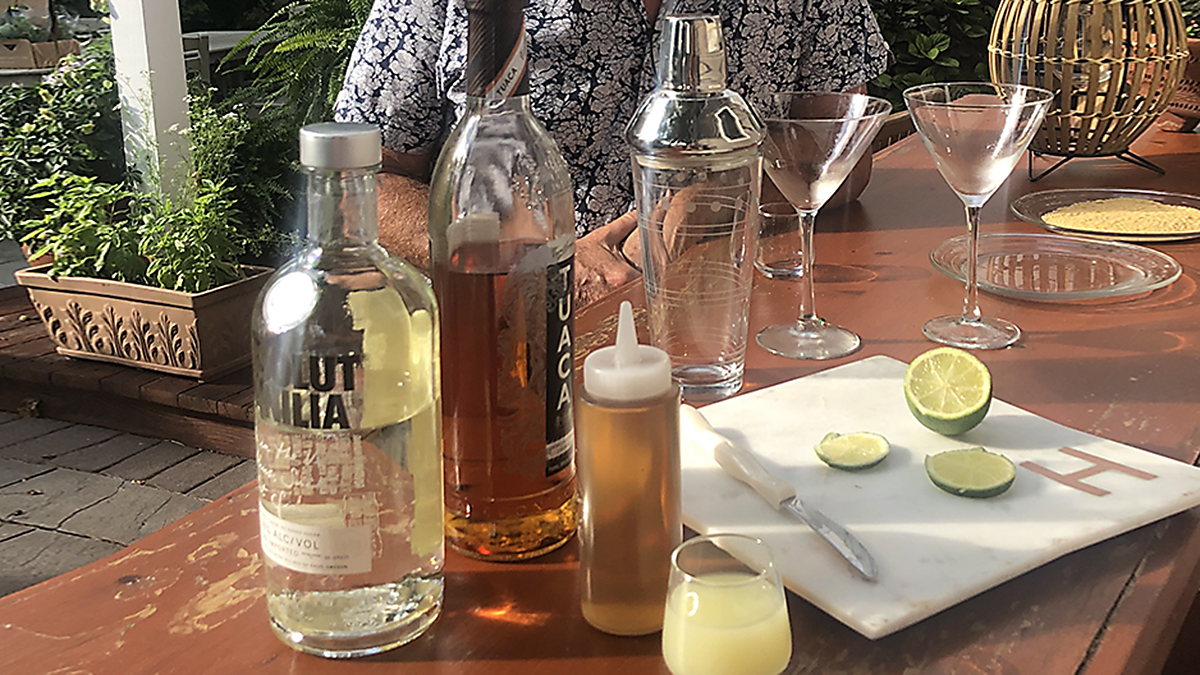
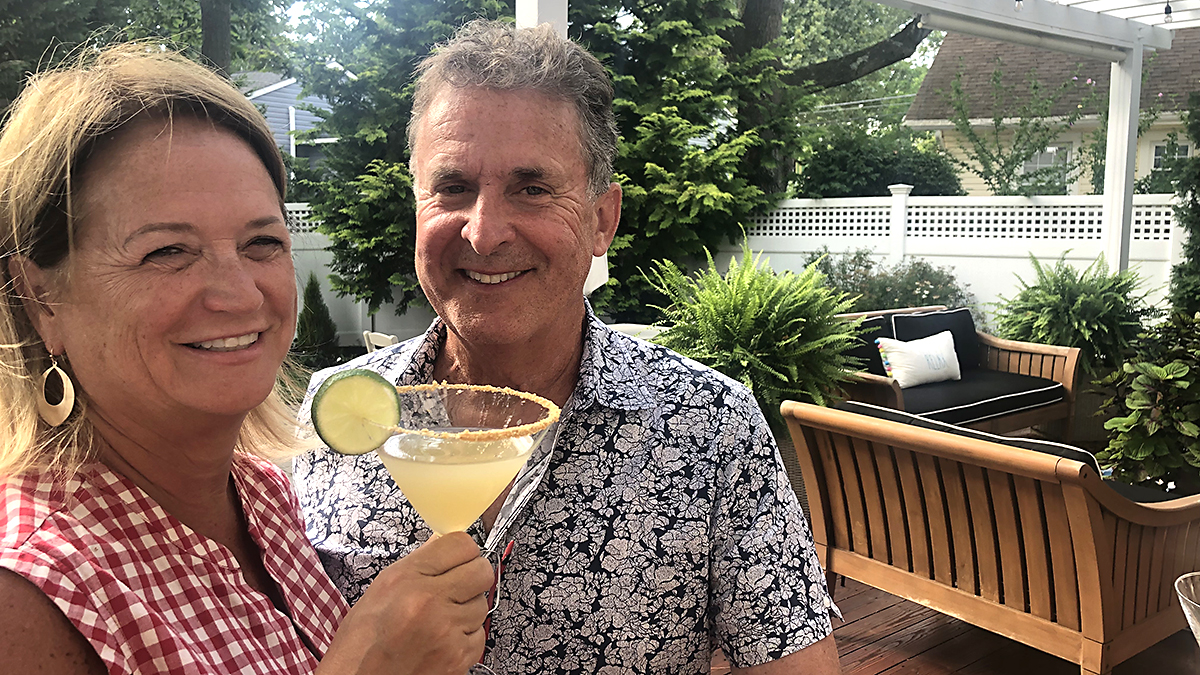
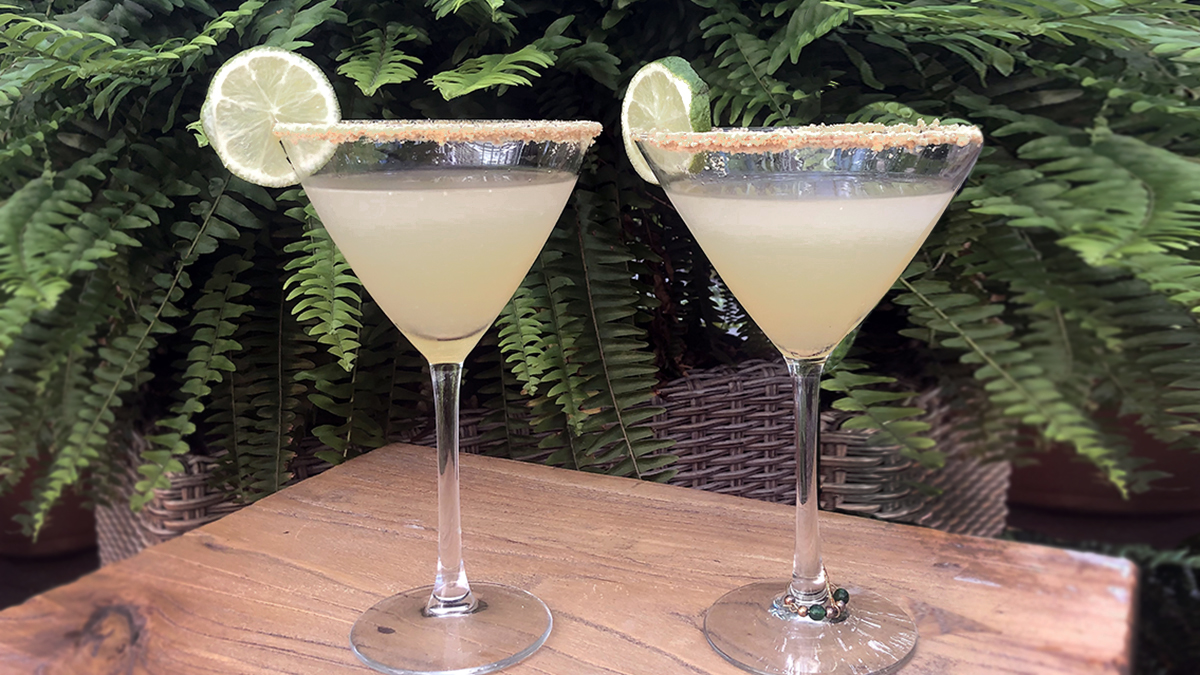
And what better way to kick off the night then with a delicious cocktail?! In this case, we went with a key lime martini, which also happens to be my brother-in-law Bob’s specialty. And because, technically, we were celebrating National Sisters’ Day, I enlisted Bob to whip up a batch for us.
This particular recipe was inspired by one I found online. It includes Tuaca, an Italian brandy “with subtle notes of vanilla and citrus, hints of butterscotch, cola, dried fig, and other flavors.” How can you pass on an ingredient with that description!
Once the drinks are made, thank the bartender/husband/brother-in-law and enjoy your key lime martini in great company.
Then, head out for an amazing night of live music by a strong and powerful female artist, where you get to spend time with your sister — and best friend — and perhaps enjoy another cocktail as well!
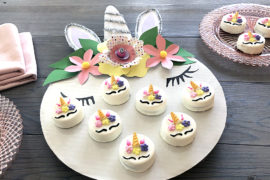
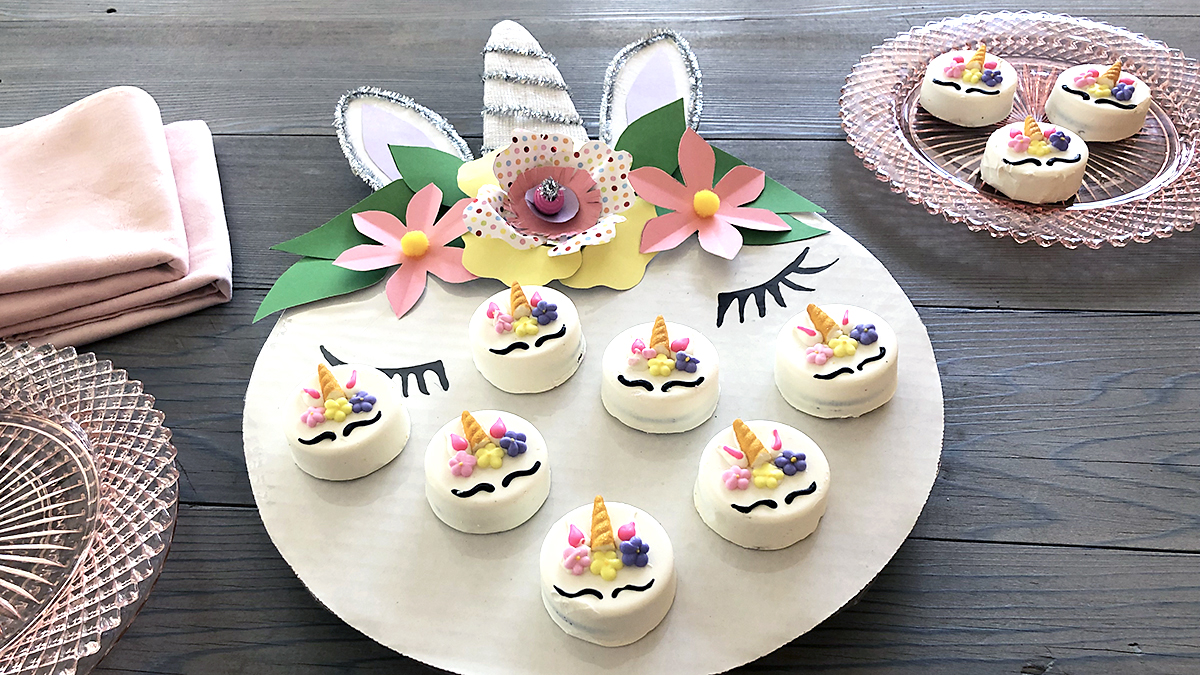
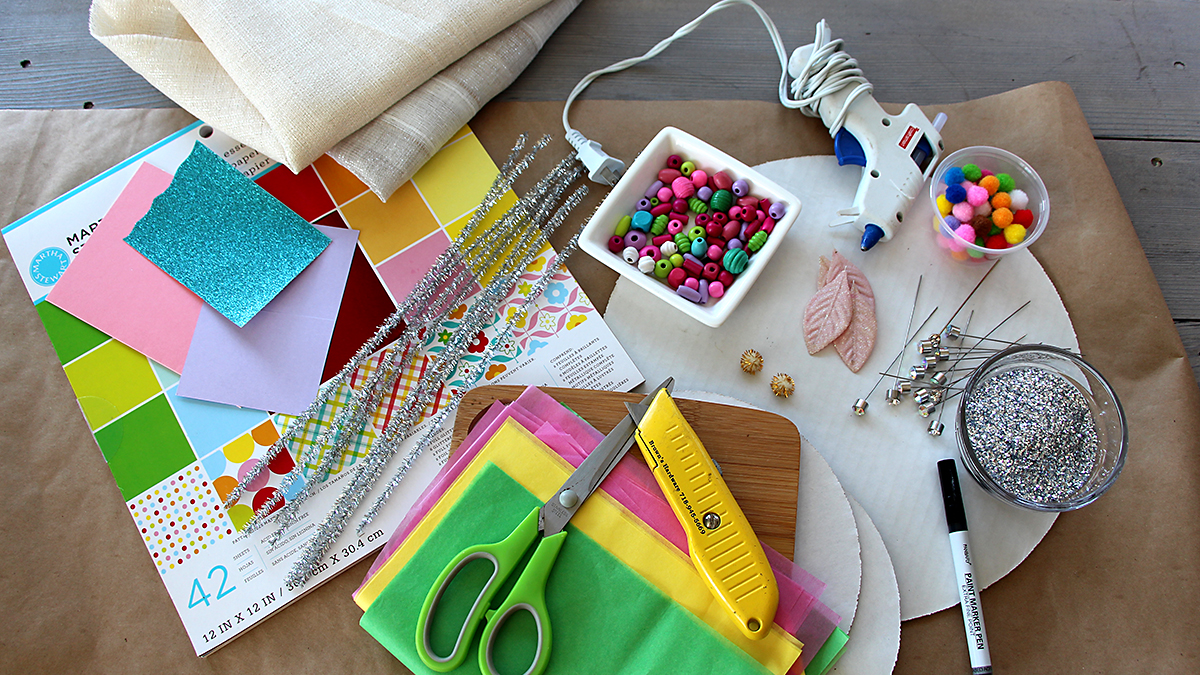
Unicorns love to party — that’s one thing I love about them. So, to maximize the magical effect of these mythical creatures, I came up with these two DIY unicorn decoration ideas for my next get-together.
Before you start to make your platter, you need to gather your “stuff.”
It has become my goal in life to GET RID OF STUFF! And let me tell you, that’s not easy for a “stuff person” who writes a lifestyle blog. So, the first thing I did was go through all my craft stashes and gather anything that looked “unicorn-y” — in other words, bright and sparkly! Besides cardboard and decorative paper, I also got out scissors and glue.
I’m proud to say I didn’t have to buy anything for this project; I just looked around my house and saw what I already had that I could repurpose in new and interesting ways.
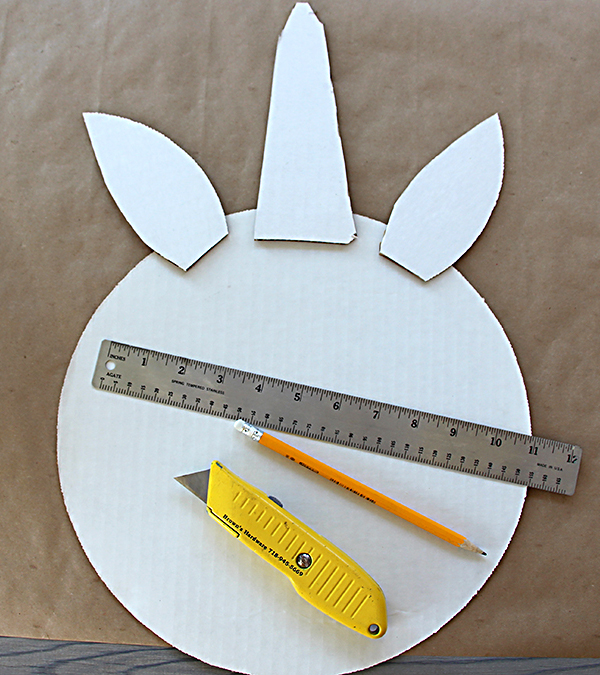
I still have a few cardboard cake plates left over from my daughter’s stint as a baker, so I used those. If you don’t have something like that, just grab one of the many cardboard boxes I’m sure you have lying around from all the deliveries you’ve gotten lately. If you don’t have cardboard with a white side, you can always paint it or cover it with white paper before assembling.
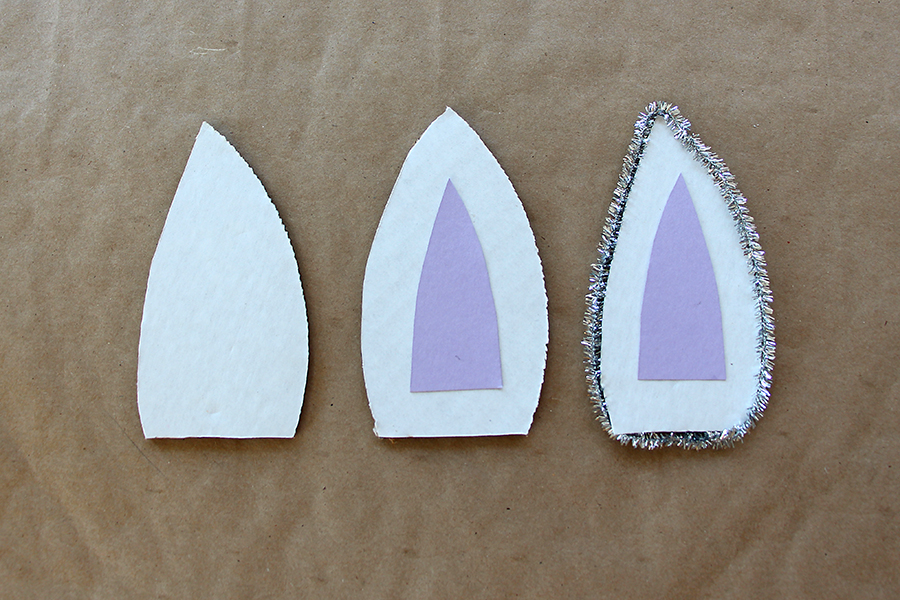
To add character to the ears, I cut out a smaller piece in a nice lavender paper to add to the center of the ear. Then I used hot glue to add a silver sparkly pipe cleaner all around the edge.
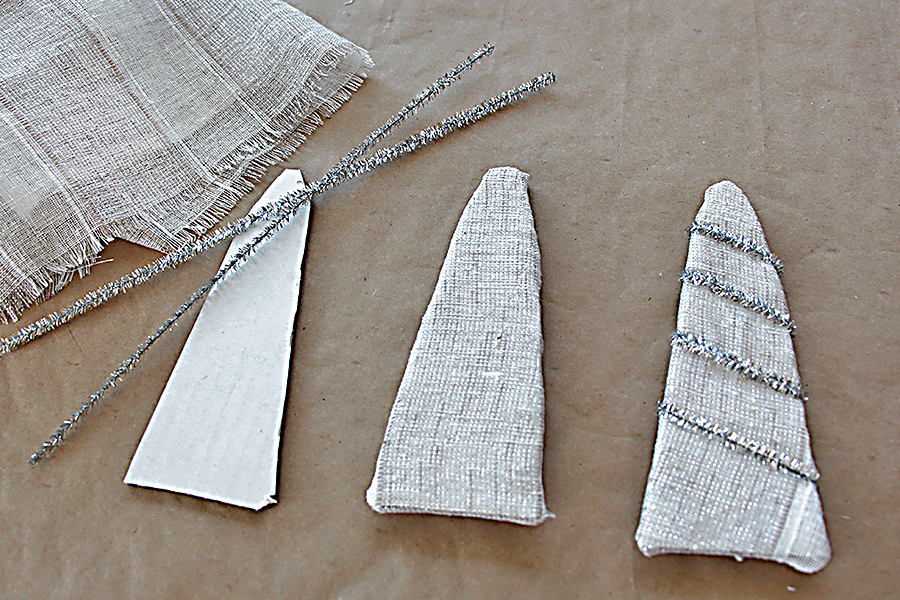
I covered the horn with a scrap of sparkly fabric left over from a Christmas stocking project. I cut the fabric slightly larger than the horn and wrapped it around, glued it in the back, and then wrapped the horn with two silver pipe cleaners.
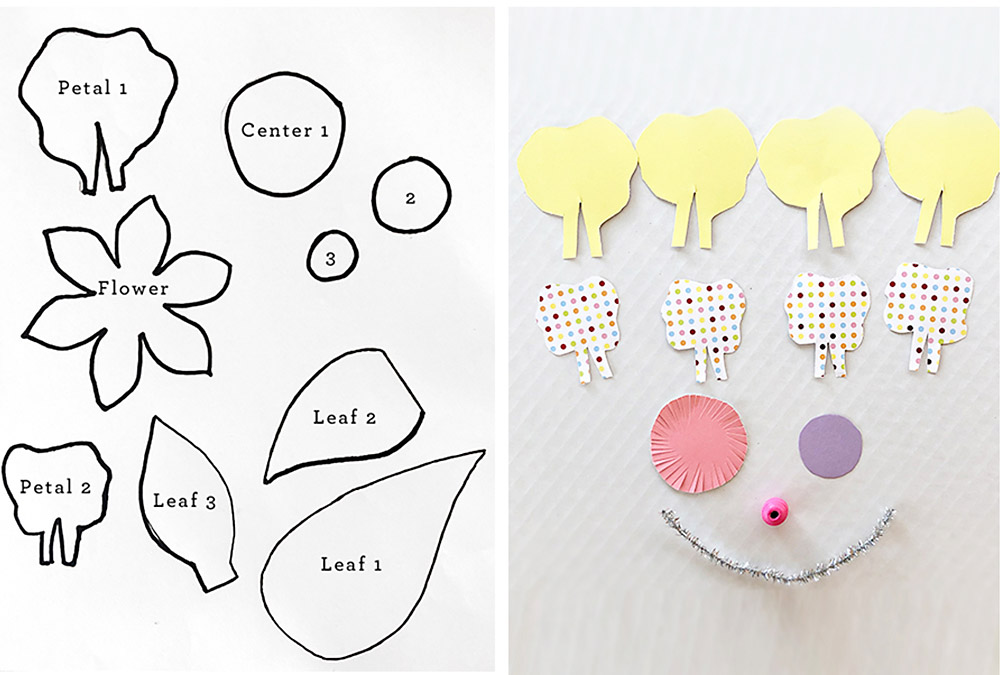
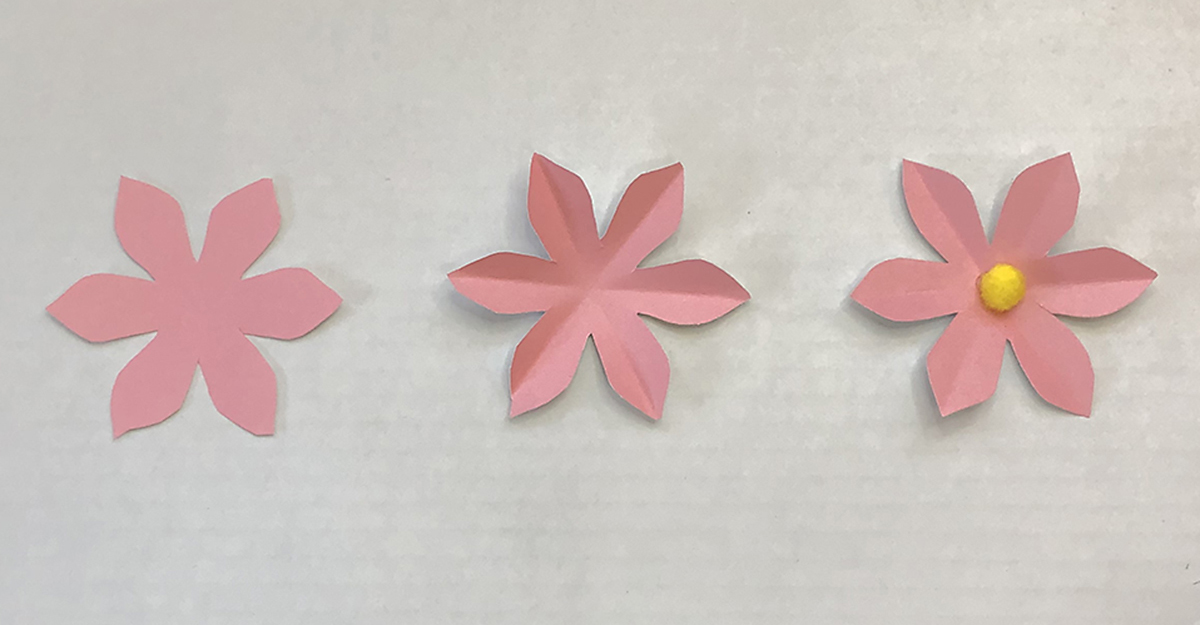
Using the flower template, cut out all the pieces needed to make each flower. Make sure to use different colors for each part of the flowers and green for the petals.
Assembling the first flower
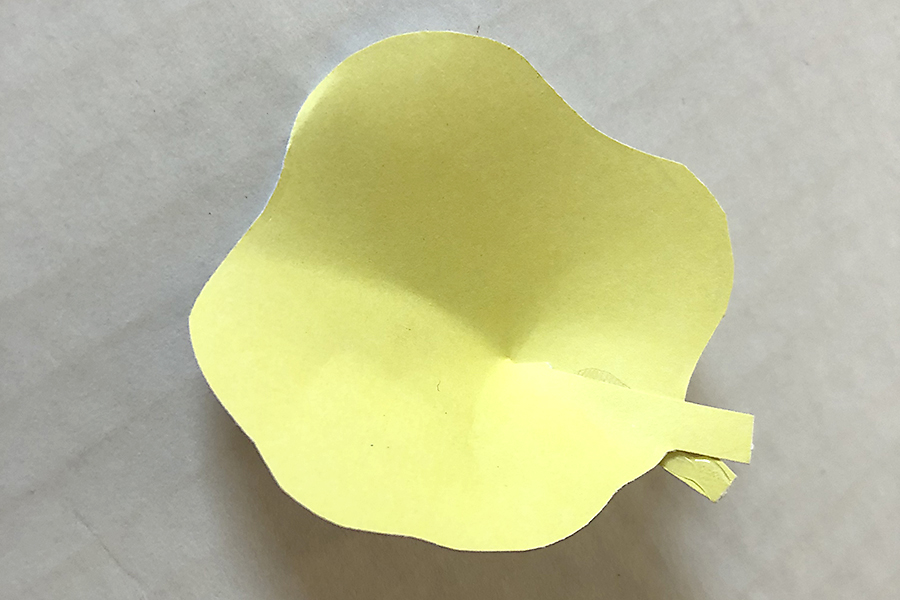
Starting with the large petals, dab a small amount of glue onto one side of the stem and gently bend the other stem to overlap the glue. Press and hold to secure. Do this to all four petals.
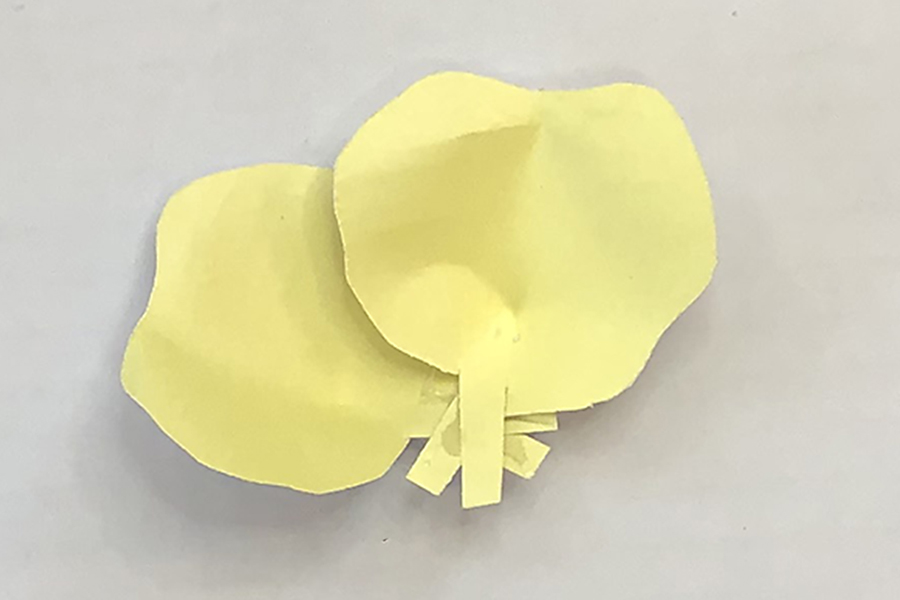
Assemble the first layer of the flower by overlapping…
…and gluing the petal stems together as you go.
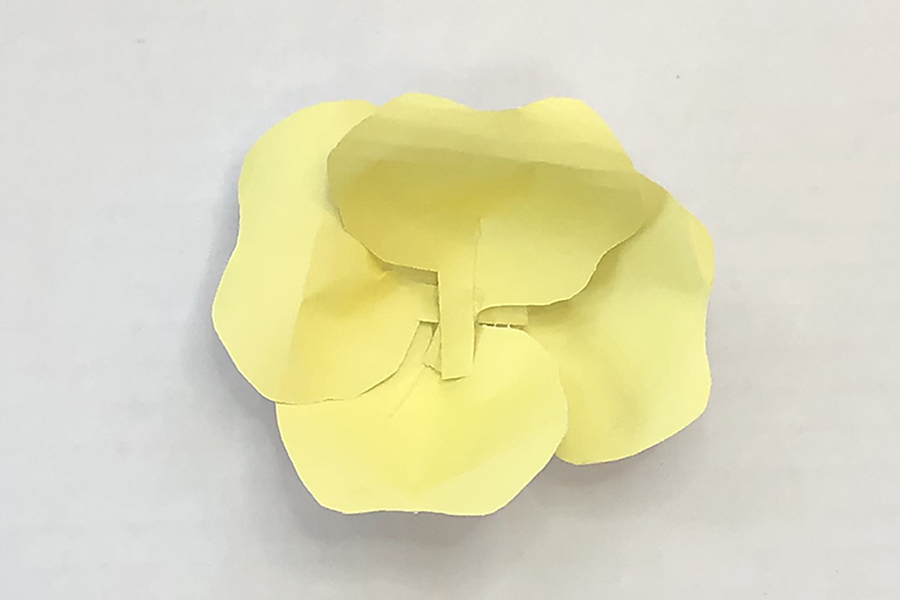
Repeat this step with the smaller petals. I chose a polka dot paper to add a little whimsy.
Then, glue each layer on top of the next in the following order:
Large petals
Smaller petals
Large center circle (that I fringed the edges of)
Medium-size center circle
Smallest size center
Again, for a bit more pop, I used a wooden bead with a sparkly pipe cleaner laced through the center. Remember: Use what you have and be creative.
Creating the second flower
The other flower on the template is a single layer with a pom-pom center. To add more dimension to this flower, add a crease to each petal by simple folding the flowers in half three times.
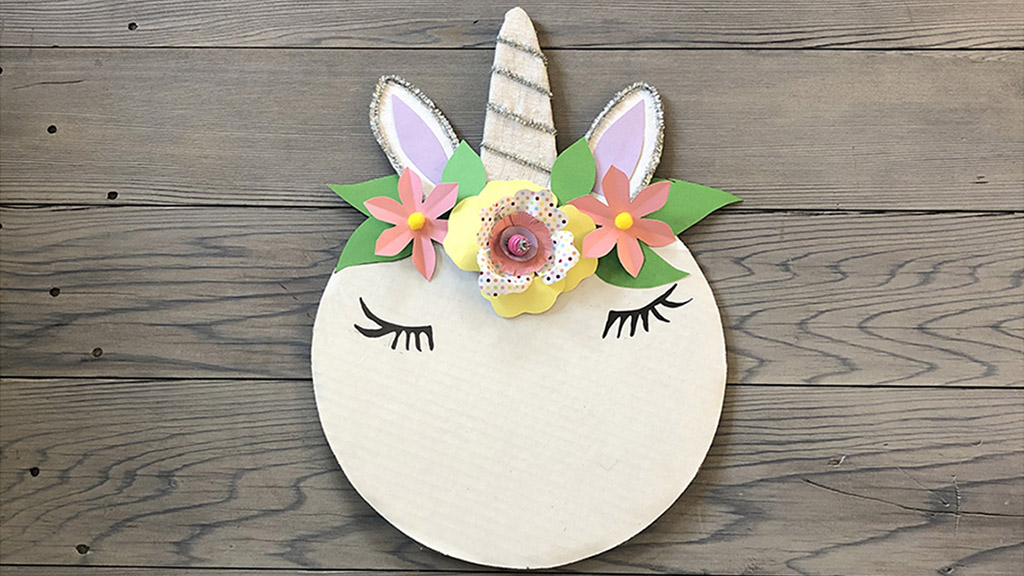
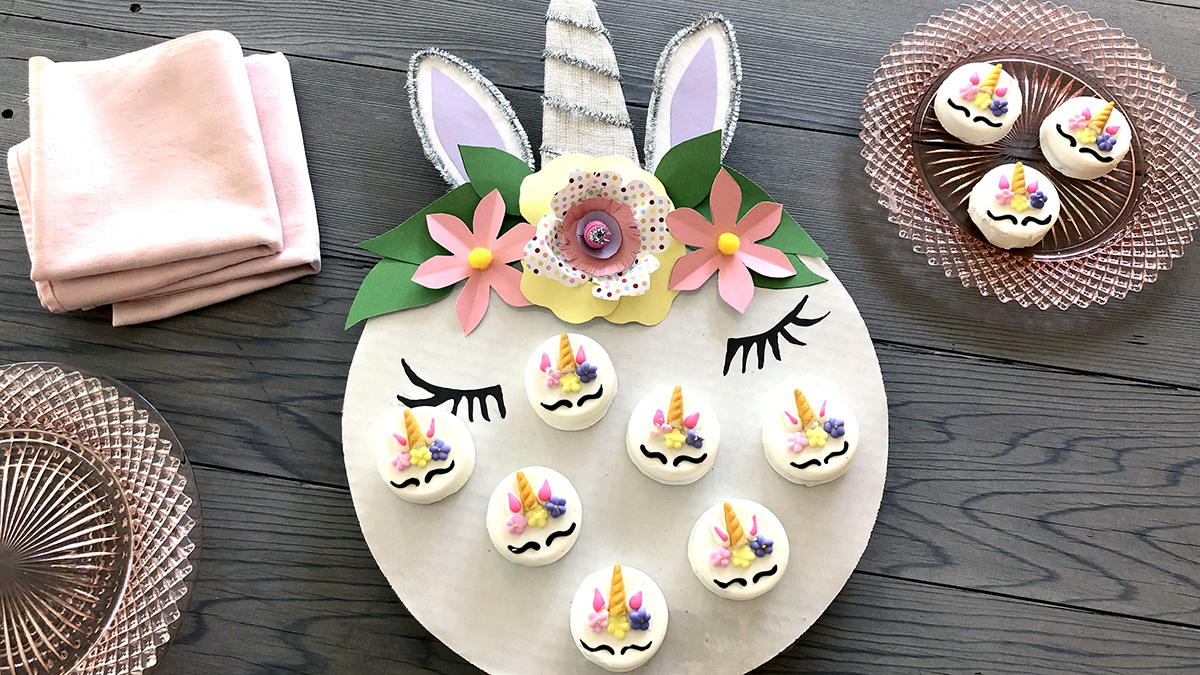
Assembling the unicorn party platter
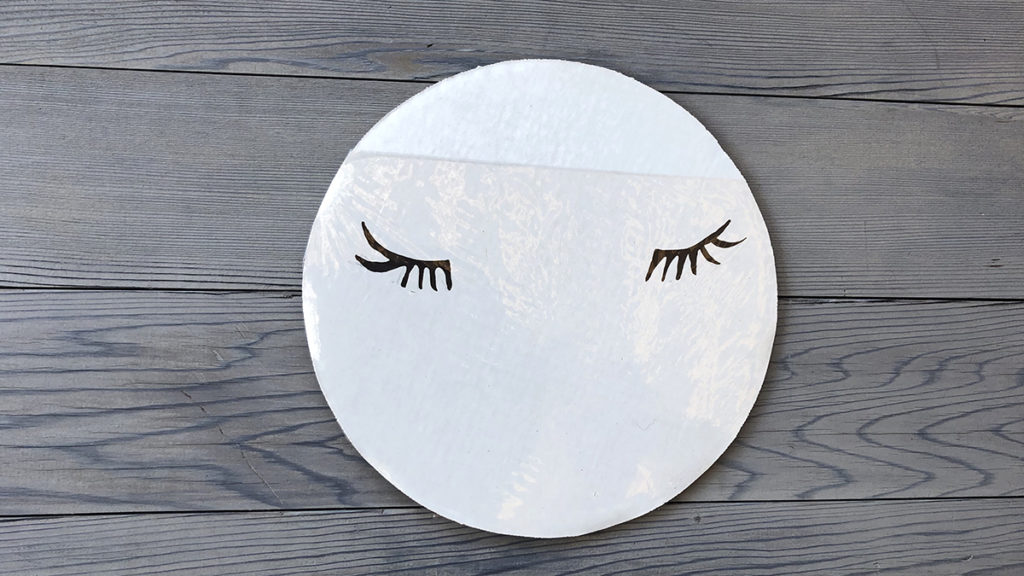
With a black marker, draw eyes on the face using the template as a guide.
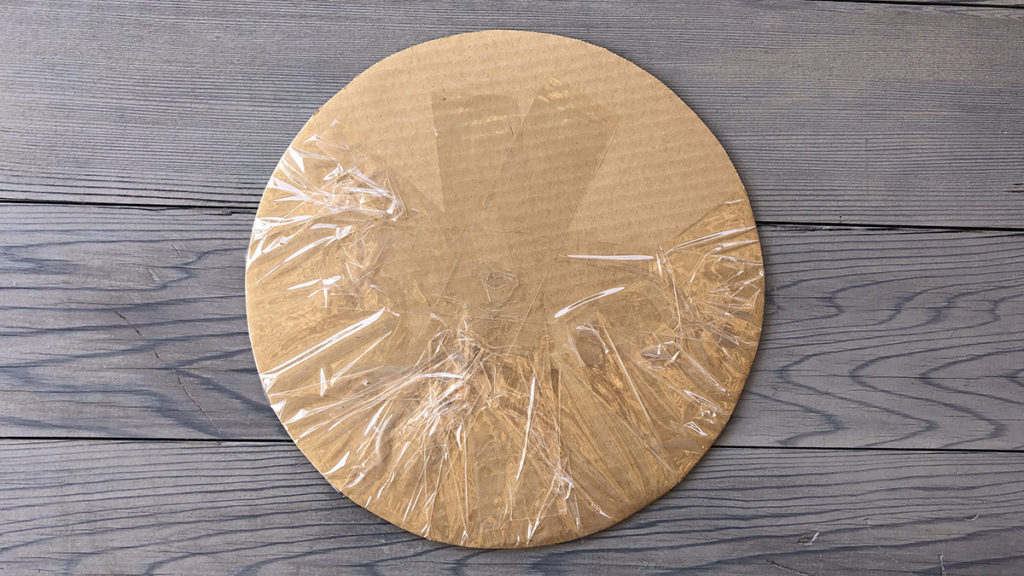
Cover with a piece of clear protective cover, such as cellophane, plastic wrap, or clear contact.
Glue the horn on, then the ears, then the large center flower, then the green leaves — three on each side — and, finally, the two smaller flowers on either side of the center flower.
How adorable is that! I really love the way it turned out. And the fact that I made it using bits and pieces of things I already had is my kind of upcycling!
This platter is perfect for serving sparkly unicorn cupcakes, too!
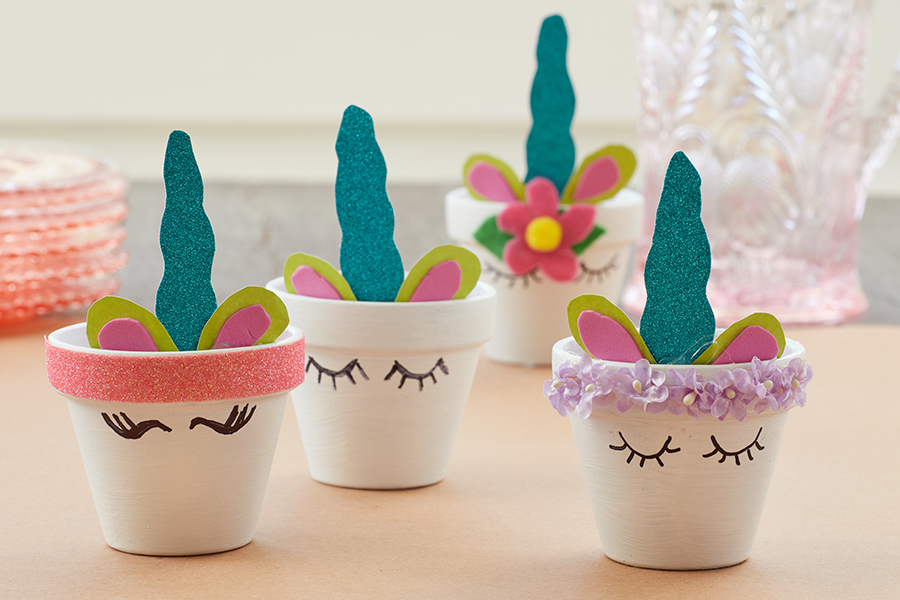
Mini unicorn planters
These mini unicorn planters will take the decor at your unicorn birthday party to the next level. They have a gazillion different uses and, as most of my projects are, are very easy to make. They are a fun project to do with little kids, too.
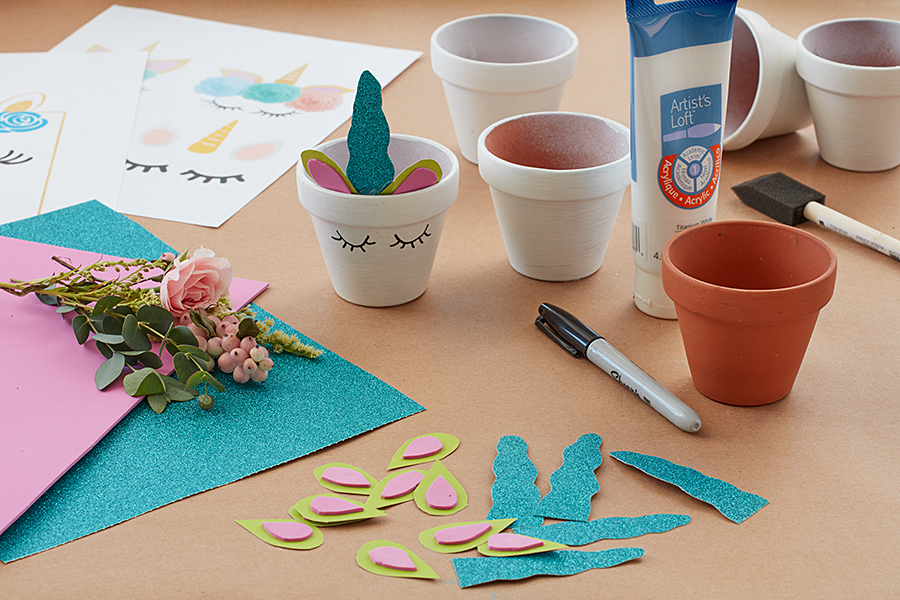
What you’ll need
Mini clay pots
White paint (acrylic, spray paint, any kind will do)
Paint brush
Craft paper and foam sheets (in various bright colors, and one with sparkles)
Decorative elements (washi tape, faux flowers, sparkles)
Black permanent marker
Instructions
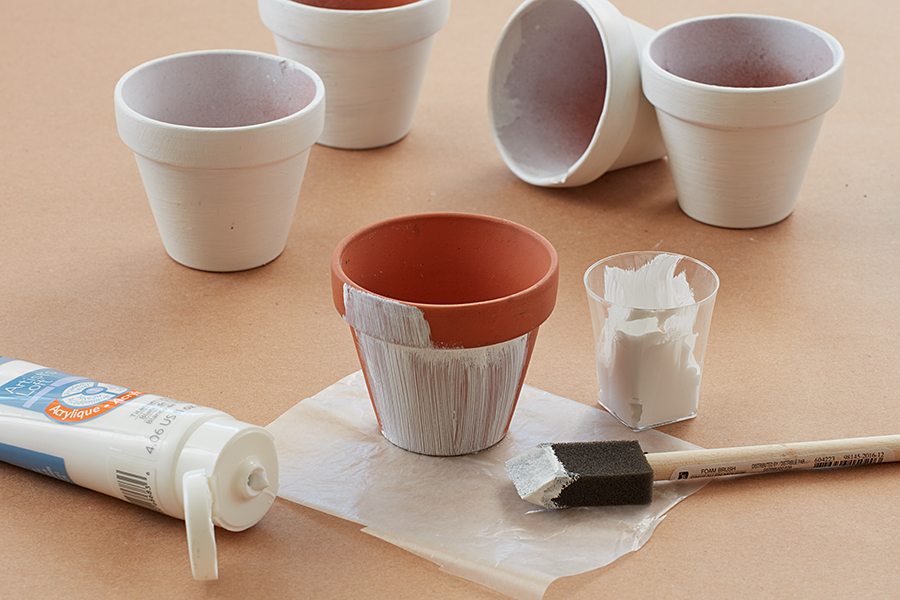
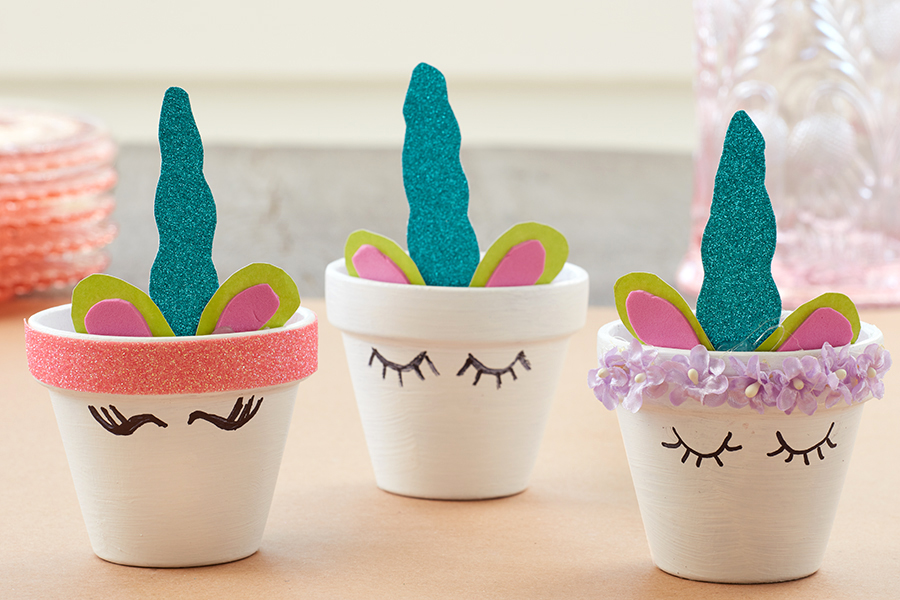
Paint all the pots.
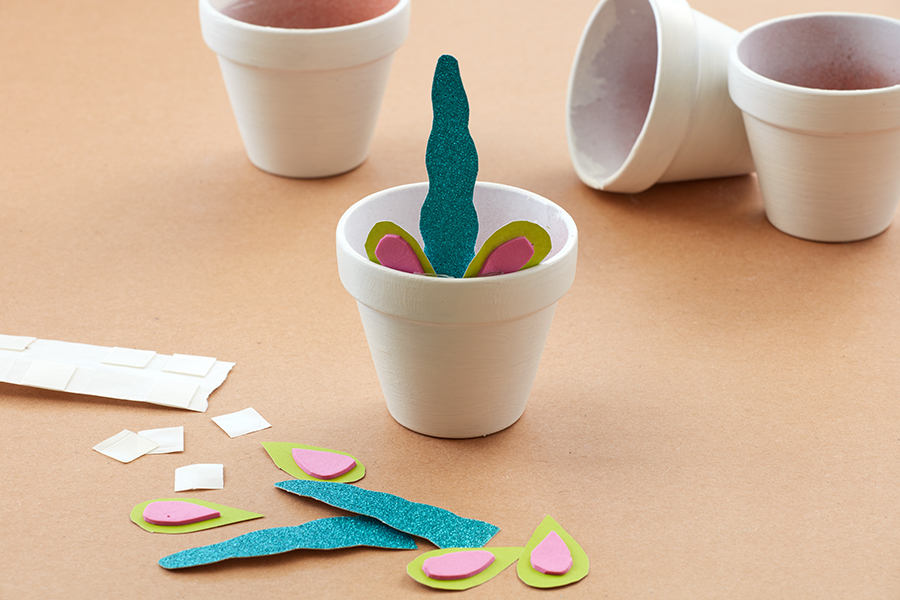
Cut out the horn and ears, and glue them to the inside rim of each pot.
Decorate the rim to add a fun pop of color.
Then, draw flirty little unicorn eyes under the rim on either side of the horn using a black permanent marker. You can find many templates online from which to draw inspiration. I like to do them freehand because, just like snowflakes, no two unicorn’s eyelashes are exactly the same!
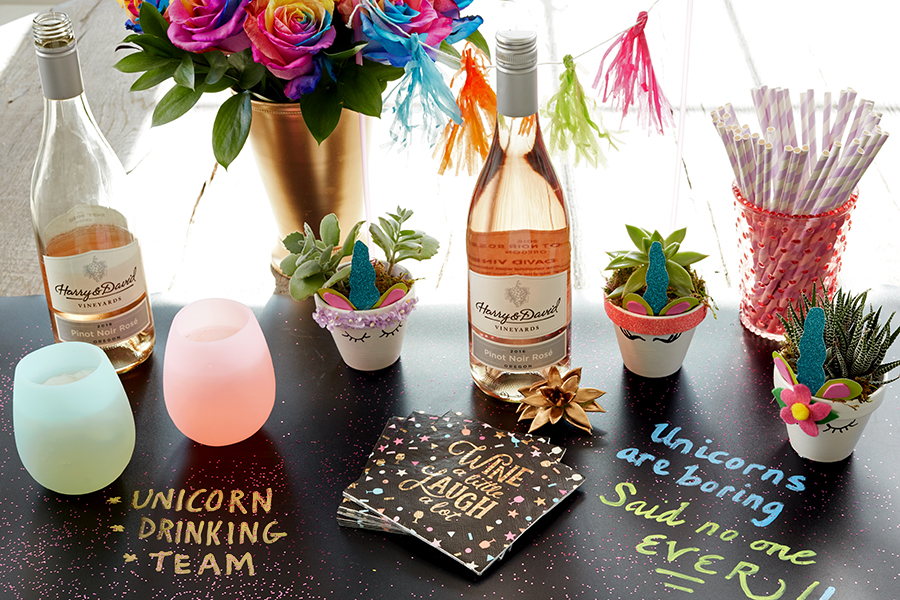
I filled my uni-pots with mini plants: one cactus, two succulents, and one fern. They would look amazing with fresh flowers as place settings or filled with candy for a sweet take-home gift.
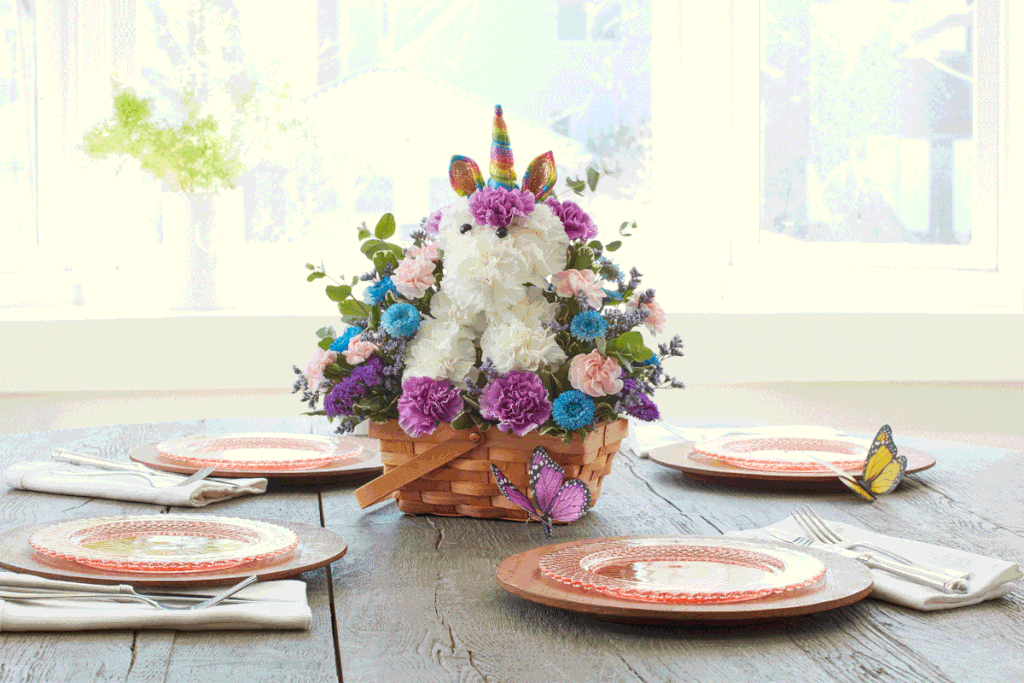
These planters are the perfect complement to the Enchanting Unicorn™ floral arrangement, one of the most popular gifts in the Enchanting Unicorns collection. Pair them at your next magical unicorn party, and your little one will be over the moon!
But unicorns aren’t just for little girls — they’re for everyone! I heard their favorite type of wine is, in fact, rosé. Pop open a bottle at your next unicorn-themed party and let the good times flow.
…to these glasses of delicious frozen rosé — also known as frosé — served on a golden tray decorated with a simple, sweet, single rose.
There are so many ways to use a single rose to add unexpected pops of beauty when entertaining. And there is an easy way to preserve fresh cut roses so that they will last for weeks, allowing you to use them multiple times in many different ways: preserving them in wax! And, yes, I did say easy, but did I also say how much fun it is?!
Here are two ideas for using waxed roses.
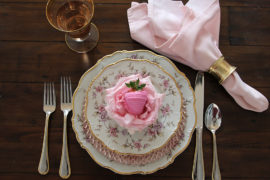
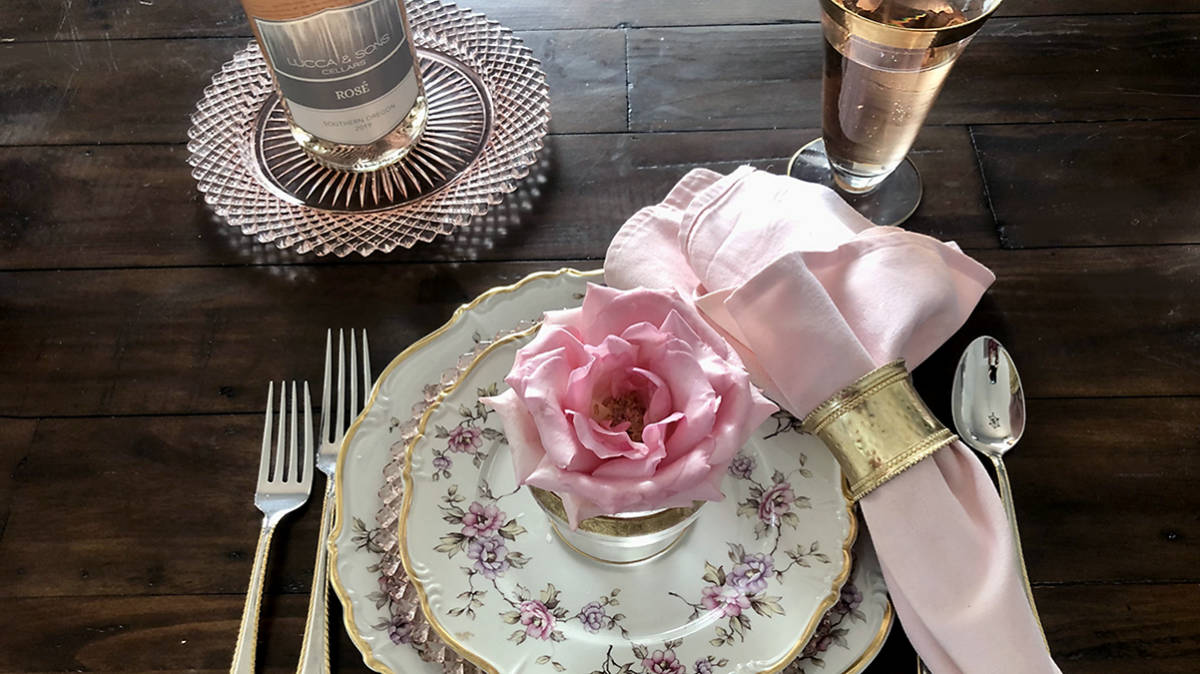
As if this combination of vintage china, pink depression glass, and gold accents wasn’t pretty enough, a waxed rose greeting each guest as they take their seat for lunch takes it to the next level.
But wait, there’s more! Gently place a single chocolate-covered strawberry into the waxed rose and start your celebration off with a little something sweet. Or package it up and send your guests off with the best take-home gift ever!
If you’ve never preserved flowers in wax, check out my step-by-step guide for how to do it. I even made a video to go along with it! These instructions apply to all flowers, not just roses.
Preserving flowers in wax, admittedly, takes a little practice, but it is so fun and relaxing to do. And the best part is that you get to enjoy your flowers as fresh cuts first. You can wait until your flowers are fully bloomed and just about to pass their prime to preserve them using the waxing method.
What are the first two things that come to mind when you think of summer? A lot of folks might say “sun and surf” or “grill and chill,” but if you ask me, it’s roses and rosé! And I’m not talking about Lauren Zima’s recap show for Bachelor Nation.
For me, summer is about celebrations and relaxation. Flirty and frivolous, rosé is the perfect beverage to enjoy on a sun-kissed balcony, at a bustling beachside bar, or while dining al fresco on a warm summer evening. Add the overwhelming fragrance and stunning beauty of rambling roses and you have the perfect storm of summer perfection!
Here are three ways to enjoy roses and rosé this season.
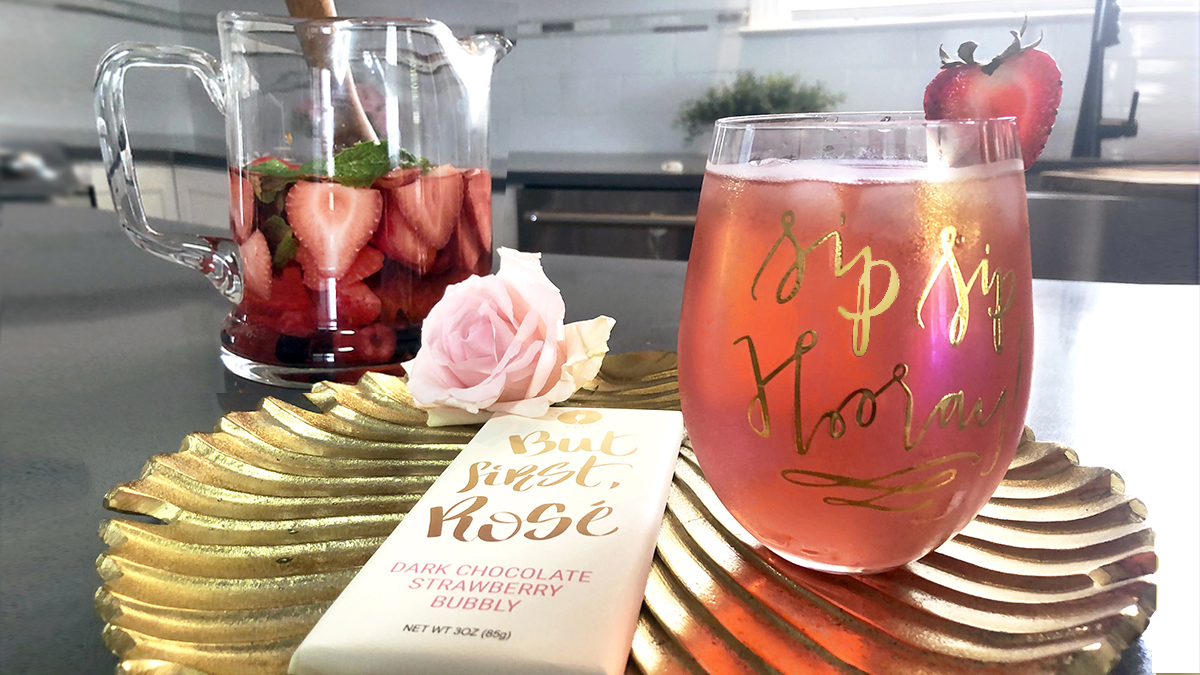
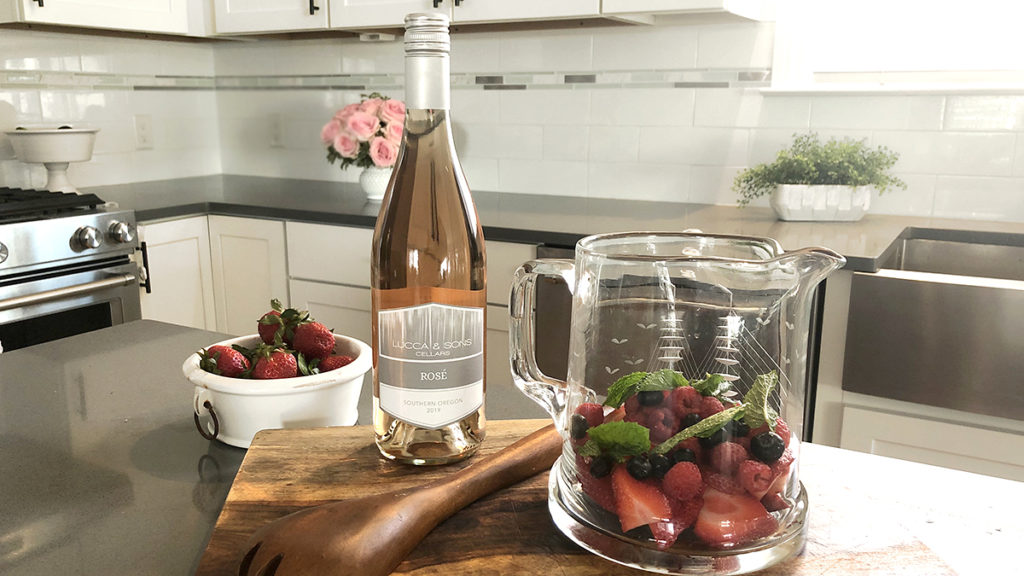
Rosé sangria mojito cocktail
Rosé is extremely versatile and can function as a base for your favorite cocktail, adding lovely flavors like strawberry, raspberry, and citrus. I wanted to create a summer cocktail that was light, with layered flavors, but not sweet. What I came up with is a cross between sangria and a mojito.
This rosé sangria mojito is a more grown-up cocktail. If you prefer your drinks on the sweeter side, you can add some simple syrup to the mix or use a sweetened cranberry juice instead of the flavored seltzer.
This drink pairs perfectly with the chocolate strawberry bubbly bar or dark chocolate sparkling rosé cordials that come with the Girls Night In Rosé Gift Basket. Just mix it up, pour it into the “Rosé All Day” stemless wine glass, and you’re ready for any celebratory occasion!
Wash all the berries. Remove the tops of the strawberries and cut into slices.
Add all the fruit to the pitcher, along with a few sprigs of fresh mint.
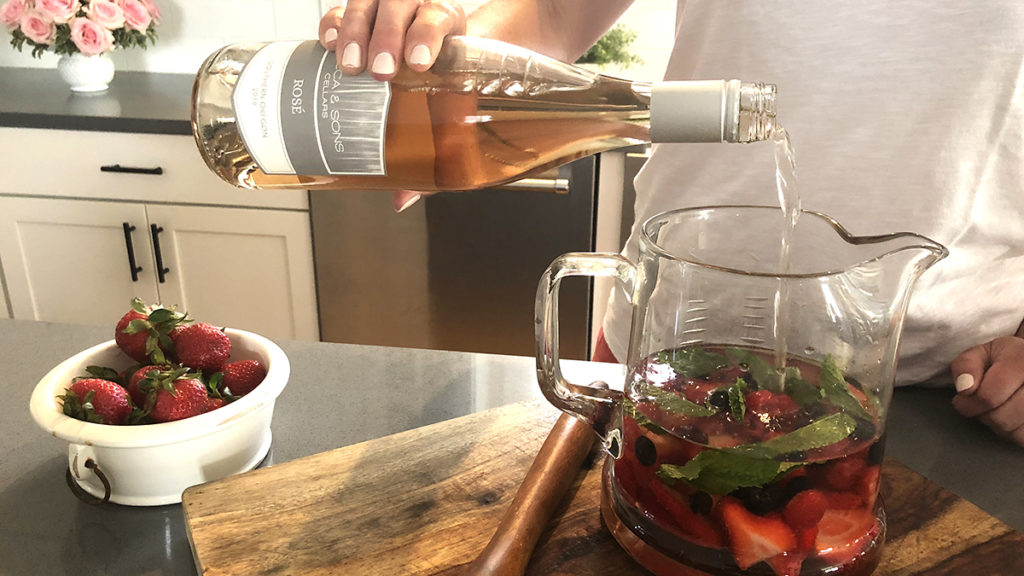
Add two cups of rum, the bottle of rosé, and a can of cranberry seltzer.
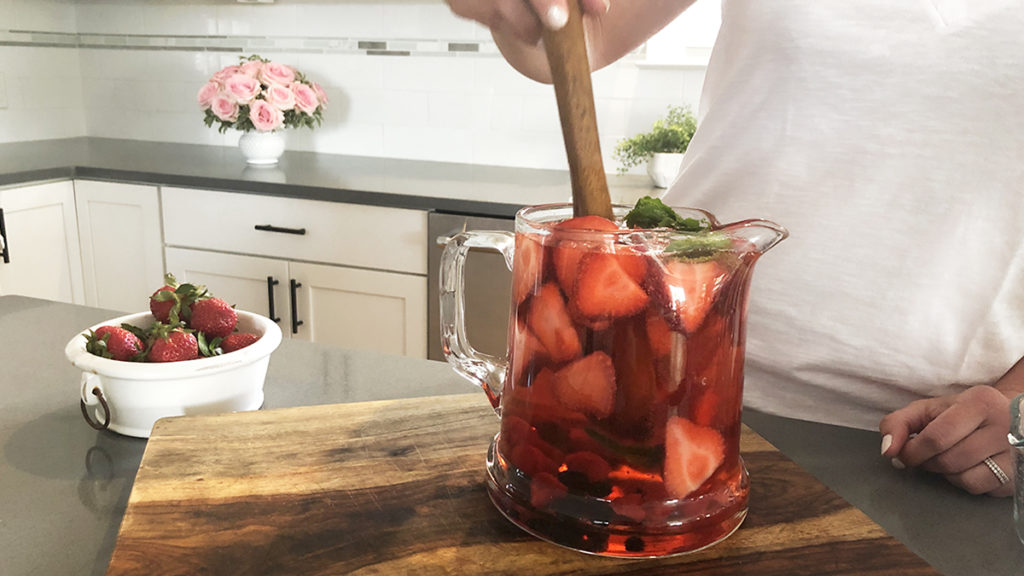
Stir to mix all the ingredients together and refrigerate for about an hour.
When ready to serve, pour in a glass over ice and garnish with a strawberry slice.
DIY roses and rosé wreath
This summer, everything is coming up pink! And that means lots of fabulous party décor in that trendiest of colors. This roses and rosé wreath is a particularly pretty — and pink — way to display your wine while keeping it chilled at the same time.
If you don’t feel like going all out, there’s a version of this you can make with a faux rose wreath. Or, meet in the middle and do a little of both.
The series “Get Crafty” gives you the inspiration for creating inventive DIY projects during the holidays and year-round.These Easter brunch ideas include a seasonal cocktail, centerpieces made of spring veggies, and chocolate dipped strawberries that look like carrots.
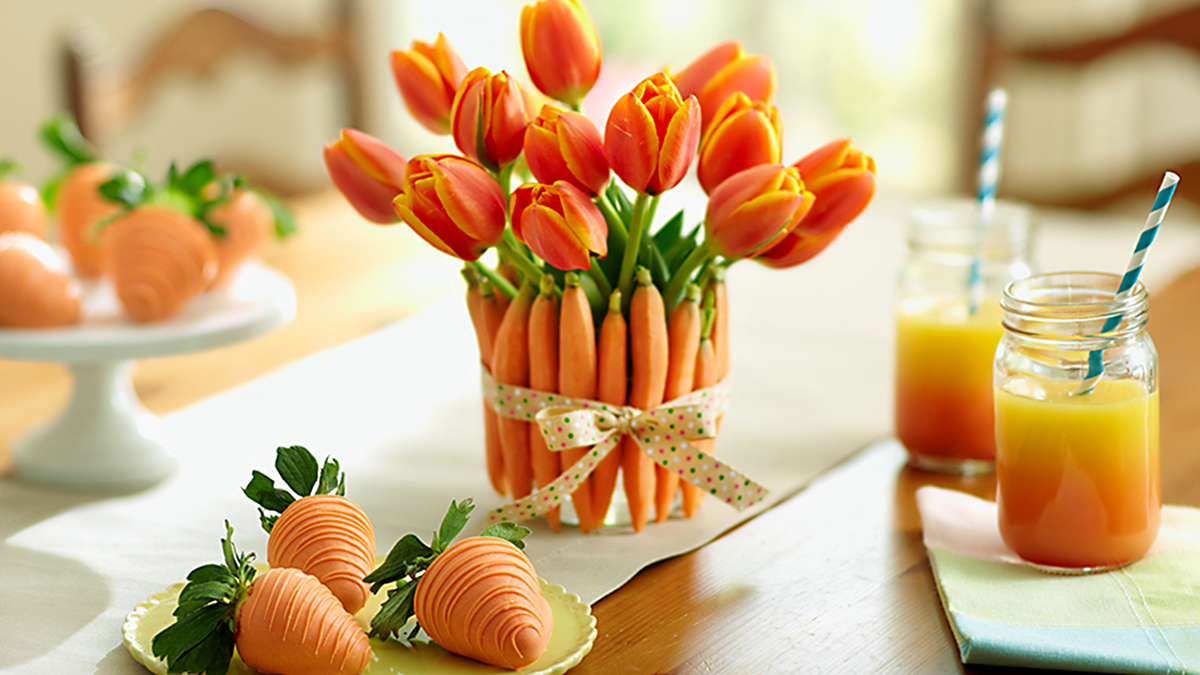
When I think of things that represent Easter, my favorite spring flower, the tulip, comes to mind. Then there’s the Easter bunny’s favorite food, carrots. And what would Easter be without delicious desserts??? Put them all together and what do you get? A fresh, fun, and creative cocktail, centerpiece, and sweet treat that are perfect Easter brunch ideas.
Signature seasonal cocktail
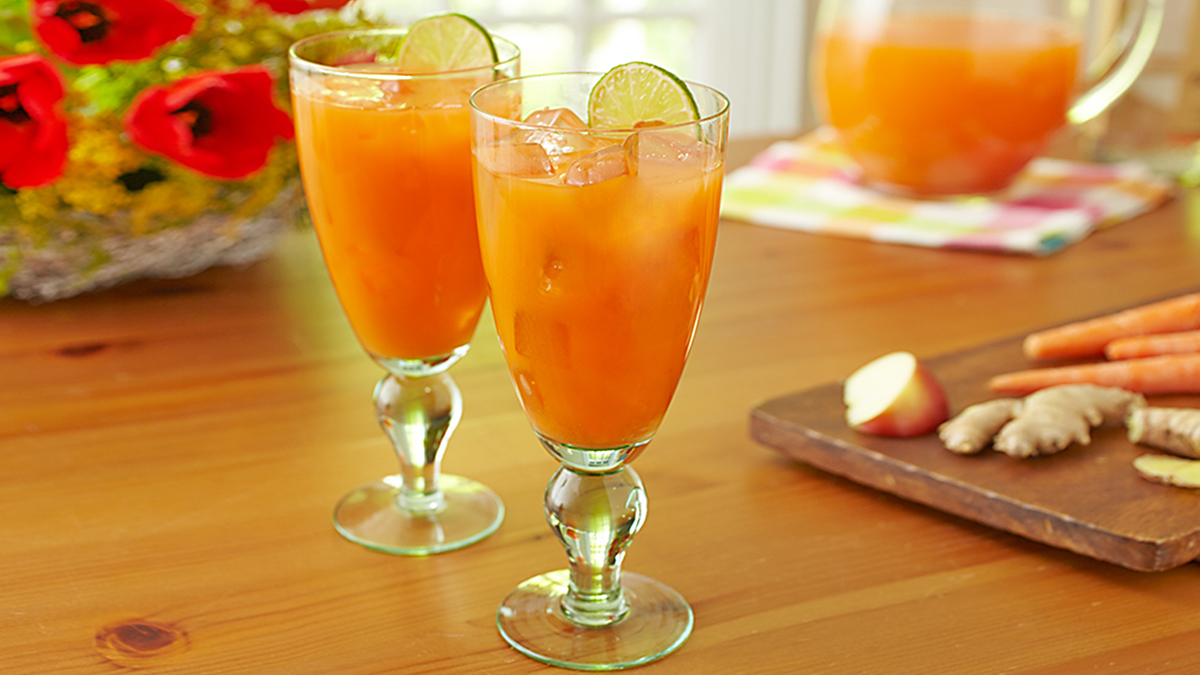
A signature craft cocktail is always on my holiday entertainment menu. This beverage incorporates the fresh vegetables and flavors of the season, making it perfect for your Easter gathering. And with nearly a full day’s serving of carrot juice in each glass, it’s not only delicious but is packed with vitamins and minerals!
Muddle the ginger slices in the bottom of a cocktail shaker.
Add the carrot juice, apple juice, and vodka.
Shake well for about 10 seconds.
Pour over ice.
Garnish with a lime wedge.
Notes:
Note: You can make fresh carrot and apple juice or buy organic prepared juices.
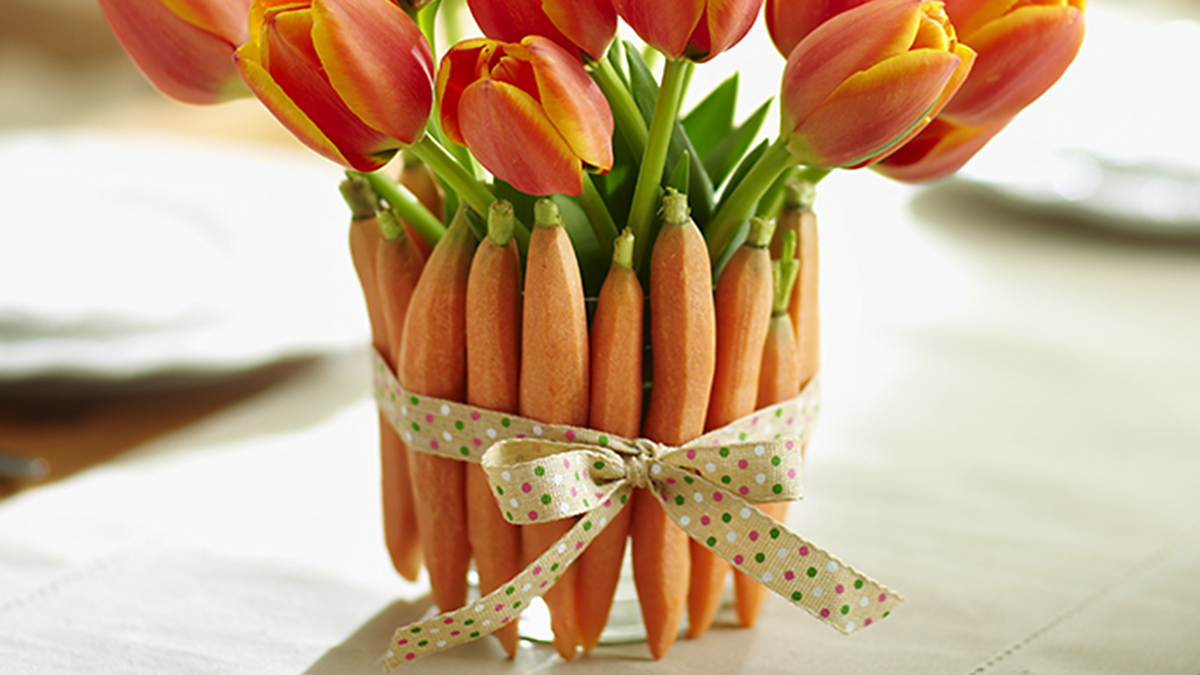
Fresh spring centerpiece
Incorporating seasonal fruits and vegetables into your tablescapes and floral designs takes them from pretty to pretty spectacular! A great starting point is the Baby Vegetable Gift Box or Baby Vegetables Crate from Harry & David. Brimming with the finest seasonal produce available, either one is the perfect gift for the vegetable connoisseur in your life. And if that person is you, get it for yourself!
There’s something about miniatures that gets me every time, and these carrots are no exception. They’re the perfect size to fit around a lowball glass to create one-of-a-kind arrangements. Simply put a rubber band around the glass and insert the carrots between the glass and the rubber band, and continue until the glass is completely covered.
Tie a coordinating ribbon around the vase to cover the rubber band. You can also use a piece of fabric, raffia, or twine.
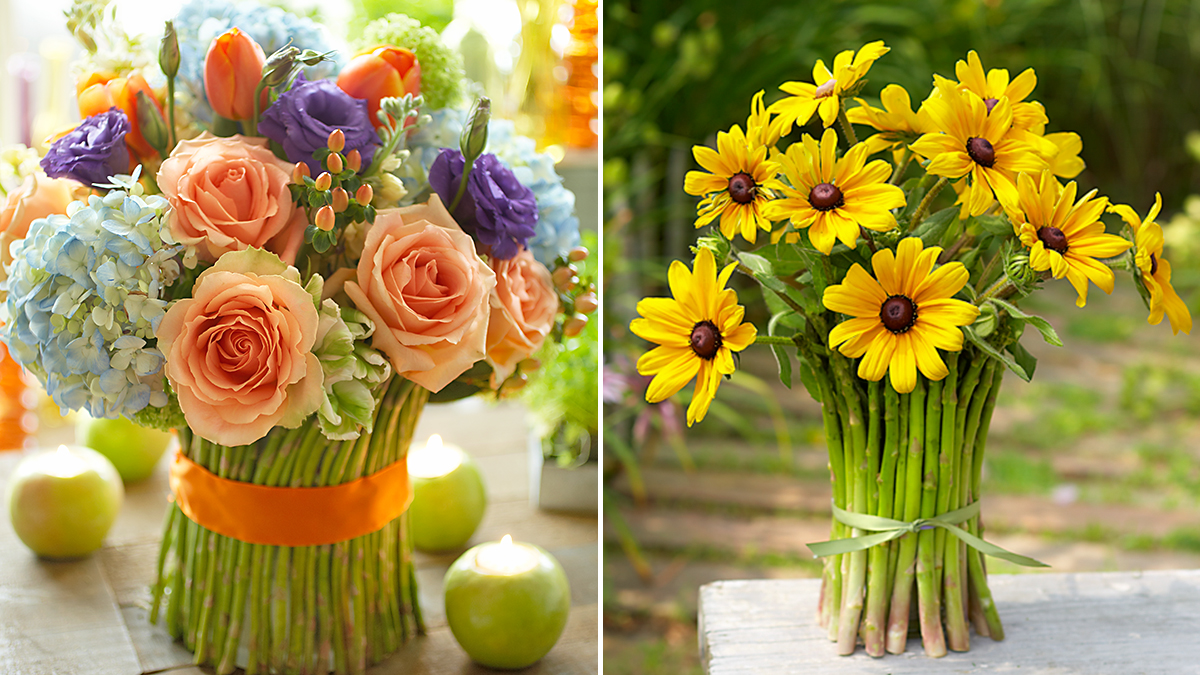
Creating asparagus vases using this same technique is one of my go-tos in the springtime.
Even if you’re pressed for time, you should always have flowers on your table when entertaining. And there is no easier arrangement to make than filling a favorite vase with beautiful, fresh-cut tulips. It’s so easy, it’s almost like the tulips arrange themselves!
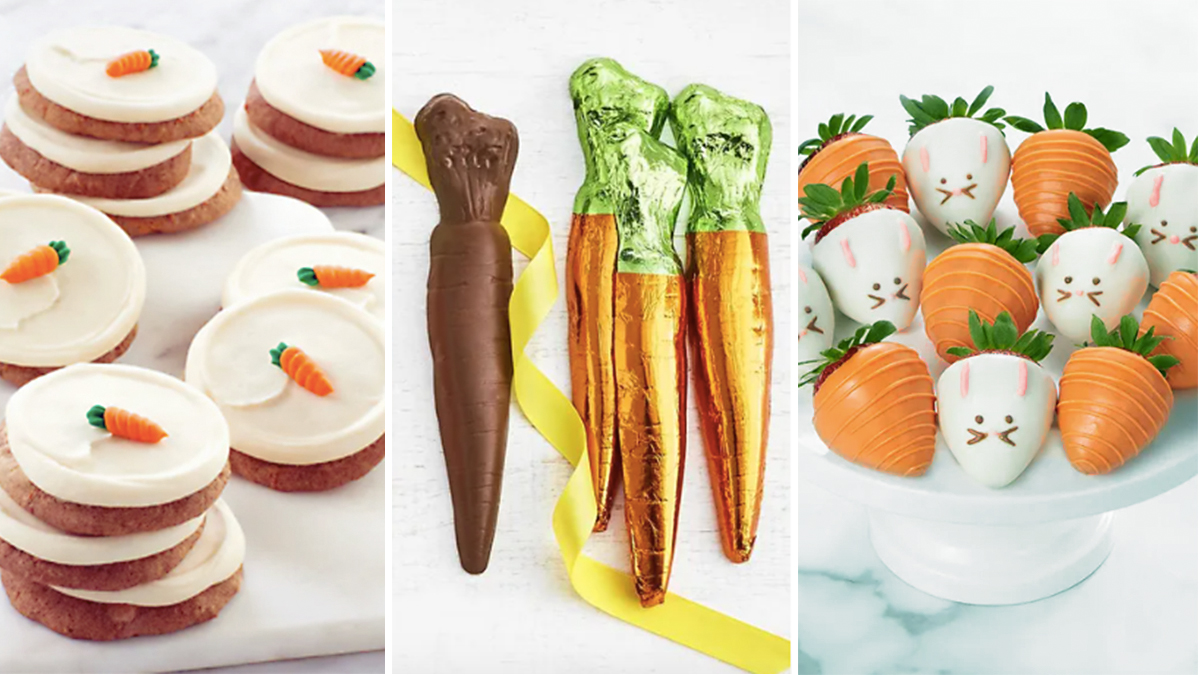
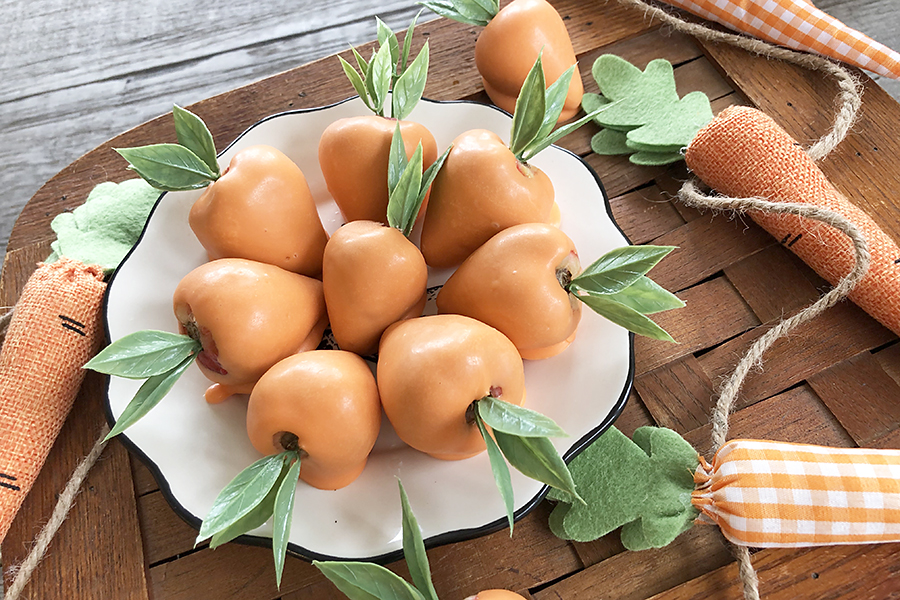
If you have the time and want to make your own chocolate-dipped strawberries, follow my instructions below. Just don’t expect them to turn out as good as the ones from Shari’s Berries! They’ve been perfecting the art of dipping strawberries into melted candy for over 30 years. Still, it is a fun project to do at home.
Prepare the strawberries for dipping by rinsing and thoroughly drying them. Lay the strawberries out on a paper towel and place another towel over them and gently press. Let them sit out for a bit before dipping, as it is important that they are completely dry.
While the strawberries are drying, melt the chocolate in a double boiler, microwave, or candy melting machine.
Start with about a cup of melts, stirring constantly until melted. Turn down or remove from heat and add more candy melts as needed, stirring them in until they are melted. Doing it this way helps to keep your candy from overheating, and breaking down and taking on a thick, chalky consistency.
Remove the stems before dipping. Insert a wood skewer into each strawberry, dip the strawberry in the melted candy, and place it on a piece of parchment paper to cool and set. (Note: If you are not adding the faux leaves, you do not need the skewers. Leave the stems on the berries and use them to hold onto as you dip the strawberries in the melted chocolate with your hands.)
Take a stem of faux greenery that has multiple stems/leaf clusters and use clippers or wire cutter to cut small sprigs.
Once the candy is completely cool, remove the wood skewer and insert a sprig of greenery into the strawberry.
Continue doing this until all the strawberries have a "carrot top."
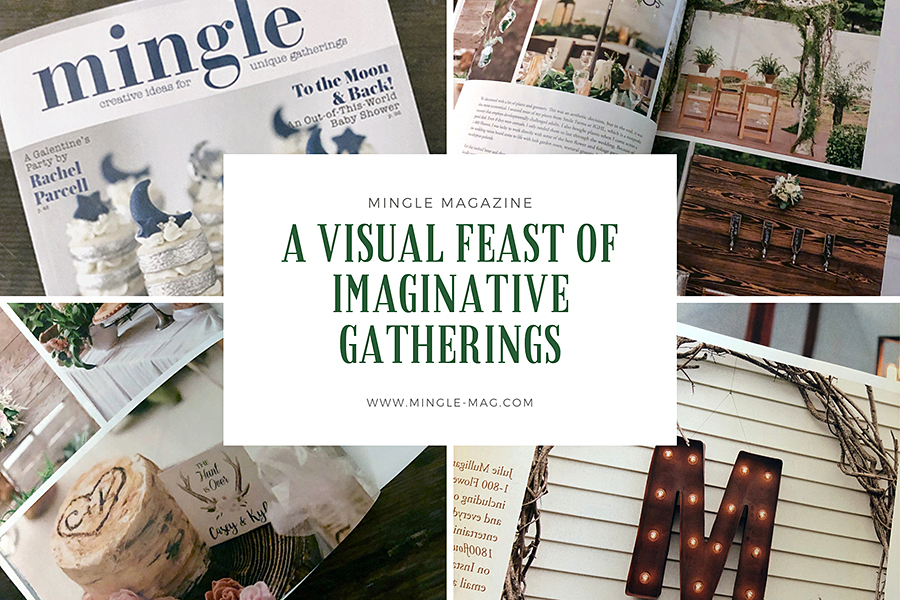
I have been a loyal reader of Mingle Magazine for a long time. Being a floral lifestyle blogger for 1-800 Flowers.com and a passionate party planner, it’s pages speak to my soul. I save all the past issues and look through them for inspiration. Each time I find something new that I hadn’t noticed before or I’m seeing differently based on a project that I am working on or an event I am planning.
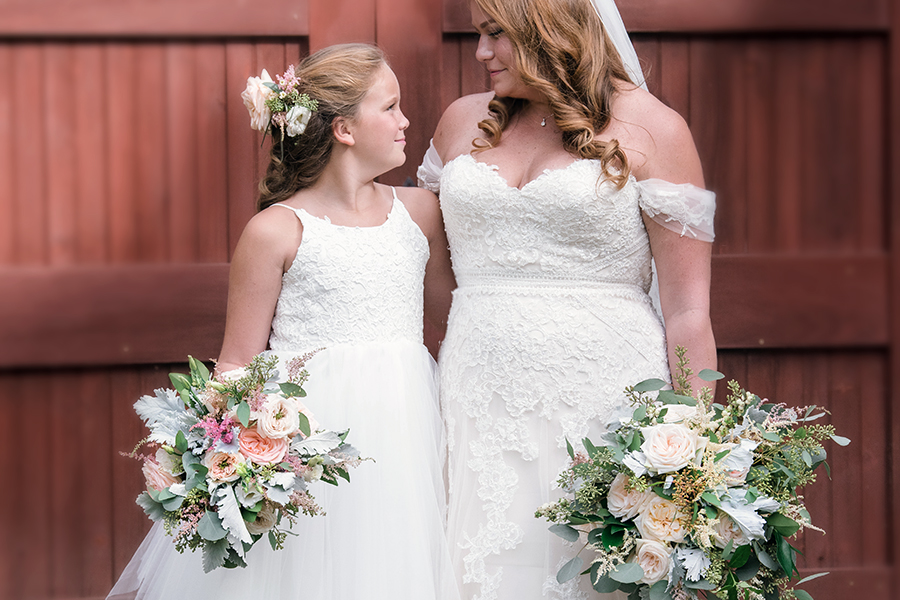
Mingle is a publication that features creative ideas for unique gatherings from selected reader submissions. Well, I submitted photos and ideas from my daughter Casey’s wedding and guess what – my story was accepted! It’s is in the 2020 winter issue, available now on the Mingle website and select retailers..
I did a post last Mother’s Day about the wedding, particularly creating the bouquets for my daughter and granddaughter and all the emotions and feelings that go went along with that. In case you missed it or want to read it again just click on this link.
The Mingle article focuses on the décor and highlights some of the personal touches and ideas that we incorporated into this special day. I’m so grateful to have had this opportunity to publicly acknowledge and give credit to all the talented people and companies that helped make Casey & Kyle’s dream wedding a reality. Andrew Carnegie said it perfectly – “Teamwork is the ability to work towards a common vision. The ability to connect individual accomplishments towards organizational objectives. It is the fuel that allows common people to obtain uncommon results.”
To see the results and read the article go to www.mingle-mag.com.and order your copy today. In the meantime, here are some fun shots and ideas that didn’t make it into the article. All photography by EXO Photography.
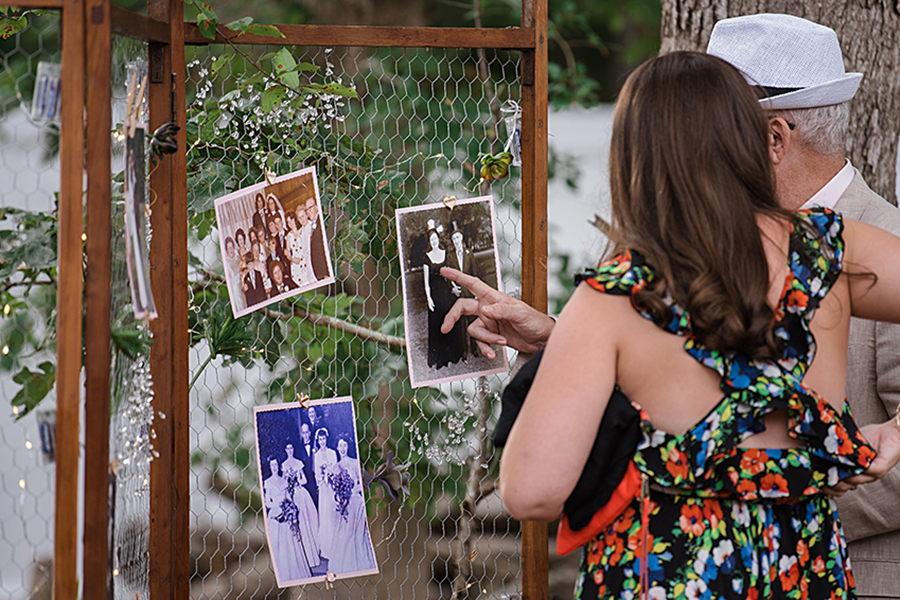
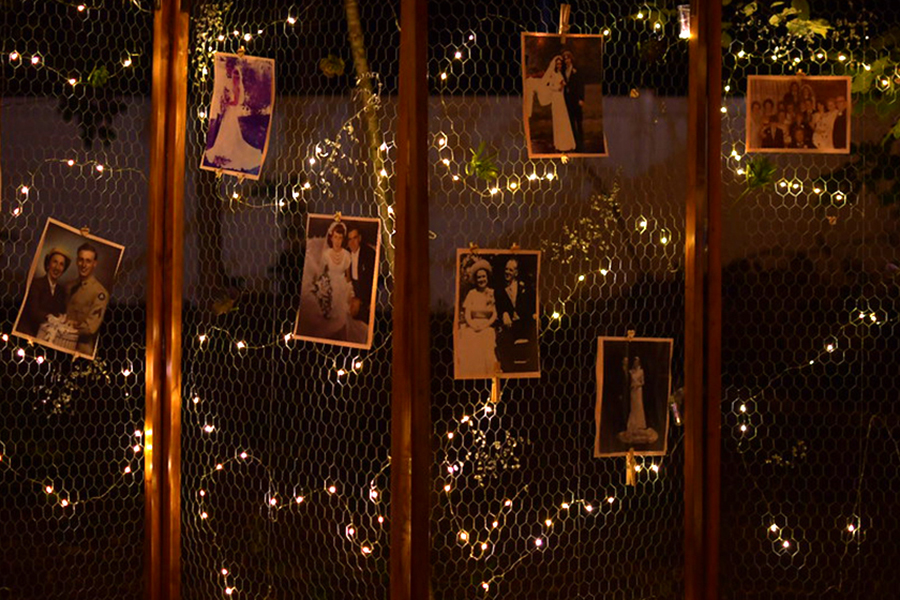
Chicken wire attached to vintage wood room dividers not only helped us define a space but was a perfect place to display family wedding photos of Casey and Kyle’s parents and grandparents.
Adding twinkling lights just made it that much better!
Fresh garlands and cut foliage were shipped directly from Sutton Ferneries in Florida. Most plants came from Smile Farms at IGHL which is right down the road from Casey & Kyle’s house, where the wedding took place! Smile Farms’ mission is to provide developmentally disabled adults with meaningful work opportunities at farms, urban gardens, greenhouses and farm stands where they can grow and sell flowers, plants and produce in their local communities.
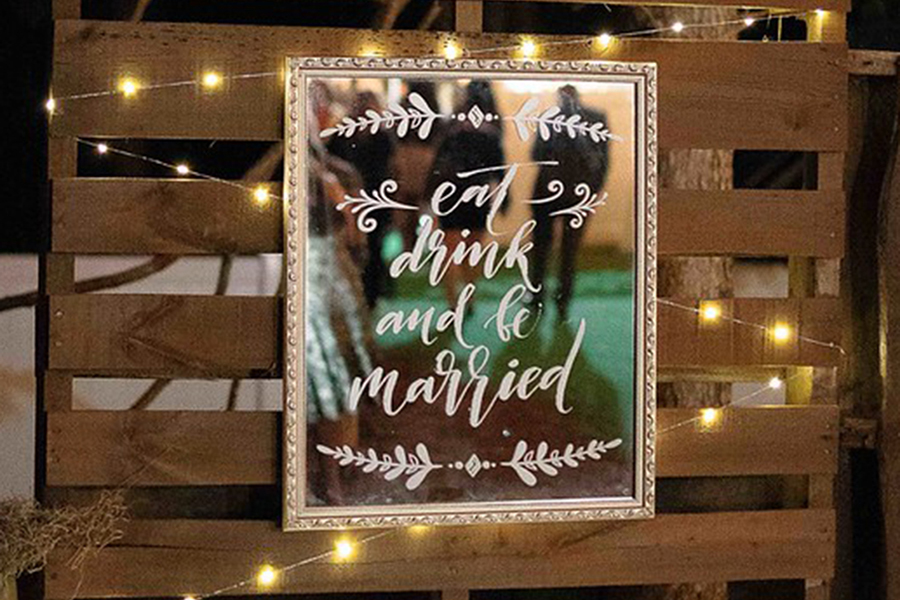
You can do so much with pallets, a string of lights, and a few accent pieces from Home Goods!
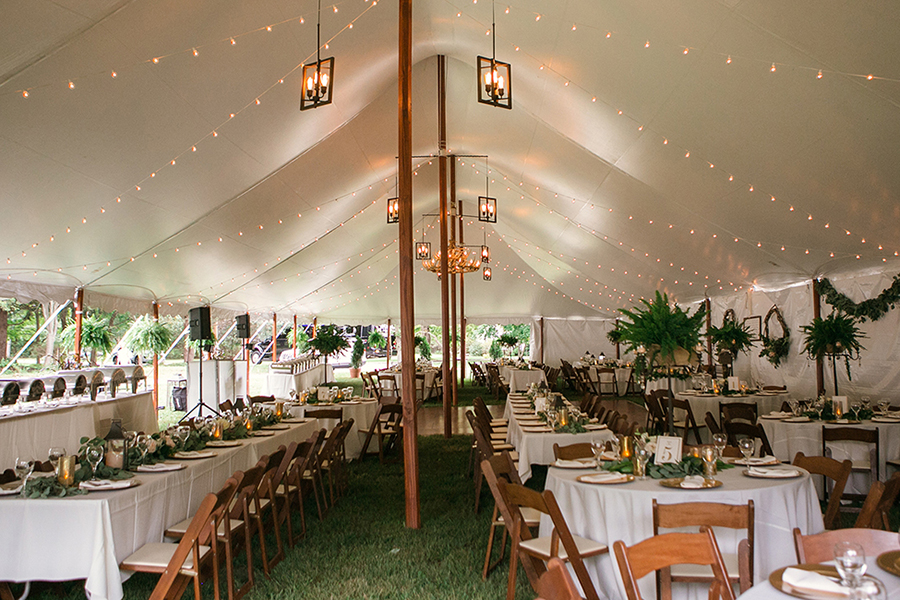
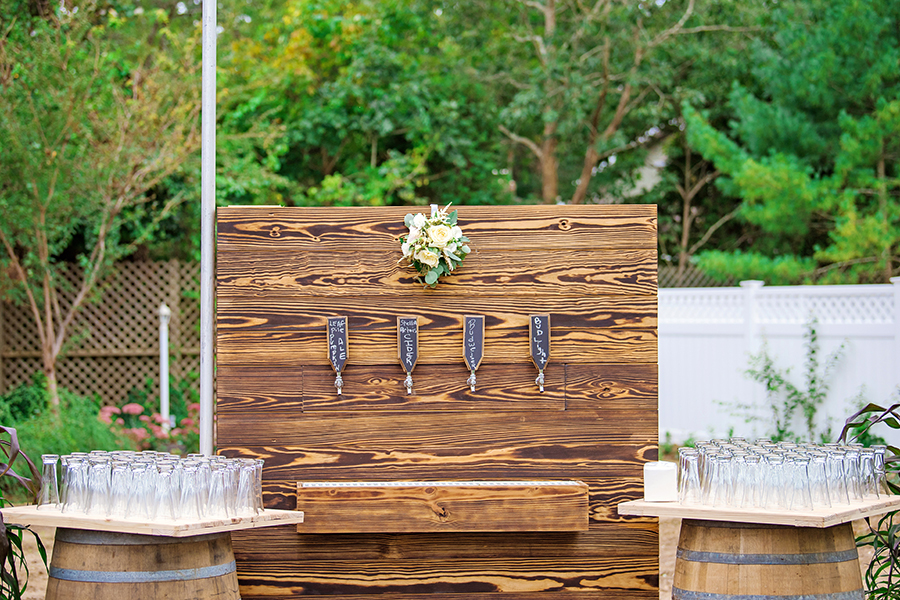
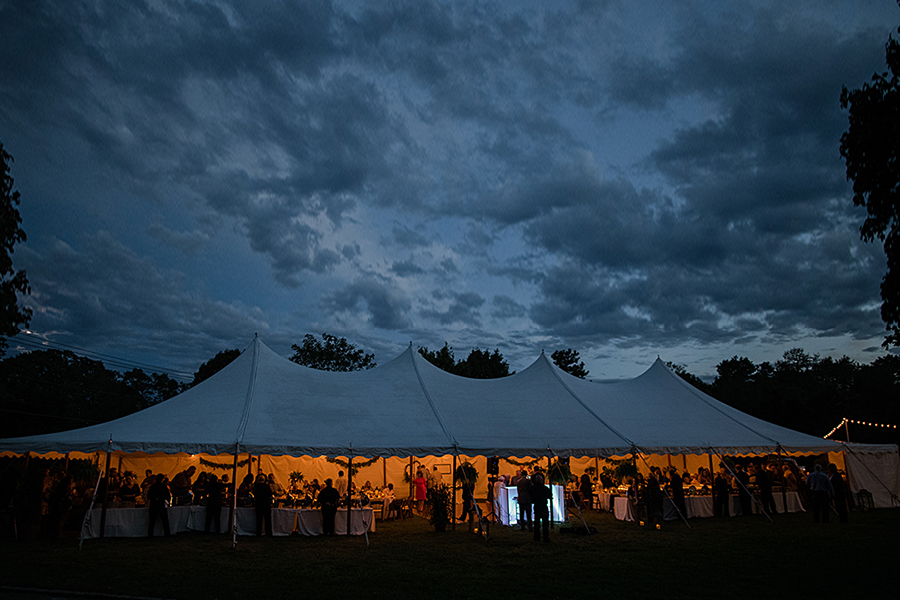
Remember what I said about the dream team? Joe, the owner of Camelot Party Rentals knew the bride and groom wanted a tap wall and couldn’t find one – so he built one! From the bistro lights, wooden tent poles, lanterns, farm tables, and whiskey barrel tables, to the tent – everything was perfect.
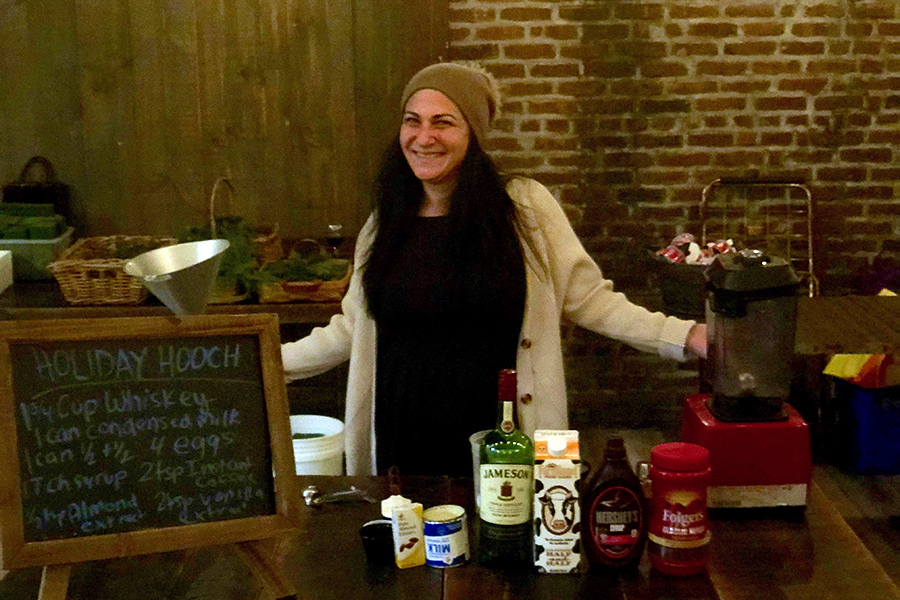
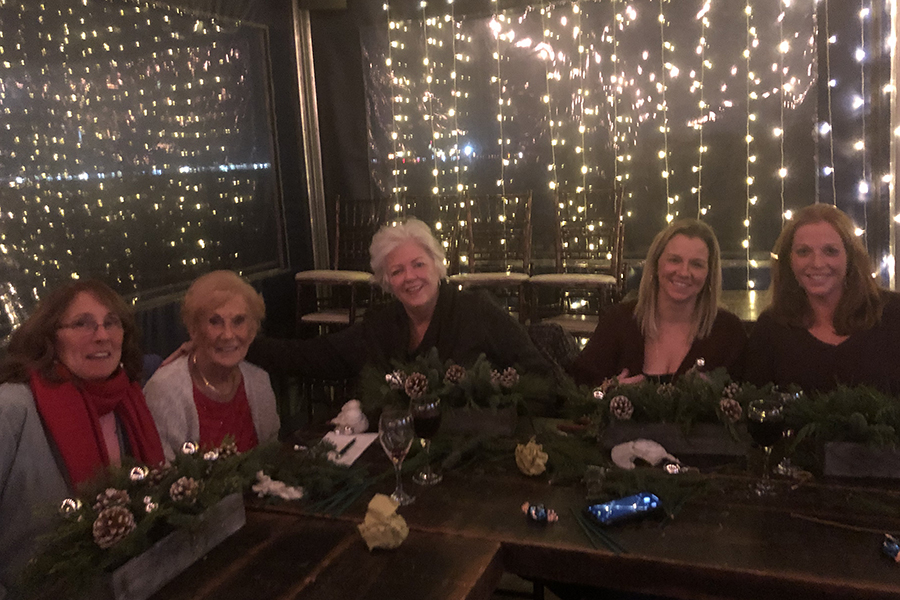
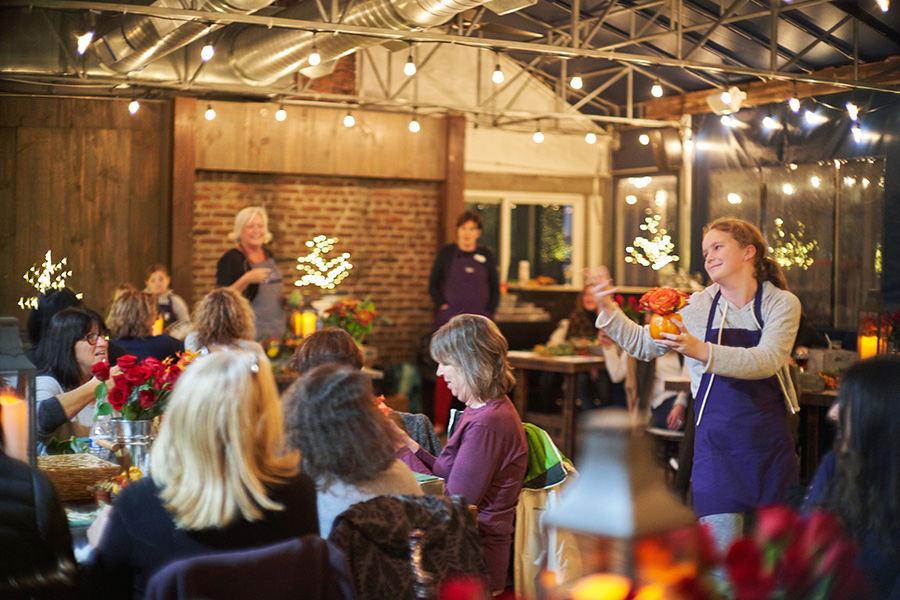
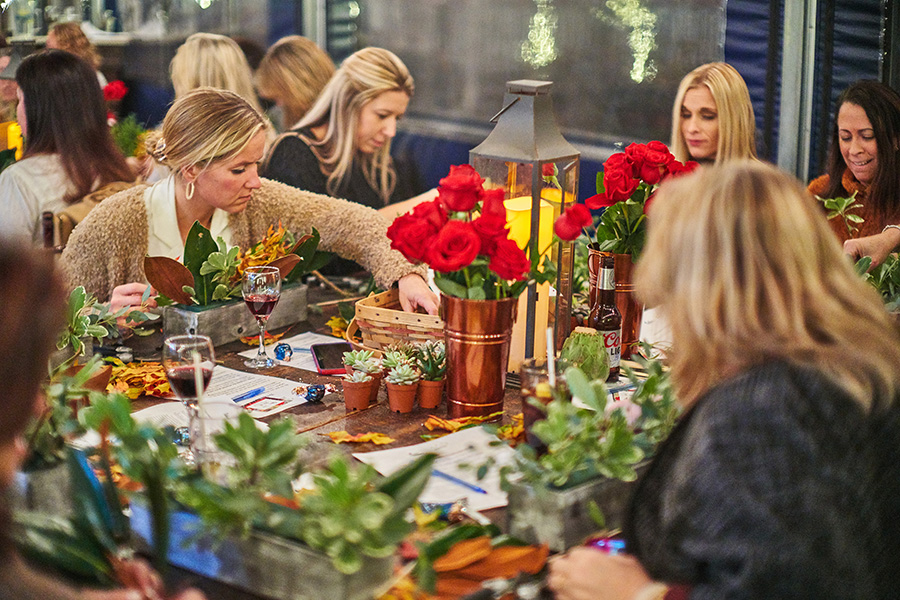
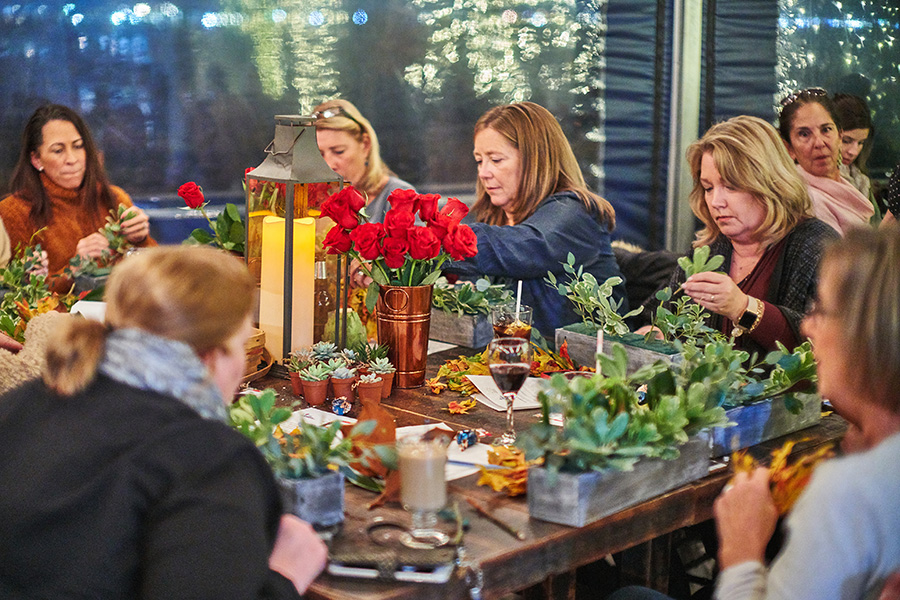
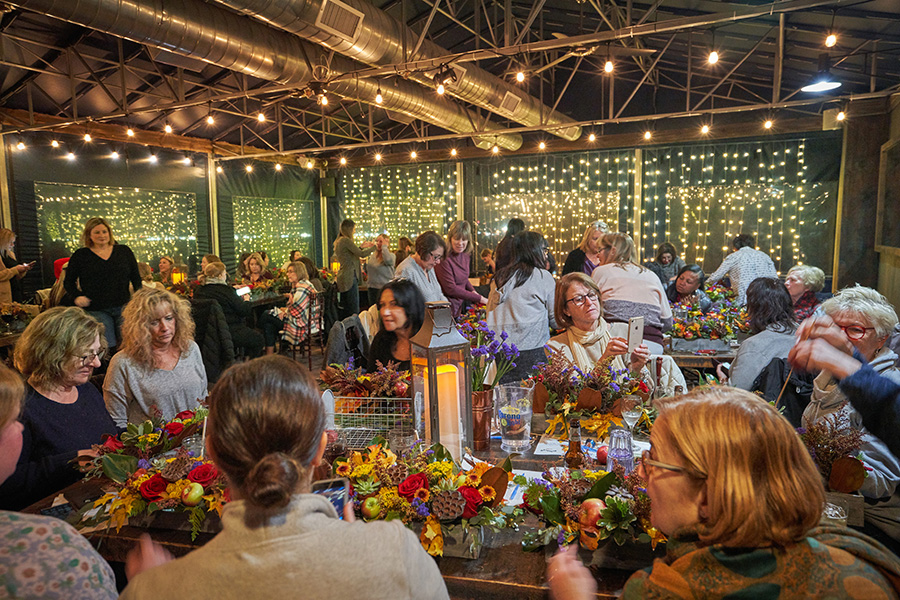
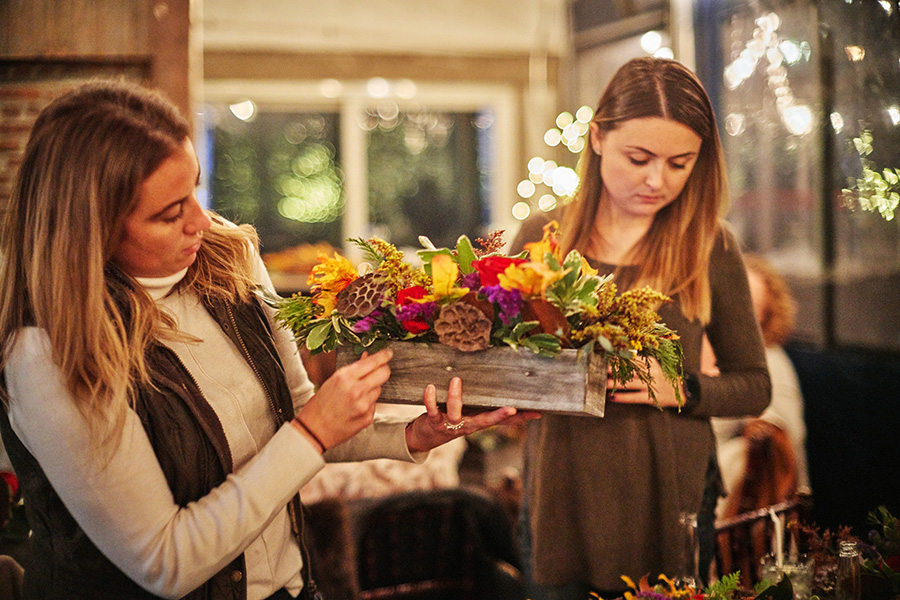
It may have been a snowy cold Wednesday night in Rockaway but nothing stops this creative crowd! We had a full house from our second Creative Workshop by 1-800 Flowers at Bungalow Bar.
Katy Bree, the General Manager at Bungalow Bar got the night started by sharing an old family recipe for an Irish Crème cocktail that she likes to call “Holiday Hooch”. It was a fun way to kick start the night and everyone seemed to love the drink (I know I did)!
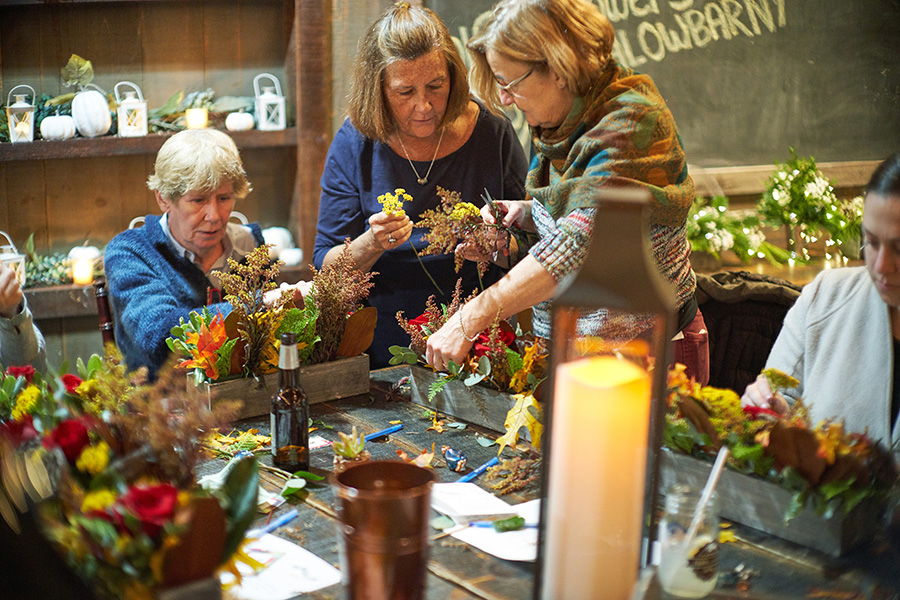
Then everyone got down to the task at hand.
Taking what could be saved from this three-week-old arrangement,
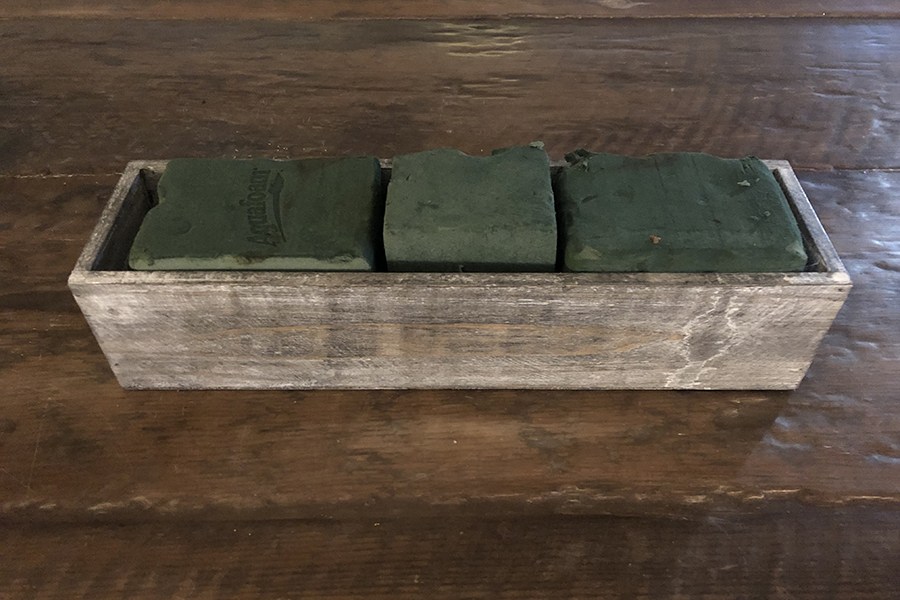
Filling the wooden planter with fresh, soaked floral foam.
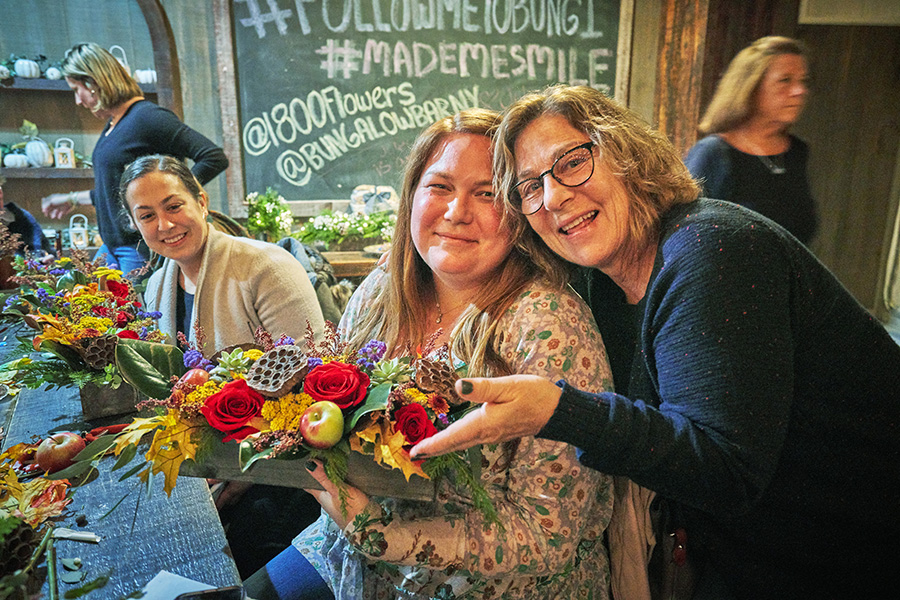
We limited the number of people for this exclusive event which made the night more intimate and personal.
There were multi-general family groups.
And friends,
neighbors,
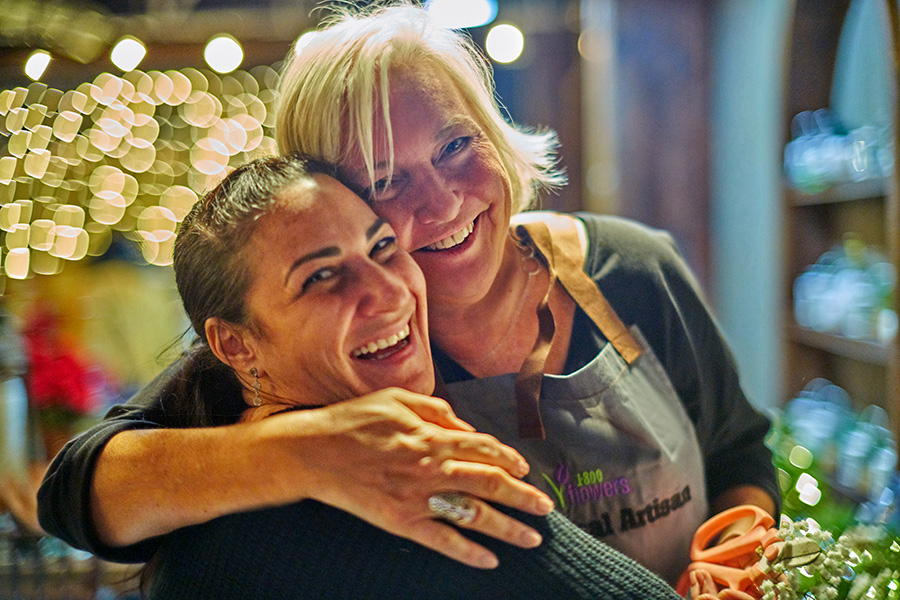
And mothers and daughters.
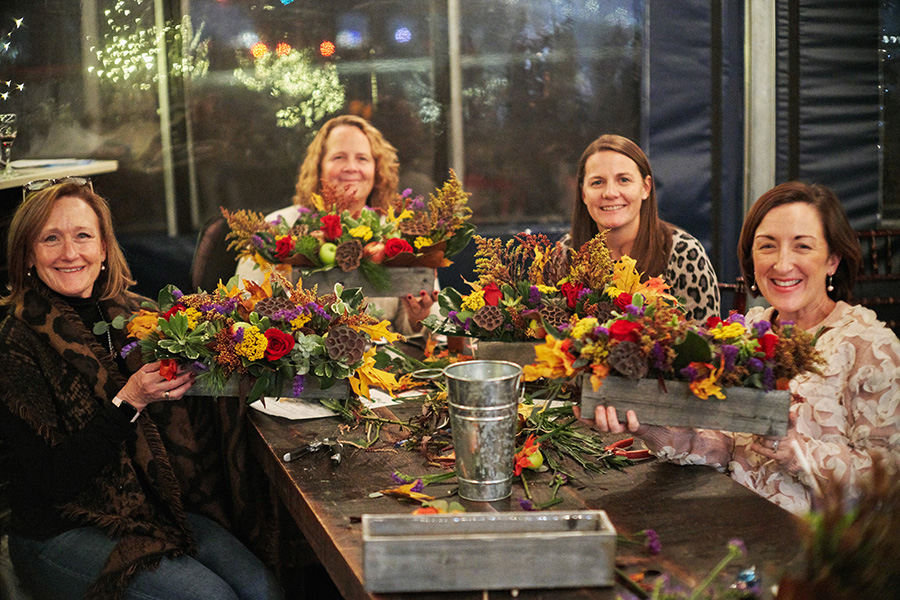
And not surprising – everyone did an incredible job!
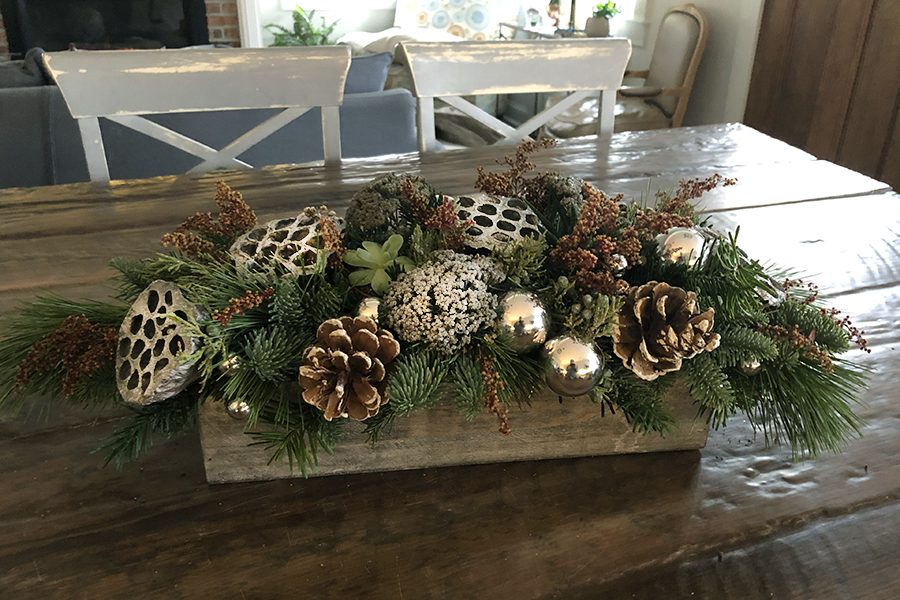
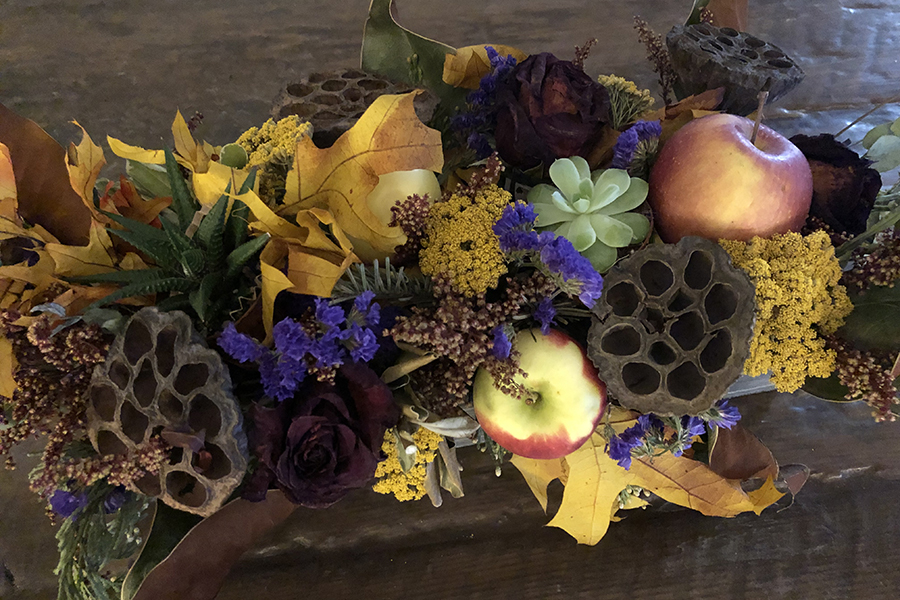
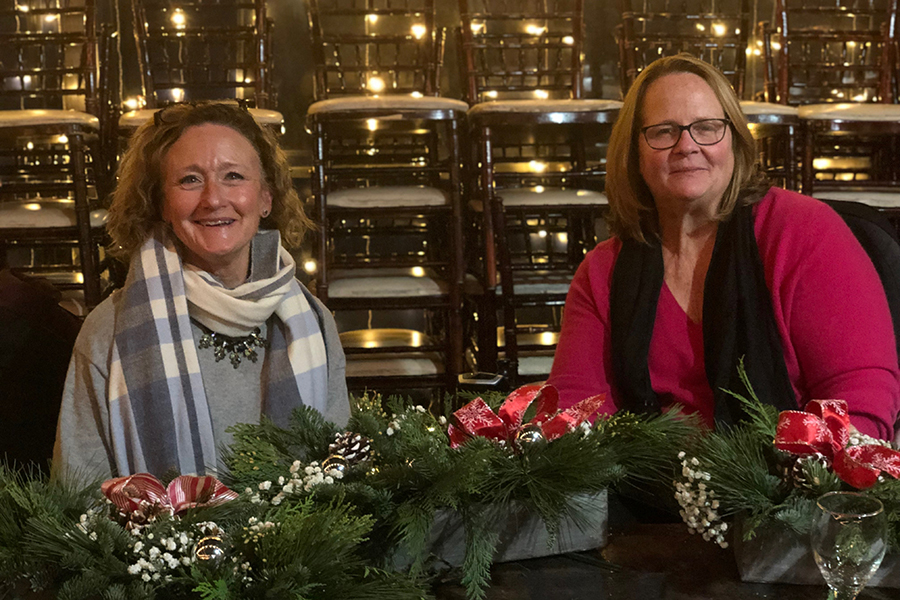
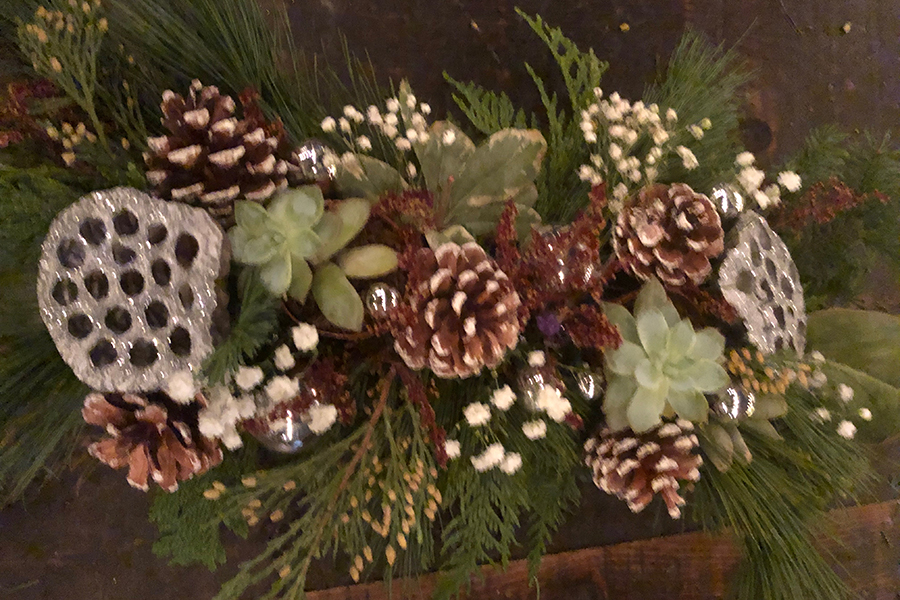
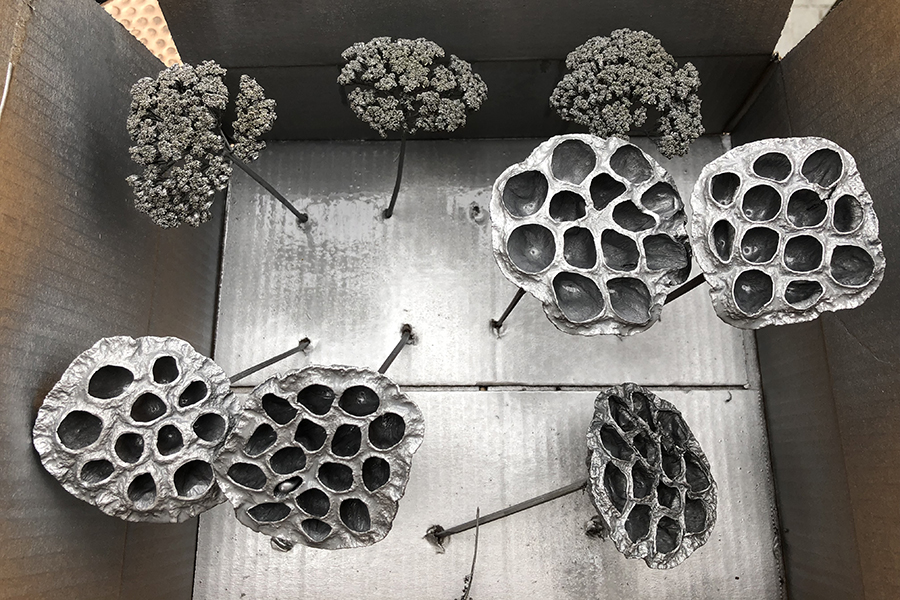
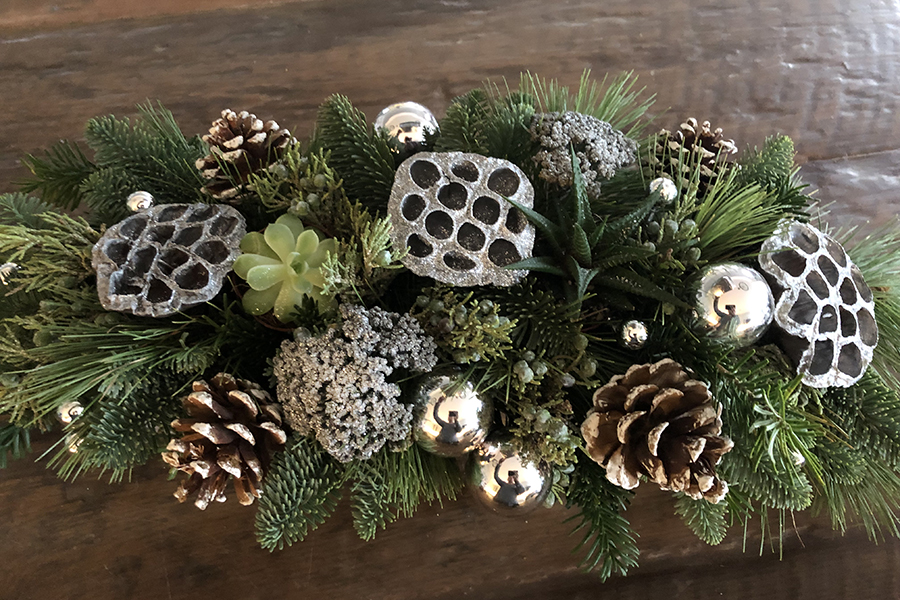
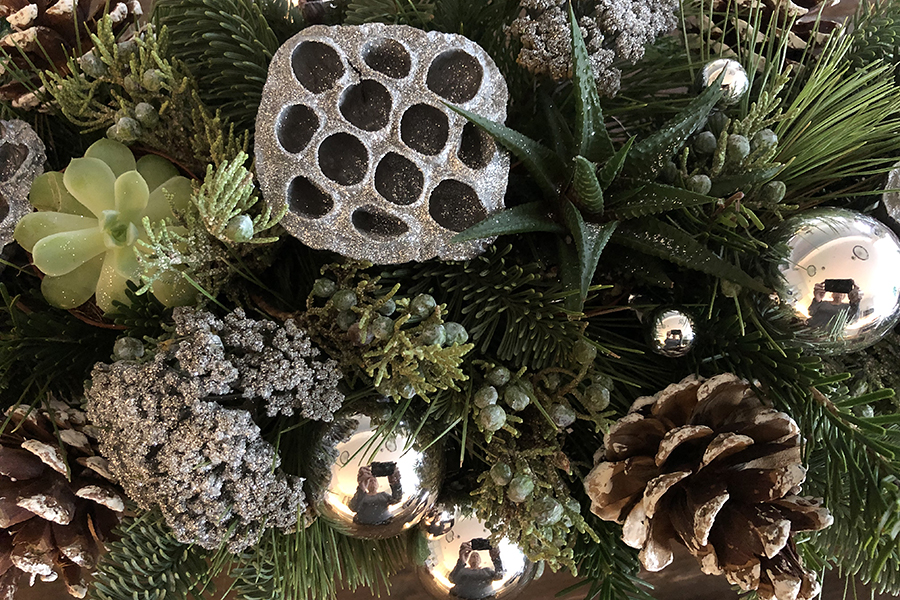
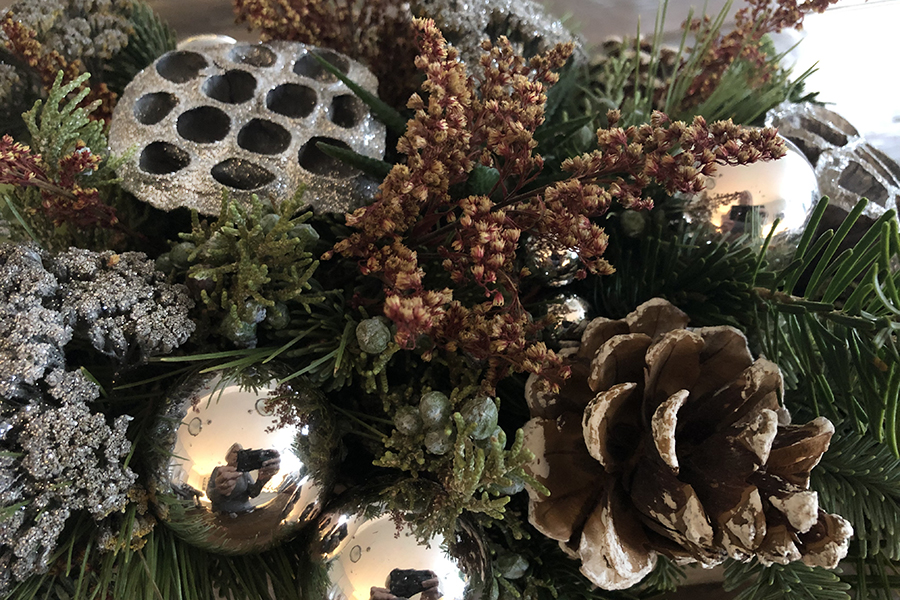
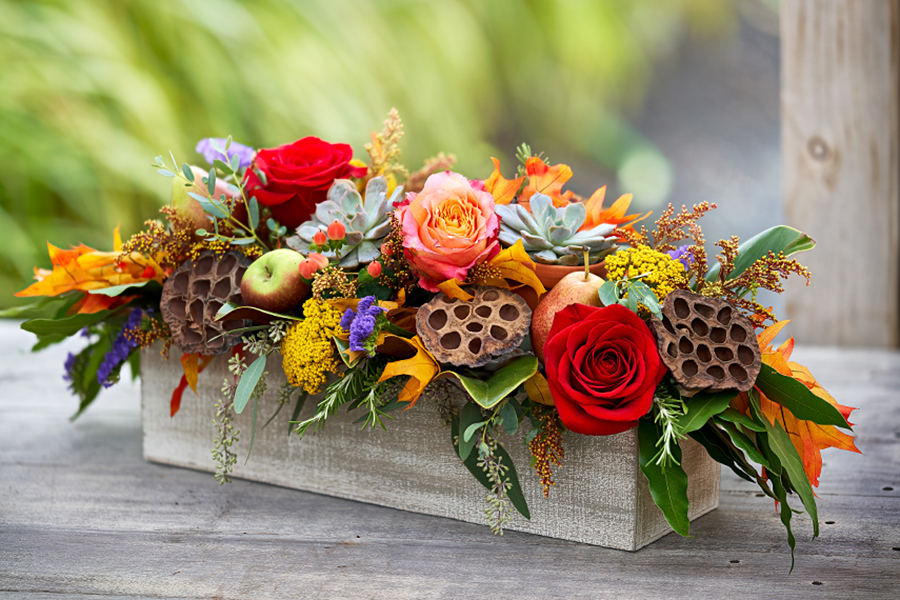
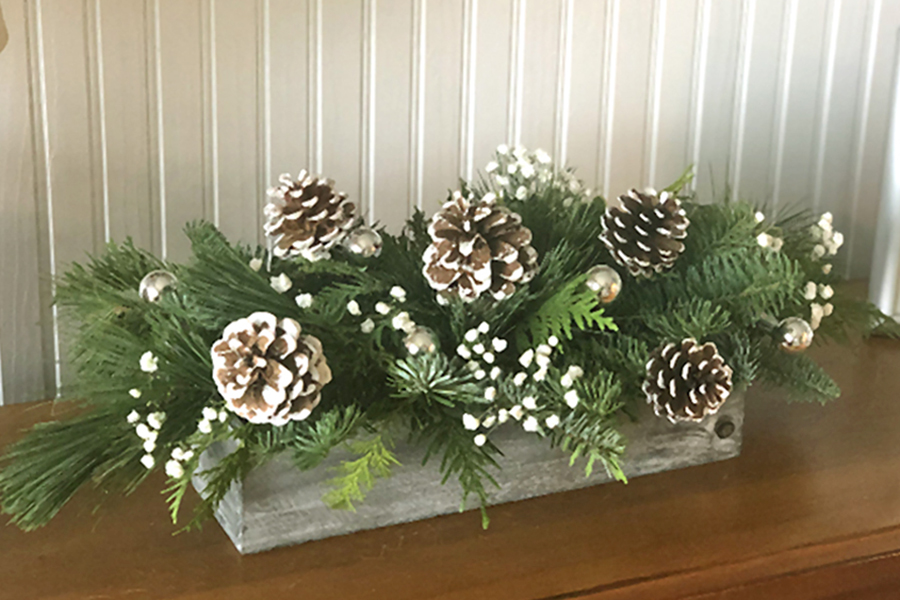
I was particularly impressed and inspired by my daughter Casey’s (far left) use of materials from the Autumn Centerpiece. I had brought some grey and silver paints as well as glitter in case anyone brought the succulents and pods from their first arrangement.
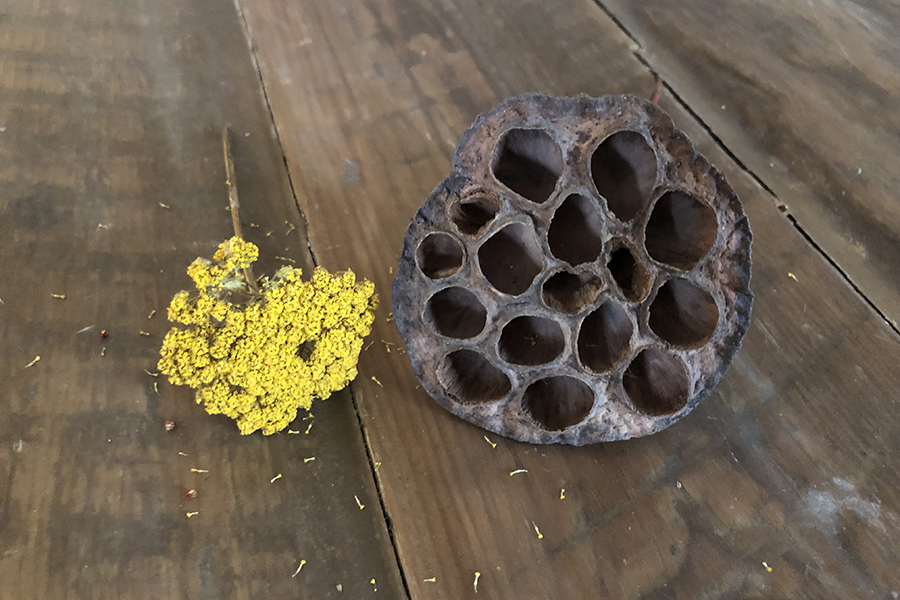
I flipped over the way that the pods completely changed their look with the glitter. Yet they still added a natural vibe to the arrangement – only with a little sass!
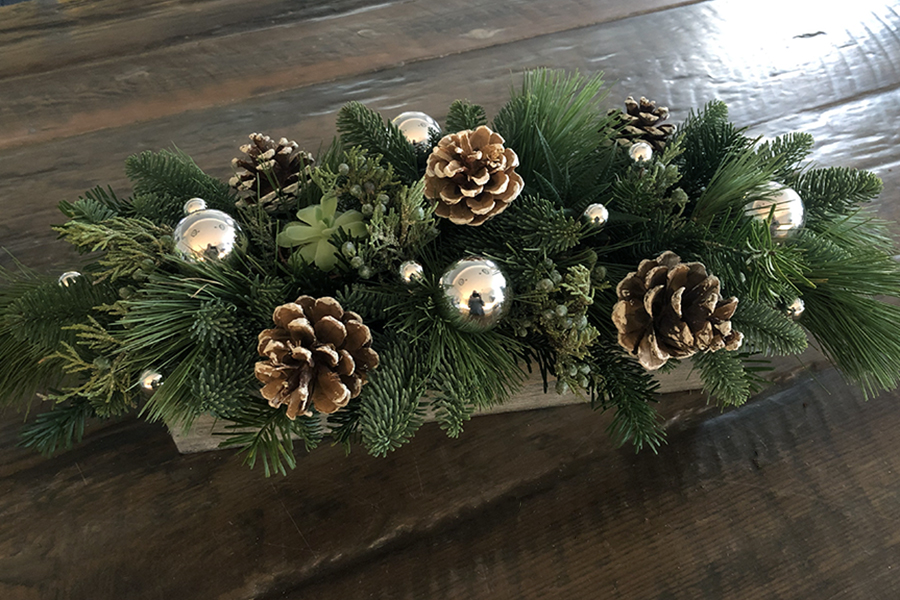
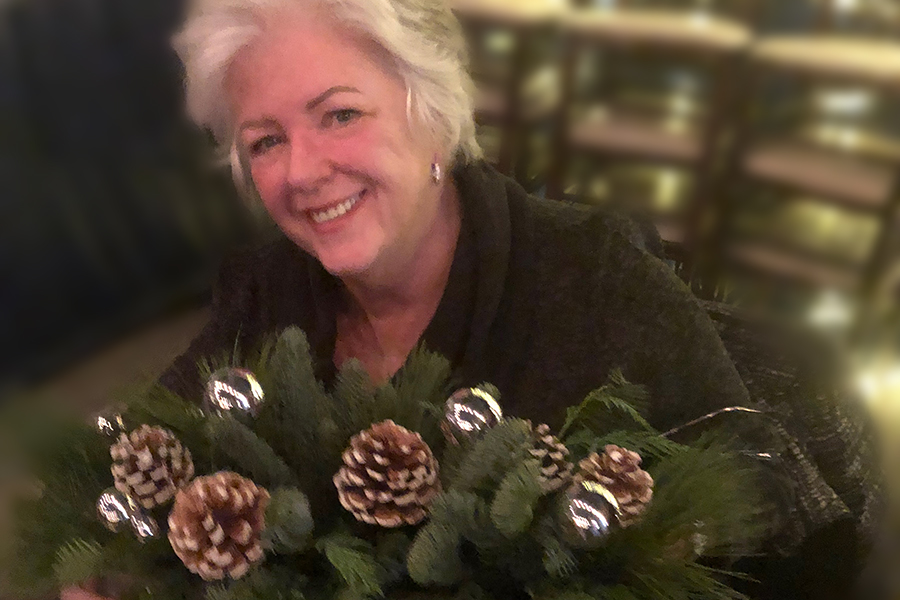
So of course, I had to make one of my own evergreen arrangements reusing not only the succulents and pods, but the yarrow too.
I sprayed everything first with grey paint as a base and then with a coat of silver. Then I sprayed them with a light coating an adhesive and sprinkled glitter all over.
I also incorporated the dried, tinted solidago. I liked the way it added a little bit more of a woodsy color, picking up the brown pine cones.
I love the way this arrangement turned out, don’t you!
Exciting things are happening at 1-800 Flowers.com and I have been so busy lately that I haven’t had a chance to share all the exciting news with you! I have been working with the team at 1-800 Flowers Corporate and the crew at the 1-800 Flowers retail store in Carle Place to put together a calendar of Creative Workshops. We have done of number of floral and plant DIY classes over the last few months in Carle Place to much success.
Last month we launched a collaboration with Bungalow Bar in Rockaway Beach for monthly Creative Workshops taught by experts in floral design and lifestyle, plant care, and related categories. All workshops take place in the picture perfect, private, waterfront event space at Bungalow Bar.
Thanks to Katy Bree, the General Manager at Bungalow Bar for bringing this collaboration to life!
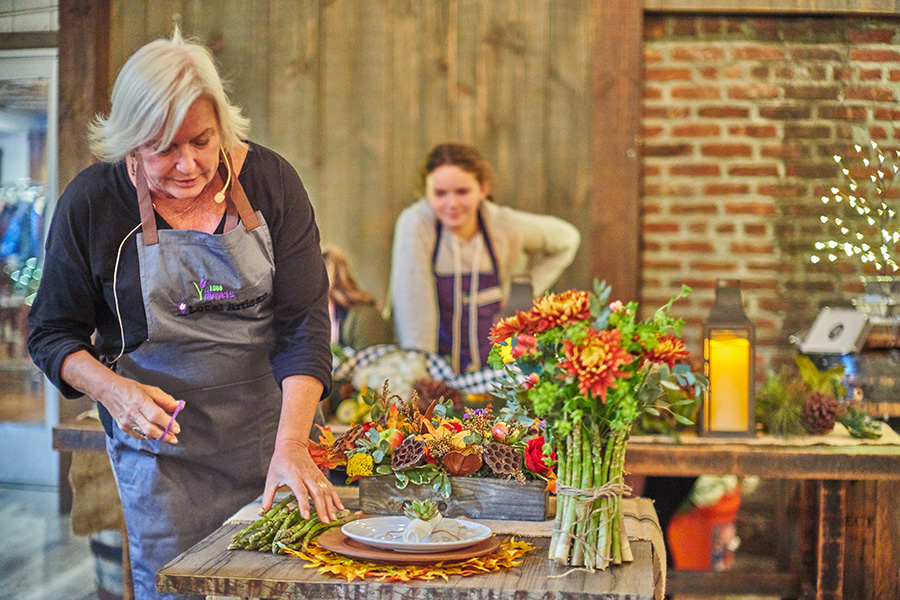
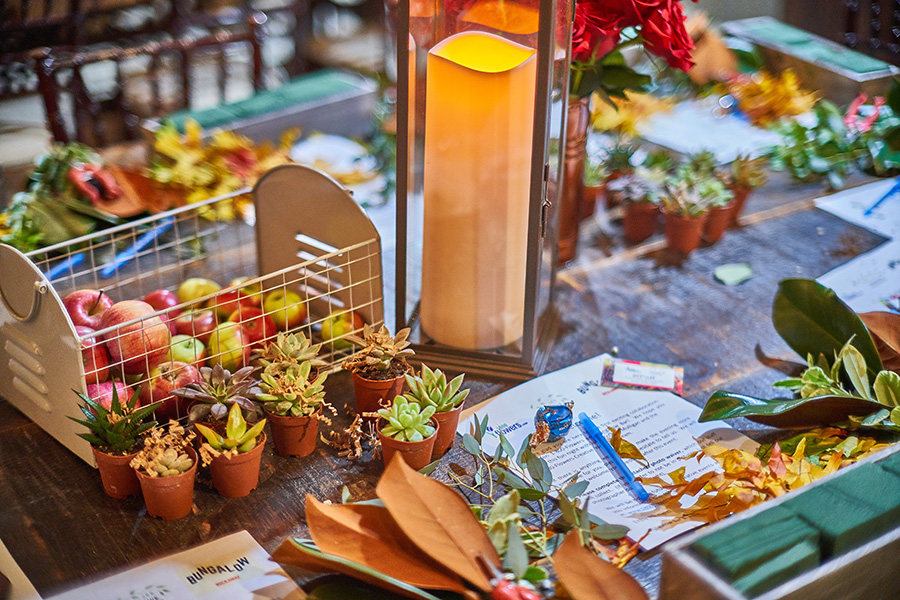
Our first workshop “Making an Autumn Harvest Centerpiece” sold out immediately with 62 attendees!
Here’s a peek inside the happenings that night and I think it’s obvious that we are giving the people what they want – a few hours spent with good people, learning a new skill, sharing laughs, having a cocktail or two, and perhaps a bite to eat before or after. (Bungalow even gives a 10% discount on all attendee’s food bill!)
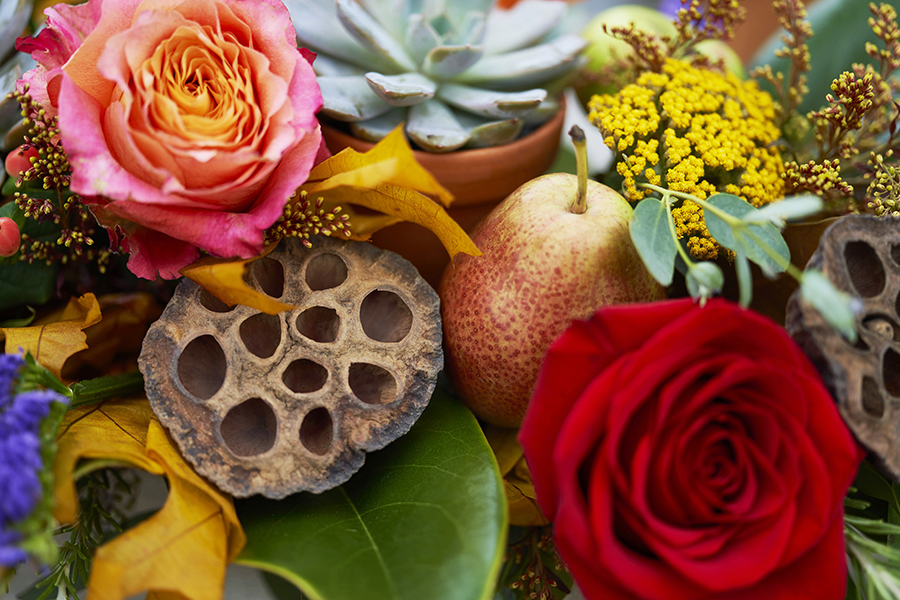
I included a few floral lifestyle tips before we started creating the centerpieces, such as how to incorporate seasonal vegetables into your designs.
And that’s my granddaughter Juliette, who keeps a close eye on Grammy to make sure I’m doing everything right!
Or she was just anxiously waiting for her moment in the spotlight. The apple doesn’t fall far from the tree!
Sustainability was a big factor in choosing the ingredients. This centerpiece is built to last! Every element dries naturally while maintaining its’ beauty, allowing you to enjoy this arrangement for weeks!
One of my favorite elements are the mini succulents, provided by Arizona East.
There was a bit of skepticism early in the class regarding most people’s ability to manage a design with so many different ingredients.
But I have to say everyone did an incredible drive. Even I was starting to wonder, could they…
Well they sure did!
And I got so caught up in the moment that I promised everyone that I would do a special “exclusive” class in December just for the attendees of this class, where I would teach them how to take their newly designed Autumn Harvest Centerpiece and turn it into a beautiful evergreen arrangement that will last for another few weeks! It was an “Oprah Moment” for sure.
How do you think our second workshop went? You’ll have to check back and see!
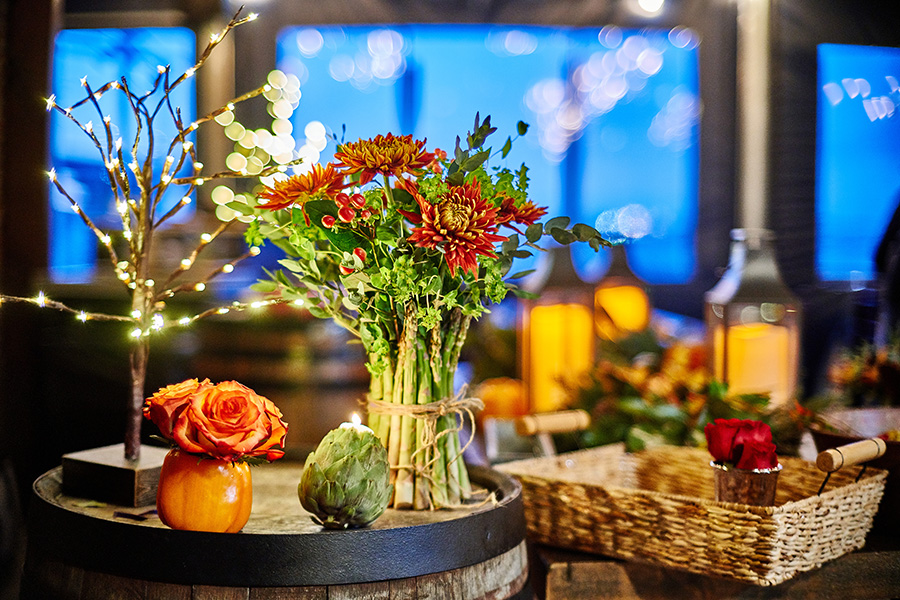
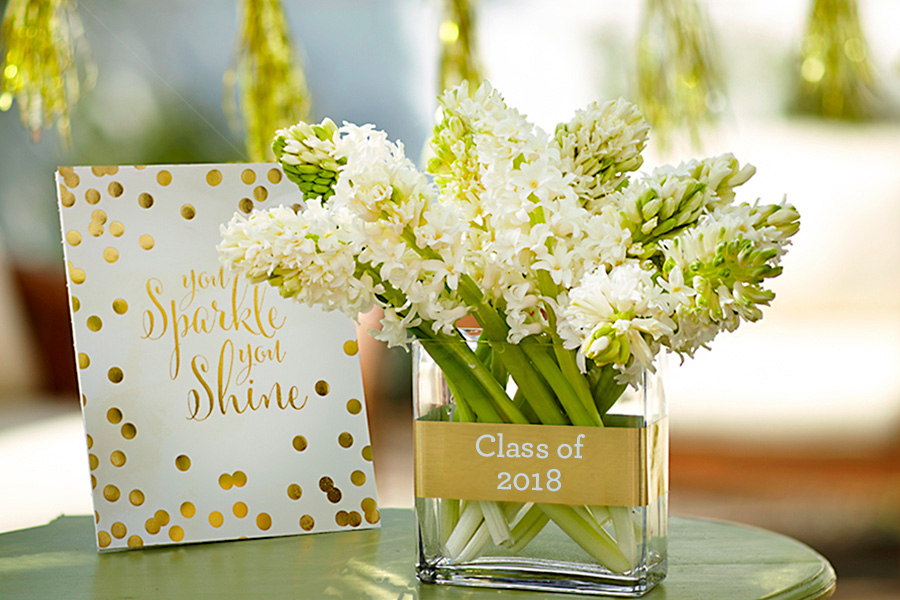
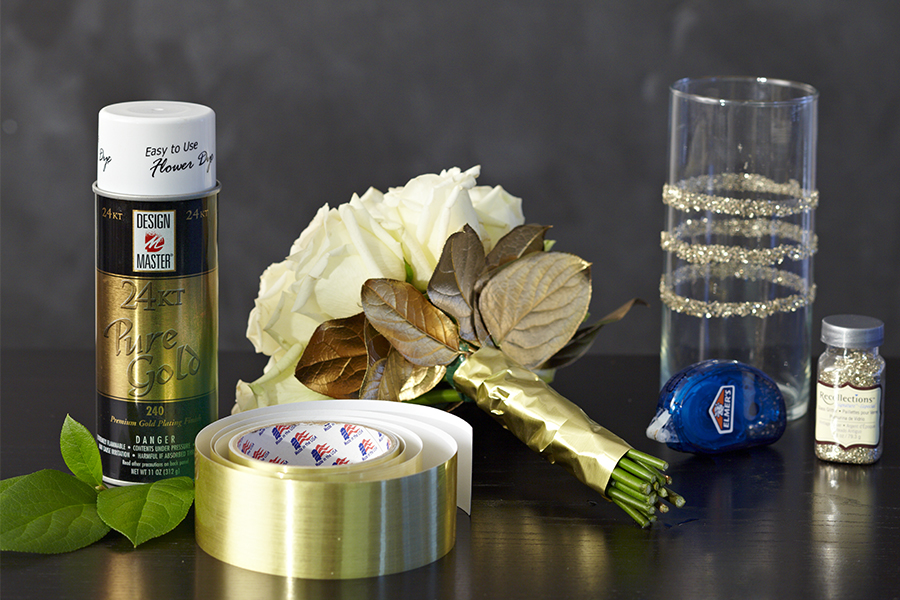
Graduation truly is a time to sparkle and shine—and using gold in your party décor will also put you right on trend. Gold is everywhere these days and in many different ways: foil, leaf, glitter, tassel, etc. Here are a few easy ways to make your graduation the one that outshines the rest!
Duct tape, you’ve come a long way! One of the simplest ways to customize and add some pizzazz to your centerpieces is to wrap a piece of gold duct tape around the vase and write a message on the tape. This gold duct tape is actually dry-erase as well—what could be easier!
Black-and-gold is a popular color combo this season, and there are many different invitations available with this look. The glitter on the border and cap are fun, but the simplicity of the design makes it sophisticated at the same time.
I used a few different techniques for this special arrangement, but each one is very easy to do.
What you’ll need:
10-12 white roses
6 stems salal leaves
Floral tape or rubber band
Design Masters Gold spray paint (this is a floral paint)
Gold duct tape
Adhesive glue tape runner
Gold glitter
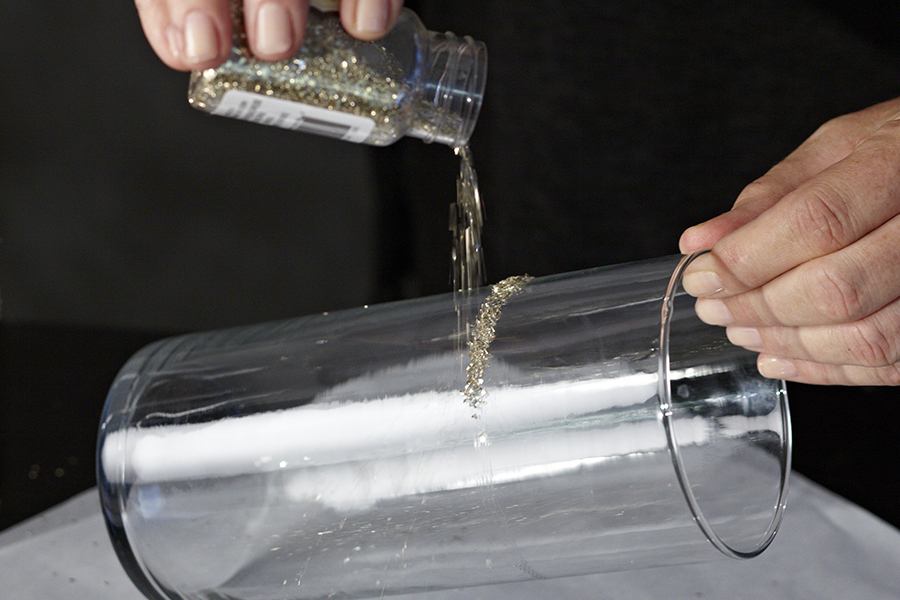
For the vase:
Make several stripes around a clear glass cylinder vase using the tape runner. Lay scrap paper on a flat surface.
Holding the vase over the paper, sprinkle the glitter over the areas where you have applied the adhesive tape. (The glitter that falls on the paper can easily be put back in the jar to use for additional vases or another project.)
Hand-tied bouquet:
Remove the foliage from the rose stems.
Gather the roses together in your hand starting with the middle rose, adding each additional rose at a slightly lower level.
Secure stems with floral tape first to hold them tightly together.
Cut the bottom of the rose stems so that the roses will sit just at the top of the vase.
Cut salal stems shortly shorter and spray front and back of leaves with Design Masters gold spray paint and let dry for a few minutes.
Collar the bottom of the bouquet, just under the roses with the gold leaves.
Use floral tape to keep the salal stems in place before wrapping all of the stems with gold duct tape, leaving 1-2″ of the stems exposed.
Add 1-2″ of water to the vase before placing your bouquet.
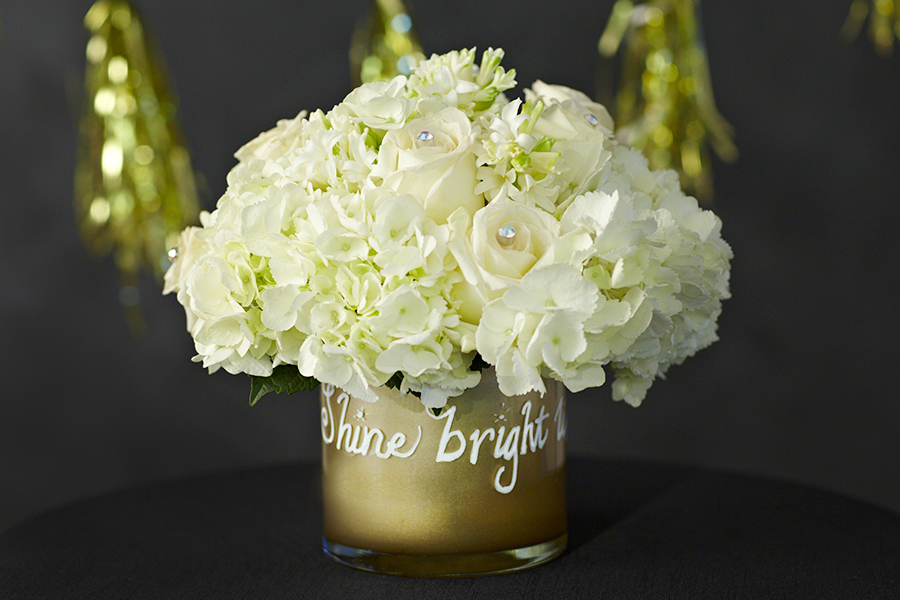
Gold vase with inspirational words:
Use a paint marker made specifically for glass to add an inspirational saying to a gold glass vase. I went with Shine bright like a diamond. Some other possibilities: You sparkle and shine or Twinkle, twinkle, rising star.
Another hot trend that’s perfect for graduation celebrations is tassels. We made our festive gold tassel banner from a bag of gold shred. Just take individual strands, group them together and secure at the top with a small piece of wire. Attach the tassels to a piece of gold ribbon—that’s it! Easy peasy!