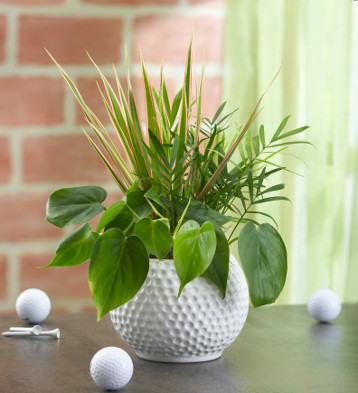
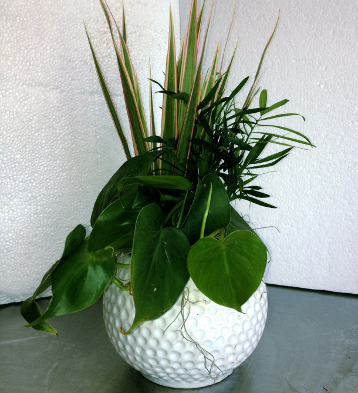
It’s always nice to buy dad something for Father’s Day, but making him something you know he’ll love is an extra special touch. If you’re looking for a Father’s Day craft that fits dad’s personality, why not try this unique planter? All you need are just a few plants, soil, and a container!
Materials needed for DIY Father’s Day planter
Ceramic container (I used a golf ball planter, but feel free to be creative!)
Soil
3-4 plants of different height, preferably a type with vines, such as philodendron.
Plants we used include:
Tricolor marginata
Philodendron
Mini palm
Spanish moss
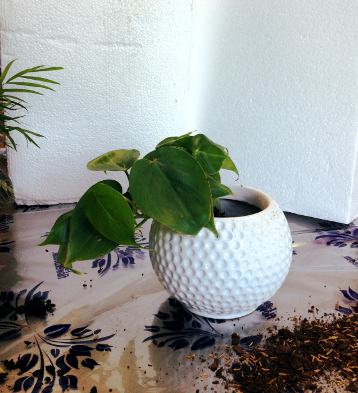
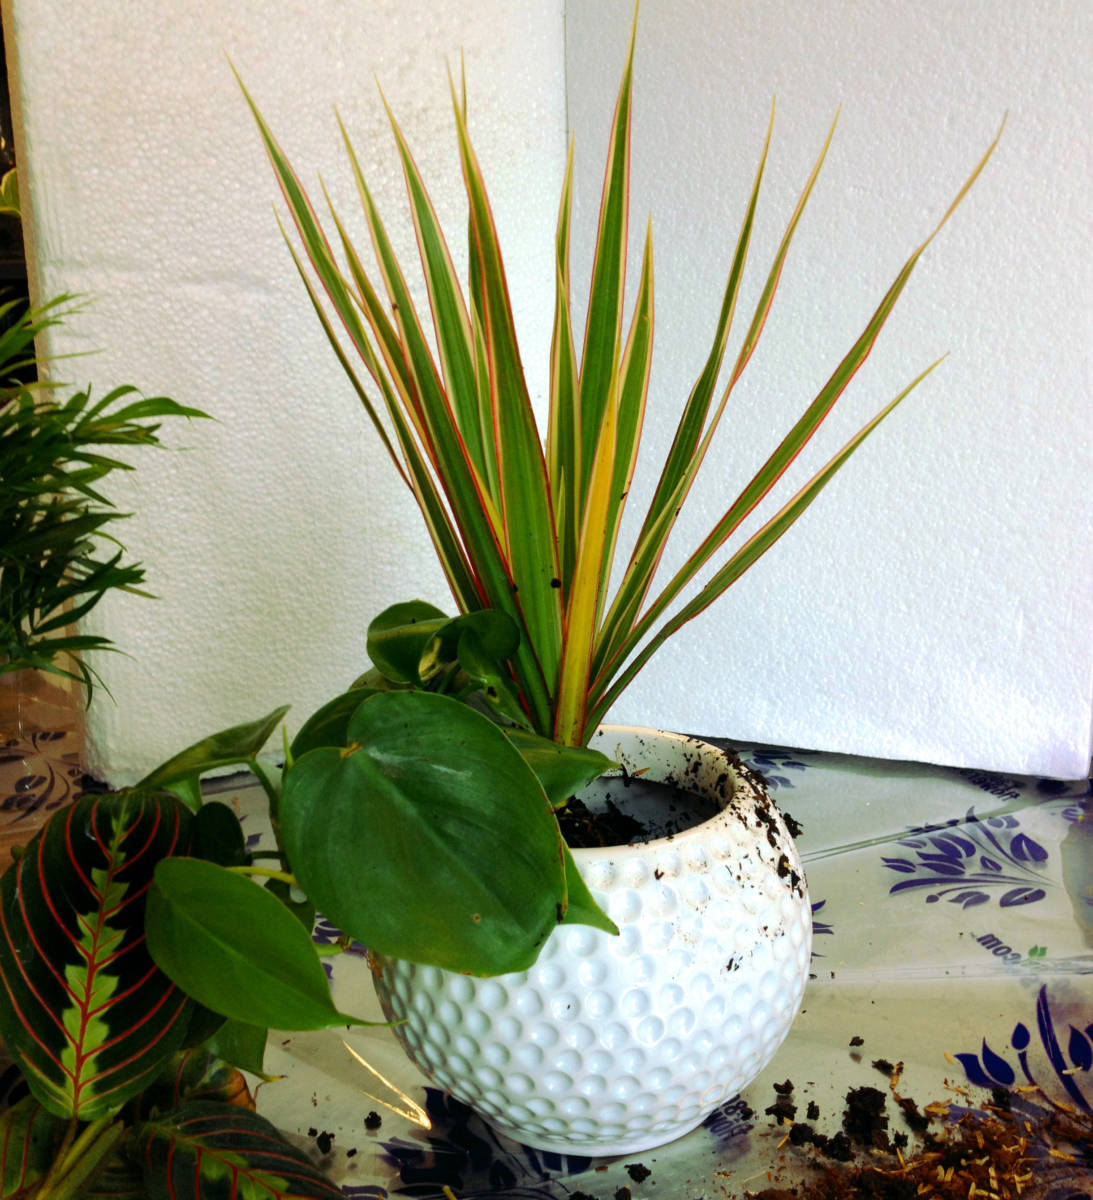
How to make a DIY Father’s Day planter
Take your container and fill it one-tenth of the way full with potting soil. (The amount will depend on the depth of the container.)
Place your plants, one at a time, in the container. Use the plant with vines first to one side, the tallest to the back or center of the planter, and the shorter plant to the opposite side.
Add soil, compacting as you go. Compact or compress the soil around the individual plants to get rid of air pockets.
Lightly water the plant.
Add your Spanish moss as a finishing touch to the completed planter.
Give this fun Father’s Day craft to dad and watch him smile with joy!
Note: Plants are easier to work with when the soil is dry. Therefore, if you’re able to, get them a couple of days in advance. If you are not sure how to take care of it, refer to our plant care section.
Hope you and your dad have an amazing Father’s Day!
Our series “Get Crafty” gives you the inspiration for creating inventive DIY projects during the holidays and year-round. These DIY crafts combining butterflies and blooms create a spring vibe that will last until summer and are perfect decorations for spring gatherings.
Butterflies and blooms have a lot in common. Alone, each is a symbol of rebirth and resurrection — like spring itself. As the first crocus of spring breaks through the cold, hard ground after many months of winter, we see the triumph of the spirit and soul over the physical world. And then the hyacinth and tulips sprout, and everything turns green and blossoms all around us. This metamorphosis, like the one that occurs when the colorless caterpillar turns into the beautiful winged butterfly, represents transformation and hope.
Butterflies and flowers have what is known as an “ecological relationship.” They are affected by each other; that is, changes in one lead to changes in the other. Butterflies depend on flowers for food, and flowers depend on butterflies to reproduce.
So, the next time you are creating a floral display, why not add a few butterfly touches to your arrangements to complete the look? See how a butterfly placed here and there brings the display to life and makes it feel more alive and whimsical!
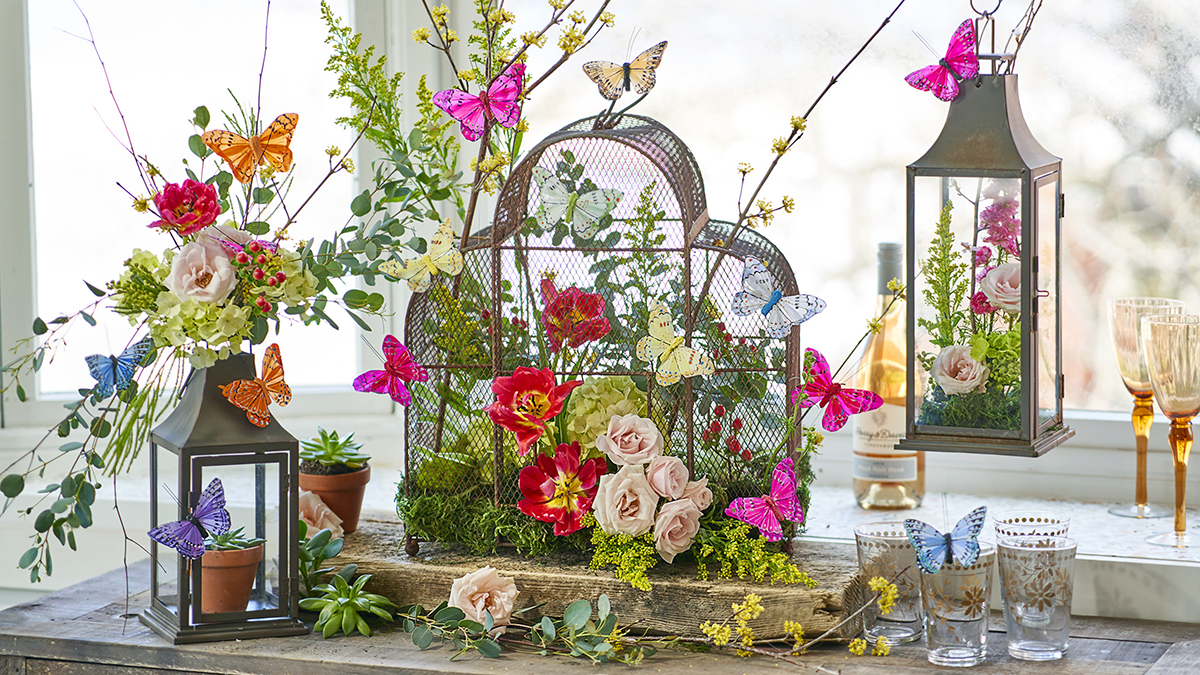
You can go all out and create a “Butterflies and Blooms” vignette, like the one here, or take a cue from this rustic garden vibe and add just one of these DIY crafts to your table or bar.
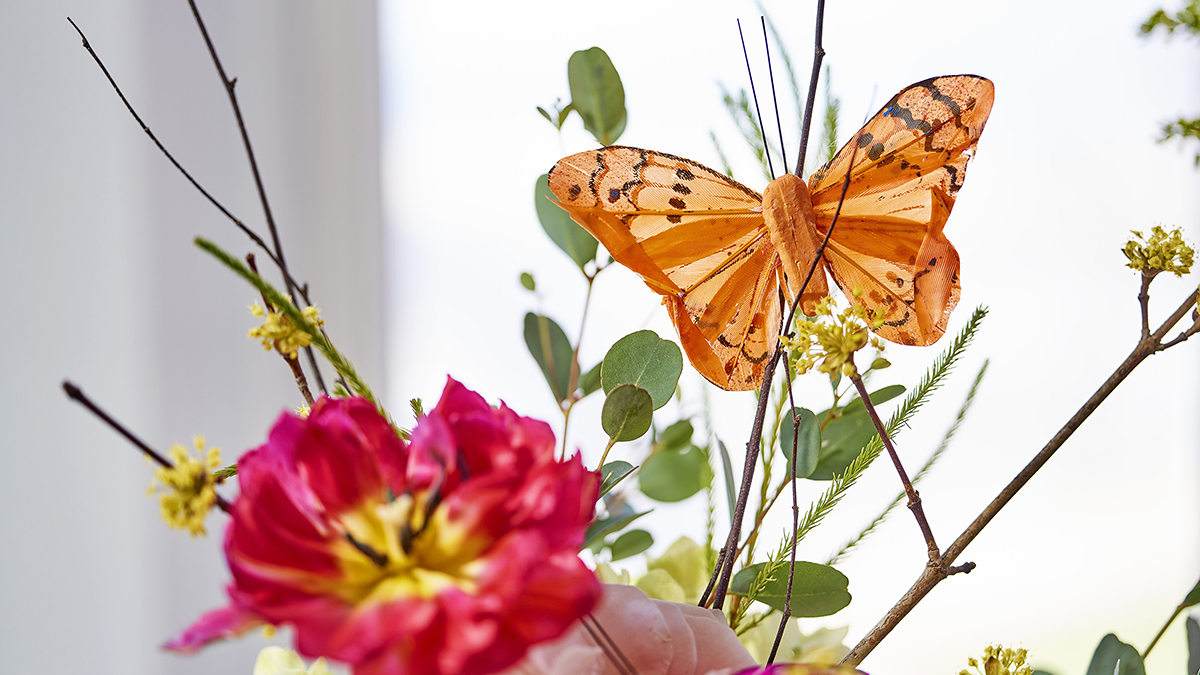
Butterflies
Pretty faux butterflies are inexpensive and easy to find. I ordered a few different sizes and colors online, as well as ones with two kinds of attachments: pre-wired and clip on. You can also use a little adhesive with either version if you need to.
Birdcage
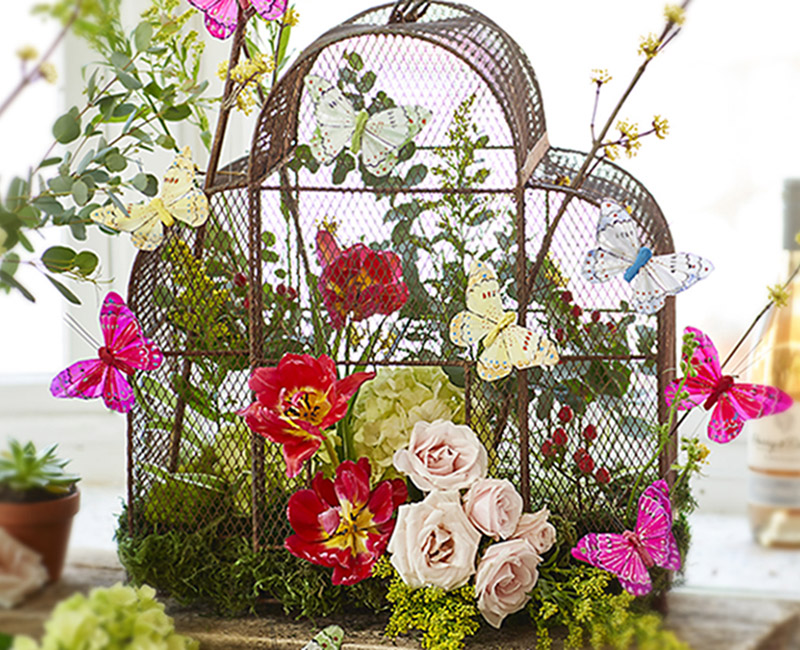
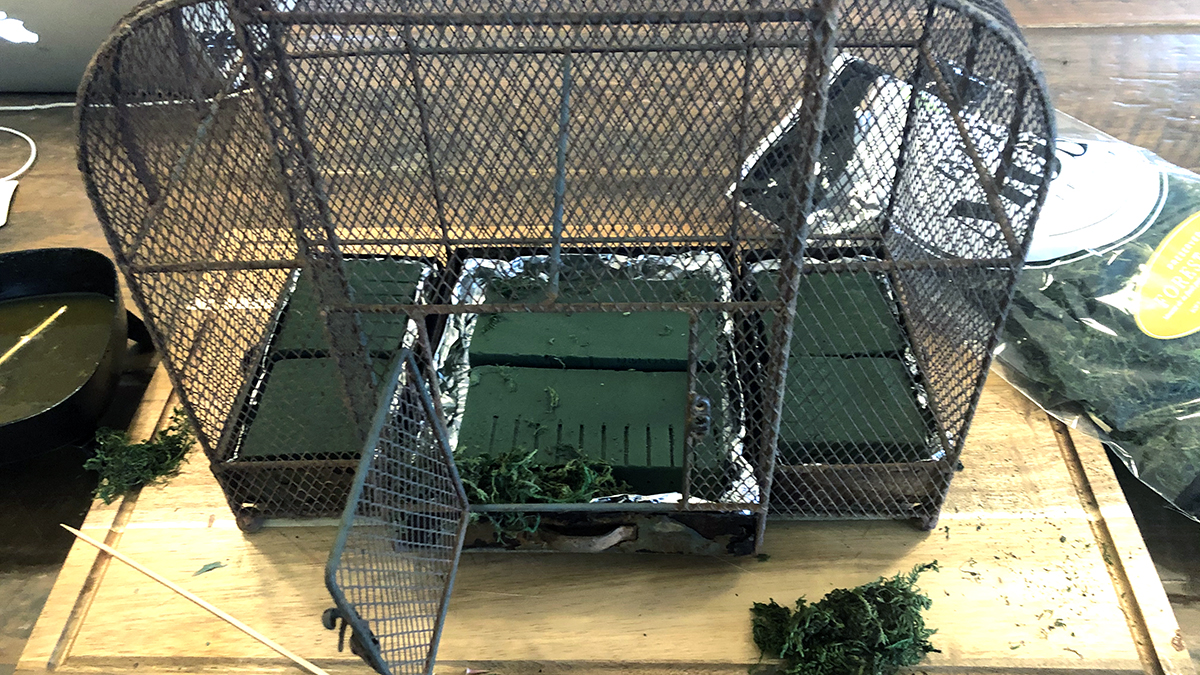
I have a hard time throwing anything out — including this rusty, old birdcage!
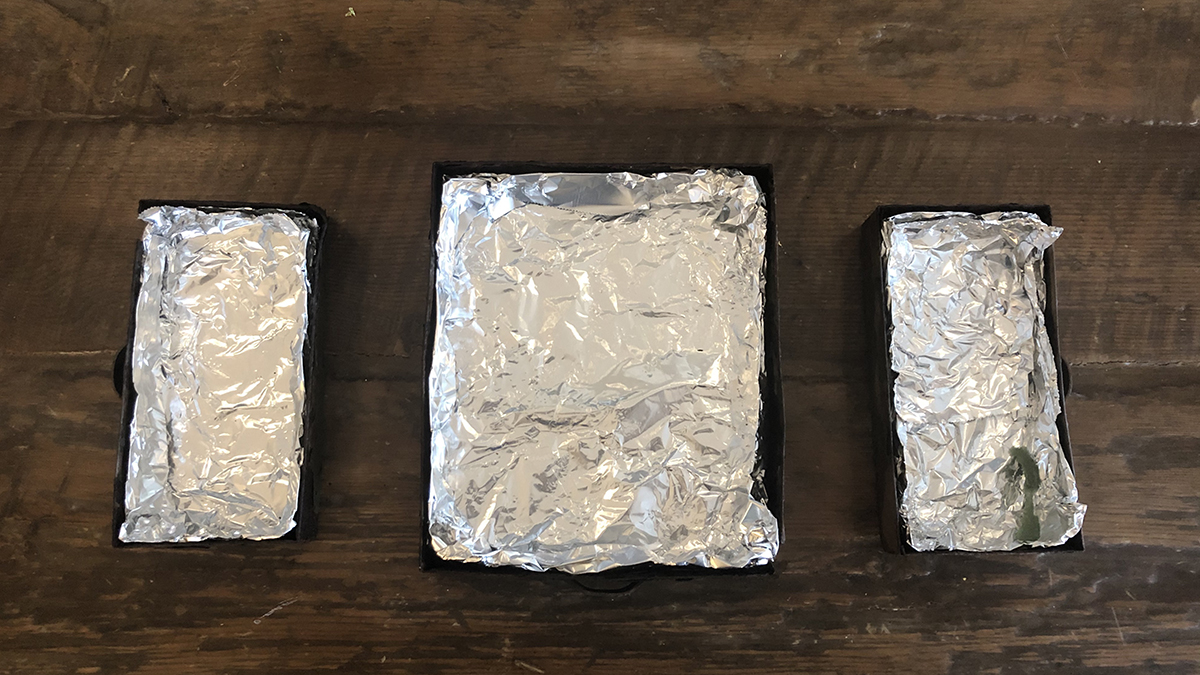
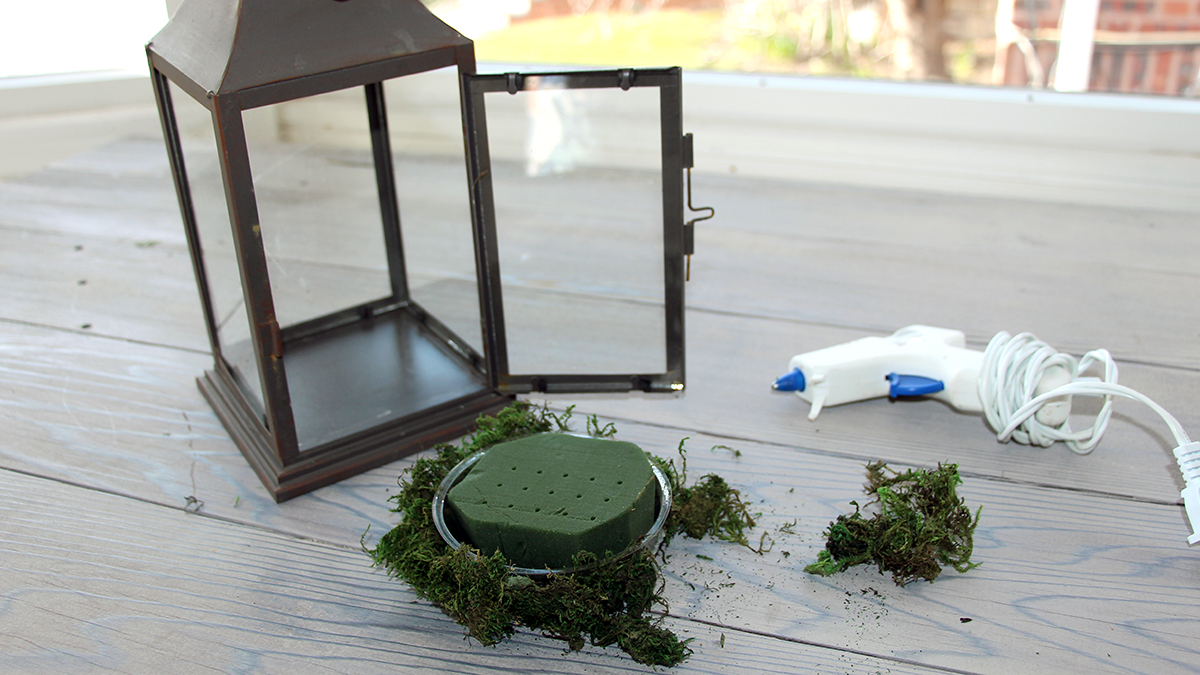
Due to their sitting in my garden all year, the trays have large holes in them. To prep them to hold water and floral foam for the flower arrangement, I lined each one with aluminum foil.
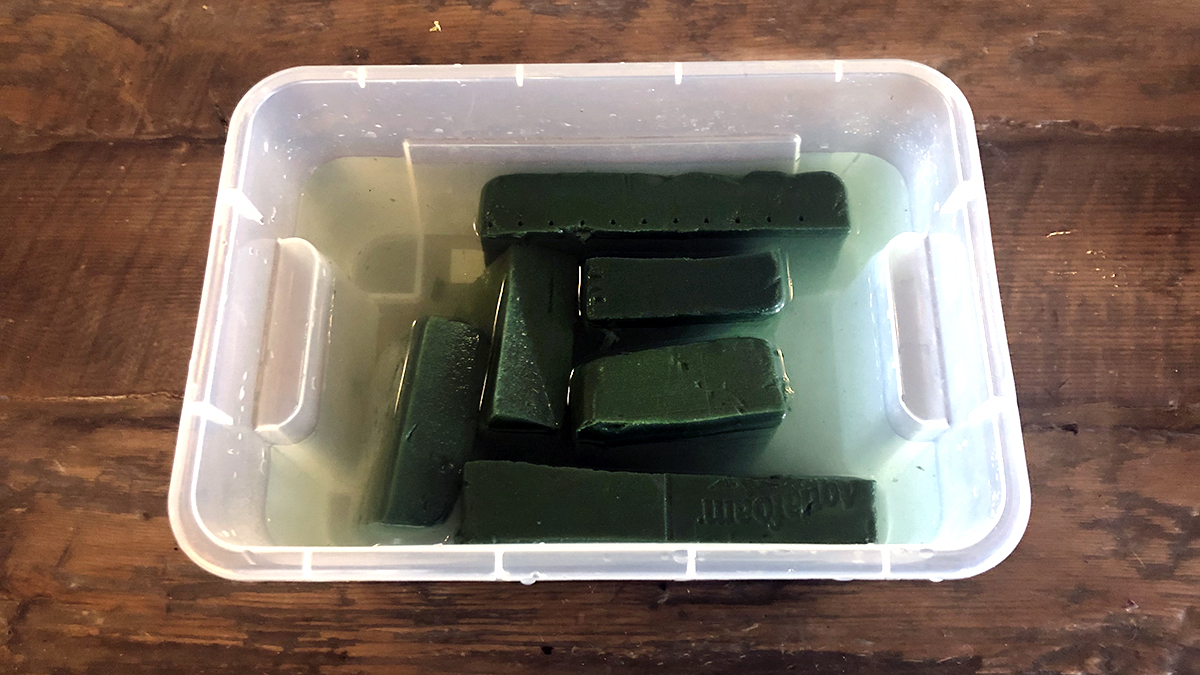
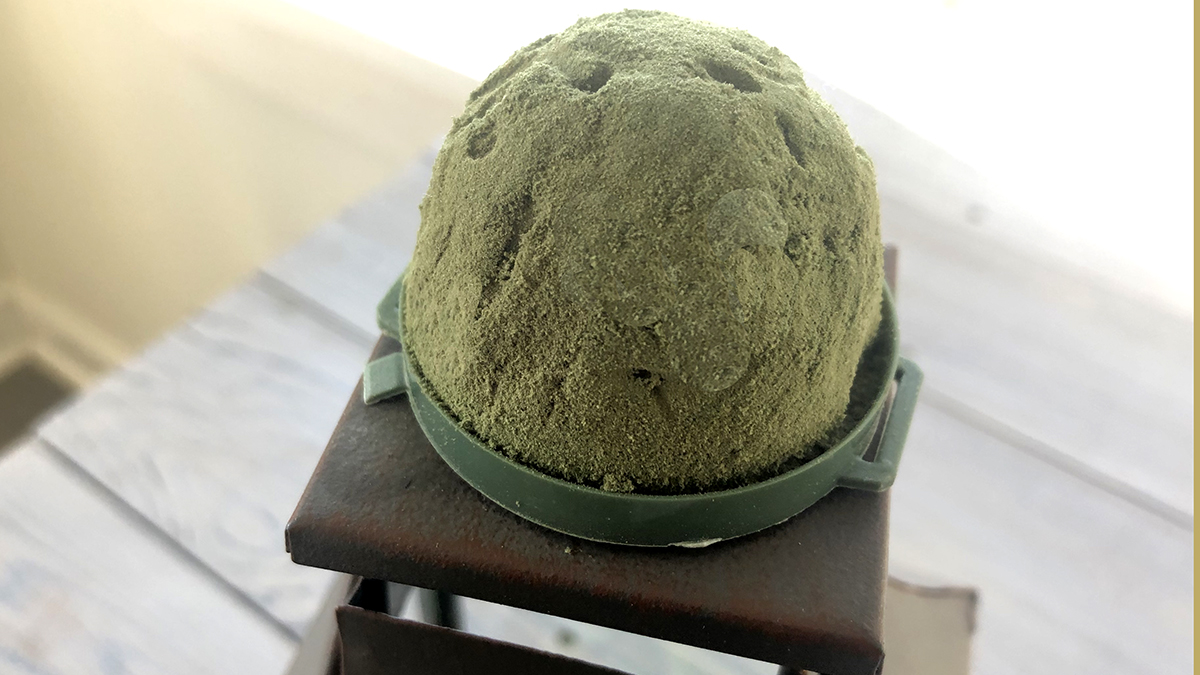
I pre-cut pieces of floral foam, to fit snuggly into the trays, before soaking them in a bucket (or sink).
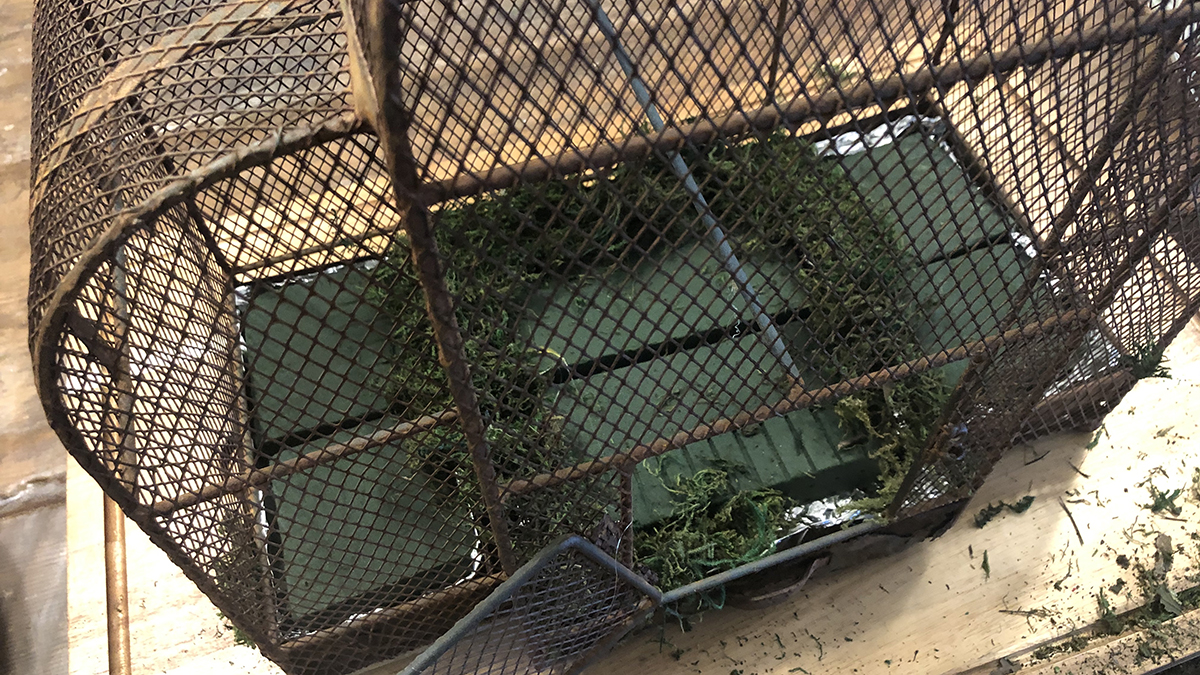
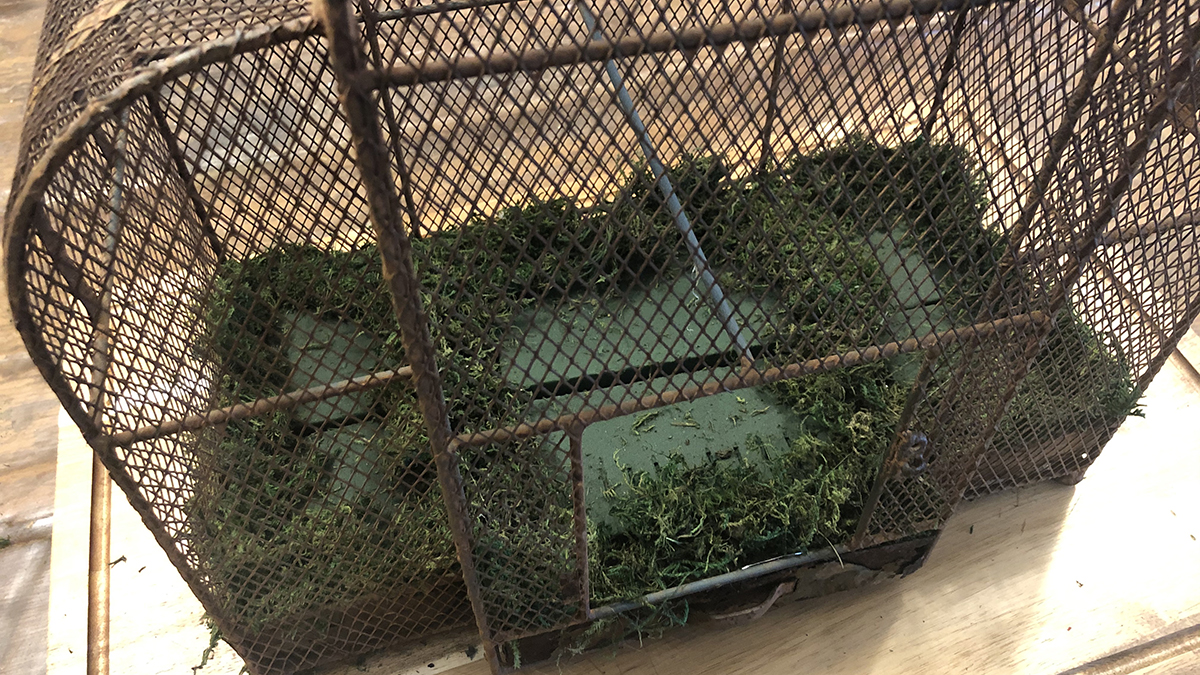
I placed the trays back in the birdhouse and then added the thoroughly soaked pieces of foam to them by going in through the opening in the front of the cage.
Next, I added some moss to the spaces in between to cover the foil and any openings.
I added all the foliage and cut flowers — eucalyptus, hydrangea, tulips, roses, solidago, and hypericum — through the front opening as well. Then, I inserted forsythia branches and some solidago through the wire grid at the top of the cage, being careful to get the end of each stem and branch into the foam so that it stayed hydrated as long as possible. I created a design that has the look of flowers spilling out of the birdcage, when in reality all the floral is securely anchored in the foam.
I then placed the butterflies as if they were fluttering all around the outside of the cage. Perhaps coming over to have a look and see what’s going on? The butterflies on the thin wires really do look like they are flying around in your little garden.
Lanterns
Lanterns have so many different purposes besides just holding a candle, and they can be used to decorate outside as well as inside.
A mini plant or succulent looks great nestled inside the lantern, as does a small arrangement of fresh cut flowers. Basically, all you need to do is follow the same steps as the birdcage but pare it down!
To decorate the top of the lantern with fresh flowers, use a floral igloo. You can find these at your local florist or hobby shop, or online. These are nothing more than small pieces of floral foam attached to a plastic tray. Just think of the possibilities!
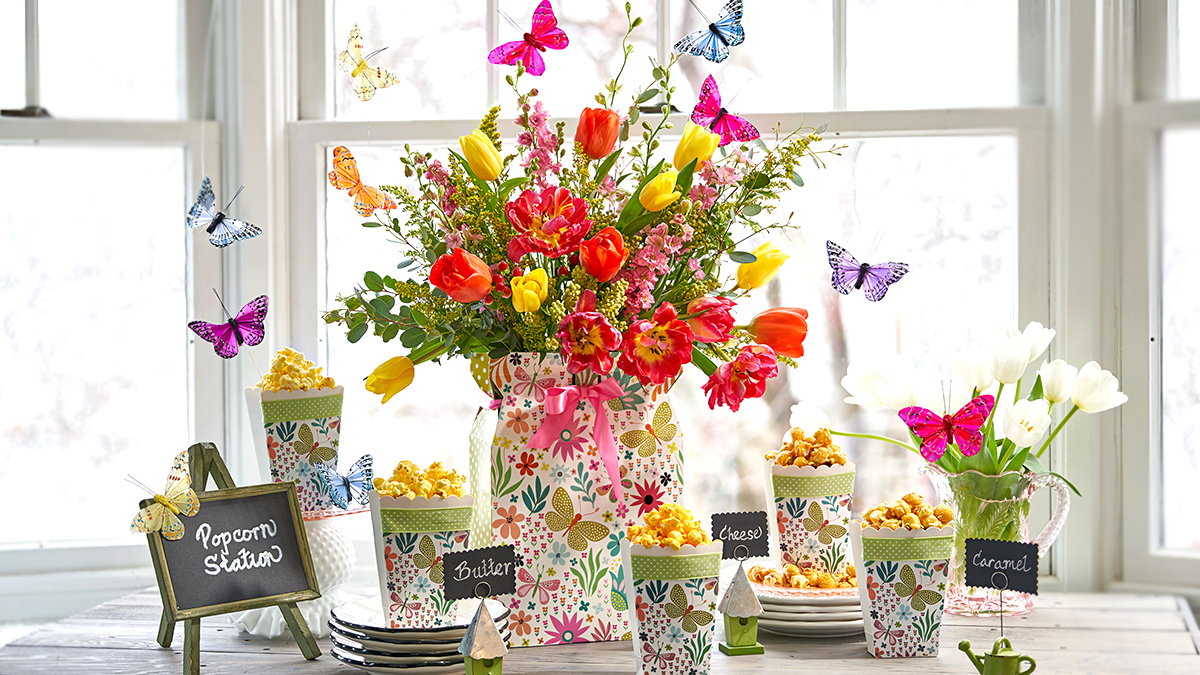
‘Butterflies and Blooms’ popcorn station
With butterflies being such a popular theme right now, The Popcorn Factory has a whole line of Butterflies and Bloom gifts that are perfect for any occasion.
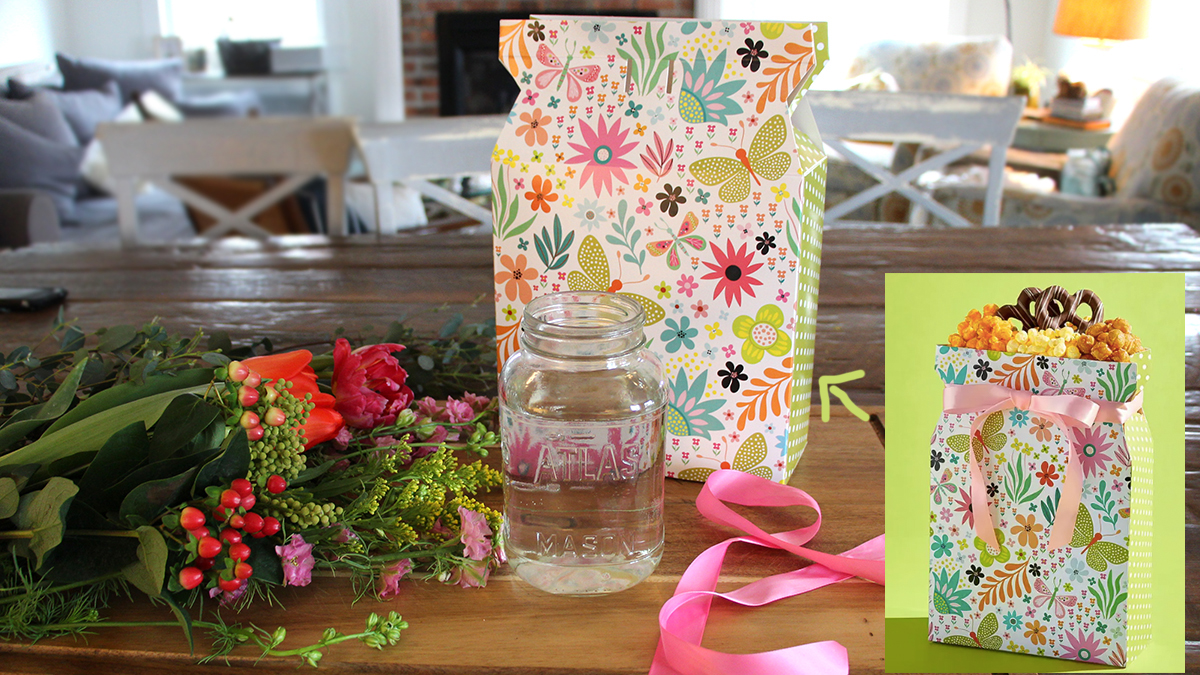
I ordered the Butterflies and Blooms bow box, which is filled with three different flavors of popcorn — butter, cheese, and caramel — and a packet of chocolate-covered pretzels.
I loved the pretty pattern on the box so much that I decided to make it the design for a popcorn station!
I started by emptying the goodies from the box, which I then used as the base for a fresh-cut flower bouquet, picking up all the bright spring colors in the design. All I did to turn the box into a vase was place a mason jar filled with fresh, clean water in the box and arrange the flowers.
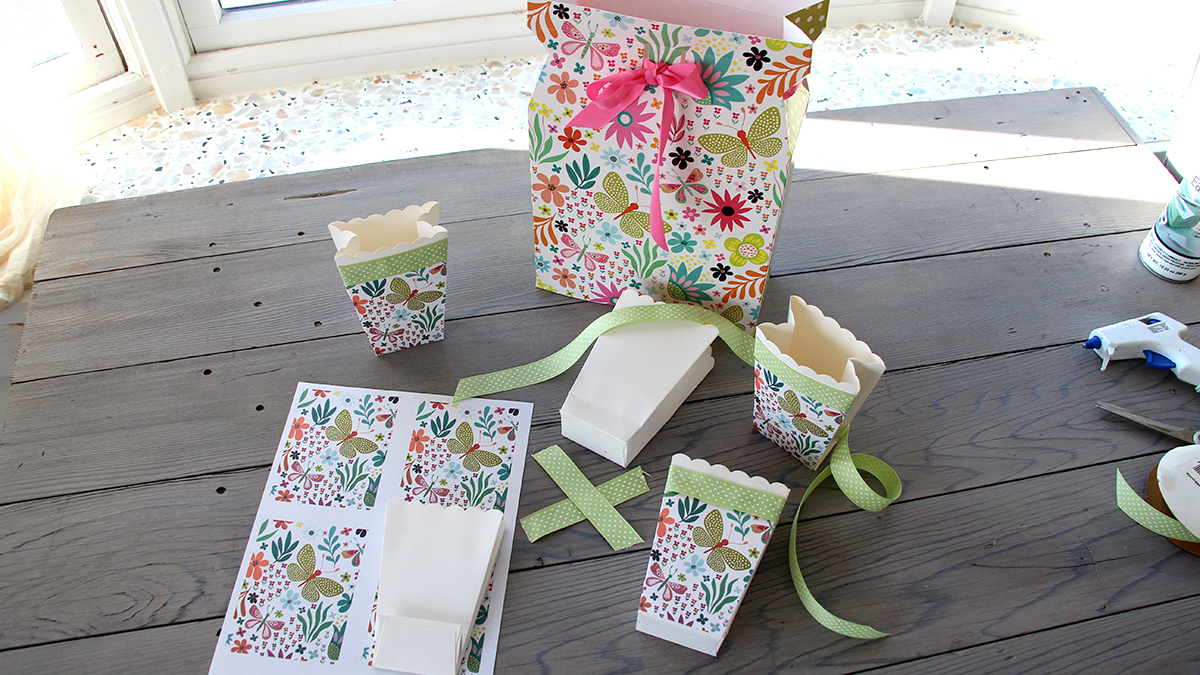
I simply took a photo of the front of the box, sized it to fit the front of the popcorn holder, printed it out, and glued it to the container while it was still flat (unfolded or filled). And, as luck would have it — or because I never throw anything away that I might have a use for later — I had a roll of matching green dotted ribbon to use as a finishing touch. Again, I just measured it to size and glued it on.
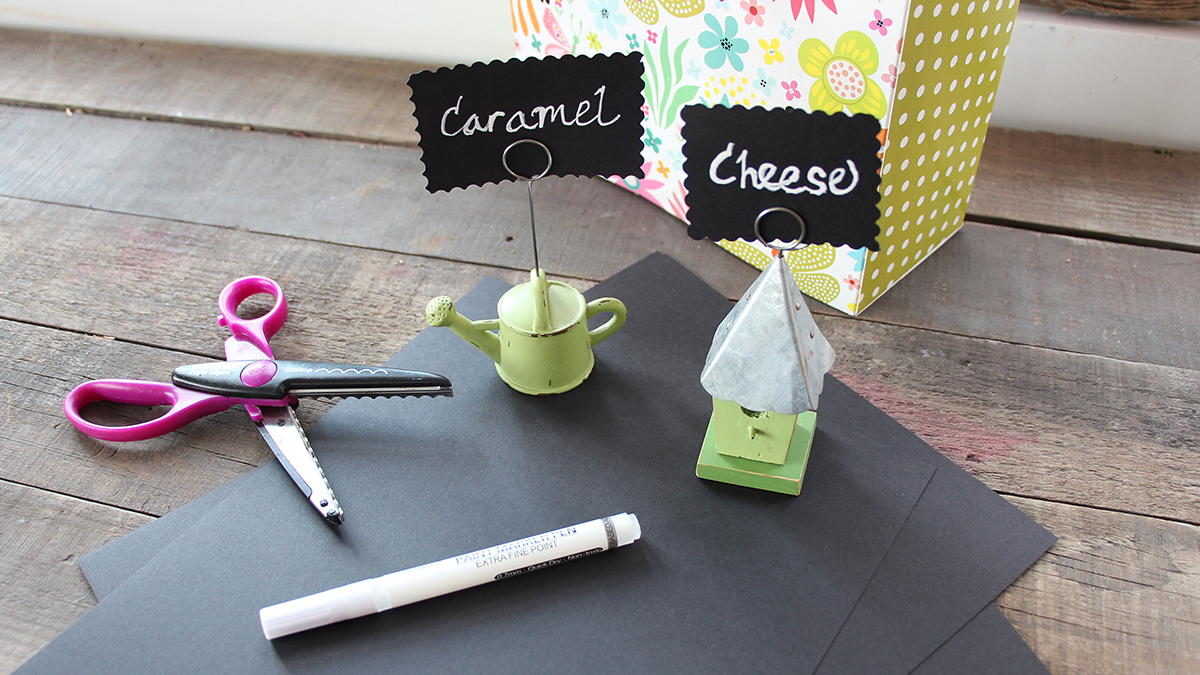
I made signage for the various popcorn flavors using black card stock paper and a white pen.
And that’s it. These DIY crafts are so easy to make, and they’re on trend to boot. Now you’re ready for spring entertaining!
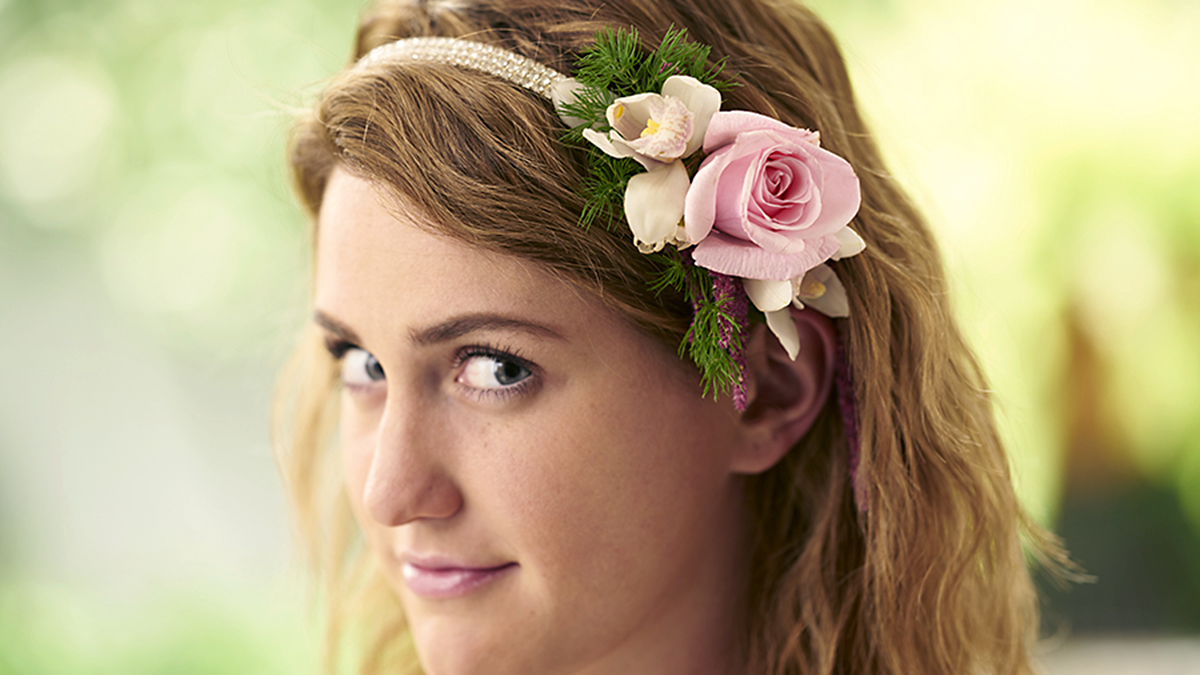
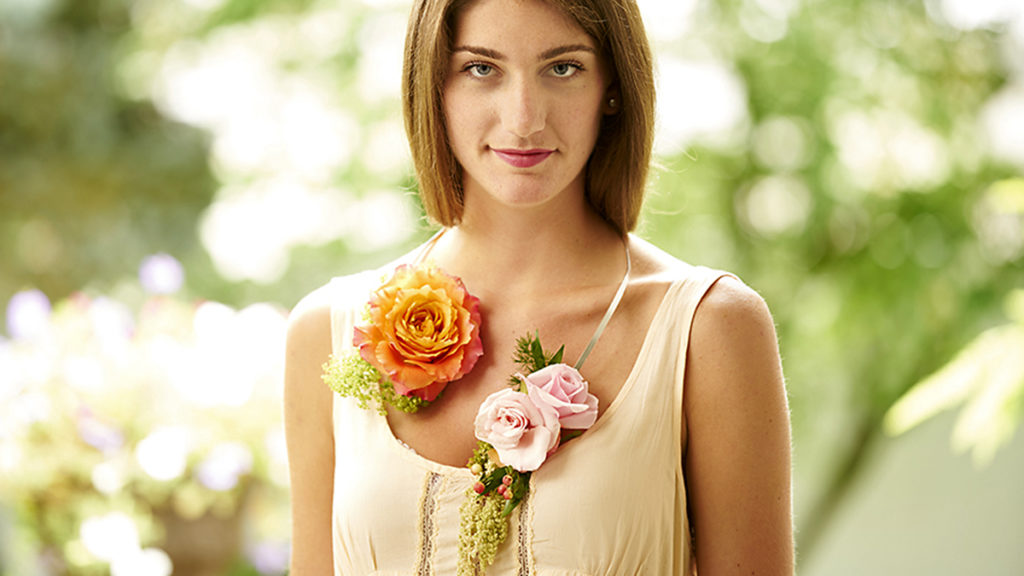
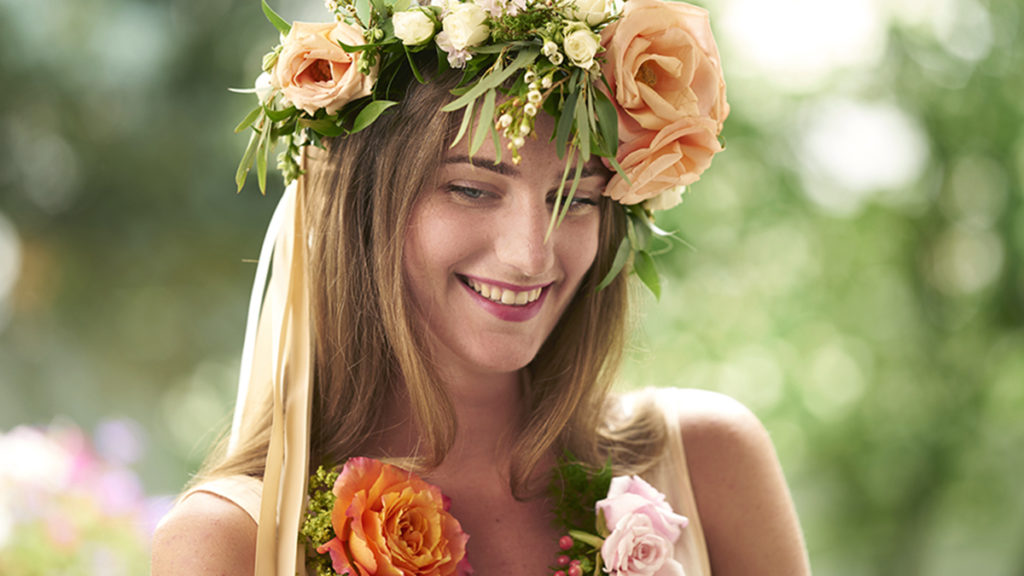
Our series “Get Crafty” gives you the inspiration for creating inventive DIY projects during the holidays and year-round. Floral designer and lifestyle expert Julie Mulligan has a whole host of ideas for DIY prom flowers that will help you turn heads all night long.
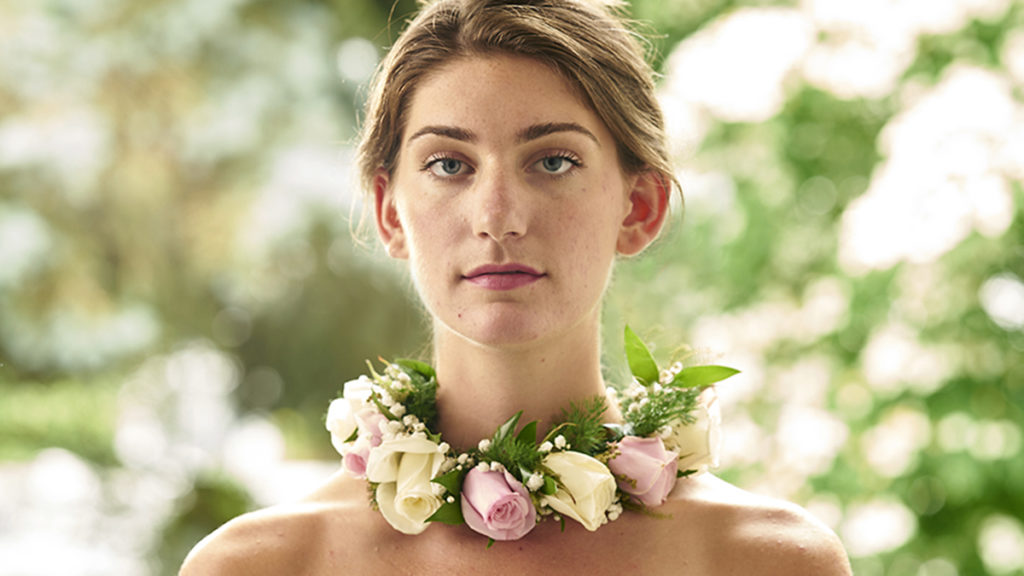
Prom season is here, and with it comes the excitement of getting all dressed up and celebrating one of the biggest nights in a young person’s life. With the magnitude of the event, this is not the time to “go small.” Rather, you should be pulling out all the stops. Everything from the dress or tux to shoes, hair, and make-up has to be just right and planned out in advance.
And what about the flowers? Exchanging corsages and boutonnieres has always been a cherished prom tradition, but that doesn’t mean you need to go with the same old, same old.
Take the opportunity to make a statement with your flowers. With a little inspiration and a creative floral designer, your floral accent can be the perfect finishing touch of your prom attire. It might be hard to find a dress and/or color that no one else at prom will be wearing, but some fresh flower fashions like these will make you this year’s trend-setter extraordinaire!
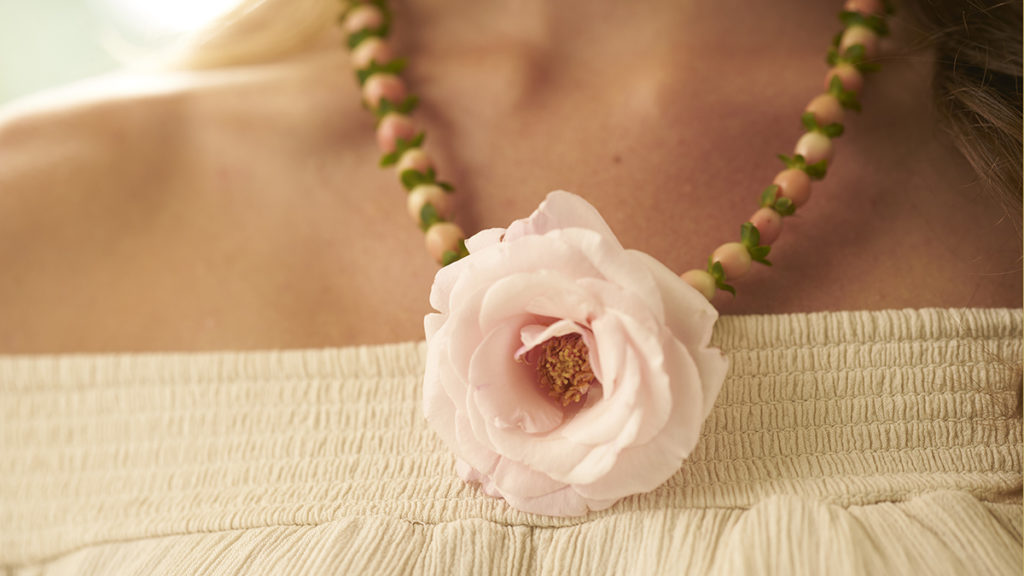
Forget wristlets and pin-on corsages with ribbons and bows, and think of your flowers as a true accessory or unique piece of jewelry. Many famous women, from Frida Kahlo to Billie Holiday, have used flowers to set themselves apart from the crowd.
All these are easier to make than they look, so find one you like and give it a try. If you’re not the crafty type but see something you love, bring a picture of it to your local florist. I’m sure they will be more than happy to do the work for you and help make your prom night dreams come true!
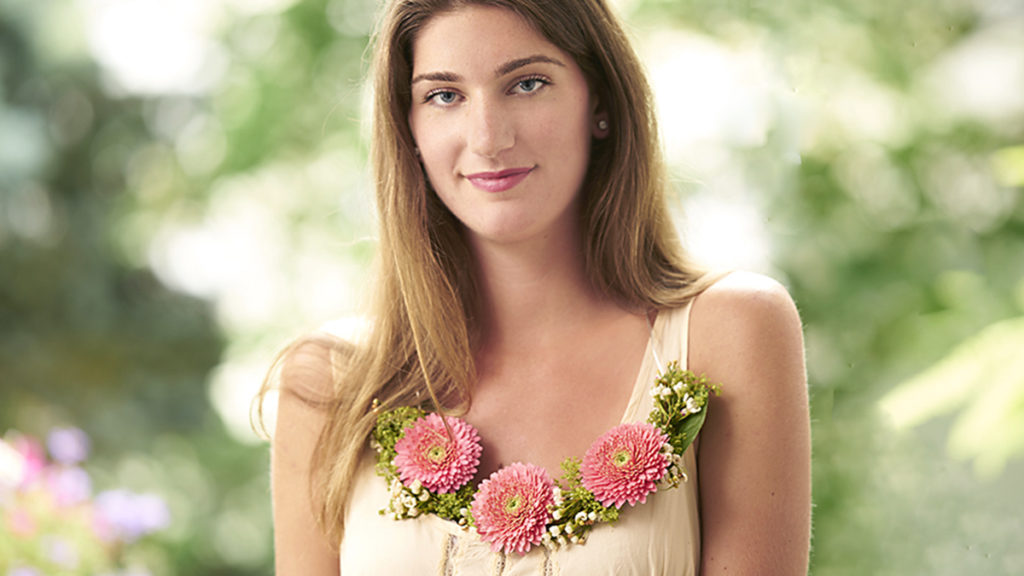
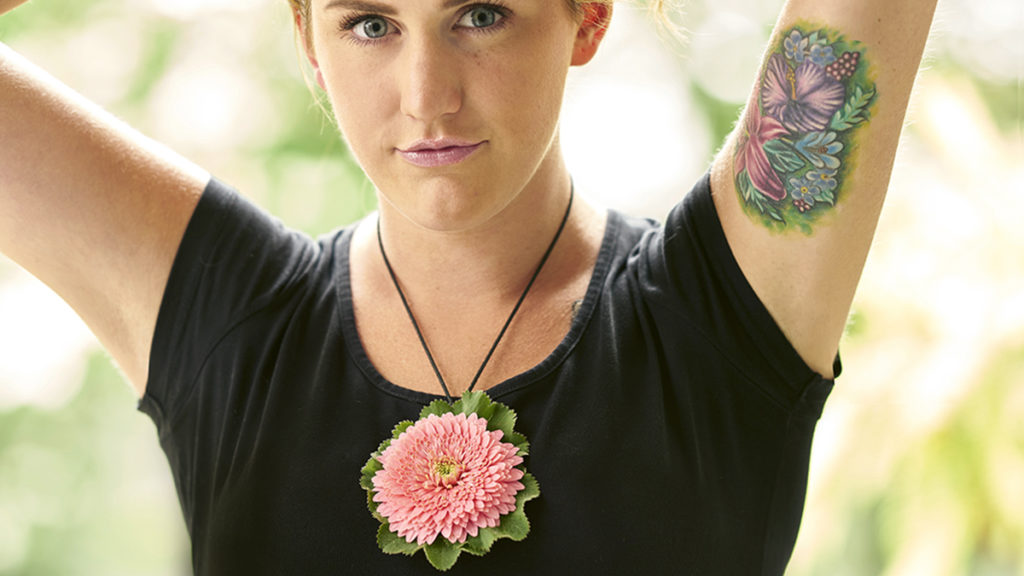
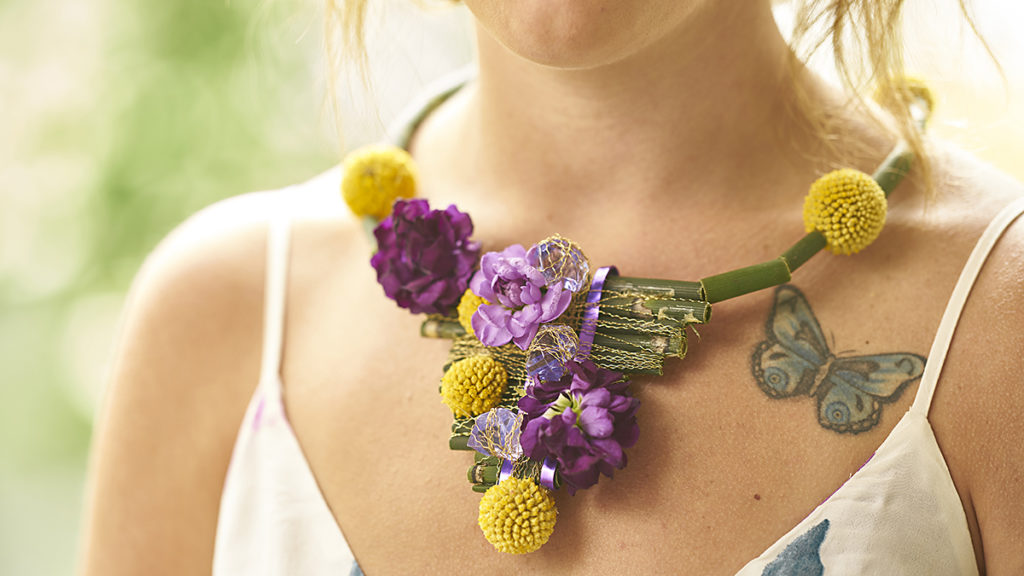
Here are a few more inspirational ideas and interesting ways to express your true self and style with prom flowers.
Whatever you wear, and however you choose to style it, just be sure to have the time of your life at prom!
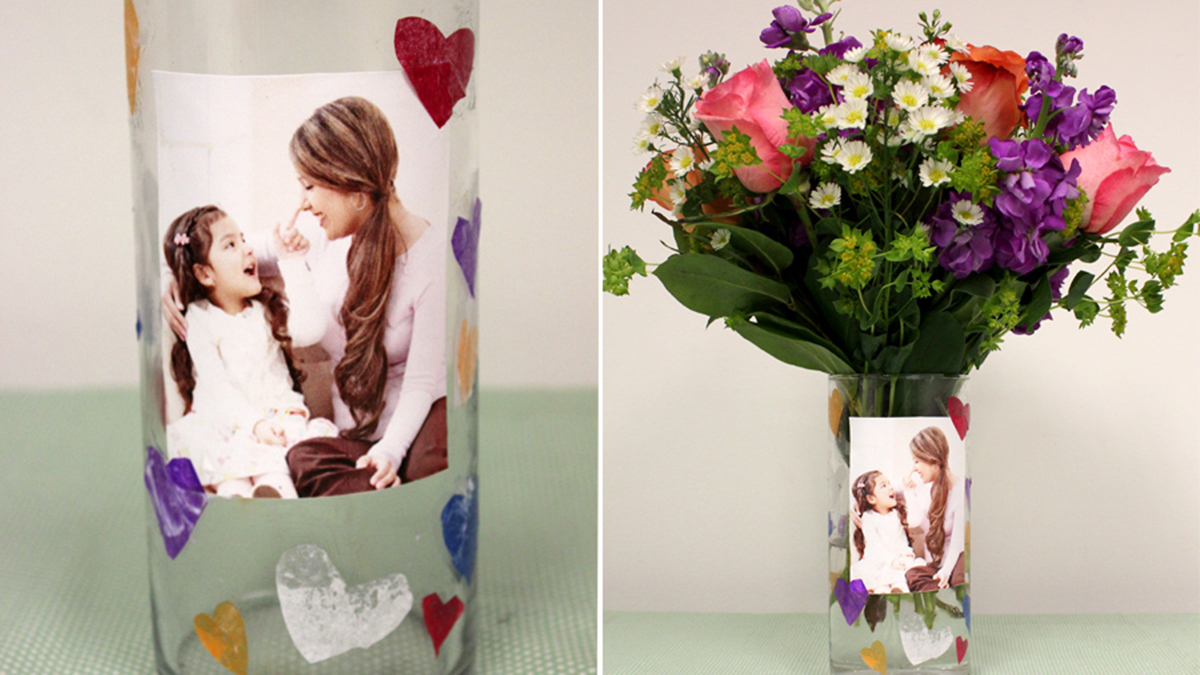
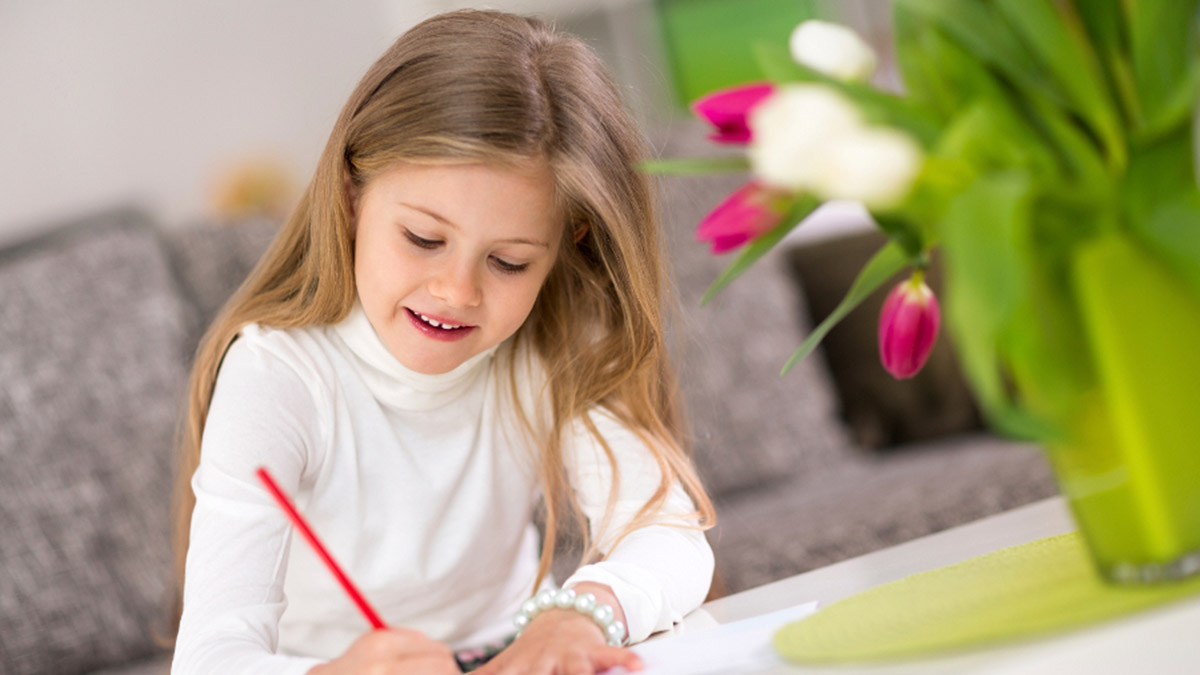
Our series “Get Crafty” gives you the inspiration for creating inventive DIY projects during the holidays and year-round. Pair those Mother’s Day flowers with a creative DIY photo vase — the perfect Mother’s Day craft for kids of all ages!
This year, take your Mother’s Day flowers to the next level with a creative and personalized DIY photo vase. The beauty of this vase is in the tiny details that reflect each child’s personality, making it the perfect Mother’s Day craft for kids of all ages.
Depending on how old the child is, you may want to prepare the tissue paper shapes beforehand, as little kids may have trouble cutting the delicately thin material. Be sure to provide them with a smock and clear out an area for crafting, as this project includes liquid adhesive.
Once this DIY photo vase is completed, add mom’s favorite flowers or arrangement for a Mother’s Day gift she’ll treasure always.
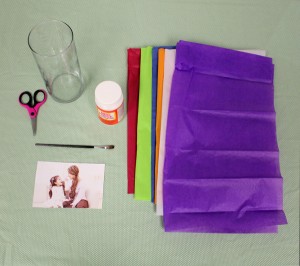
Supplies for DIY photo vase
Vase
Liquid adhesive (Mod Podge, PVA glue)
Small paintbrush
Tissue paper in a variety of colors
Photo
Scissors
How to make a DIY photo vase
Use soap and water to clean any residue off the vase. Set aside to dry.
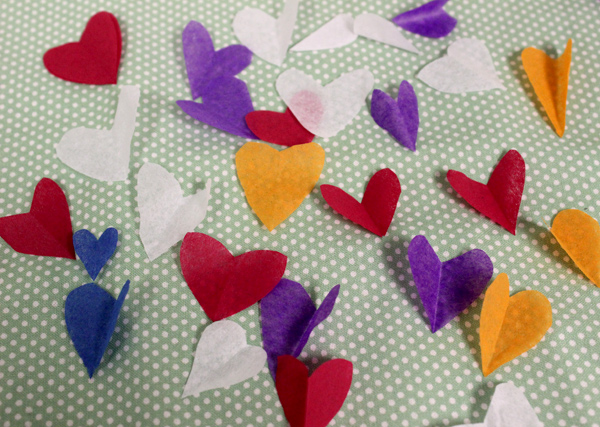
Cut shapes out of the tissue paper. We chose hearts, but you can go with flowers, stars, or diamonds. The homemade touch of this project is what makes it special, so the shapes do not all have to be the same size or shape. Once you have enough shapes, set them aside.
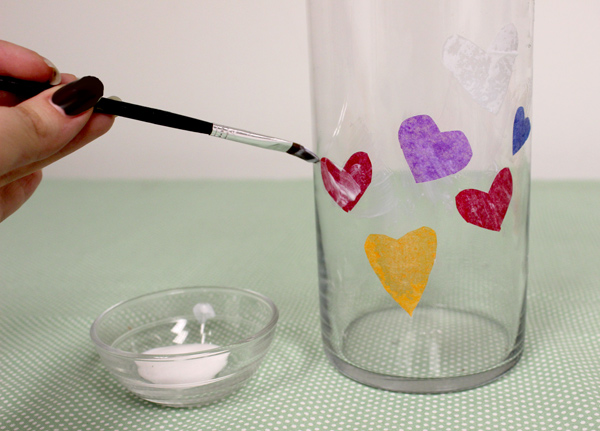
Pour some of the adhesive into a small bowl. Dip the brush into the adhesive and pick up a tissue paper shape with the brush, and “paint” it onto the vase. You only need a light coat of adhesive, so try to avoid drenching the shapes.
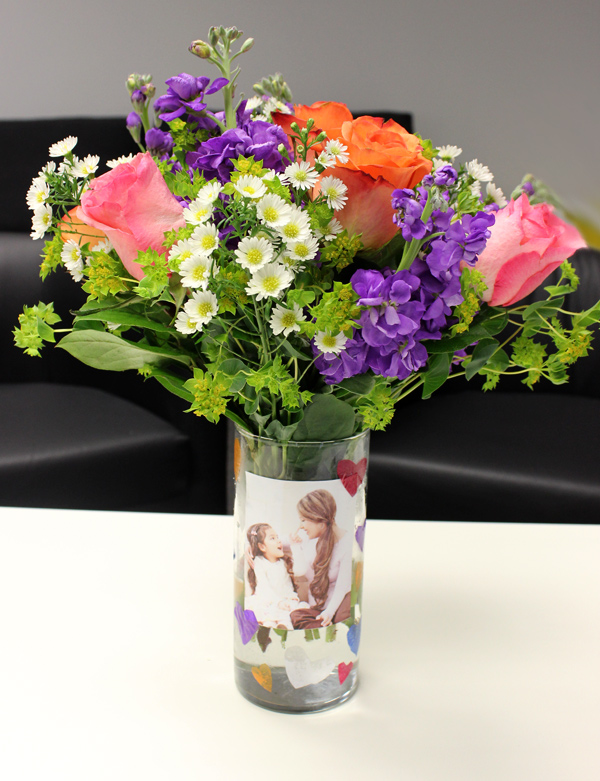
Once you have stuck all the shapes to the vase, it’s time to add the photograph. You may want to trim the photo to fit your particular vase before placing it on. Once you have decided where the photo will go, use the brush to paint the adhesive onto the back of the photo. Apply it to the vase and hold it down for 5 to 10 seconds until it’s secure.
Give the vase a few minutes to dry, and then use a cup or pitcher to carefully pour water into the vase. Then, add the flowers, and your DIY photo vase is ready to show off!
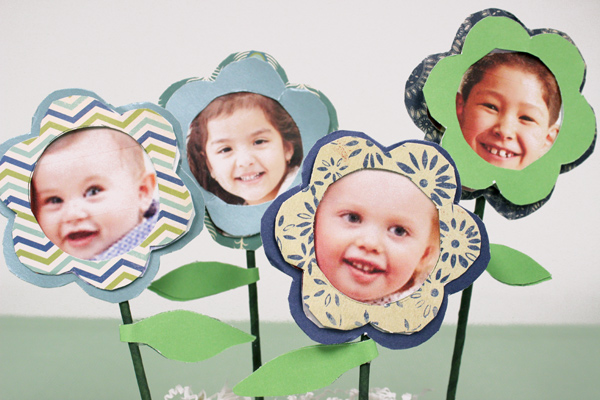
Our series “Get Crafty” gives you the inspiration for creating inventive DIY projects during the holidays and year-round. Let the children make their own homemade Mother’s Day craft with this creative DIY photo flowers idea that will touch mom’s heart.
Move over macaroni frames, there’s a new DIY Mother’s Day craft in town! And it’s not only fun to make but easy, too.
Using our photo flower stencil template, some scrapbooking paper, scissors, and a bit of glue, we created creative and colorful DIY photo flowers. They’re the perfect kid-friendly complement to those stunning Mother’s Day flowers you plan on getting Mom.
Let the kids get creative by picking out their own patterned paper and colors. They’ll love letting their personalities shine in this personalized Mother’s Day gift idea.
And Mom will think it’s just the sweetest present she’s ever received.
Scrapbook and construction paper in various colors and patterns
Scissors
Glue
Floral tape
Tape
Lollipop sticks or similar
Photos
Directions for DIY photo flowers
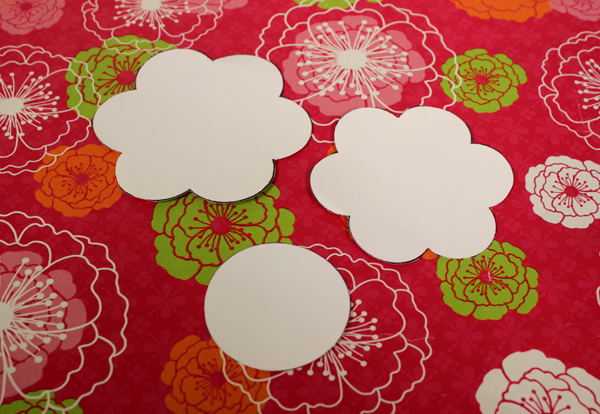
Load your printer with a sheet of cardstock; download and print the photo flower stencil template. Cut out the shapes to use as stencils. Set aside.
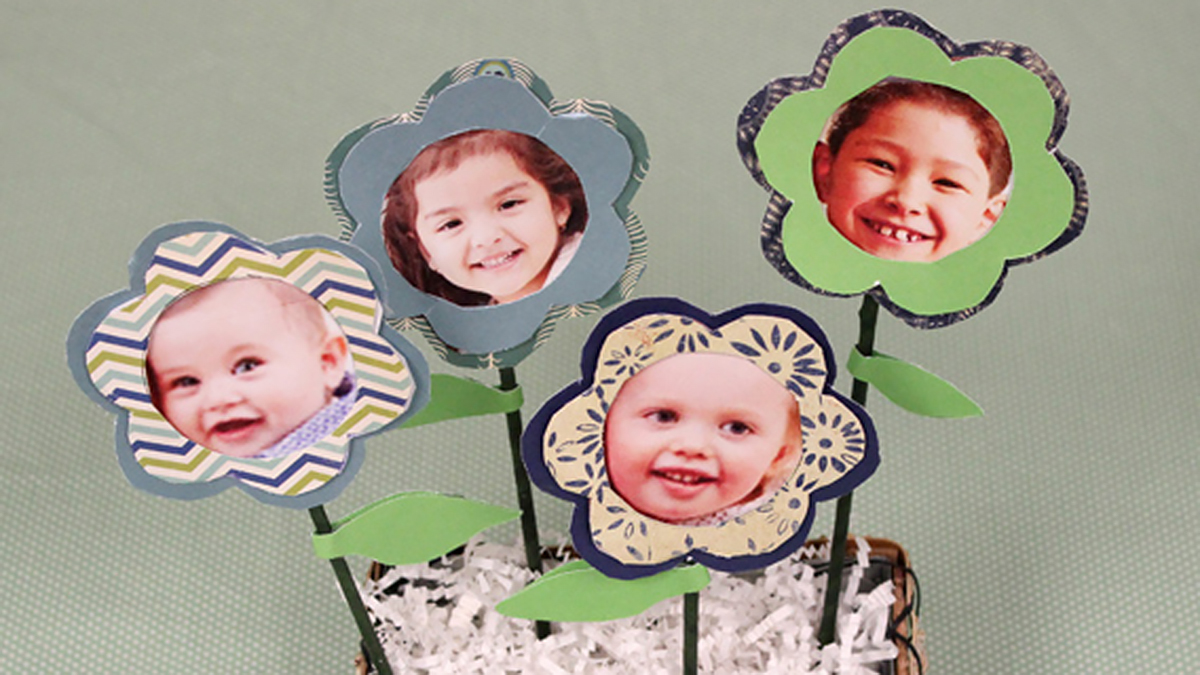
Now, prepare the photograph. If are using an existing photo, trace the smaller flower on the photograph and cut out the shape. If you plan on printing your child’s photo, crop the area you wish to use to 3.5 inches by 3.5 inches. Print on high-quality photo paper for best results. Once printed, use the smaller flower to trace the shape and cut out the photo.
Take the larger flower and trace it onto the color/pattern you’d like to appear on the outermost layer of the flower. Cut out and set aside.
Then, take the smaller flower and trace it onto the color/patterned paper you would on the middle layer of the flower. Trace the circle stencil in the middle of the smaller flower shape. Fold in half and cut out the circle shape from the flower to create an open space.
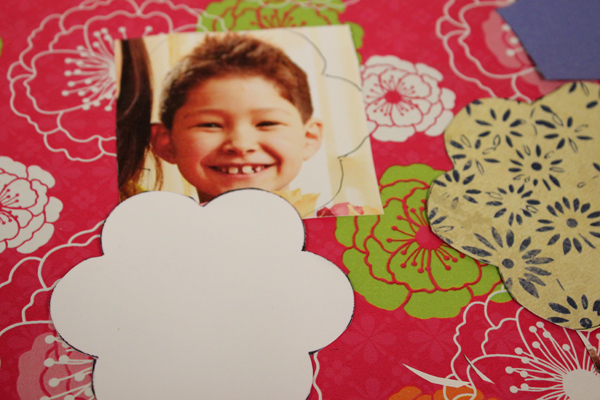
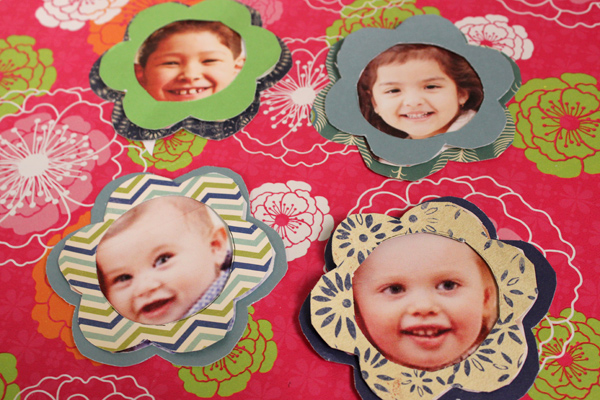
Once you have all the shapes cut out, place a few drops of glue onto the largest flower. Take your first photo and glue it down. Once it’s dry, add a few drops of glue to the smaller flower and place it on top of the photo.
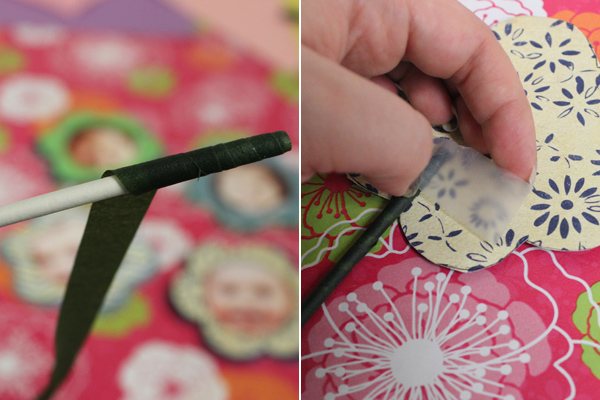
To make the stems, grab your stick and wrap it in floral tape. (The tape is naturally slightly sticky so no further glue is necessary.) Once fully wrapped, tape the stick to the back of the flower.
Optional: Fold a piece of green construction paper in half and cut out a folded leaf shape. Add glue to one half of the leaf and hug it around the newly created stem.
Our series “Get Crafty” gives you the inspiration for creating inventive DIY projects during the holidays and year-round. Show Mom just how special she is by surprising her with a Sunflower Wheel of Appreciation! Read on to learn how to make this DIY Mother’s Day craft.
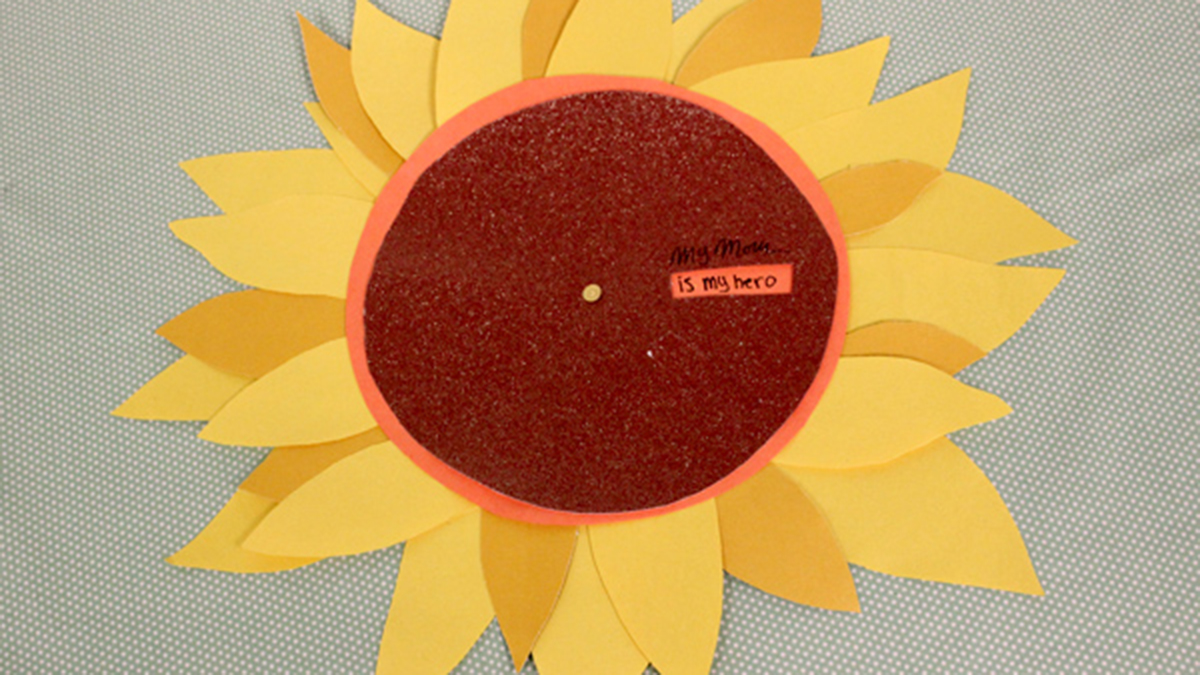
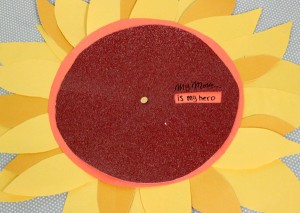
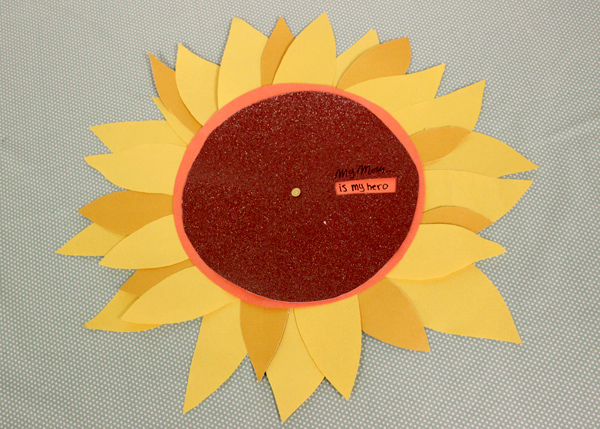
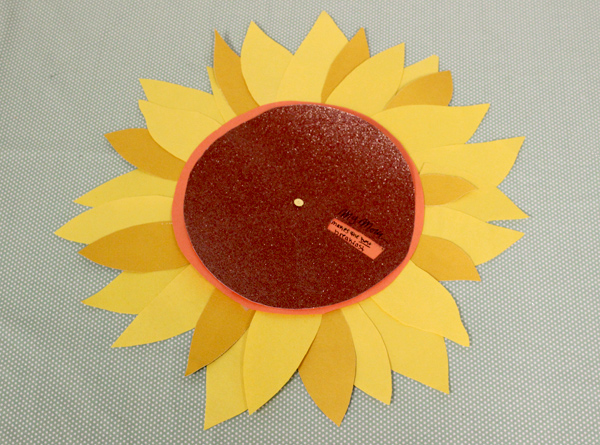
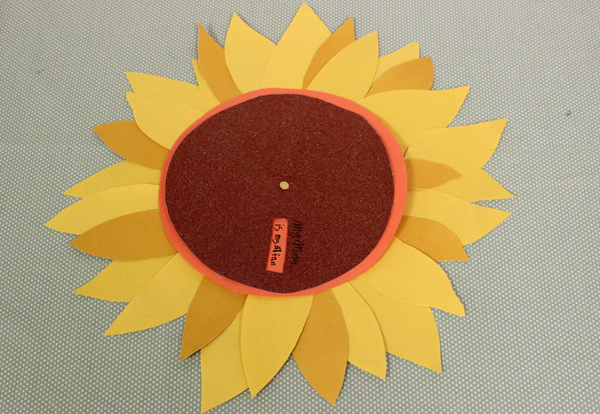
Mom does it all. She cooks, cleans, consoles, and even coaches us through life’s toughest moments. To show Mom just how special she is, make her this Sunflower Wheel of Appreciation to go along with her Mother’s Day flowers. This creative DIY Mother’s Day craft is blooming with compliments that are sure to make Mom smile.
We chose to craft ours to resemble a sunflower, but you can get creative and mix and match colors and shapes to replicate Mom’s favorite flower! Think white and yellow for a beautiful daisy or pink and white for a stunning lily.
Supplies for Sunflower Wheel of Appreciation
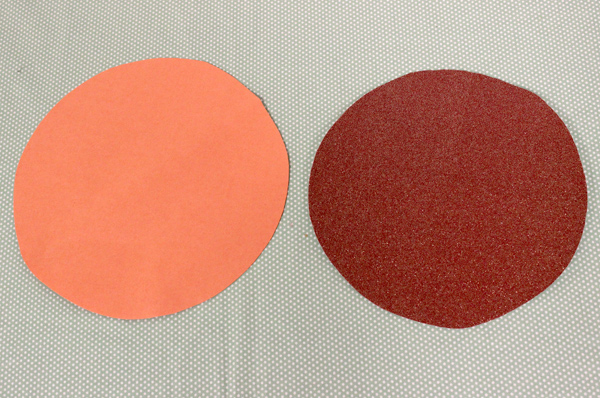
Cardstock in 2-4 different colors (We used brown, orange, and two shades of yellow)
1 paper plate
Scissors
Glue
1 fine tip marker
Paper fastener
Directions for Sunflower Wheel of Appreciation
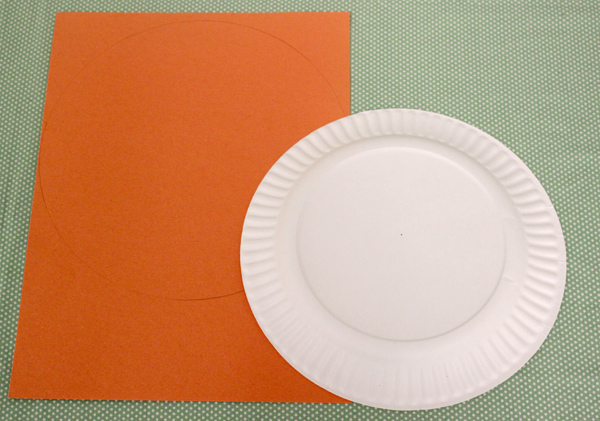
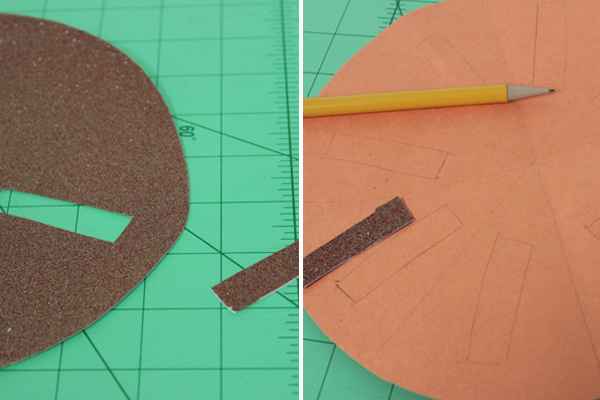
Trace the paper plate onto the piece of cardstock that will become the bottom of the wheel.
Then, trace a circle shape just a bit smaller than the first shape on a piece of different-colored cardstock. If you need a stencil for this part, bend the paper plate in half and trim the ends just a bit. The result will have scalloped edges but will suffice for creating the general circle shape.
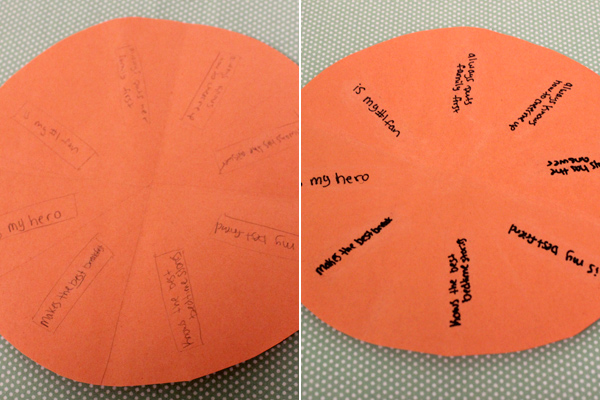
Use scissors or an X-Acto knife to cut out a rectangular shape on the smaller circle. Take the cut-out rectangle shape and use it to create a border for your text on the larger circle. This will assure your text stays within the boundaries of the box.
Once you draw your rectangular borders, use a pencil to write a message for Mom in each one. Then, use a marker to go over the letters to make the words pop. Erase any stray pencil markings.
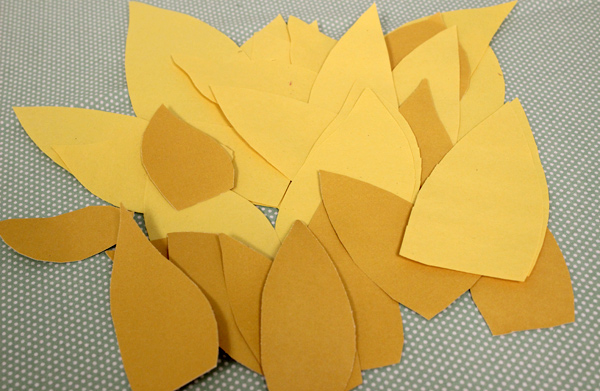
Now, take the cardstock you plan to use for the petals and cut out several petal shapes in varying sizes (they don’t need to be perfect). We used two shades of yellow, but you can stick to just one and still come out with a wow-worthy project.
Apply glue to the wide ends of the petals and stick them to the back of the larger circle.
To complete the wheel, position the smaller circle in the center of the larger circle and seal in the middle with the paper fastener.
Now, give your Wheel of Appreciation a spin and let your Mom know why she’s the best in the world!
Our series “Get Crafty” gives you the inspiration for creating inventive DIY projects during the holidays and year-round. Your Mom is one of a kind, so she deserves a truly original Mother’s Day gift. Here’s how to make her a gorgeous DIY candy bouquet.
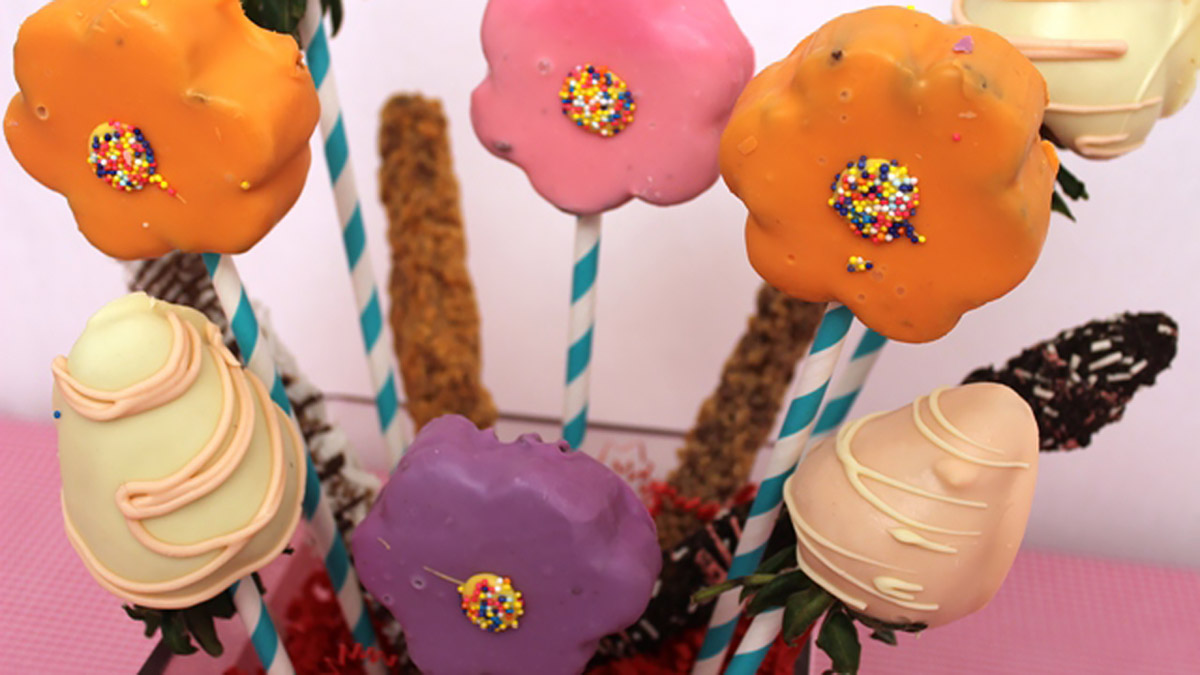
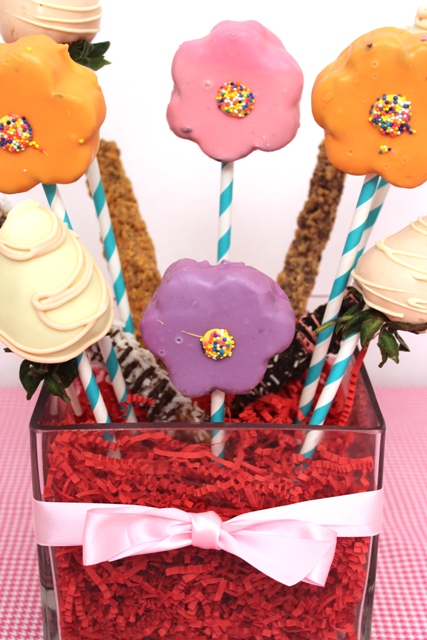
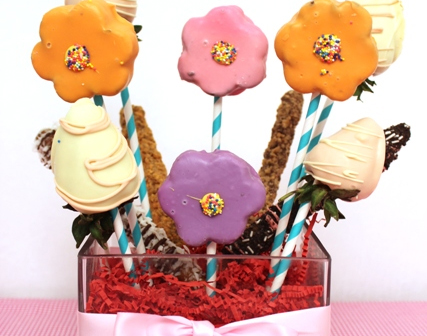
This gorgeous DIY candy bouquet takes only a few minutes to put together (no baking required!) and is a Mother’s Day craft that no chocolate-loving mama can resist.
Here’s a step-by-step tutorial on how to make one for your mom. After all, she deserves only the very best.
1. Cut a piece of Styrofoam so that it fits snugly into your vase. Push the Styrofoam block into the base of the vase.
2. Fill the vase with crinkled filler paper in the color of your choice. Make sure to completely cover the top and sides of the Styrofoam so that the white color doesn’t peek through.
3. Pierce different-sized lollipop sticks into the Styrofoam in the spots where you want your candy flowers to go. Using both small and large lollipop sticks will give your arrangement height and dimension.
4. Stick one green candy-striped straw into the base of each mini brownie cake and chocolate-covered strawberry. Then, take the skewered brownies and strawberries and start arranging them in the vase by placing them on top of the lollipop sticks, just like a flower head. (The lollipop stick should go into the hole at the bottom of the straw.) This will securely anchor the treats to the Styrofoam and hold them up straight.
5. Take a few candy bar pretzels and stick them straight into the filler paper to fill up any empty spots in the vase.
6. Tie a ribbon around the vase to make your sugary bouquet more realistic!
If you’re not the DIY type, don’t worry. You can still show your mom how sweet she is by sending her a delicious, readymade Mother’s Day fruit bouquet instead. It’s overflowing with Mom’s favorite fruit, and it will hook her up with her chocolate fix, too!
Our series “Get Crafty” gives you the inspiration for creating inventive DIY projects during the holidays and year-round. Sometimes the best Mother’s Day gift is one that’s homemade. Here are seven Mother’s Day crafts for kids that Mom will cherish forever.
For spouses, grown-up children, and even parents of parents who have celebrated many Mother’s Days, picking out the perfect gift can be easy. But younger children may not be so sure about what to get or do for mom that will have her smiling from ear to ear. Thankfully, we’ve got loads of DIY ideas that the little ones can pull off for Mother’s Day.
Here are seven favorite Mother’s Day crafts that kids can make for mom this year, or any year.
1. Photo vase
Flowers are a popular gift on Mother’s Day, so why not create a personalized vase for Mom to put them in? All you need is some liquid adhesive, a small brush, tissue paper, a photo with Mom, and scissors. Check out our step-by-step instructions for this homemade Mother’s Day craft.
2. Personalized picture frame
If Mom has photos lying around without a frame to put them in, then this is a gift she absolutely needs. First, find a plain wooden frame that fits the photo you’d like her to display. Then, using paint, markers, glitter — anything, really — decorate the frame with Mom’s favorite colors and designs. Children can even write a personalized note around the edges if they’d like.
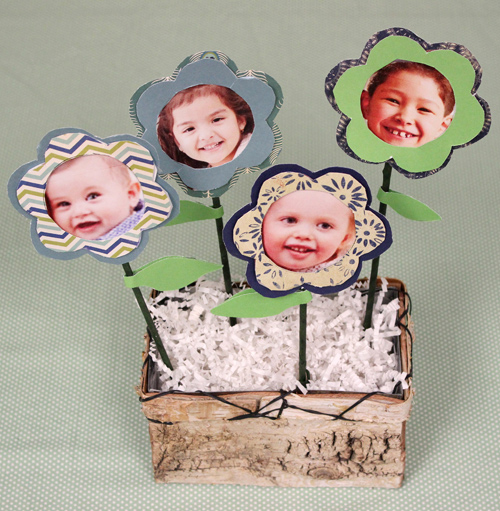
3. Photo flowers
In addition to live flowers, children can also gift Mom another type of flower — a photo flower! This children’s craft is super easy to make and perfect for all ages, and, better yet, we’ve got the templates you need to get started. We know Mom will love any type of flower you give her, but a flower with her child’s face in the center is sure to be a huge hit!
4. Candle holders
Candles are another popular gift for moms, which makes this DIY candle holder an excellent craft for Mother’s Day. All you’ll need is a glass cylinder for the candle to sit in, a photo or two with Mom, and some tape. After printing out your photo(s) on vellum paper, simply wrap them around the exterior of the glass cylinder and tape them down securely.
5. DIY sunflower wheel of appreciation
Call out all the things that make Mom special with this DIY Wheel of Appreciation craft. This tutorial shows you how to create one in the shape of a sunflower for some cheery inspiration.
6. ‘Do Not Disturb’ door hanger
Moms are so involved in our everyday lives that when Mother’s Day rolls around they definitely deserve some time to relax. Help Mom make sure she isn’t interrupted during her “me” time by making a “Do Not Disturb” sign she can hang on her doorknob. All you need to make it is a blank sign and some arts and crafts supplies. You can bet she’ll love this on those mornings when she needs a little extra beauty rest.
7. Sweet candy bouquet
Create a colorful arrangement out of Mom’s favorite treats with this DIY Candy Bouquet. Patterned paper straws add a colorful touch to the arrangement.
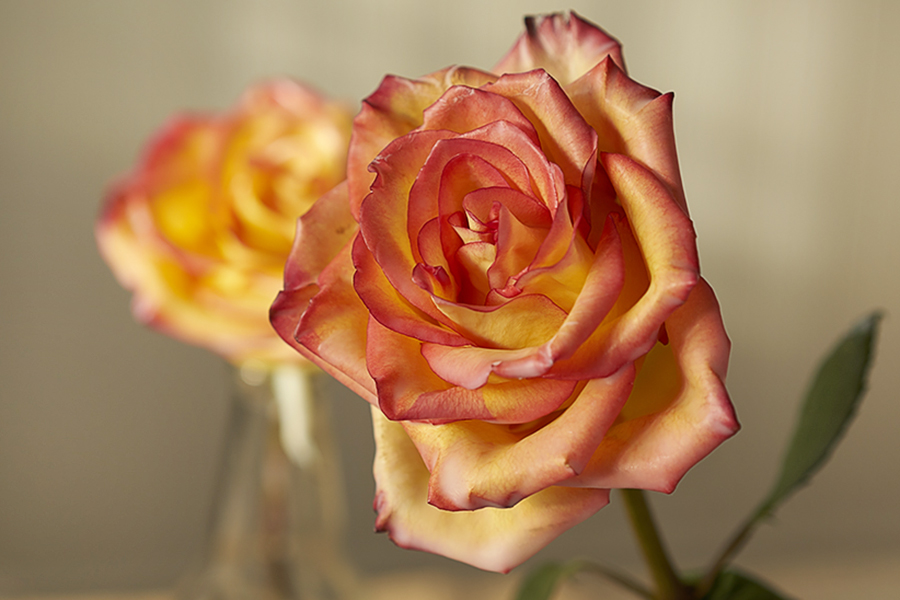
You can make your beautiful fresh-cut roses last longer than you ever imagined by dipping the open blooms in melted wax. The best time to preserve flowers with wax is at the very end of their shelf life — after you have enjoyed their beauty for over a week — when the rose is in full bloom.
I have waxed roses many times over the years using paraffin wax. Now that soy wax is readily available, I decided to give that I try…and I’m glad I did! Soy wax is a completely natural and renewable resource, has a lower melting point, and cleans up easily, with just soap and water. And soy wax is so versatile that you can melt it in the microwave!
What you need to preserve flowers with wax:
Open roses
Microwave-safe container
Soy wax flakes
Candy thermometer (optional)
Empty bottles or vases or wax paper
Steps:
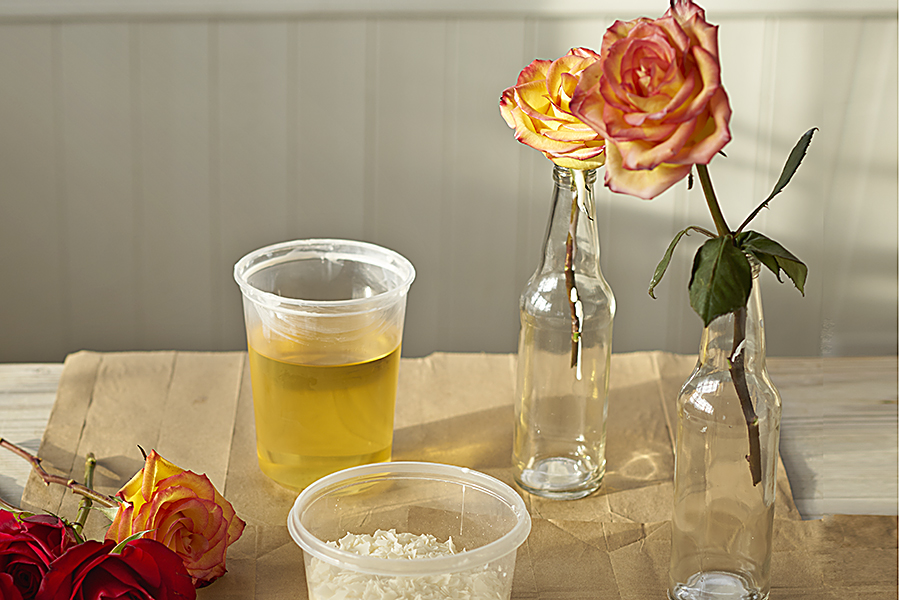
Cut the stems of your roses to about 8 to 10 inches long to make it easy to dip the heads into the wax. Then, place the stems into your bottle or vase to cool. Be sure to put scrap paper on your work surface, including under the bottles, to catch dripping wax.
Fill the microwavable container all the way to the top with the wax flakes and microwave for 2 minutes. After 2 minutes, take the container out of the microwave and stir the melted wax with a disposable plastic spoon. If there is still any white/un-melted wax, return the container to the microwave for another minute and repeat. Also: As the wax melts, you might find that you need to add more flakes. Go ahead and stir them into the container, and continue the melting process.
Once all the wax is melted, you can start dipping. Place the wax container on a protected surface and have your bottle or vase ready to place the dipped roses in for cooling. You can also place the dipped roses on wax paper to cool, but they will keep their shape better if they cool while upright.
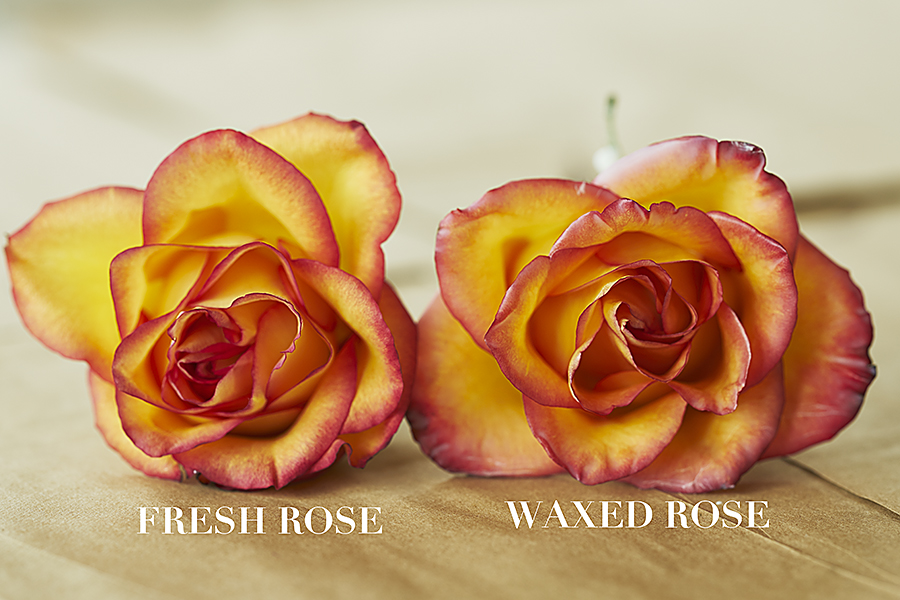
Note: Your wax should be at about 100° F. (You can measure the temperature with a candy thermometer.) I found that melting the wax in short increments of time will keep it from getting too hot. I waited a minute or two after removing my wax from the microwave to start dipping. You can tell that your wax is getting too cool if it starts to get cloudy looking and appears cloudy on the rose petals as well. The goal is to make your rose look so lifelike that it’s impossible to tell that it has been dipped in wax!
If you have many flowers to wax, you can continue to melt as you go along, using the same container and adding more wax flakes as needed. When you’re done, cover the wax container so you can use again at another time. You can preserve many different varieties of flowers and foliage with this method!
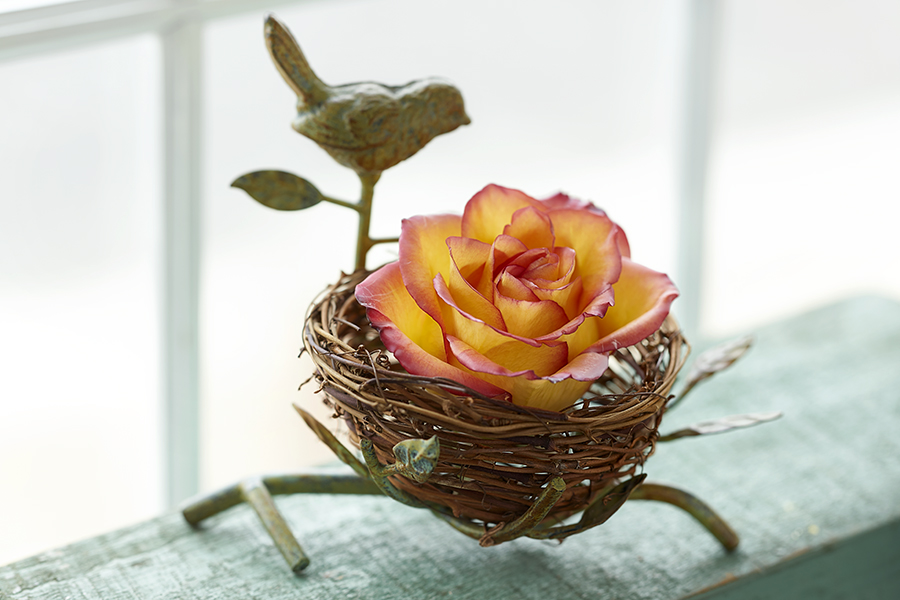
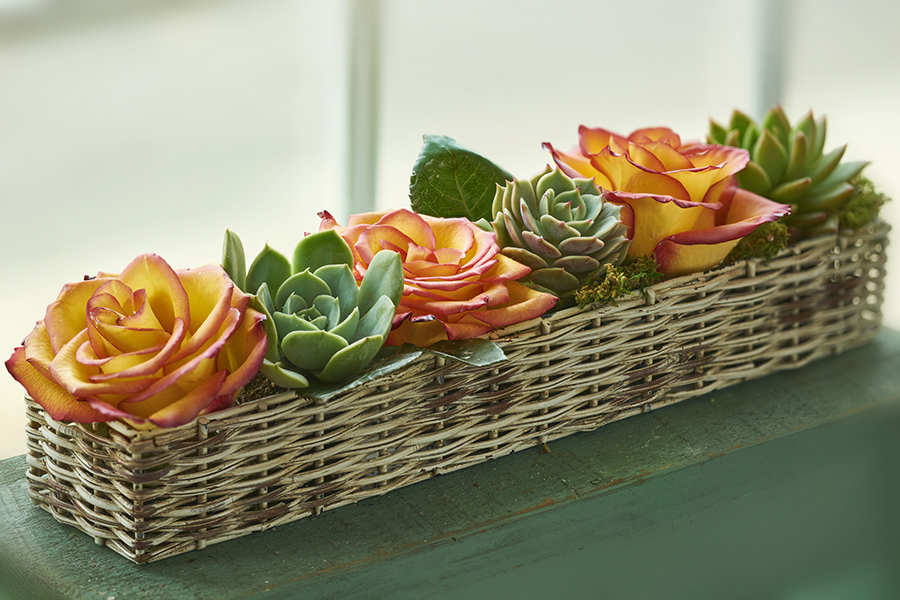
2 ideas for enjoying your waxed roses
After the wax has completely cooled, cut the stem off so that you can cradle the rose in this sweet bird’s nest dish.
I love this arrangement! I simply alternated waxed roses and baby succulents to create a modern centerpiece as carefree as it is beautiful.