Our series “Get Crafty” gives you the inspiration for creating inventive DIY projects during the holidays and year-round. Your Mom is one of a kind, so she deserves a truly original Mother’s Day gift. Here’s how to make her a gorgeous DIY candy bouquet.
This gorgeous DIY candy bouquet takes only a few minutes to put together (no baking required!) and is a Mother’s Day craft that no chocolate-loving mama can resist.
Here’s a step-by-step tutorial on how to make one for your mom. After all, she deserves only the very best.
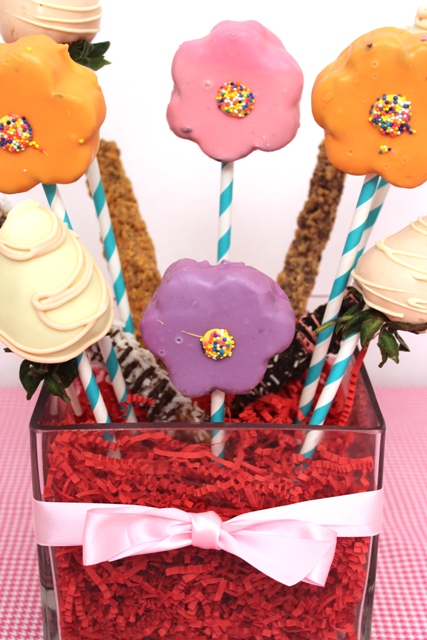
1. Cut a piece of Styrofoam so that it fits snugly into your vase. Push the Styrofoam block into the base of the vase.
2. Fill the vase with crinkled filler paper in the color of your choice. Make sure to completely cover the top and sides of the Styrofoam so that the white color doesn’t peek through.
3. Pierce different-sized lollipop sticks into the Styrofoam in the spots where you want your candy flowers to go. Using both small and large lollipop sticks will give your arrangement height and dimension.
4. Stick one green candy-striped straw into the base of each mini brownie cake and chocolate-covered strawberry. Then, take the skewered brownies and strawberries and start arranging them in the vase by placing them on top of the lollipop sticks, just like a flower head. (The lollipop stick should go into the hole at the bottom of the straw.) This will securely anchor the treats to the Styrofoam and hold them up straight.
5. Take a few candy bar pretzels and stick them straight into the filler paper to fill up any empty spots in the vase.
6. Tie a ribbon around the vase to make your sugary bouquet more realistic!
If you’re not the DIY type, don’t worry. You can still show your mom how sweet she is by sending her a delicious, readymade Mother’s Day fruit bouquet instead. It’s overflowing with Mom’s favorite fruit, and it will hook her up with her chocolate fix, too!
Our series “Get Crafty” gives you the inspiration for creating inventive DIY projects during the holidays and year-round. Sometimes the best Mother’s Day gift is one that’s homemade. Here are seven Mother’s Day crafts for kids that Mom will cherish forever.
For spouses, grown-up children, and even parents of parents who have celebrated many Mother’s Days, picking out the perfect gift can be easy. But younger children may not be so sure about what to get or do for mom that will have her smiling from ear to ear. Thankfully, we’ve got loads of DIY ideas that the little ones can pull off for Mother’s Day.
Here are seven favorite Mother’s Day crafts that kids can make for mom this year, or any year.
1. Photo vase
Flowers are a popular gift on Mother’s Day, so why not create a personalized vase for Mom to put them in? All you need is some liquid adhesive, a small brush, tissue paper, a photo with Mom, and scissors. Check out our step-by-step instructions for this homemade Mother’s Day craft.
2. Personalized picture frame
If Mom has photos lying around without a frame to put them in, then this is a gift she absolutely needs. First, find a plain wooden frame that fits the photo you’d like her to display. Then, using paint, markers, glitter — anything, really — decorate the frame with Mom’s favorite colors and designs. Children can even write a personalized note around the edges if they’d like.
3. Photo flowers
In addition to live flowers, children can also gift Mom another type of flower — a photo flower! This children’s craft is super easy to make and perfect for all ages, and, better yet, we’ve got the templates you need to get started. We know Mom will love any type of flower you give her, but a flower with her child’s face in the center is sure to be a huge hit!
4. Candle holders
Candles are another popular gift for moms, which makes this DIY candle holder an excellent craft for Mother’s Day. All you’ll need is a glass cylinder for the candle to sit in, a photo or two with Mom, and some tape. After printing out your photo(s) on vellum paper, simply wrap them around the exterior of the glass cylinder and tape them down securely.
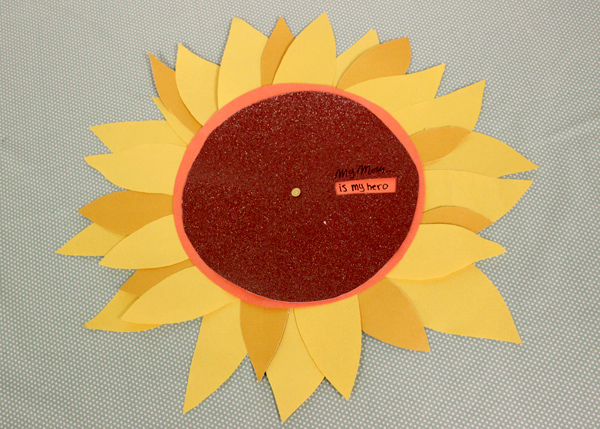
5. DIY sunflower wheel of appreciation
Call out all the things that make Mom special with this DIY Wheel of Appreciation craft. This tutorial shows you how to create one in the shape of a sunflower for some cheery inspiration.
6. ‘Do Not Disturb’ door hanger
Moms are so involved in our everyday lives that when Mother’s Day rolls around they definitely deserve some time to relax. Help Mom make sure she isn’t interrupted during her “me” time by making a “Do Not Disturb” sign she can hang on her doorknob. All you need to make it is a blank sign and some arts and crafts supplies. You can bet she’ll love this on those mornings when she needs a little extra beauty rest.
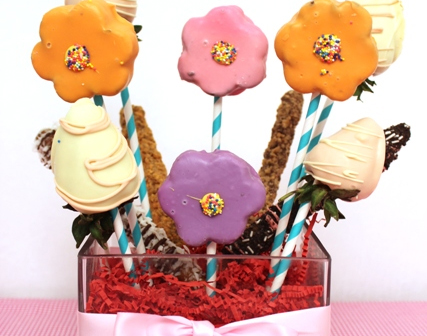
7. Sweet candy bouquet
Create a colorful arrangement out of Mom’s favorite treats with this DIY Candy Bouquet. Patterned paper straws add a colorful touch to the arrangement.
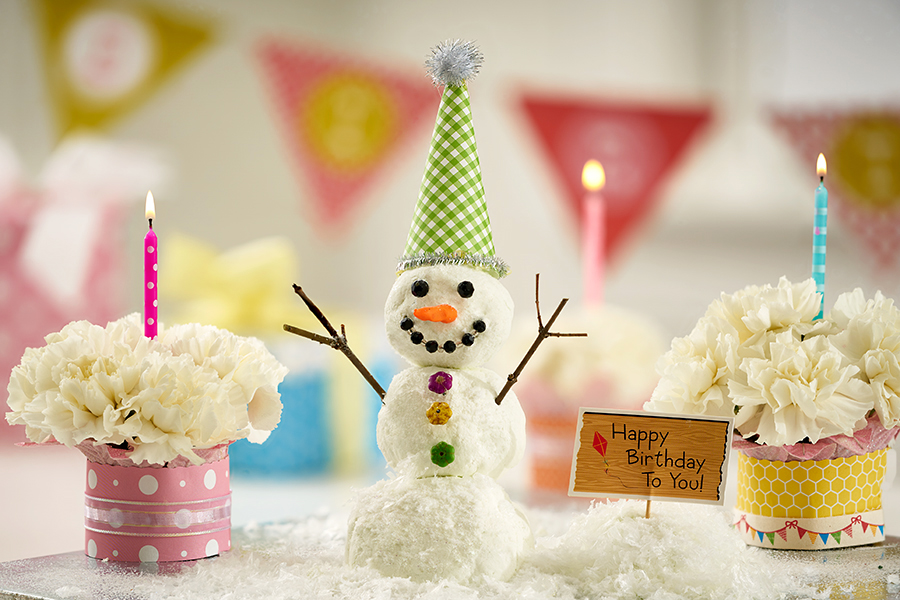
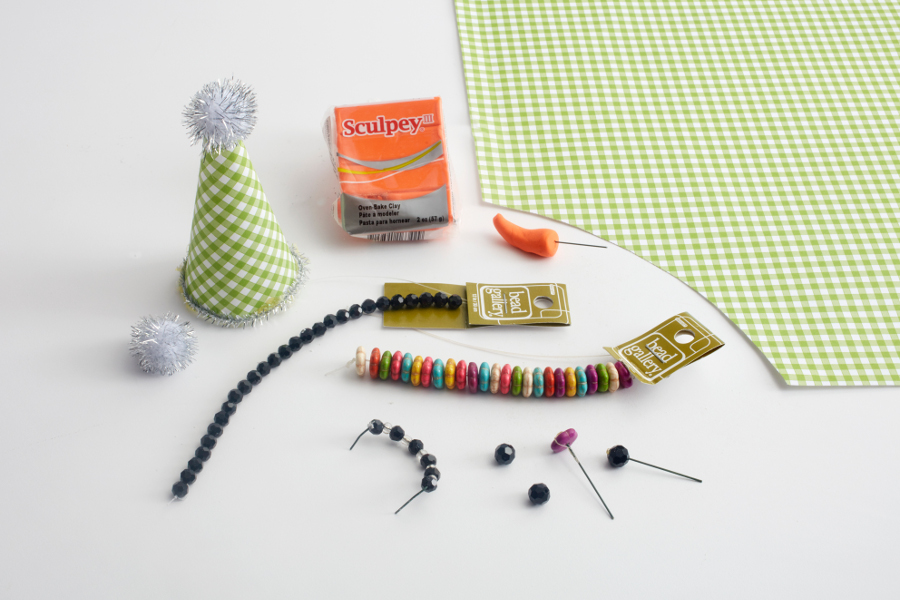
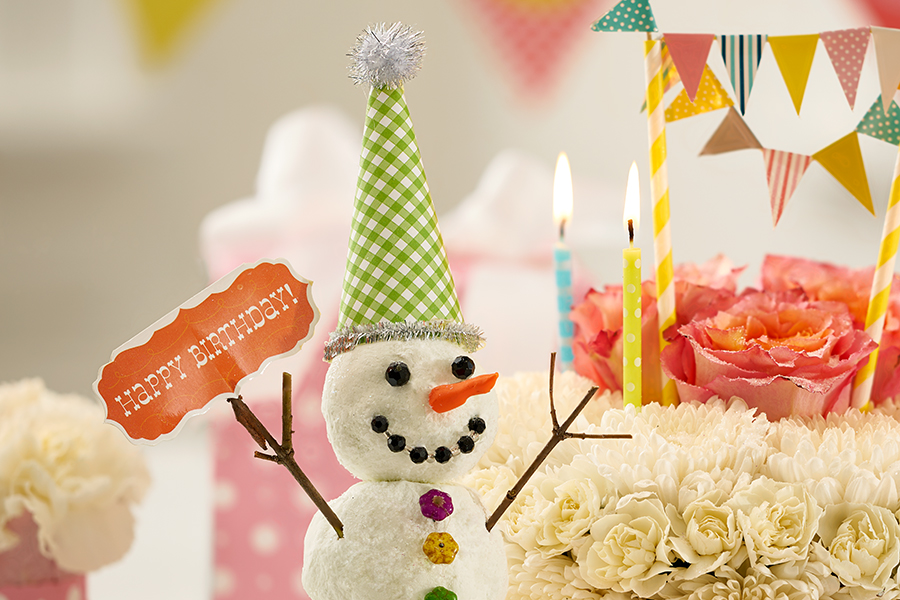
Who better to deliver birthday wishes on a chilly winter day than a happy little snowman? Think about it: Have you ever seen a snowman who didn’t have a smile on his face? Snowmen are a celebration of winter, unexpected snow days, and family fun. And the best part about this snowman (or “snowlady”) craft is that it can stay inside, sharing birthday smiles without melting!
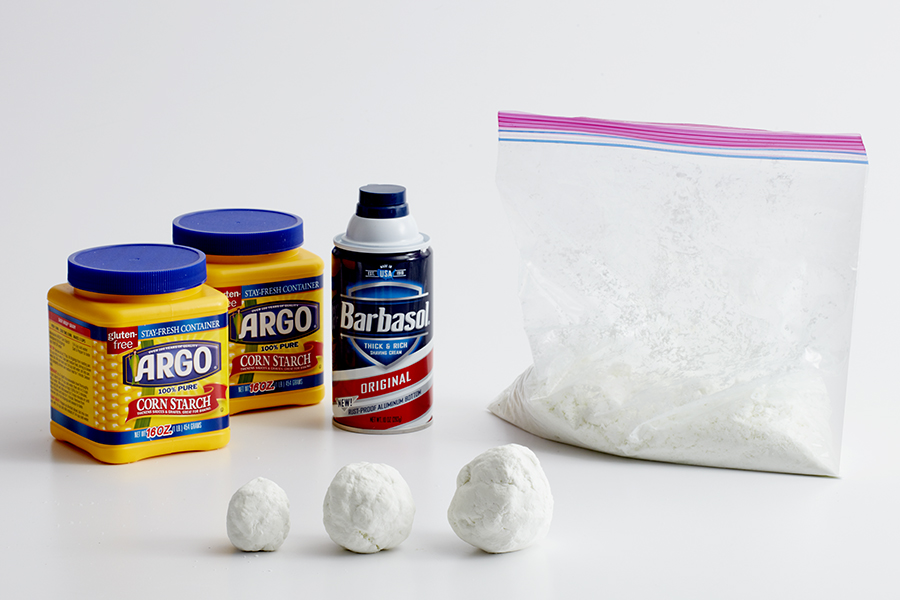
This happy little guy is the finishing touch to a birthday vignette of floral cakes and cupcakes, and I created him with everyday materials found around the home. With a little research online, I found many snowman recipes that called for corn starch and shaving cream. After doing some experimenting, I went with the shaving cream version, but both work great! This snowman craft is a fabulous fun sensory activity to do with kids too.
Make a snowman craft (without snow)
What you need
Two 16 oz. containers of corn starch
One 10 oz. can of shaving cream
Miscellaneous items to dress your snowman and add personality, such as:
Pour the corn starch into a large bowl and slowly add the shaving cream, mixing it in as you go. Keep working the shaving cream into the corn starch until you can mold the mixture and it feels dry to the touch. You can store the faux snow mixture in a resealable bag, and it will keep for a few weeks.
Because this was for a birthday, I added a birthday hat that I made from a small piece of decorative paper, and added a silver pom-pom at the top and a silver chenille stem around the base.
I also made a little “Happy Birthday” sign and attached it to one of his little twig arms!
You can also add the sign to a pile of snow made with the cornstarch mixture. I used some faux snow around the snowman, as well as floral cakes and cupcakes, to complete the look.
Create a floral snowlady
Another way to make an indoor snowperson is with flowers. If you know someone who has a birthday and deserves to smile, then this is one homemade gift they would be delighted to receive!
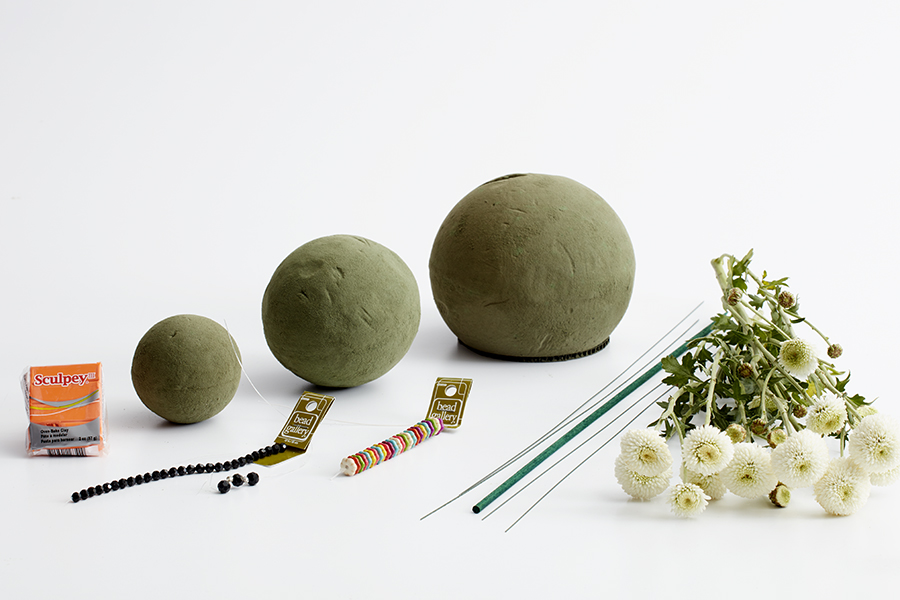
What you need to make a snowlady
2 or 3 sizes of floral foam spheres
A stick
White button poms
Decorative elements to create the face (beads, sculpting clay, etc.)
What to do
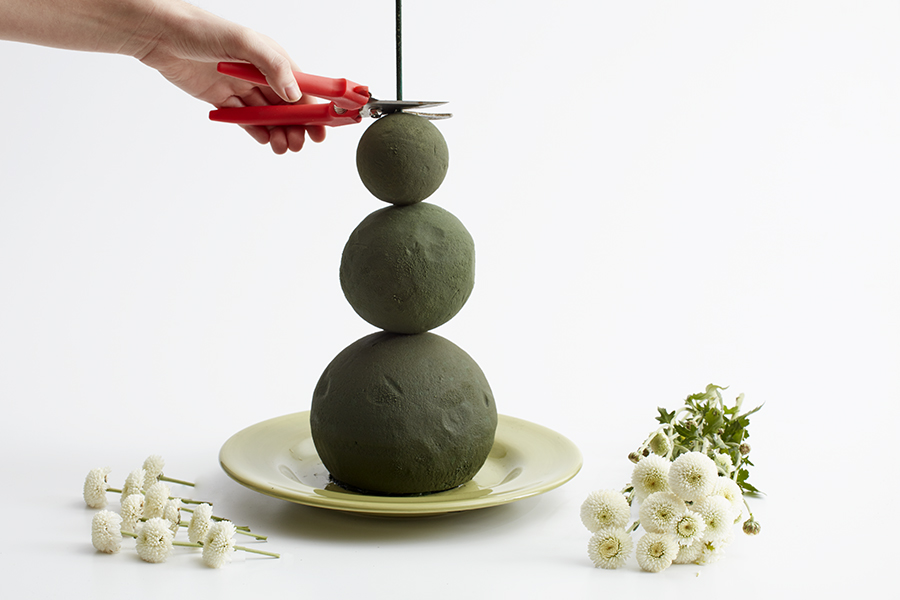
Thoroughly soak the foam spheres. I used three sizes, but you can use just two.
Place the largest sphere on a flat plate and insert the stick.
Place the next largest size on top of the larger one, and then the smallest. Cut the stick at the top if it is still sticking out.
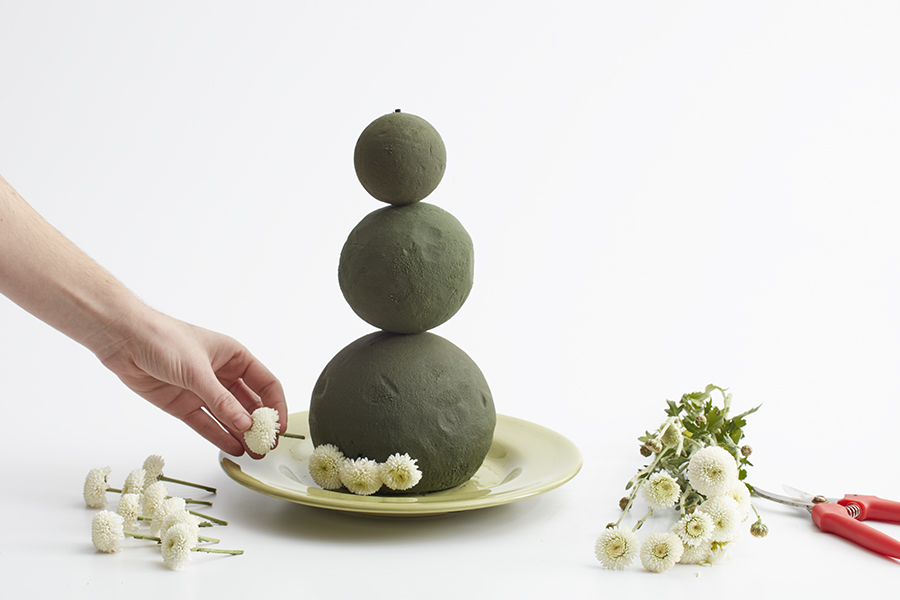
Cut all the individual button poms from the main stem, leaving about 1 inch of stem on the flower to insert into the foam.
Start at the bottom and insert the button poms until you have covered all the foam.
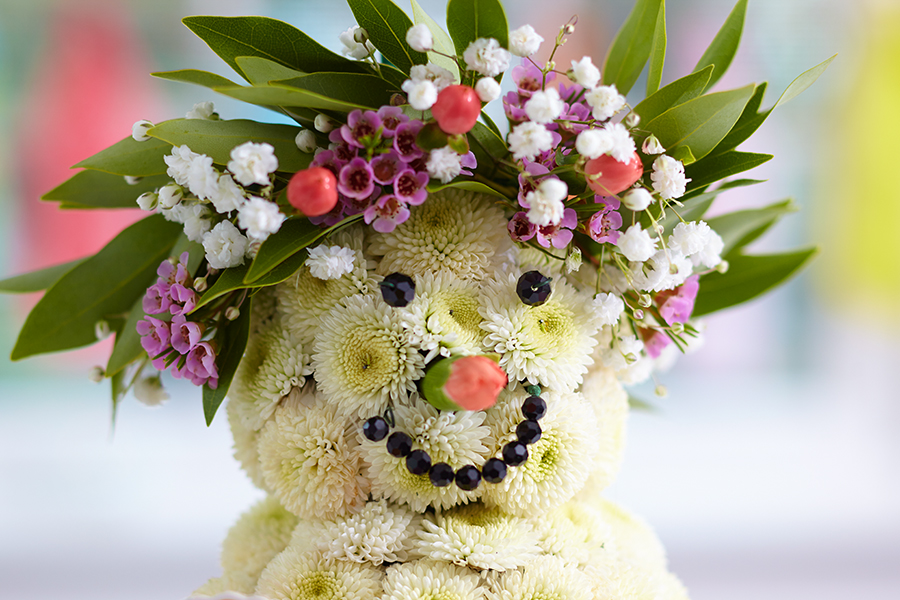
This is a large snow lady — she stands a little over a foot tall — so it takes lots of button poms to make. (I used more than 15 stems.) You can create a smaller one using the same method, however.
For the birthday bouquet, I gathered a few stems in my hand and cut the bottoms short, and inserted them into the foam. I took the parts of the stems I had cut off and inserted them into the foam as well, and added a bow between the flowers and stems to make it look like she was holding a bouquet of fresh-cut flowers! Because I knew I was going to be giving her this bouquet, I didn’t put the button poms in the area where I planned to insert the bouquet.
For the floral crown, I used small sprigs of flowers and greens, and wired them together.
Creating any of these vignettes is a sure way to let someone know how special they on on their birthday — and every day!
The series “Unboxing the Holidays” is all about bringing you top-notch advice and creative ideas to make the most of the season’s special moments. In this article, we offer creative holiday gift wrapping ideas with pro tips.
A gift that’s creatively wrapped can be as delightful to the recipient for what’s on the outside as what’s inside the box. In fact, the notion that it’s the thought that counts not only applies to the gift but also to how it’s wrapped. And we’re not talking about the precision paper folds from a store’s gift-wrapping department. Gifts wrapped with personal handiwork will be remembered because it shows time spent, care, and creativity. For this year’s gifts, be inspired by everyday items and Christmas flair. You just may put an elf out of work.
Julie Mulligan, farmhouse Christmas
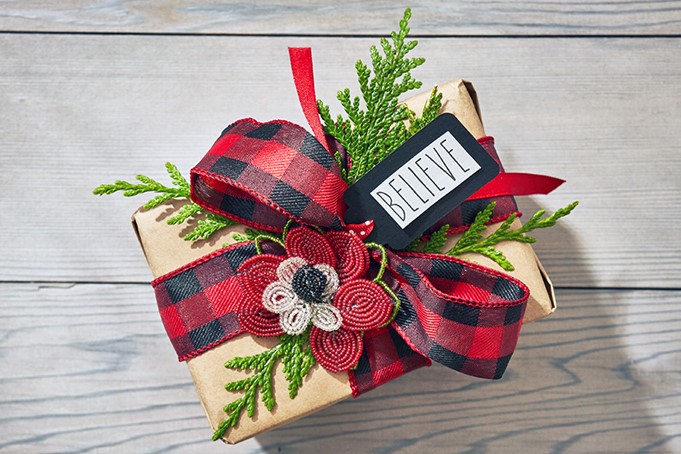
Julie Mulligan, 1-800-Flowers.com’s lifestyle and crafting expert, shares her current favorite holiday trend: farmhouse Christmas. The style goes hand in hand with the organic and sustainable trends — and nothing says farmhouse like a good buffalo check. Also called buffalo plaid, it’s everywhere right now. Just search Instagram or Pinterest, and you’ll be inspired.
A few ideas to get you started
You can’t go wrong with simple kraft paper and a red and black buffalo plaid ribbon.
Add a vintage beaded flower, some evergreens, and a chalkboard-style tag, and you’ve just entered the realm of “super gift wrapper.”
Mulligan saved two favorite ideas for last, which is what happens when you put out all your materials and just have fun with them.
This long, narrow box is ideal for a garland stretched from one tree to another. “I realized I had everything I needed right in my bag of reusable tricks,” says Mulligan. “I am in love with the way it turned out!”
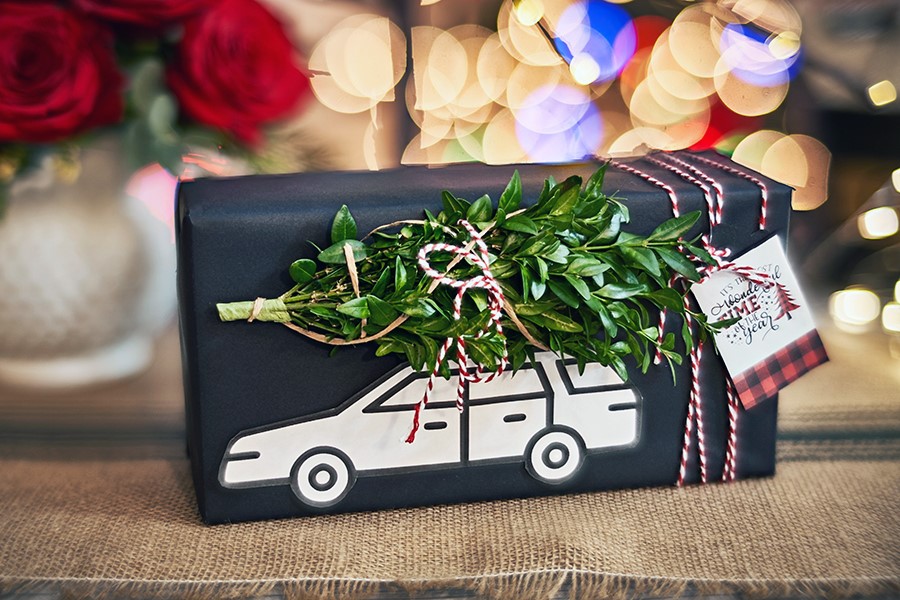
Black gift wrapping style
Mulligan also loves the black wrapping paper trend. “You can do so much with it, and it makes whatever elements you embellish it with really pop.”
She downloaded a free clip-art image of a station wagon and printed it to the size needed for her gift box. Then, cut it out and glue it on the wrapping paper.
Chalkboard art is still very popular, and you can decorate and write messages right on paper using a white marker.
“I tied a sprig of boxwood to the top of the station wagon, wrapped some red and white twine around the package, and added a cute little holiday gift tag to complete this vintage-looking farmhouse holiday present,” she says.
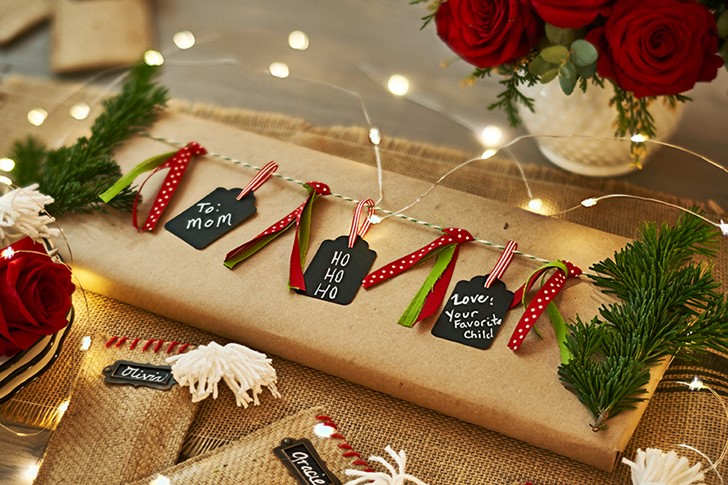
For Steve Doss, it’s not the music, food, or festivities he looks forward to the most during the holidays. “My favorite part of the holiday season is wrapping presents,” he says. Doss began his gift wrapping tradition with his mother as a child, a talent that has taken him into adulthood. “I like to pick a theme and roll with it in all of my package presentations.” One year, for example, he tied a bunch of candy canes to his nephew’s gift after learning about his passion for crunchy candies. “He was beyond excited. “
Beautiful gift-wrapping extends the recipient’s time with the present, perhaps prompting questions on the inspiration. It also elevates delight. Doss’s nephew didn’t even care what was inside the wrapped boxes. “Adorning your gifts with candy not only adds a bit of whimsy to your package but also provides the sweetest touch to the holiday season,” Doss says.
Doss’ pro tips:
Make sure you pick individually wrapped sweets so your adhesive doesn’t touch the candy itself.
You don’t have to pick holiday-specific candy for your gift wrapping. Form any of your favorite sweets into a wreath or candy cane.
Reusable chic
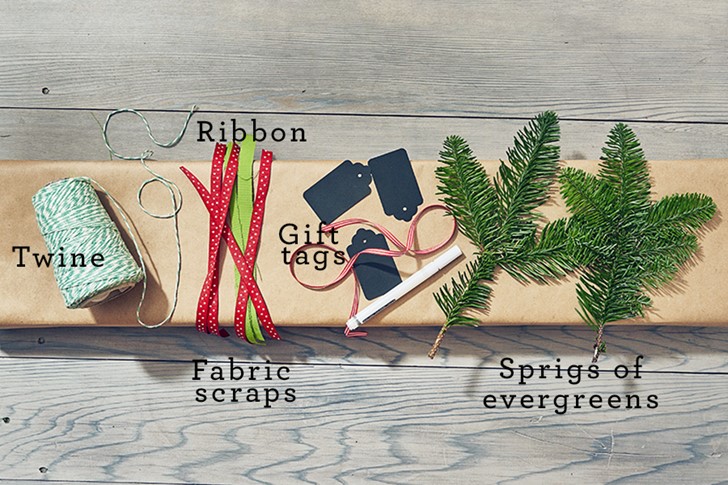
No need to break the budget with pricey holiday papers and bows that are destined to get marked down after Christmas. Use what you have. Everyday items can be the basis of your gift wrapping.
Here’s a list of items that can be used for gift wrapping:
Give shabby clothes a second life. The denim from torn jeans, dated dresses, and other remnants can be used for the wrapping. Cut into long strips for ribbons.
Handles from gift bags are handy gift ties.
Newspaper and shopping bags can be made into wrapping paper for an authentic look with a nod to practicing sustainable gift-giving.
The series “Unboxing the Holidays” is all about bringing you top-notch advice and creative ideas to make the most of the season’s special moments. Here, we teach you how to make a DIY Christmas wreath in five simple steps.
A staple of Christmas decorating since the 19th century, wreaths come in all shapes, sizes, and styles. And throughout the month of December, you’re sure to spot them everywhere — from traditional colonial homes and shop windows to semi-trailer truck grilles. Wreaths are a warm, inviting decoration rich with meaning. “Wreaths symbolize hospitality, seasonal bounty, and optimism for a prosperous new year,” says Debra Prinzing, creative director of Slow Flowers Society.
A wreath for every occasion
In fact, your wreath doesn’t have to come down when the holidays are over. “We’re seeing wreaths displayed year-round, inside and outside,” Prinzing says. “This shift opens up a world of possibilities for integrating all sorts of fresh and dried botanical ingredients into your design — including foraged elements.”
Easy peasy basic wreath project
Wreaths are an easy way to add a dash of seasonal style into your space for the other 11 months of the year. This small version with homespun flair is easy to customize for any occasion. Start with the basic wreath design, described below, and then add your favorite seasonal embellishments, such as dried fruit, berries, cinnamon sticks, wheat stems, twigs, or anything else you like!
This simple project requires few supplies, and, best of all, you can complete this DIY Christmas wreath in less than an hour.
Supplies
Wire wreath form (8-10 inches max)
Green floral wire, 22 gauge (on a paddle or spool)
Scissors or pruning shears
Wire cutters
Two to three types of greenery, divided into separate piles (eucalyptus, ficus, magnolia, and lemon leaves are good options for smaller wreaths). You will create mini bundles of greenery to decorate your wreath, so make sure you have enough to go around the entire form.
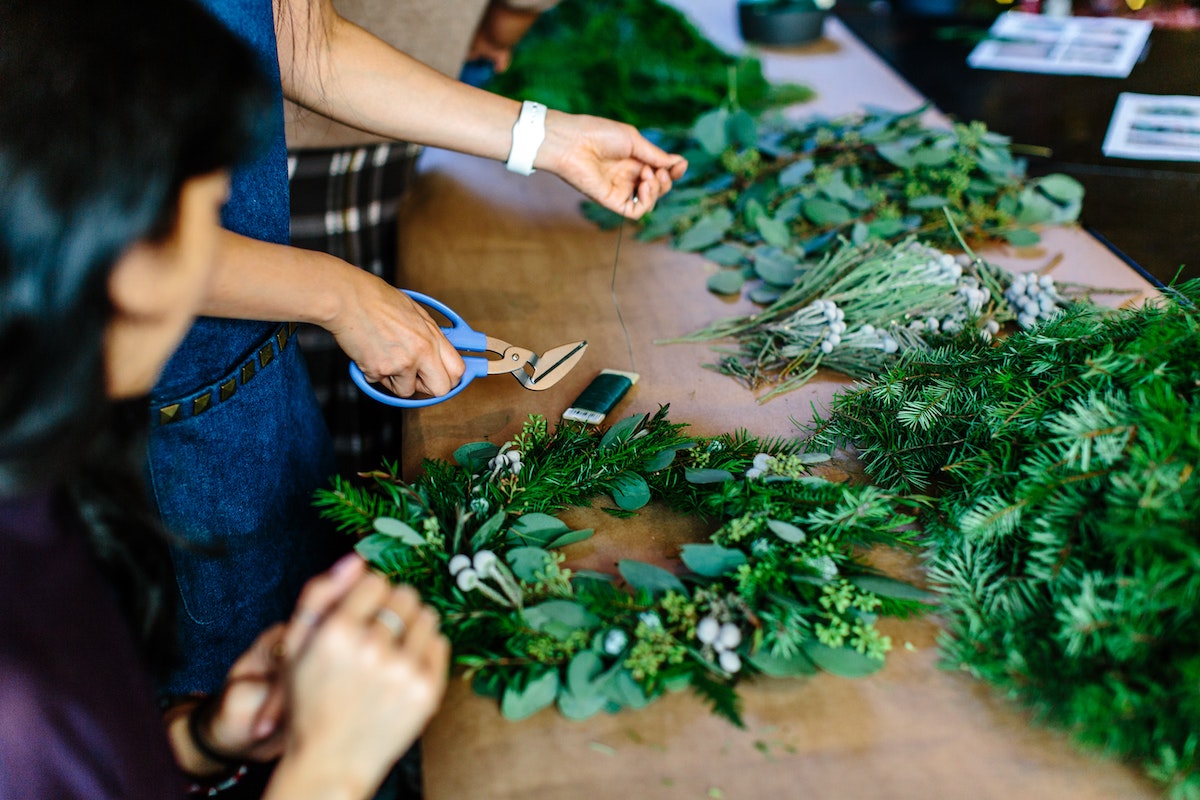
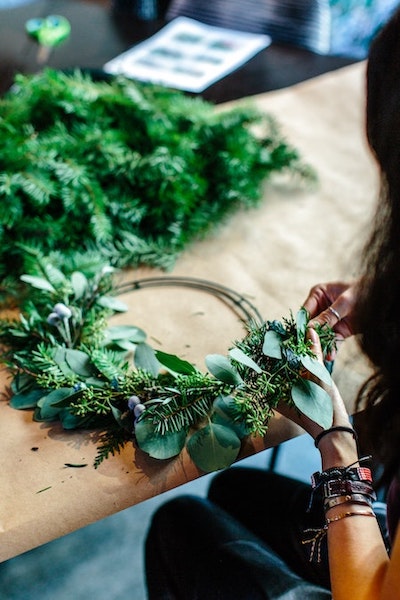
Steps
Pull about 6-8 inches of gauge wire away from the spool or paddle, but do not cut it. Starting with the end piece, wrap about 2 inches of wire in place around the form, tightly, until secure.
Select one piece of greenery from each pile. Then, layer the pieces on top of each other from smallest to largest to create a visually pleasing bundle. Hold the bundle in place and trim the stems, leaving about 2 inches.
Place your bundle face up on the form, positioning the stems on top of where you started the gauge wire. If the stems are still too long for the form, trim them again, but leave enough in place to attach the wire. Tilt the bundle slightly outward from the middle of the form until you are happy with the placement. Wrap the gauge wire around the stems tightly several times until secure.
Repeat steps 2 and 3, slightly overlapping and tilting the bundles outward, until all are securely attached, and conceal the form. After your last bundle is secured, cut the wire and tuck the end into the back of the wreath. Fill in any gaps or holes with extra greens. Don’t forget to add your seasonal elements!
Loop a piece of twine or ribbon through the back of the wreath and hang.
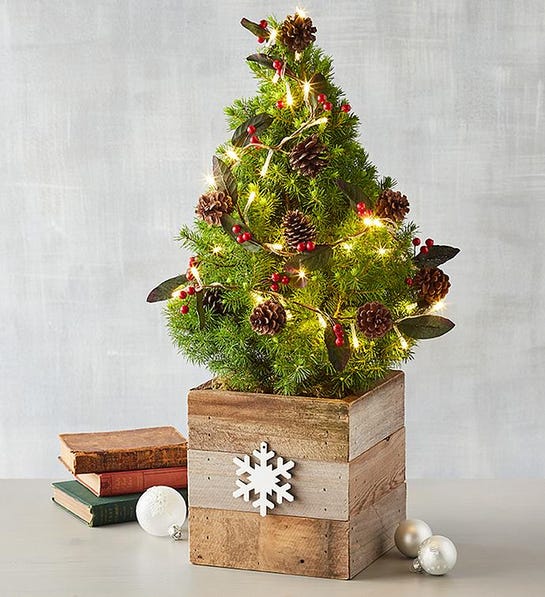
I love Christmas, and I love decorating Christmas trees! The main tree in my home tends to be pretty traditional, changing only slightly from year to year, with new ornaments added here and there. So, I’m here to talk about the beauty and versatility of fresh tabletop Christmas trees.
These beautiful arrangements are usually handcrafted by your local florist and make great gifts. In fact, the Holiday Flower Tree has been a bestseller since it was first introduced nearly 20 years ago!
Trending mini Christmas trees with lights
If you’ve attempted to decorate a Christmas tree with lights, challenges ranging from broken bulbs to tangled cords are enough to have you scrap the lights for a tree with ornaments. Fear not, for some mini Christmas trees with lights come pre-assembled, such as this Holiday Spruce or Rustic Christmas Tree. Another festive option is the Hand Tied Mini Christmas Tree Bouquet that comes with lights in a rustic mason jar. There are also trees that come with ornaments, if you want the full tree package.
Mini Christmas trees are versatile
Whether you live in an apartment, are an empty nester, or are traveling during the holidays, tabletop Christmas trees are festive additions for those who want to have a tree without the production. You can add a mini Christmas tree to the bedroom, kitchen, foyer, office, or any space that cannot accommodate a larger tree. And the trees, like the Holiday Lavender Tree, are sustainable too, and can be replanted in your garden or kept indoors for natural decorative appeal during the cozy winter months.
Other tree options that can work for the holidays and after are bonsai, olive, magnolia, and, money trees. Simply add a tree skirt or lightweight ornaments, and it’s getting to look a little more like Christmas.
DIY tabletop Christmas tree
If you have a little time and want to get creative, these trees are pretty easy to make. The basic instructions are the same for whatever size tree you want. The smaller the tree, the faster and easier it will be to construct. Petite trees are so sweet and can be tucked into so many unexpected spots. Larger trees, on the other hand, allow you to create a completely custom look based on your choice of container, decorations, and color scheme.
How to make a tabletop Christmas tree
What you need:
Floral foam
Dish/plate
Tape
Clipper
English Boxwood
Assorted evergreens
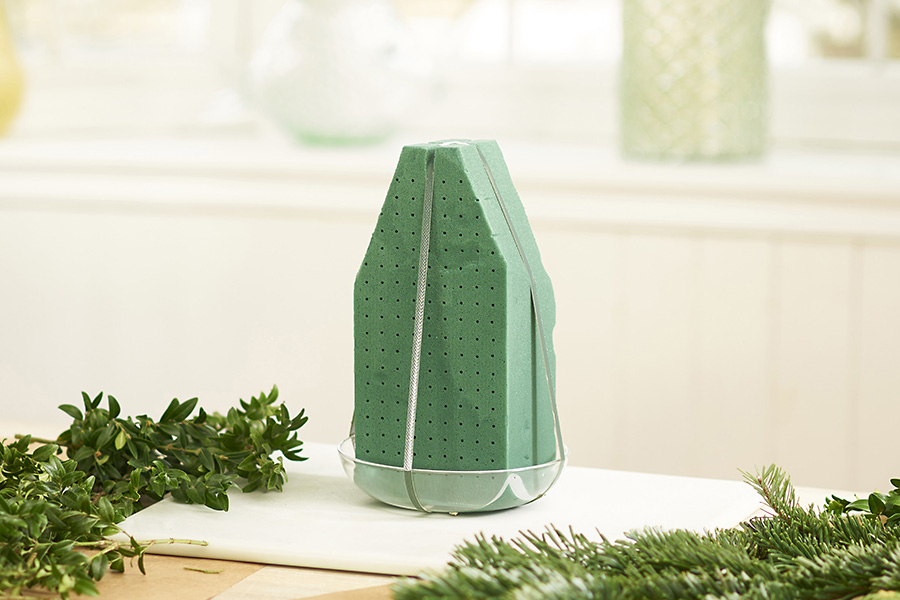
Step 1: Set up your floral foam
Cut the corners from one end of the foam as shown; fill your sink with water; and place the foam into the water, allowing it to become totally soaked through. Tape the foam into a plate/dish. You can use any waterproof container as the base and put the foam directly into your chosen container before creating the tree. Or you can create the tree using a smaller base, like the one in the image, and then place the finished tree into a decorative container.
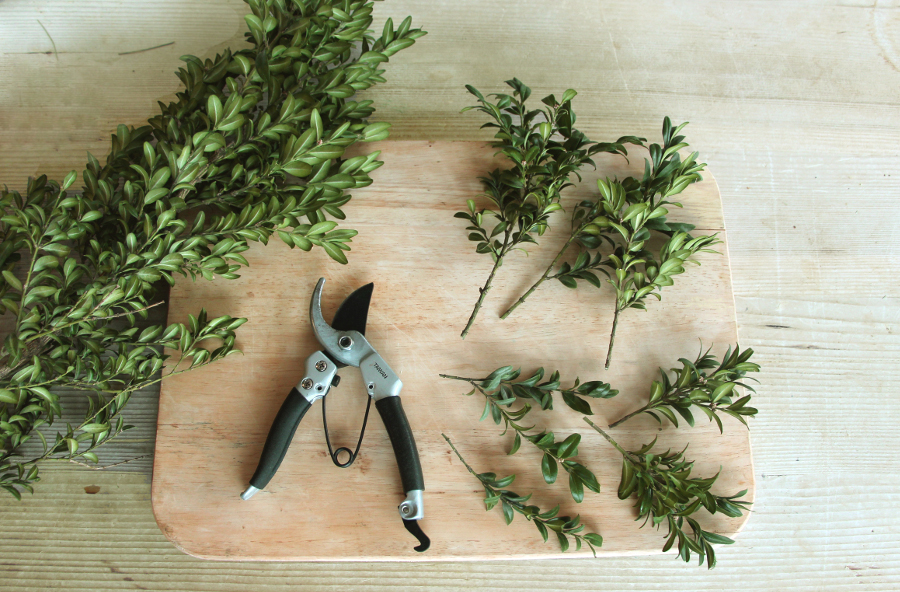
Step 2: Prepare your greens
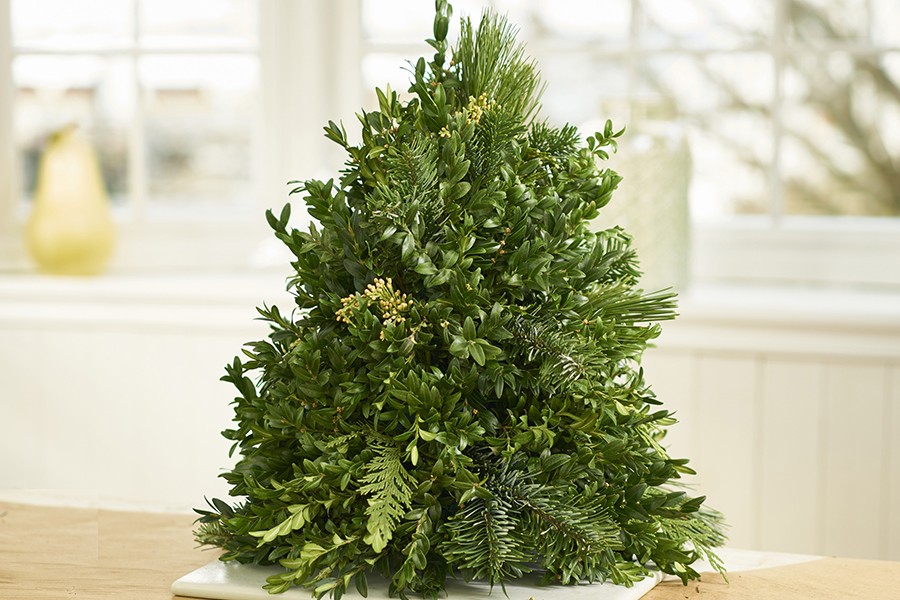
Boxwood is the main green that I used for the tree, and I accented it after the main shape was created, filling in with other assorted evergreens such as cedar, pine, and balsam.
Before starting, cut the greens off of the main branch into smaller pieces of varying lengths ready to insert into the foam.
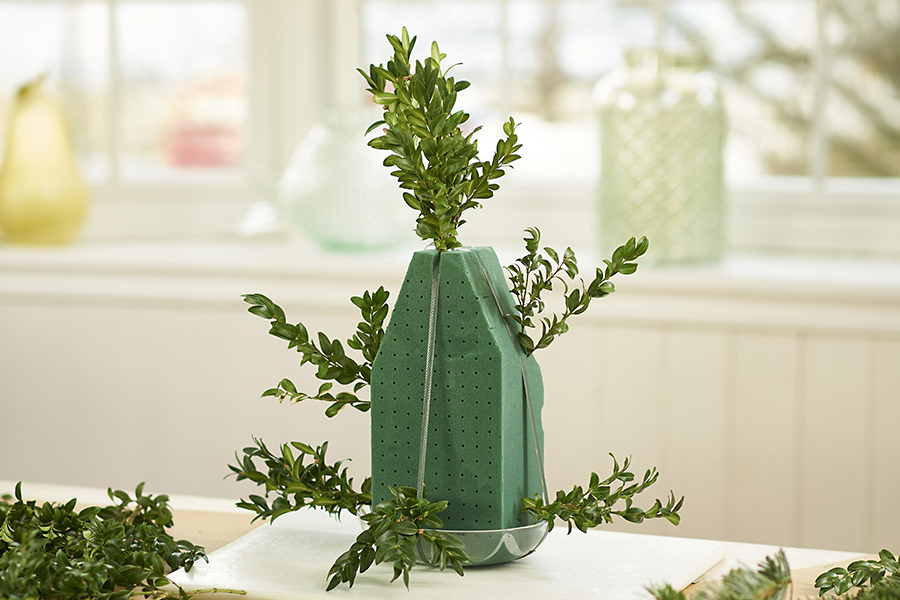
Step 3: Arrange your greens
Start by inserting a taller pre-cut piece of boxwood at the top to create your basic height. Do the same at the bottom and the sides. This gives you the base shape of your tree.
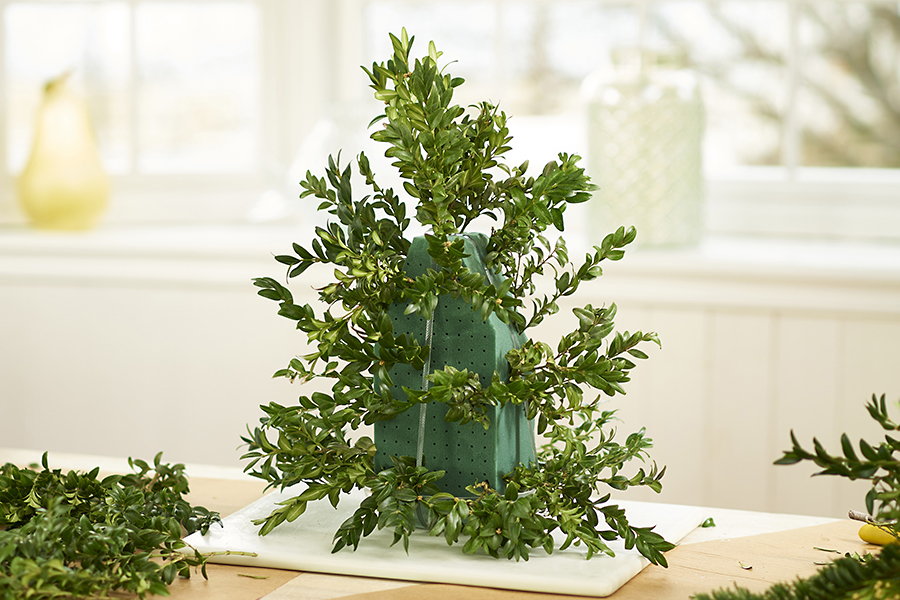
Step 4: Fill in your tree
Continue adding pieces of boxwood, turning the tree as you go, until you have filled in the whole tree.
Step 5: Accent with various evergreens
I like to add a few sprigs of other evergreens for two reasons. The first is that evergreens such as balsam and pine add wonderful fragrance. I find it adds visual interest as well.
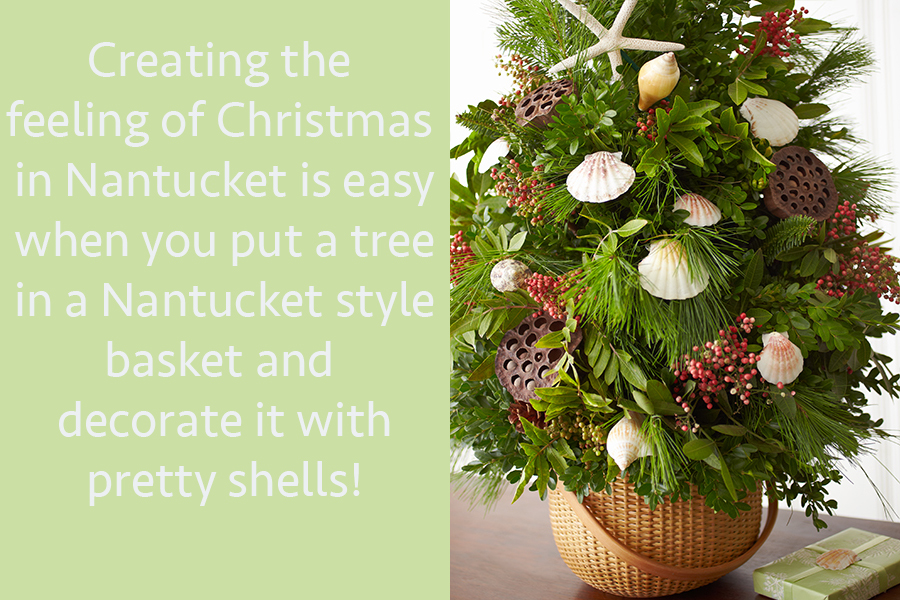
Tabletop Christmas tree decoration ideas
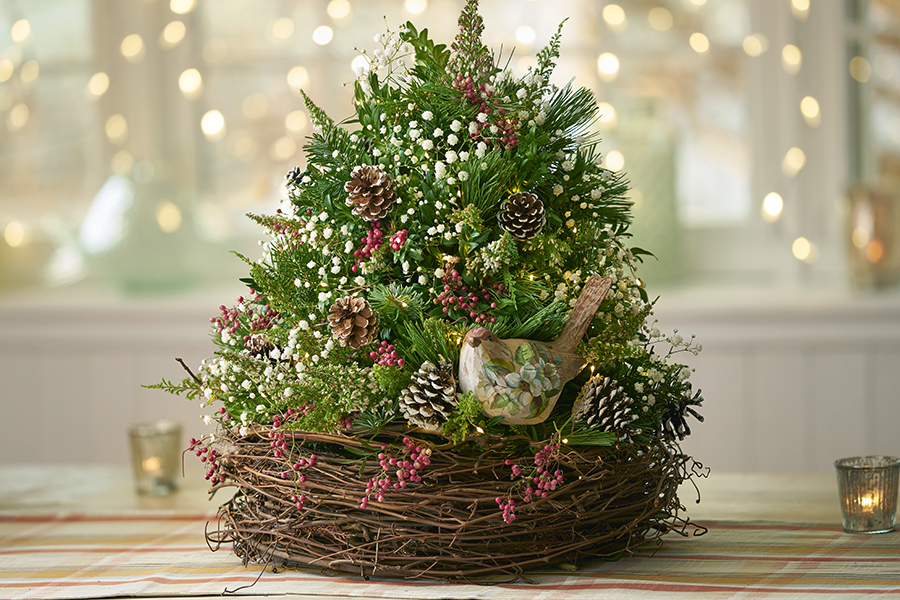
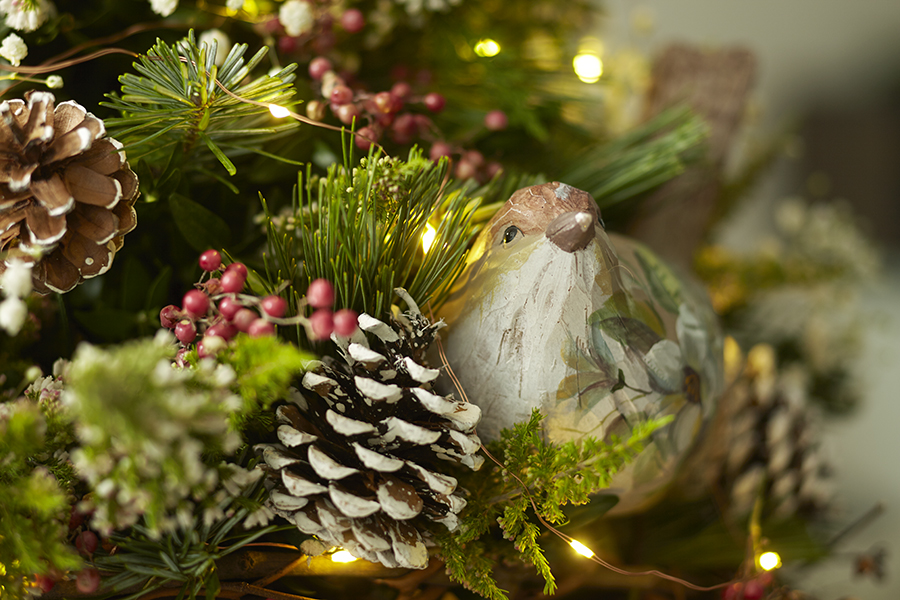
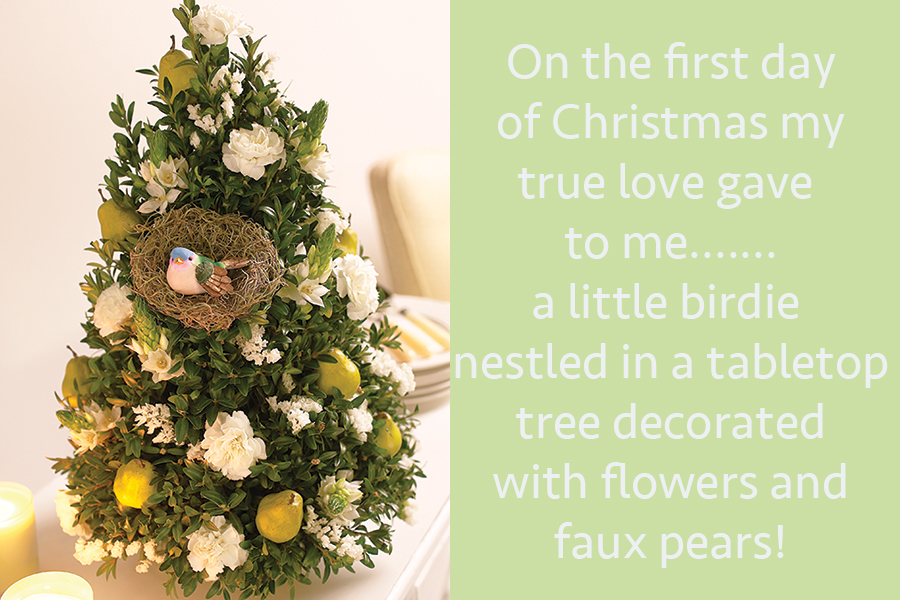
At this point, your tree is ready to decorate! Because this tree is actually a “flower arrangement,” you can easily use fresh-cut flowers as a primary decorating feature. Just give your chosen flowers a fresh cut and insert them directly into the foam; they will stay fresh for up to two weeks at least. I like to use fresh flowers that will dry nicely too, such as baby’s breath (which looks like snowflakes), pepper berries, and heather.
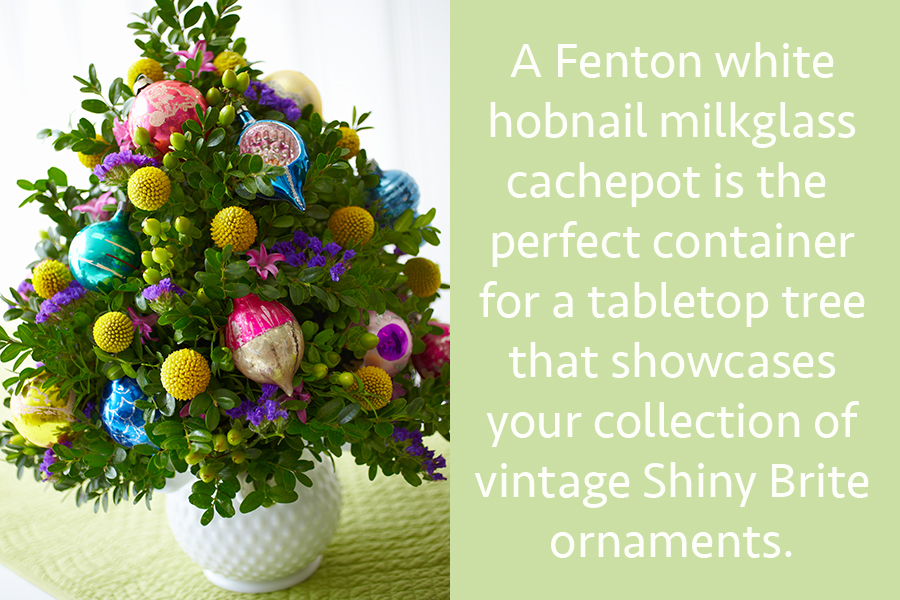
Here, I nestled my Christmas tree arrangement into a large bird’s nest basket and added white heather, baby’s breath, and pepper berries.
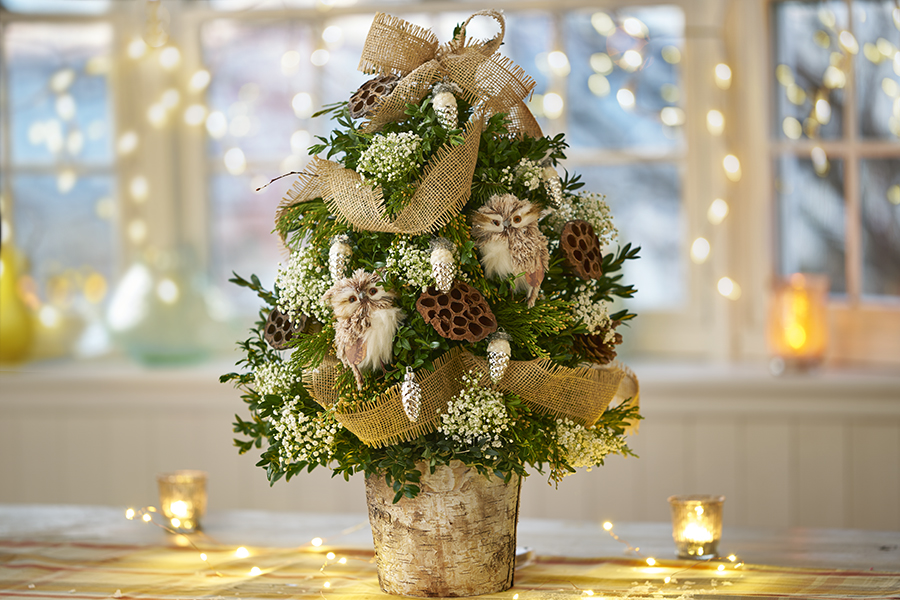
In keeping with the woodsy feeling, this is the same basic tree arrangement placed in a natural birch container. The decorations include dried pods, baby’s breath clusters, vintage silver pine cone ornaments, and burlap ribbon garland.
The theme really comes to life with the addition of these faux snowy owls. Owls are on-trend, and this is an easy way to include them in your holiday decorating.
I have created and decorated so many different trees over the years, and I find that I never run out of new ideas. Here are a few more examples to inspire you to create one of your own and start a new tradition. It’s also a great way to give a truly personalized gift!
The series “Unboxing the Holidays” is all about bringing you top-notch advice and creative ideas to make the most of the season’s special moments. In this story, learn how to flock a Christmas tree and why it’s on trend.
If ornaments and twinkling lights aren’t enough to give your Christmas tree that wow factor, it may be time to try something new — like flocking. It’s a treatment that adds a snow-kissed look to the greenery that evokes a tree in its natural wintry setting.
“I’m not surprised to see flocked Christmas trees are making a comeback,” says 1-800-Flowers.com floral and crafting expert Julie Mulligan. “It has such a nostalgic feel and sets the stage for the perfect hygge Christmas. Even if you didn’t go out into the woods and chop down your own tree and bring it into the house with the freshly fallen snow still on it, a flocked tree makes it feel like you did.”
Throw on some holiday music, set some gingerbread out, and get your crafting clothes on because it’s time to transform your home into a true winter wonderland.
How does flocking work?
If you want to get technical, flocking is the process of creating texture by attaching tiny fibers to a material. But when talking about Christmas trees, flocking means to give it that natural, snow-covered look by applying a white, powdery mixture to the branches. We love flocking a Christmas tree because it gives it more dimension and achieves that alpine feel.
The origins of flocked Christmas trees
The idea to flock Christmas trees has been around for quite a while — since the 1800s, in fact. Back then, crafters tried to get the snowy effect by using cotton and flour mixed with glue or cornstarch. But flocking as we know it today became popular around the 1950s and 1960s (though we can’t imagine metallic trees of the time looked all that natural, even after being flocked). It was around then that flocking powder became mass produced and marketed, meaning people could now quickly and easily flock their trees at home.
How to make your own flocking spray
With flocked trees becoming more popular, most stores now carry pre-flocked trees for sale. But for all you DIY enthusiasts, you can really get into the Christmas spirit by flocking your tree with either pre-made flocking powder or creating your own from scratch.
Around the holidays, the flocking powder can be found at nearly any craft or convenience store. Most kits just require you to add water to the powder and mix it for a few minutes before you’re ready to go.
But for the most extreme DIYers, you can make the flocking powder yourself with a few household items. The only catch here is that this solution won’t last for next year, meaning it should only be done on a live tree that you’re planning on getting rid of after the holidays. All you’ll need to cover a traditional 5-foot tree is the following:
2 cups white soap shavings
2/3 cup liquid cornstarch or white glue
4 tablespoons warm water
Once all your ingredients are mixed, flock your tree outside, just as you would with traditional flocking powder.
Keep in mind…
For the best, most natural results, make sure to always flock your tree before decorating it with any lights, ornaments, or tinsel.
Leave roughly two days for this project, since flock can take anywhere from 20 to 48 hours to dry.
Never brush the underside of a branch with flocking powder.
Only flock the tips of branches.
Allow some of the mixture to fall onto branches below.
Dollop (don’t spread) the mixture onto needles.
If you used flocking powder to flock an artificial tree, all you have to do after the holiday is cover it with a cotton cloth and store the tree standing up. Live trees with our DIY flocking powder can typically be left on the curb (or better yet, recycled) with any flock still on it.
Pro tip: Add glitter to your mixture for a festive glimmer.
Once the Christmas tree is flocked, add lights and decorate to your taste. Or keep it natural! It’s easy to enjoy the look of a tree with freshly fallen snow in the warmth of your own home. Says Mulligan, “Just light the fire, make a cup of hot cocoa, put on your warm wooly socks, and curl up with a good book. Have a merry hygge Christmas!”
Not all of us have the time or materials on hand to make elaborate centerpieces or place settings around the holidays. Never fear: I’m sharing with you some of my favorite ideas for decorating and entertaining this Thanksgiving. Whether you are hosting the big event or just having a few friends over during the long holiday weekend, these ideas are really easy and add that extra touch that your get-togethers always have!
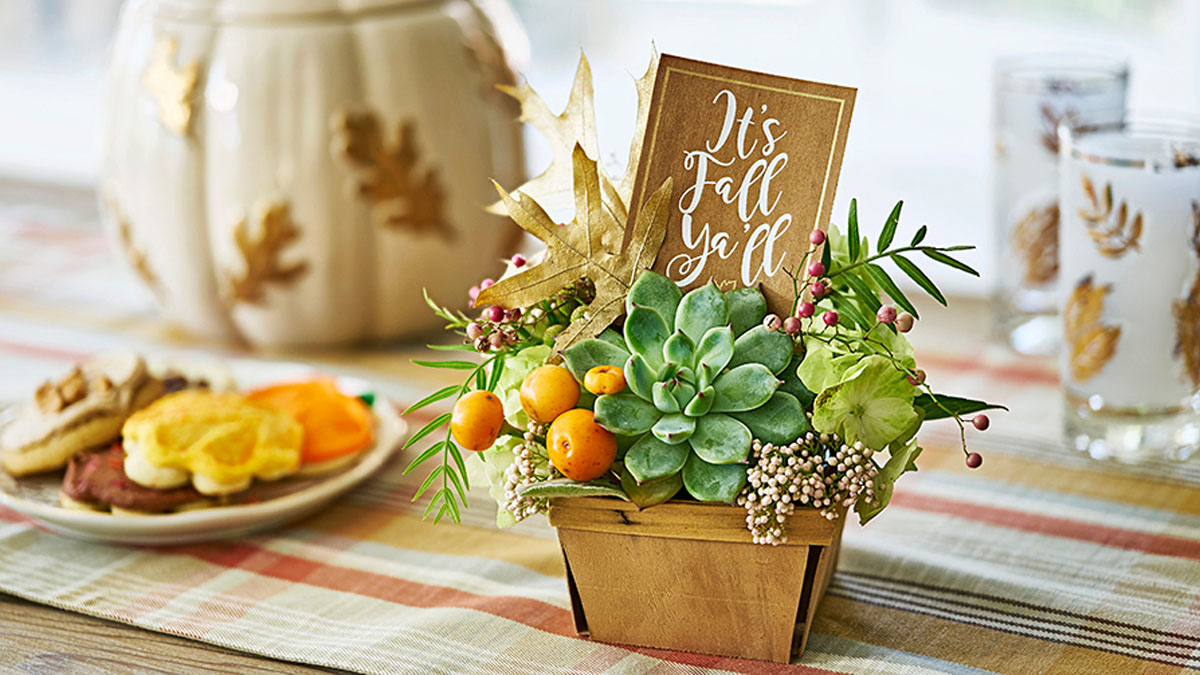
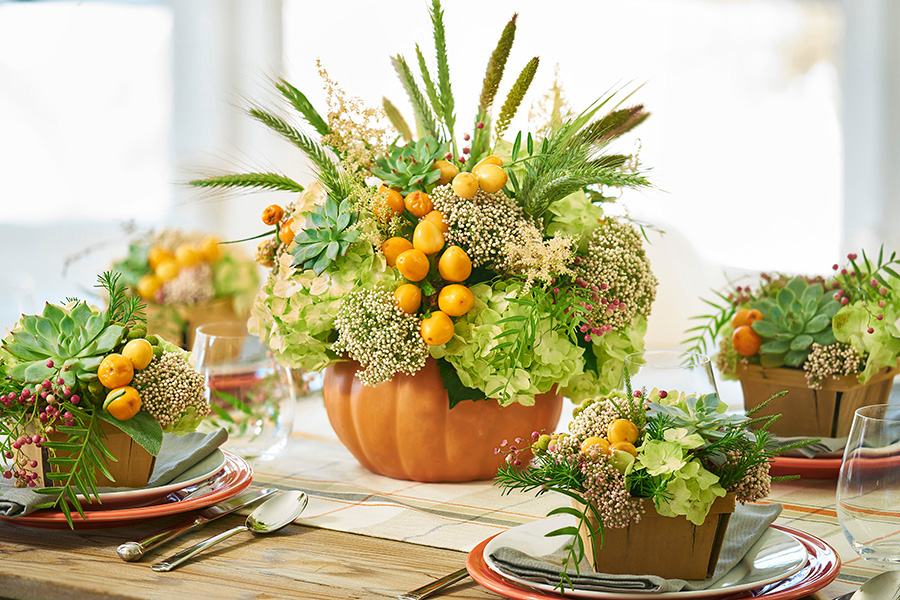
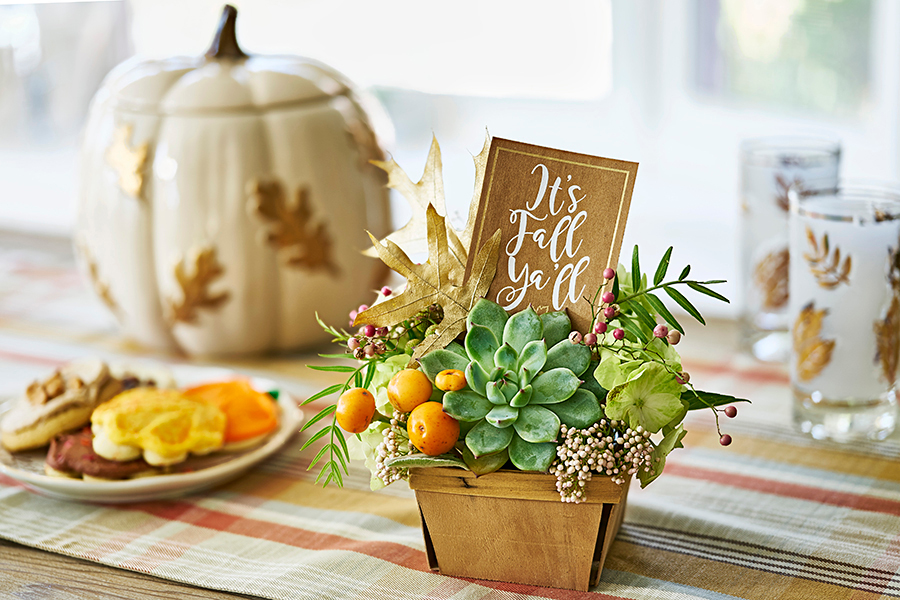
I have a few season-specific decorative pieces that I reuse every year, such as this gorgeous ceramic pumpkin. I filled mine with a farm-fresh palette of flowers, grasses, peppers, and succulents.
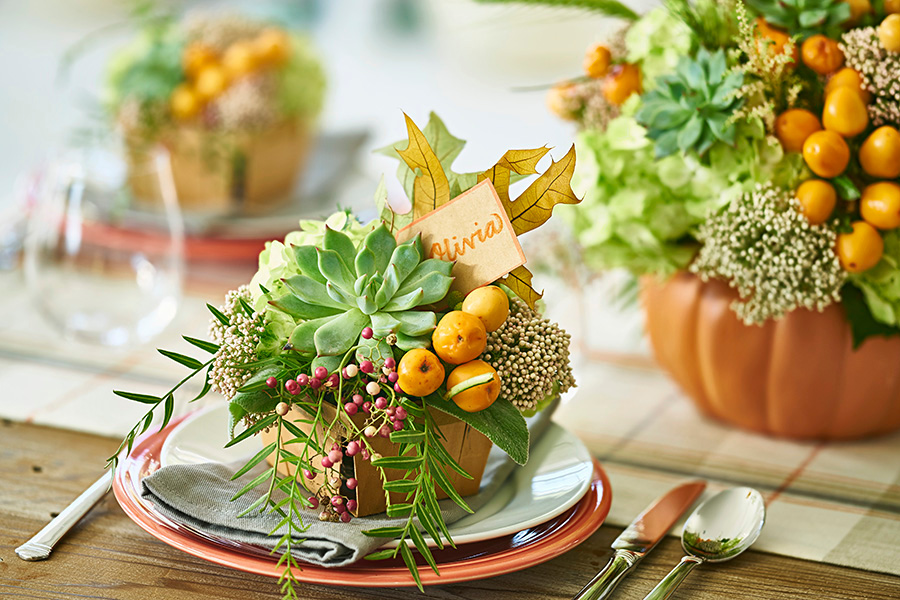
Staying with the farm-fresh theme, a great way to create a stunning tablescape is to set vintage berry baskets filled with similar floral on each plate. These arrangements look almost good enough to eat! Add a bit of personalization simply by slipping a place card in among the florals and greenery.
I find these little berry baskets to be the perfect size to use as multiples as I did on the dining table or to add just the right festive touch on the dessert or buffet table.
Just line the basket with a small dish, bowl, or can. Cut a piece of floral foam to size and thoroughly soak the foam before placing it in the dish. The foam will make it easy to create your piece, as it holds each insertion in place and provides hydration to keep your flowers fresh.
Guests will be so enamored of these handmade Thanksgiving decorating ideas that you can give them as gifts once the meal is over. It will add to their list of what to be thankful for.
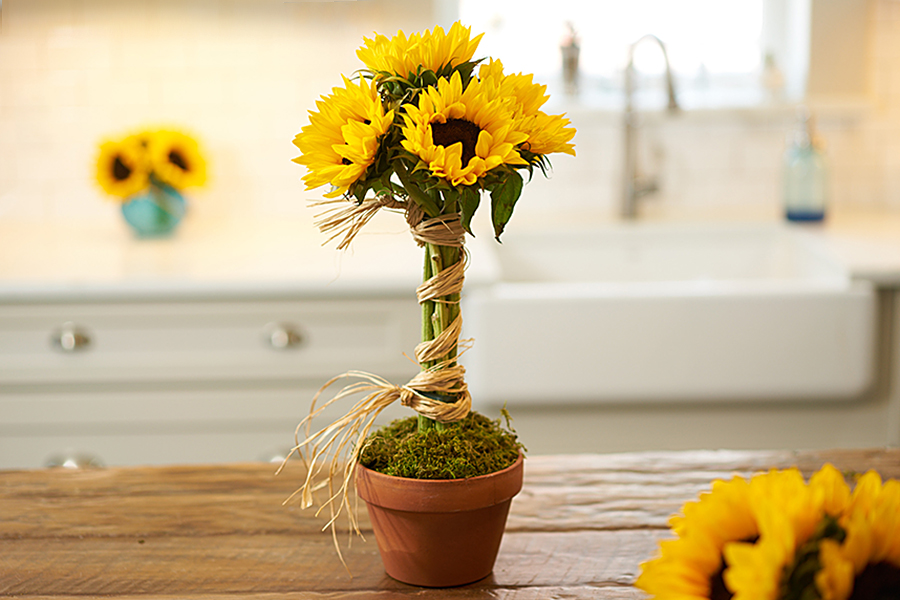
Sunflowers are one of the most popular flowers out there, and for good reason. Their shape and bright yellow, orange, and red petals are symbolic of the sun. These instantly recognizable flowers symbolize radiant happiness and all things positive.
Many different varieties of sunflowers exist, as do ways to use these flowers to decorate your home. The topiary design is an easy way to display these cheerful blooms. You can use this one design technique to create many different looks and styles, depending on the size and shape of the sunflowers you use, whether you incorporate foliage and other floral varieties, and any accessories you add, such as ribbon, raffia, etc.
The container you use contributes to the final look, too. A terra cotta planter gives a nice rustic garden look, while a white ceramic wine cooler, such as the ones pictured above, feel brighter and lighter.
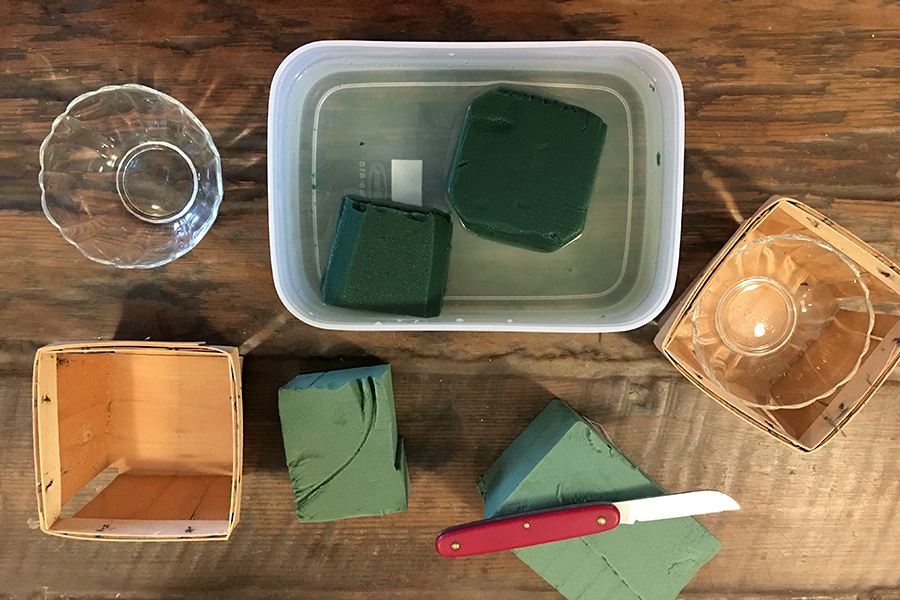
Making a sunflower topiary is easier than it looks. Here’s what you’ll need:
Materials
Container (if the container isn’t waterproof, you’ll need to use a liner, such as a plastic bag)
Floral foam
Sunflowers (at least six stems)
Waterproof tape
Raffia or ribbon
Moss
Instructions for making a sunflower topiary
Cut a piece of floral foam to fit the size of your container and soak thoroughly before placing it in the pot. If the container you’re using isn’t waterproof (this terra cotta pot has a drainage hole on the bottom), you’ll need to line it first. A plastic bag will do the trick.
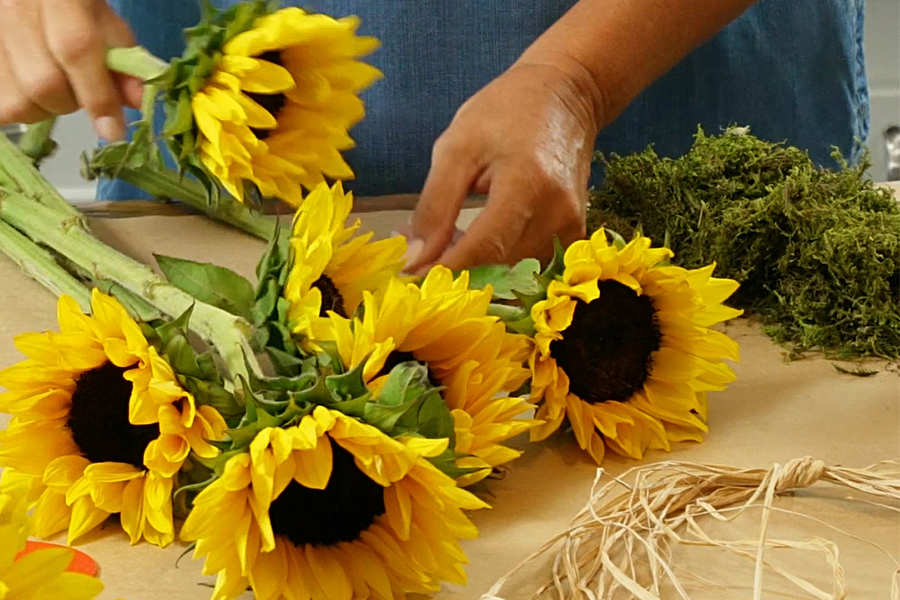
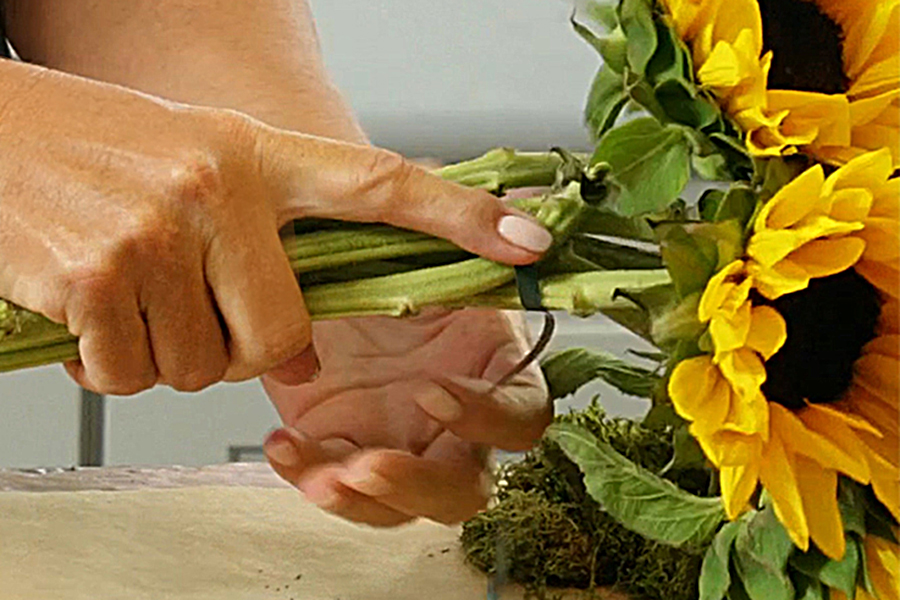
Choose six long-stem sunflowers with similar size heads.
Gather the sunflowers in your hand, one by one, with one in the middle and the other five placed around and slightly below the middle one.
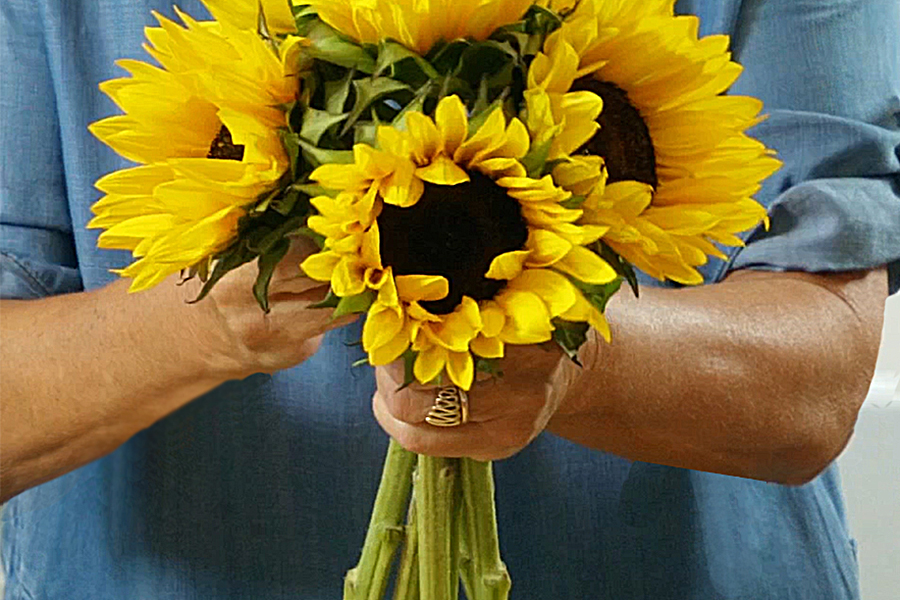
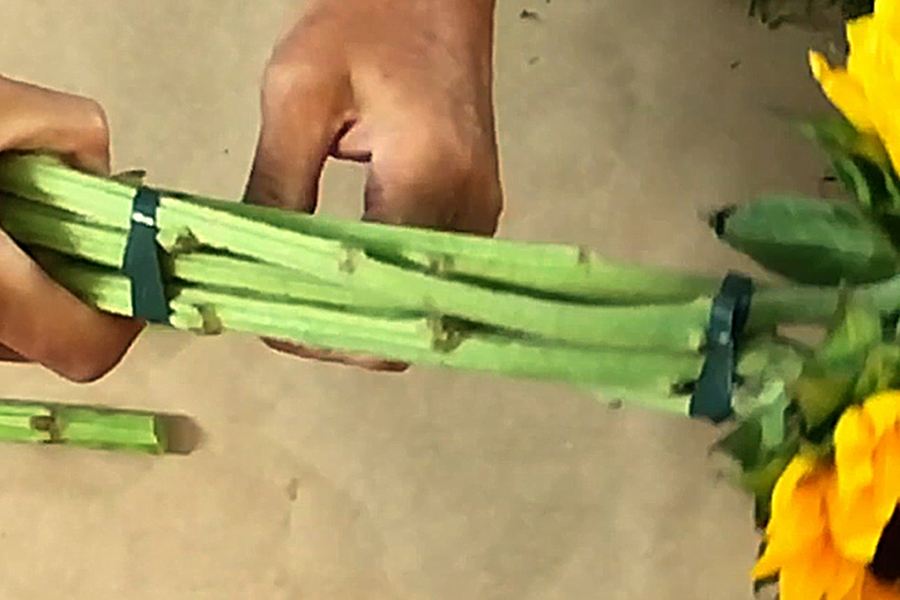
Using waterproof tape, wrap the stems together first at the top of the stems right under the heads of the sunflowers…
…and again near the bottom of the stems.
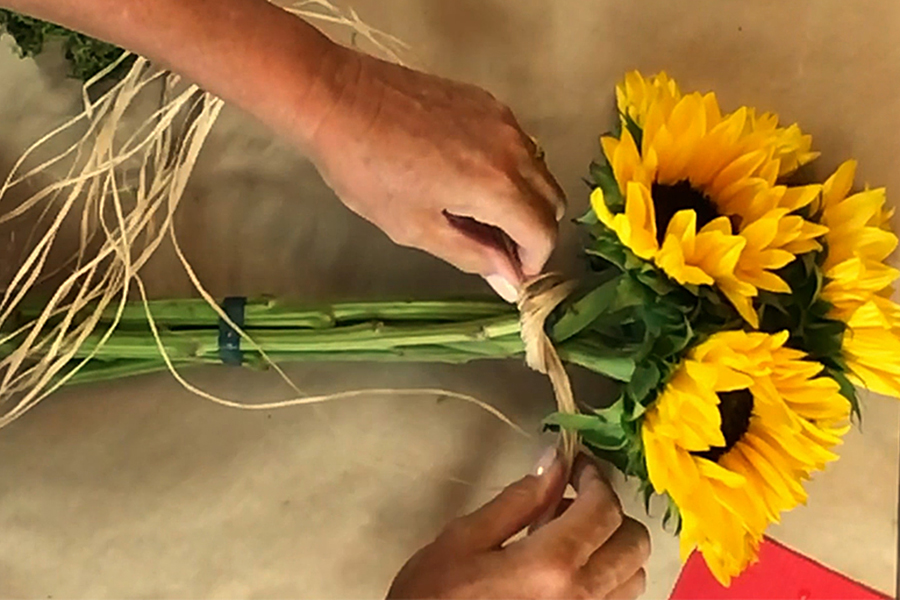
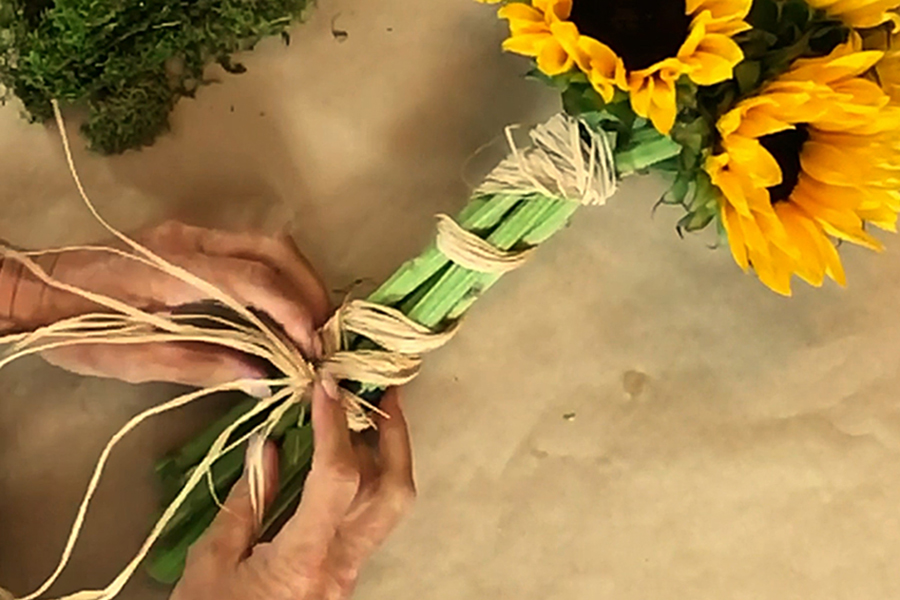
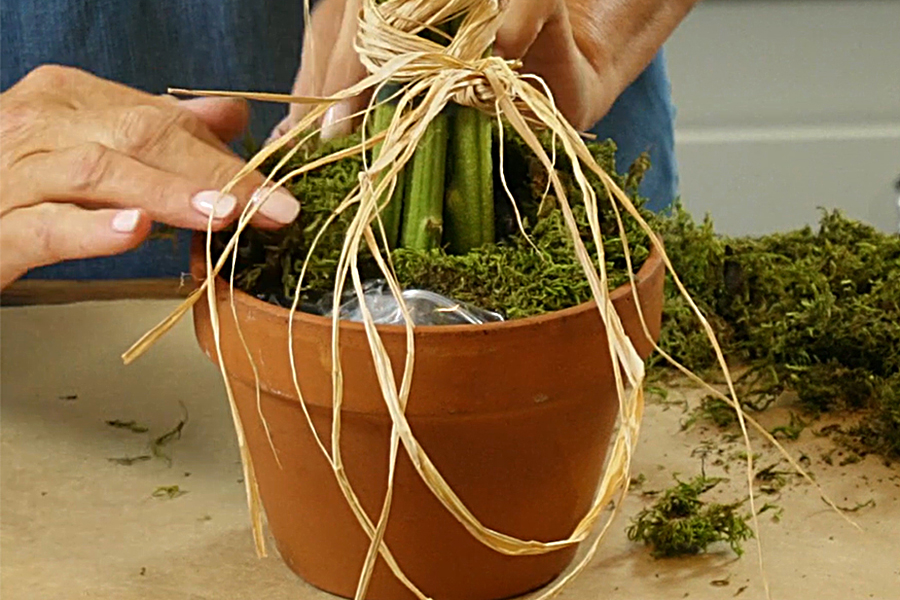
Use raffia or ribbon to cover your tape and to add a decorative touch.
Continue bringing the ribbon down to the bottom of the stems to wrap the bouquet together tightly.
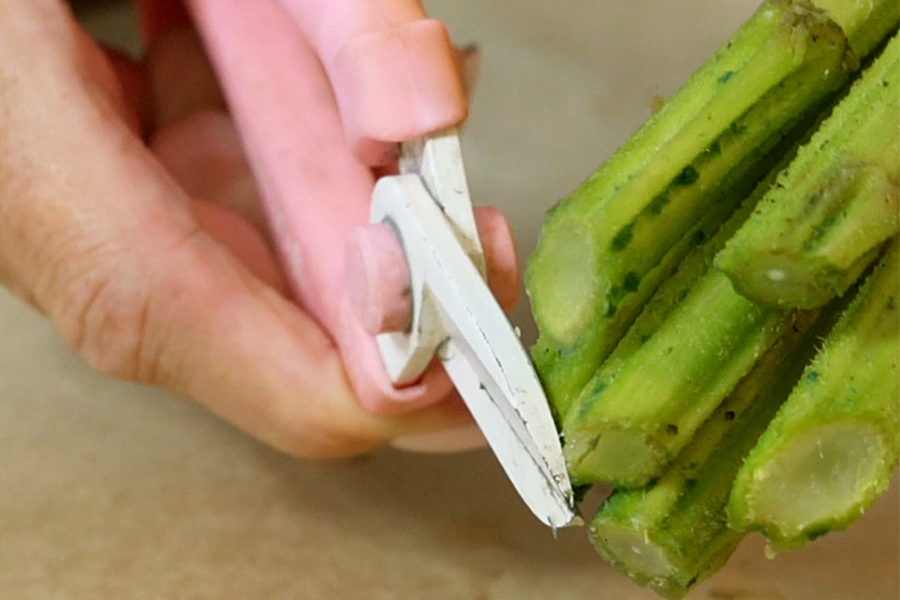
Cut the bottom of each stem on an angle.
Insert the stems into the wet foam.
Cover the foam around the stems with moss. You can also add additional flowers, fruit, or other decorative elements.
And that’s it! Your finished sunflower topiary is ready to be displayed.
Remember to add water to your sunflower arrangements daily, and they’ll stay fresh for about a week.