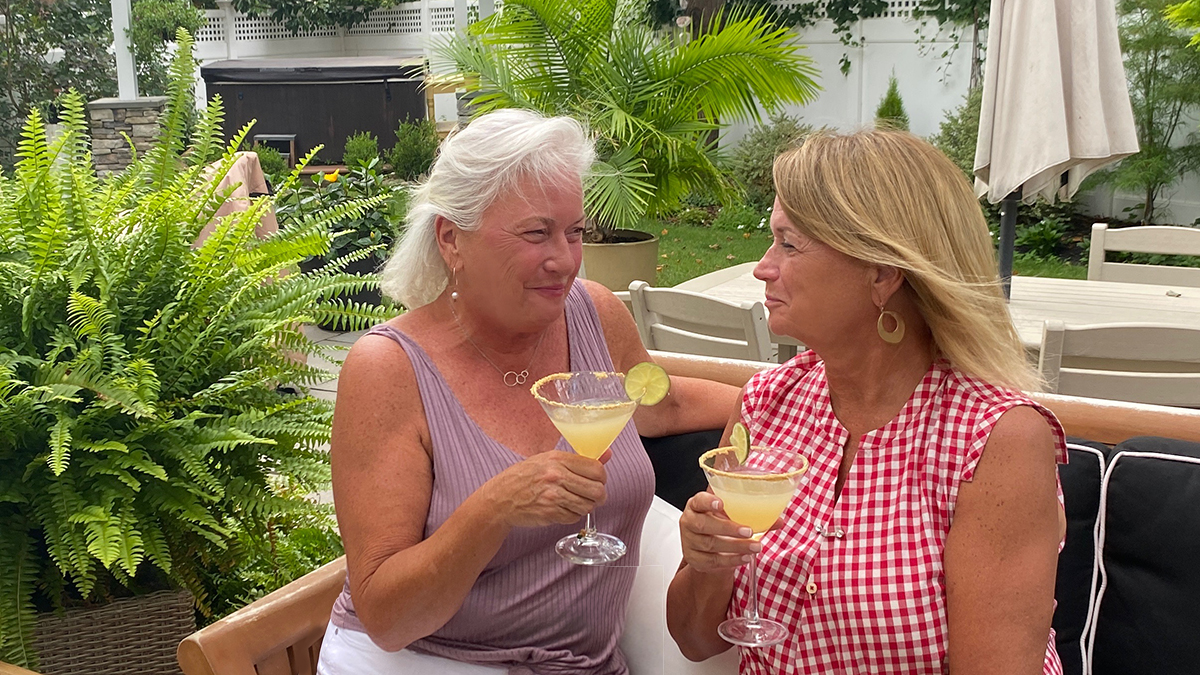
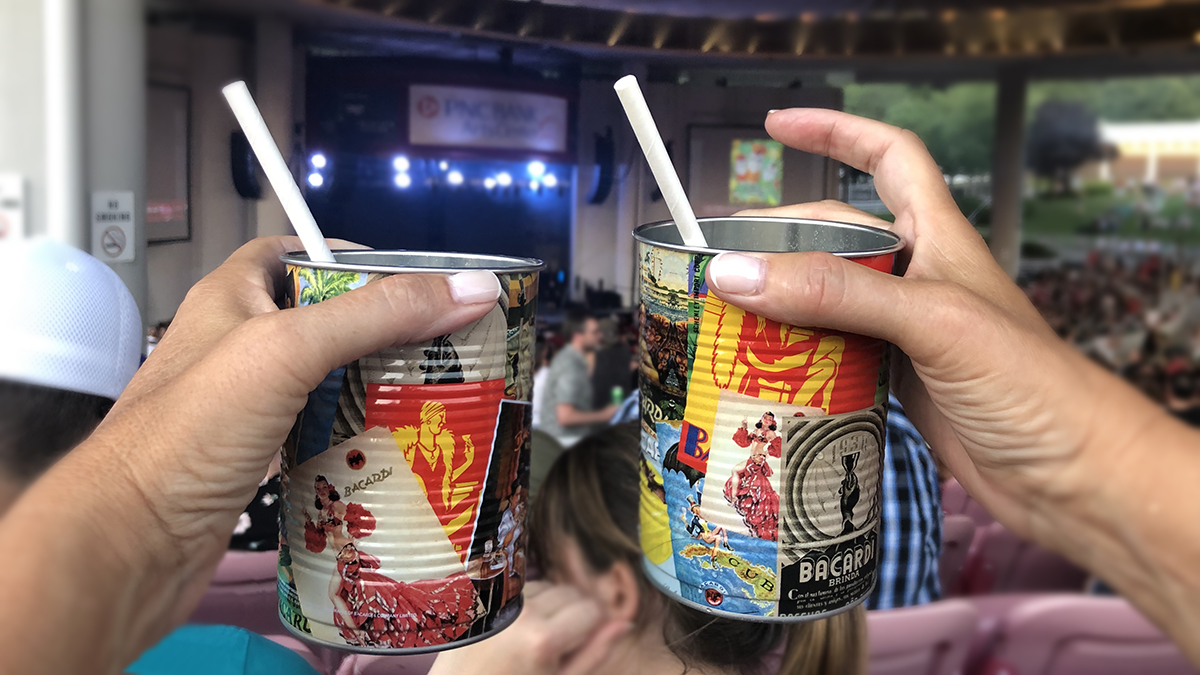
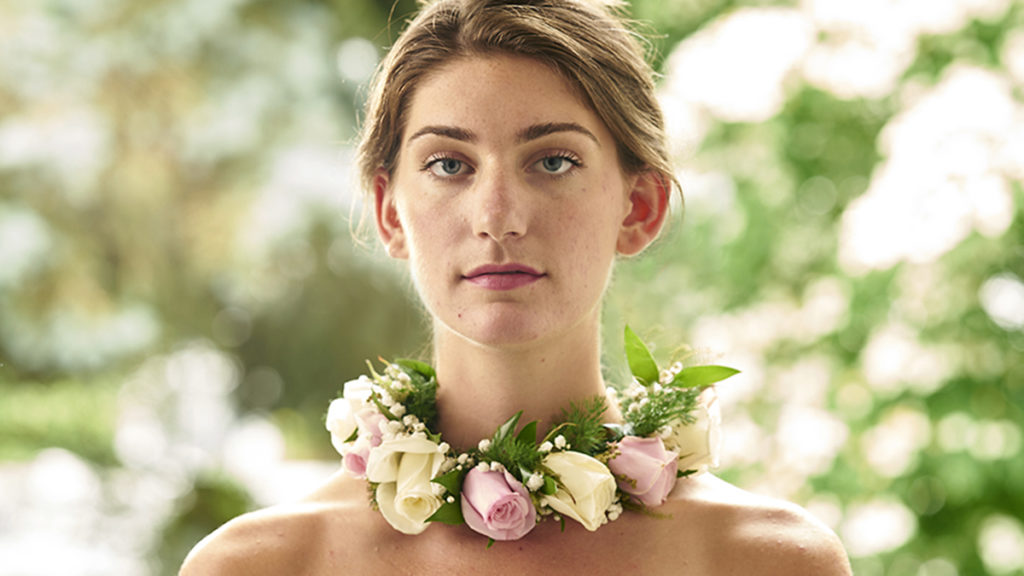
My sister, Peggy, and I could be the poster girls for National Sisters’ Day. We are best friends and, believe it or not, have never had a fight. And we don’t need a reason to laugh — we just laugh all the time when we’re together.
So, when I won two tickets from a local radio station to see Alanis Morrissette, I immediately decided that my sister was going to be my plus one.
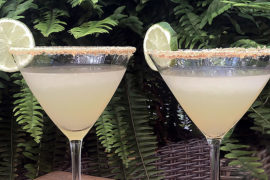
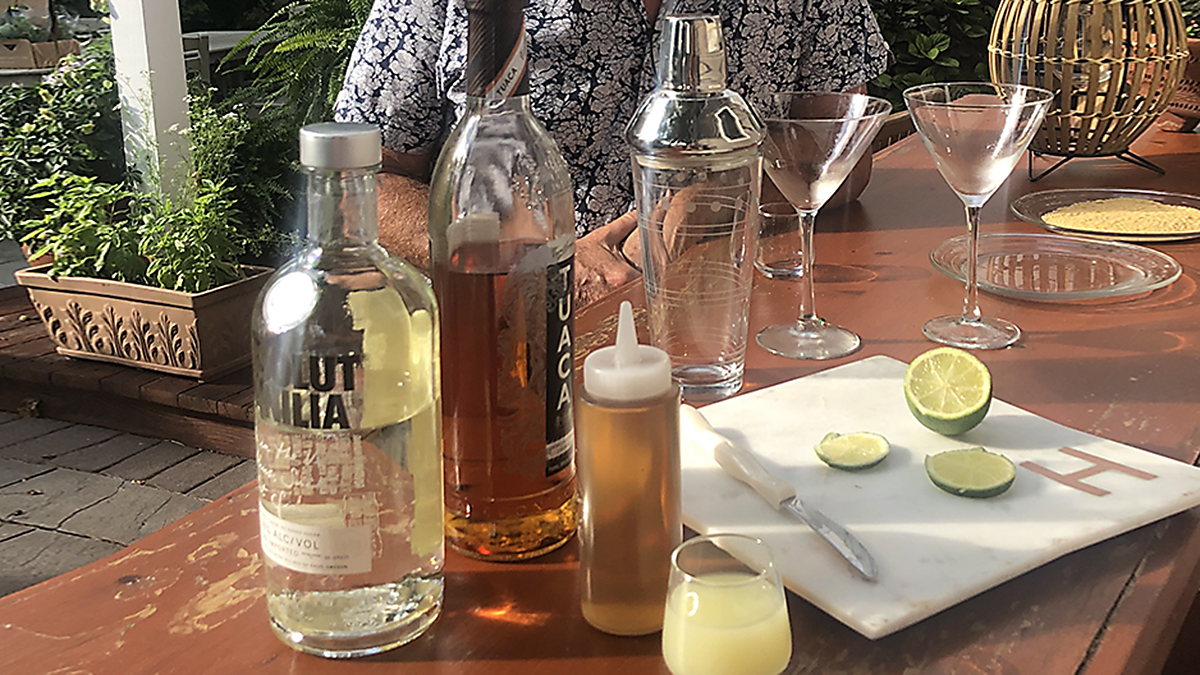
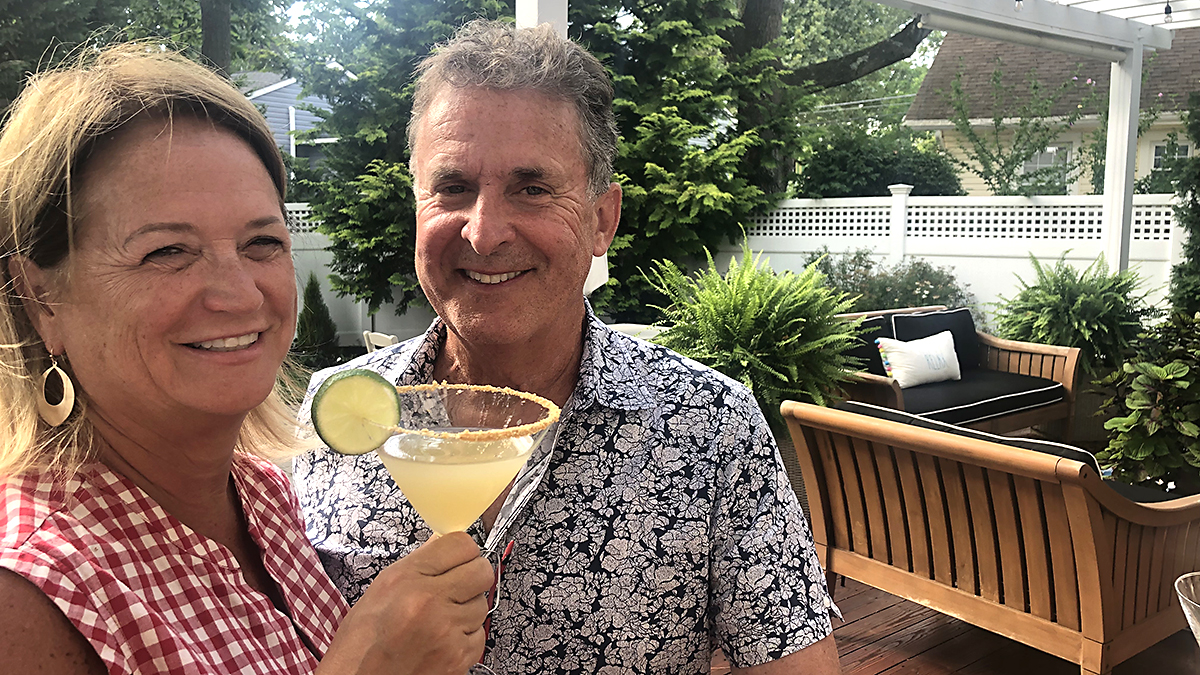
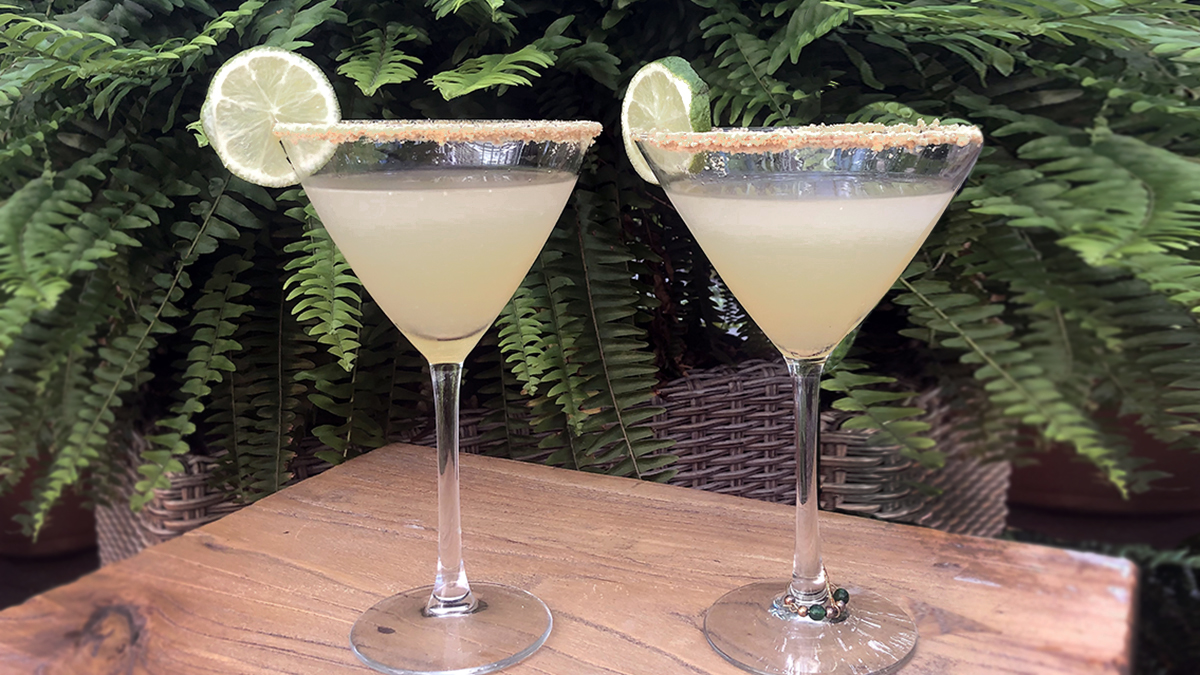
And what better way to kick off the night then with a delicious cocktail?! In this case, we went with a key lime martini, which also happens to be my brother-in-law Bob’s specialty. And because, technically, we were celebrating National Sisters’ Day, I enlisted Bob to whip up a batch for us.
This particular recipe was inspired by one I found online. It includes Tuaca, an Italian brandy “with subtle notes of vanilla and citrus, hints of butterscotch, cola, dried fig, and other flavors.” How can you pass on an ingredient with that description!
Once the drinks are made, thank the bartender/husband/brother-in-law and enjoy your key lime martini in great company.
Then, head out for an amazing night of live music by a strong and powerful female artist, where you get to spend time with your sister — and best friend — and perhaps enjoy another cocktail as well!
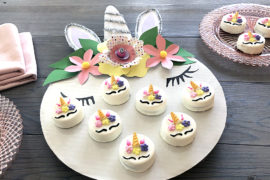
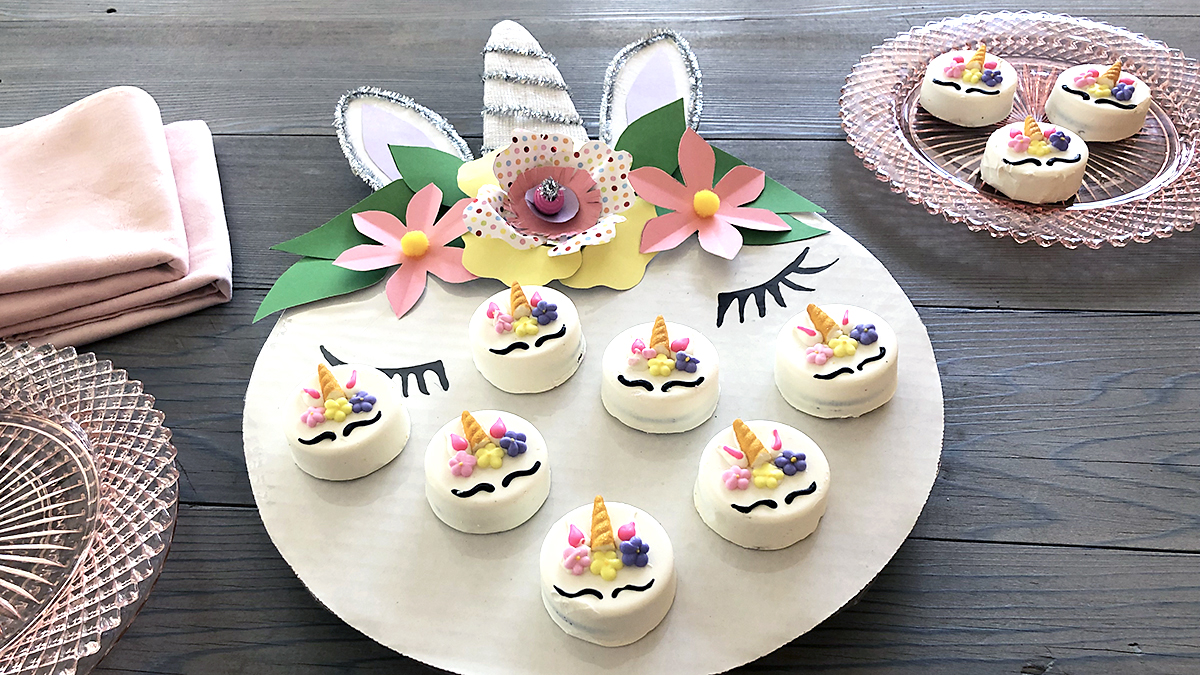
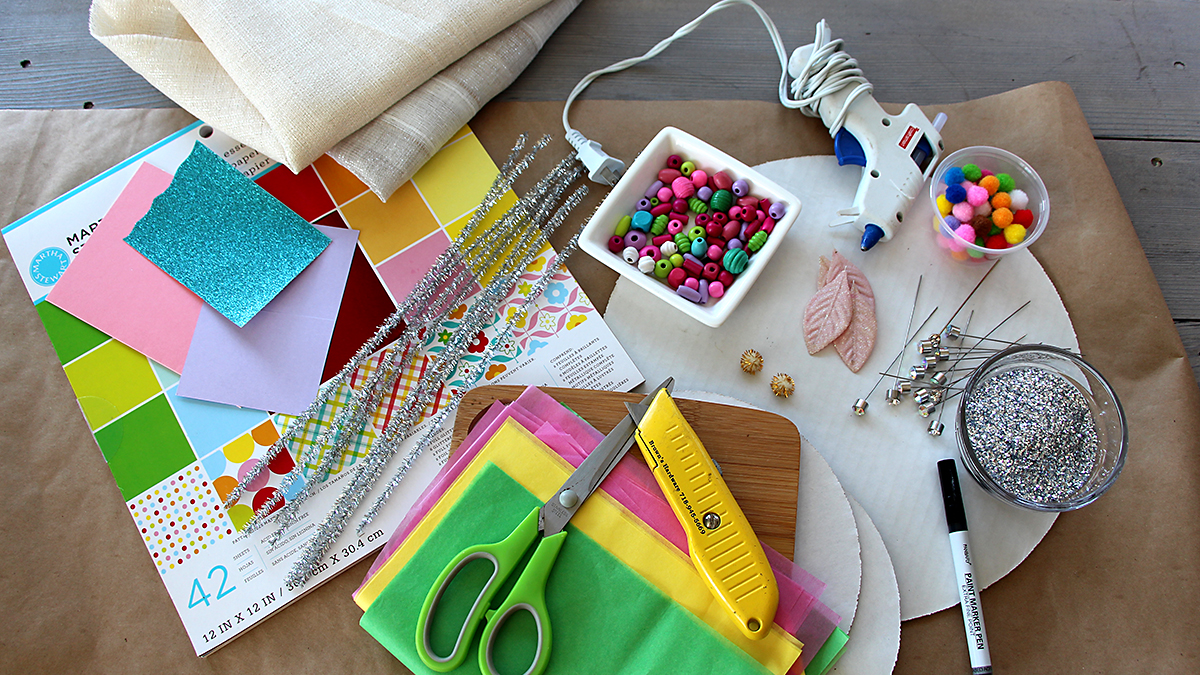
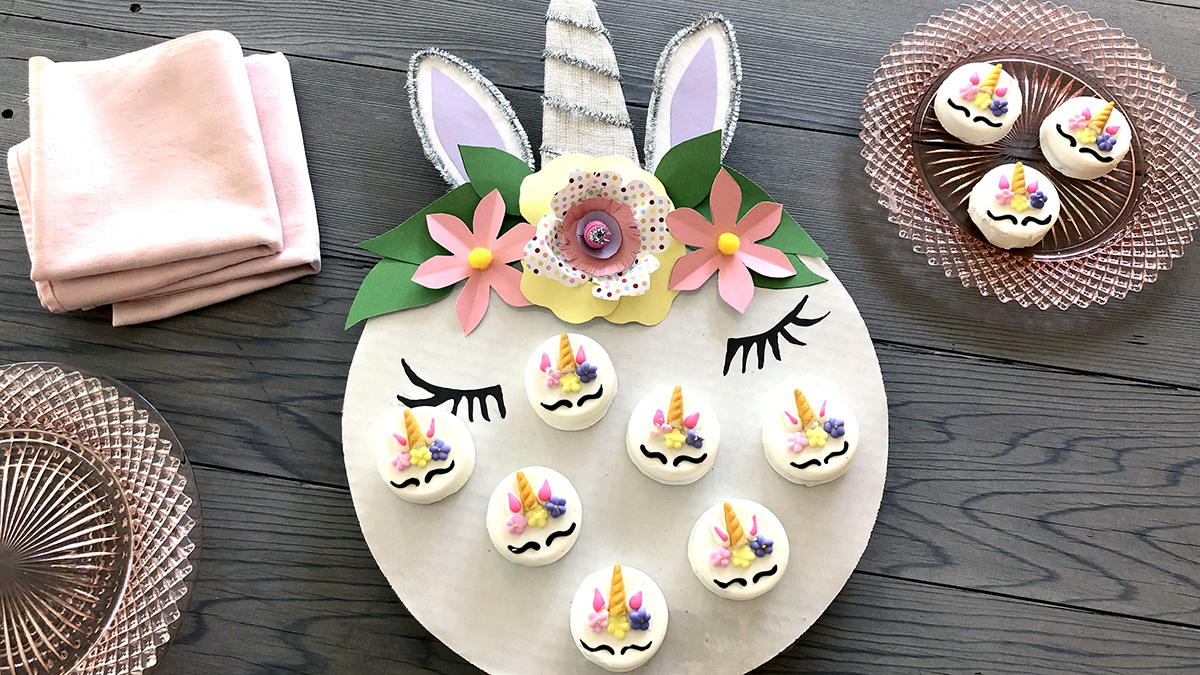
Unicorns love to party — that’s one thing I love about them. So, to maximize the magical effect of these mythical creatures, I came up with these two DIY unicorn decoration ideas for my next get-together.
Before you start to make your platter, you need to gather your “stuff.”
It has become my goal in life to GET RID OF STUFF! And let me tell you, that’s not easy for a “stuff person” who writes a lifestyle blog. So, the first thing I did was go through all my craft stashes and gather anything that looked “unicorn-y” — in other words, bright and sparkly! Besides cardboard and decorative paper, I also got out scissors and glue.
I’m proud to say I didn’t have to buy anything for this project; I just looked around my house and saw what I already had that I could repurpose in new and interesting ways.
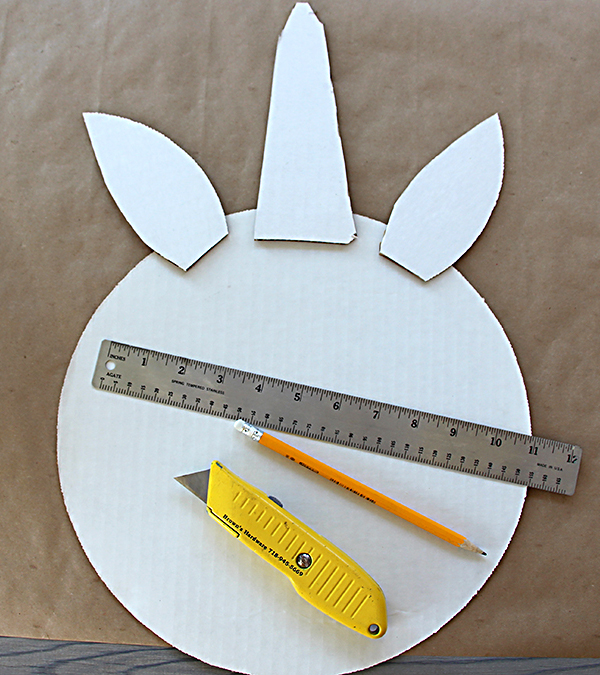
I still have a few cardboard cake plates left over from my daughter’s stint as a baker, so I used those. If you don’t have something like that, just grab one of the many cardboard boxes I’m sure you have lying around from all the deliveries you’ve gotten lately. If you don’t have cardboard with a white side, you can always paint it or cover it with white paper before assembling.
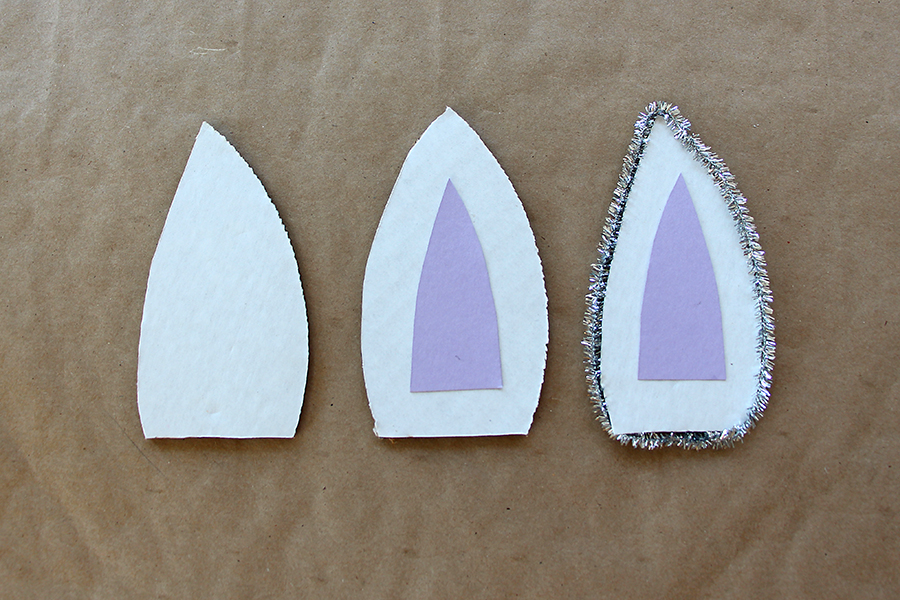
To add character to the ears, I cut out a smaller piece in a nice lavender paper to add to the center of the ear. Then I used hot glue to add a silver sparkly pipe cleaner all around the edge.
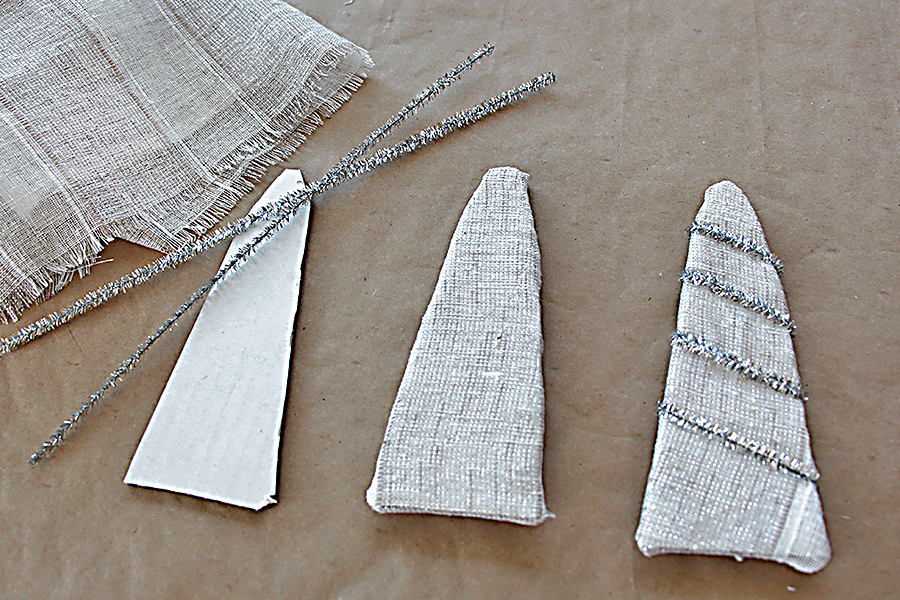
I covered the horn with a scrap of sparkly fabric left over from a Christmas stocking project. I cut the fabric slightly larger than the horn and wrapped it around, glued it in the back, and then wrapped the horn with two silver pipe cleaners.
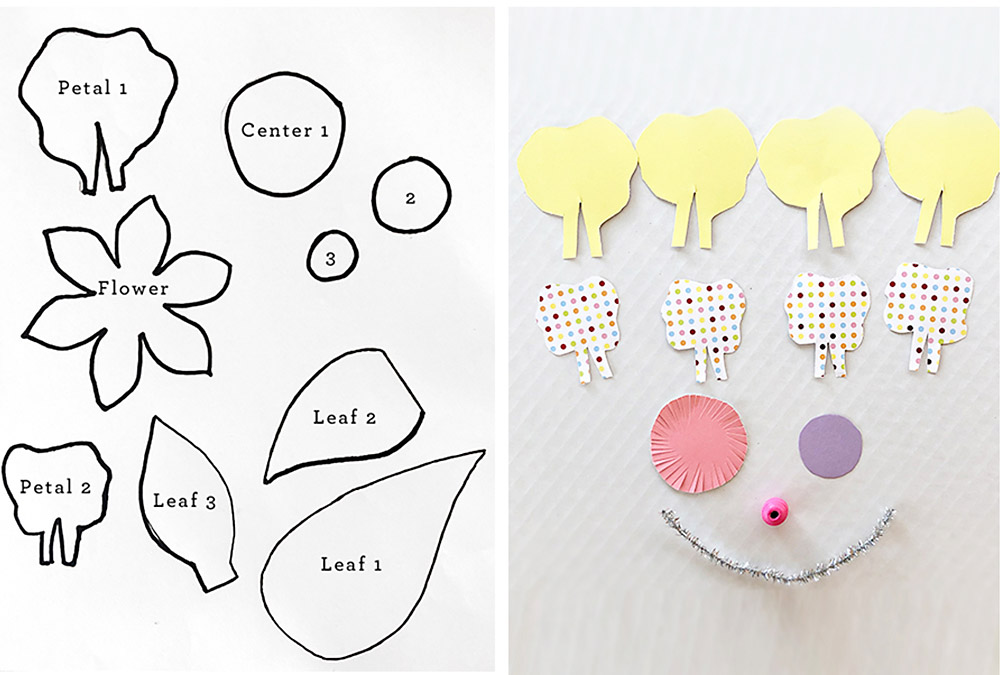
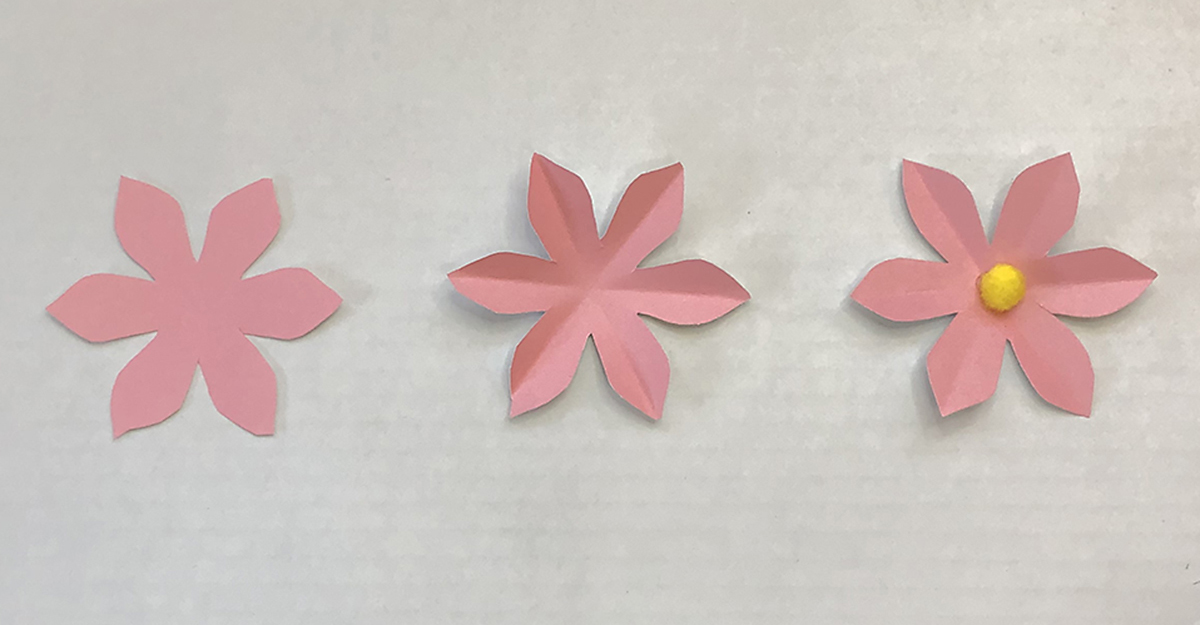
Using the flower template, cut out all the pieces needed to make each flower. Make sure to use different colors for each part of the flowers and green for the petals.
Assembling the first flower
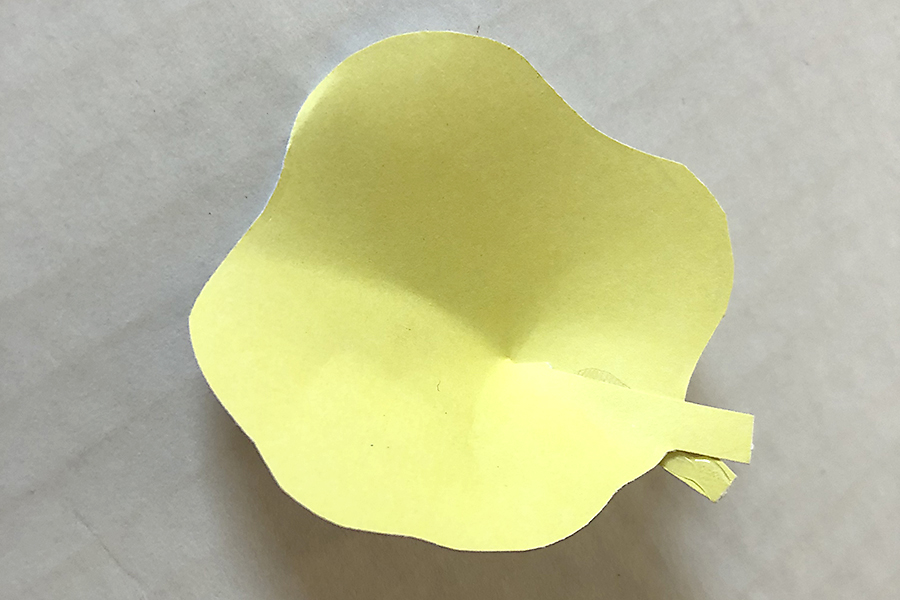
Starting with the large petals, dab a small amount of glue onto one side of the stem and gently bend the other stem to overlap the glue. Press and hold to secure. Do this to all four petals.
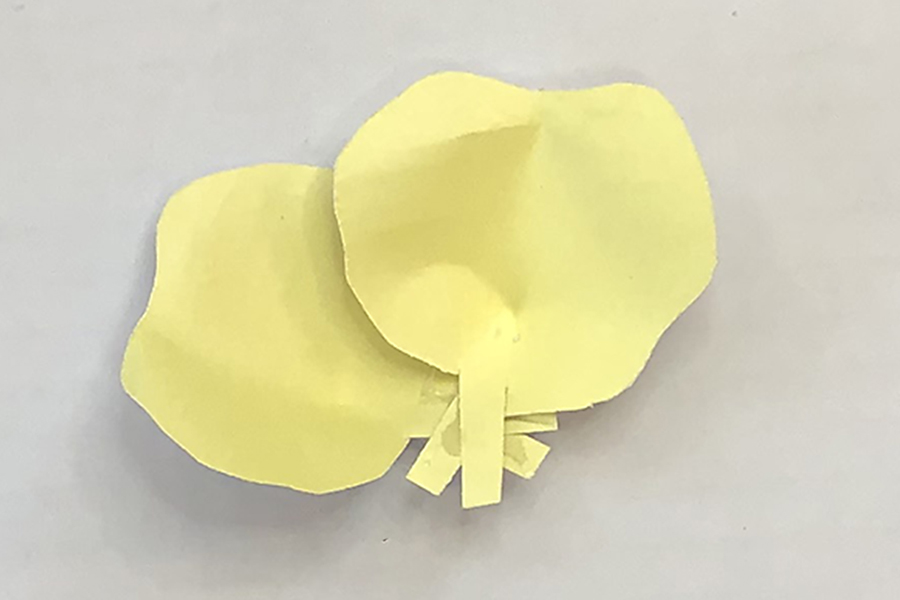
Assemble the first layer of the flower by overlapping…
…and gluing the petal stems together as you go.
Repeat this step with the smaller petals. I chose a polka dot paper to add a little whimsy.
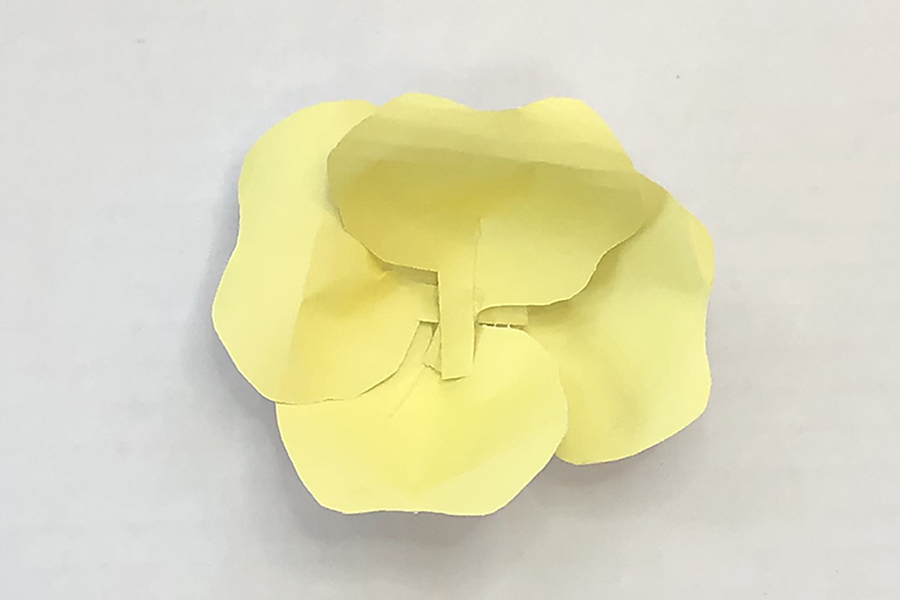
Then, glue each layer on top of the next in the following order:
Large petals
Smaller petals
Large center circle (that I fringed the edges of)
Medium-size center circle
Smallest size center
Again, for a bit more pop, I used a wooden bead with a sparkly pipe cleaner laced through the center. Remember: Use what you have and be creative.
Creating the second flower
The other flower on the template is a single layer with a pom-pom center. To add more dimension to this flower, add a crease to each petal by simple folding the flowers in half three times.
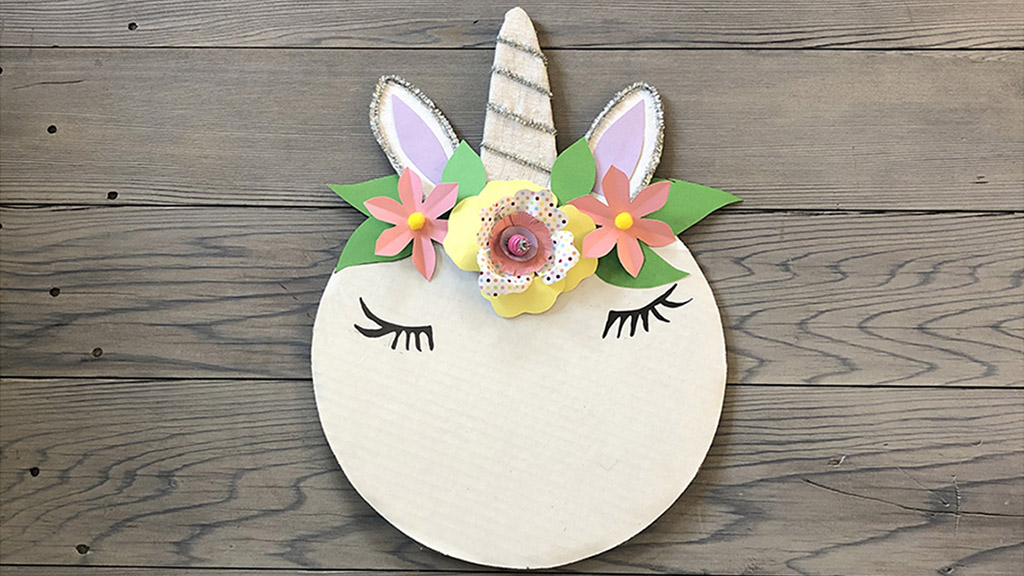
Assembling the unicorn party platter
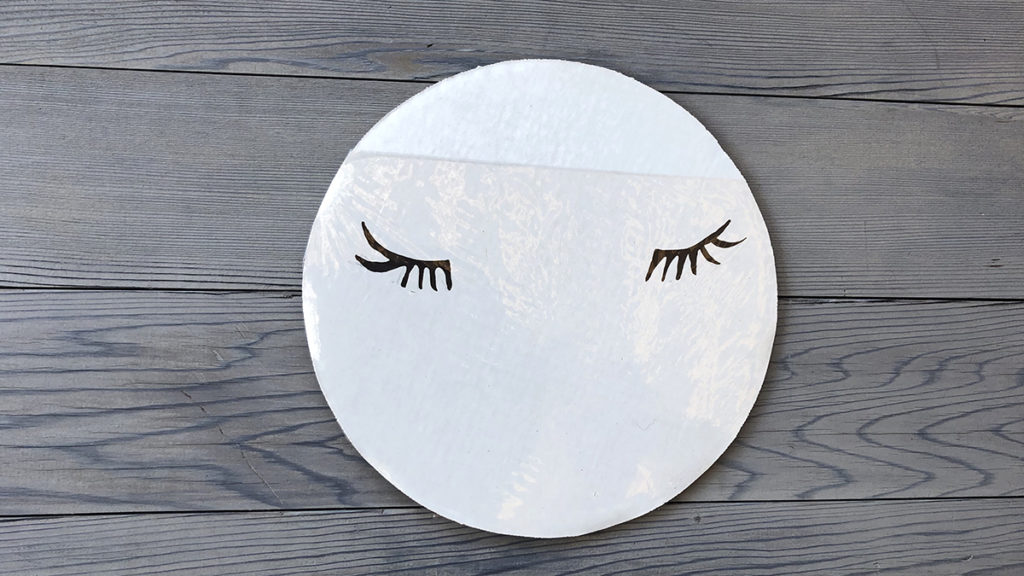
With a black marker, draw eyes on the face using the template as a guide.
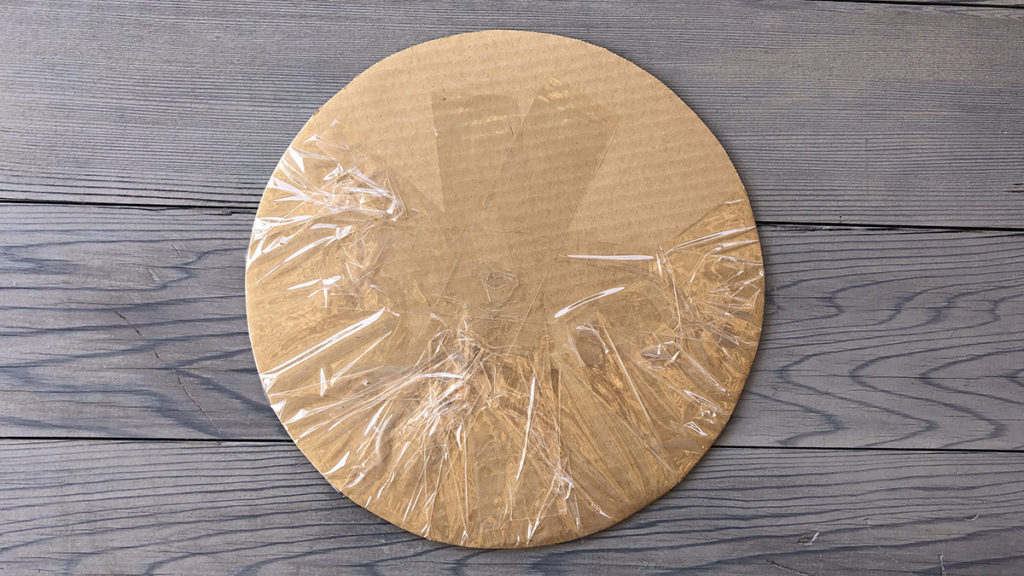
Cover with a piece of clear protective cover, such as cellophane, plastic wrap, or clear contact.
Glue the horn on, then the ears, then the large center flower, then the green leaves — three on each side — and, finally, the two smaller flowers on either side of the center flower.
How adorable is that! I really love the way it turned out. And the fact that I made it using bits and pieces of things I already had is my kind of upcycling!
This platter is perfect for serving sparkly unicorn cupcakes, too!
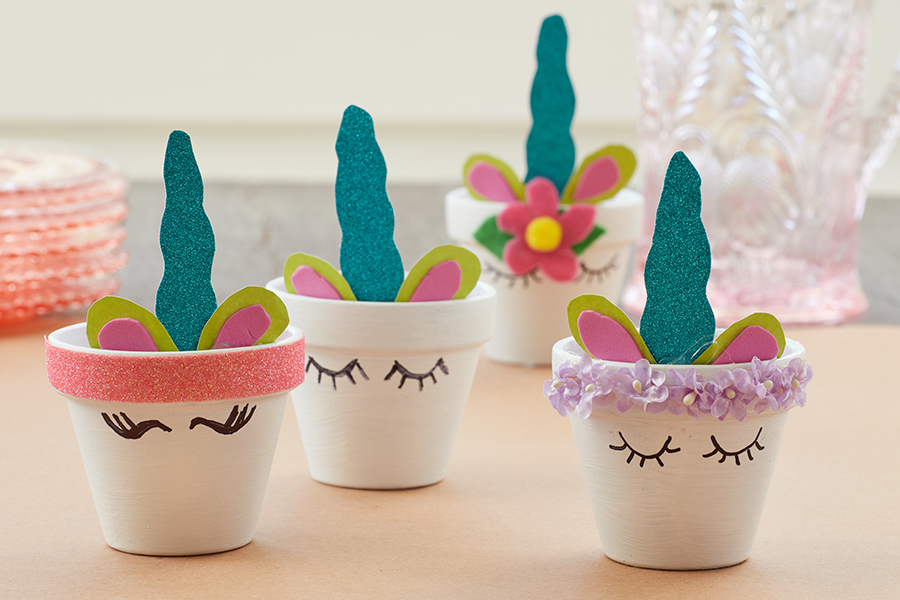
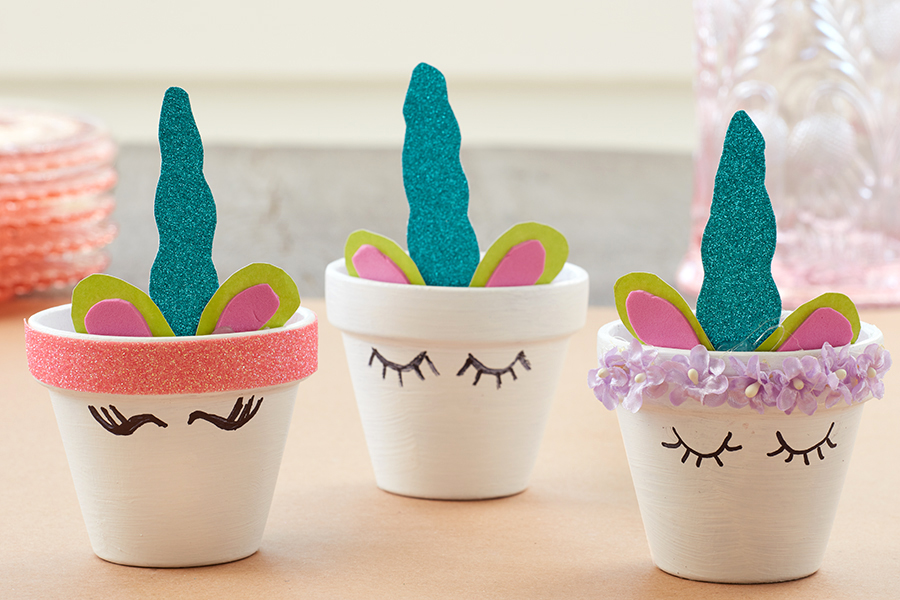
Mini unicorn planters
These mini unicorn planters will take the decor at your unicorn birthday party to the next level. They have a gazillion different uses and, as most of my projects are, are very easy to make. They are a fun project to do with little kids, too.
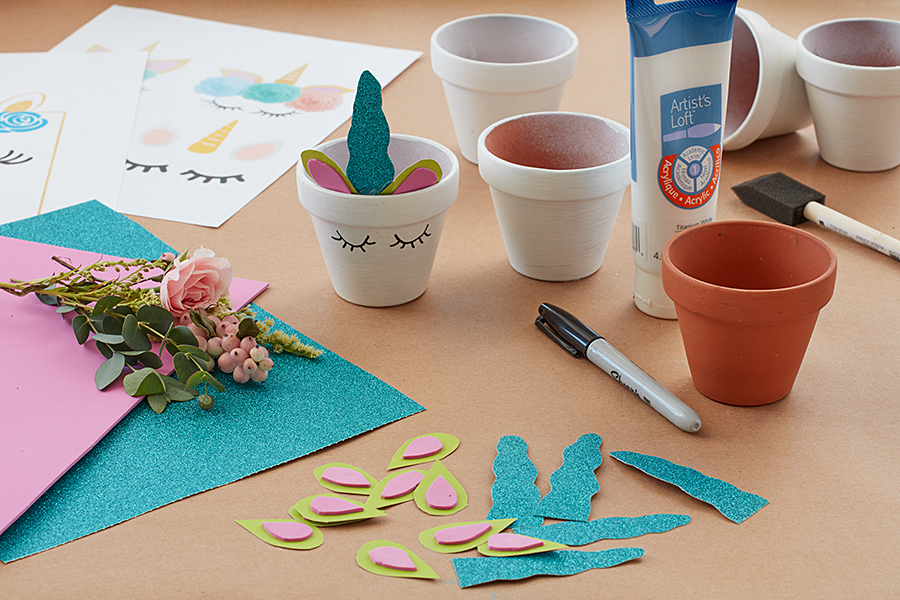
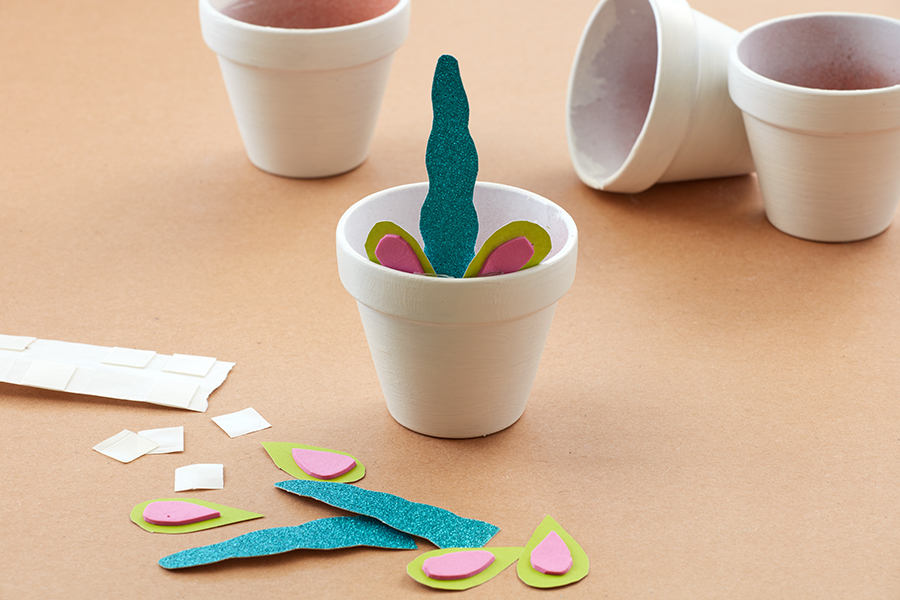
What you’ll need
Mini clay pots
White paint (acrylic, spray paint, any kind will do)
Paint brush
Craft paper and foam sheets (in various bright colors, and one with sparkles)
Decorative elements (washi tape, faux flowers, sparkles)
Black permanent marker
Instructions
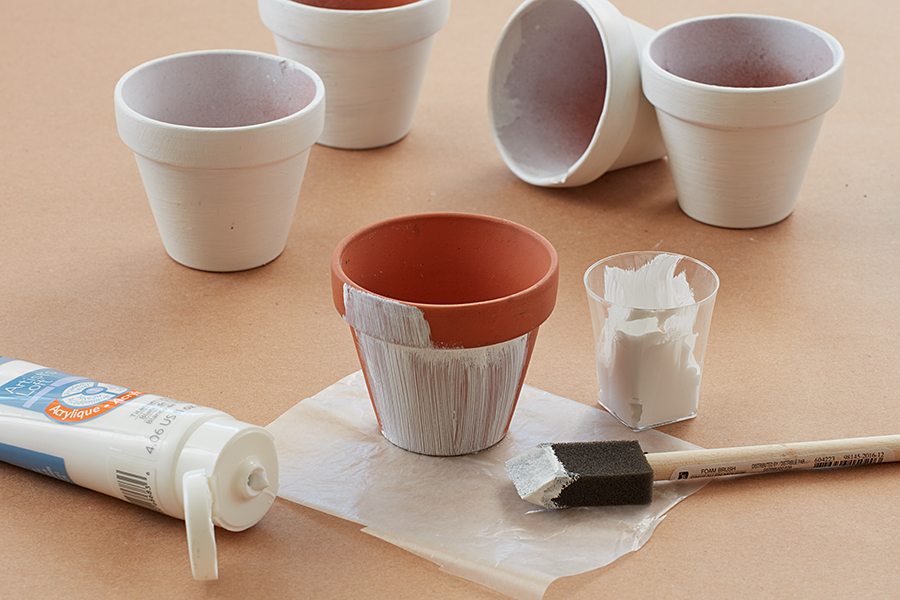
Paint all the pots.
Cut out the horn and ears, and glue them to the inside rim of each pot.
Decorate the rim to add a fun pop of color.
Then, draw flirty little unicorn eyes under the rim on either side of the horn using a black permanent marker. You can find many templates online from which to draw inspiration. I like to do them freehand because, just like snowflakes, no two unicorn’s eyelashes are exactly the same!
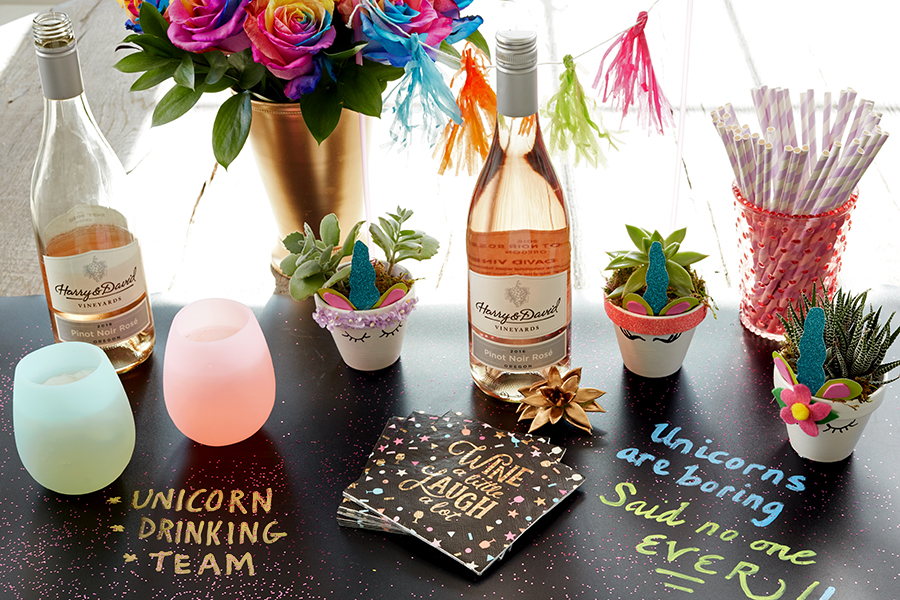
I filled my uni-pots with mini plants: one cactus, two succulents, and one fern. They would look amazing with fresh flowers as place settings or filled with candy for a sweet take-home gift.
These planters are the perfect complement to the Enchanting Unicorn™ floral arrangement, one of the most popular gifts in the Enchanting Unicorns collection. Pair them at your next magical unicorn party, and your little one will be over the moon!
But unicorns aren’t just for little girls — they’re for everyone! I heard their favorite type of wine is, in fact, rosé. Pop open a bottle at your next unicorn-themed party and let the good times flow.
What are the first two things that come to mind when you think of summer? A lot of folks might say “sun and surf” or “grill and chill,” but if you ask me, it’s roses and rosé! And I’m not talking about Lauren Zima’s recap show for Bachelor Nation.
For me, summer is about celebrations and relaxation. Flirty and frivolous, rosé is the perfect beverage to enjoy on a sun-kissed balcony, at a bustling beachside bar, or while dining al fresco on a warm summer evening. Add the overwhelming fragrance and stunning beauty of rambling roses and you have the perfect storm of summer perfection!
Here are three ways to enjoy roses and rosé this season.
Rosé sangria mojito cocktail
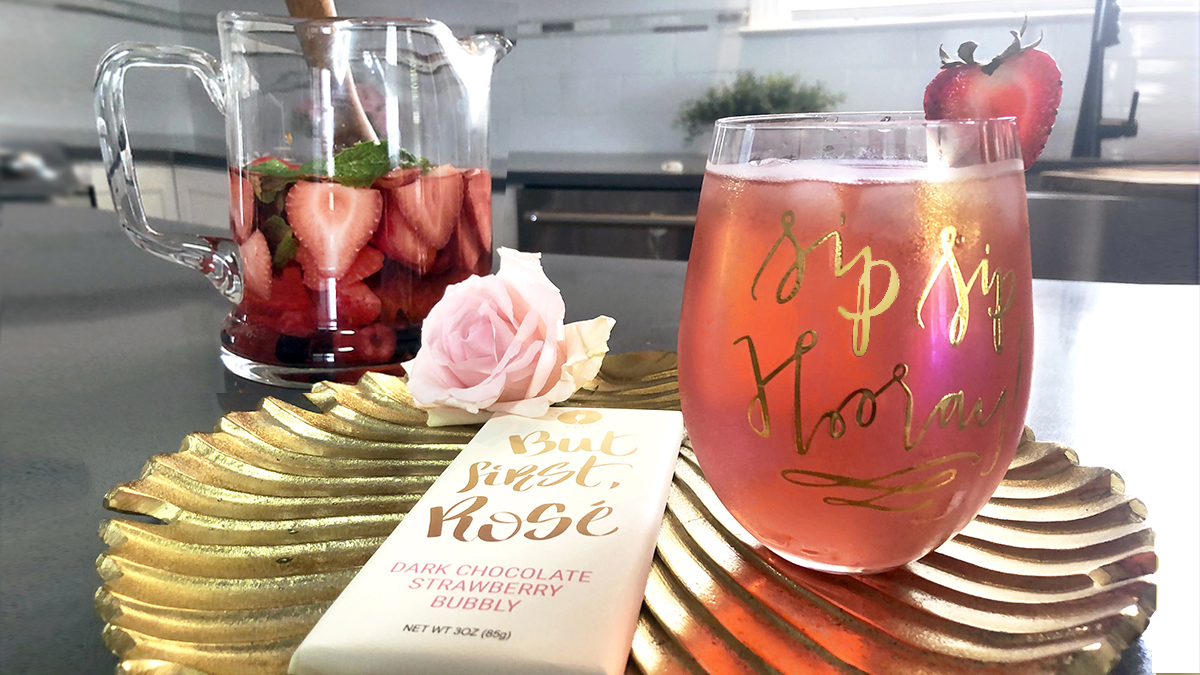
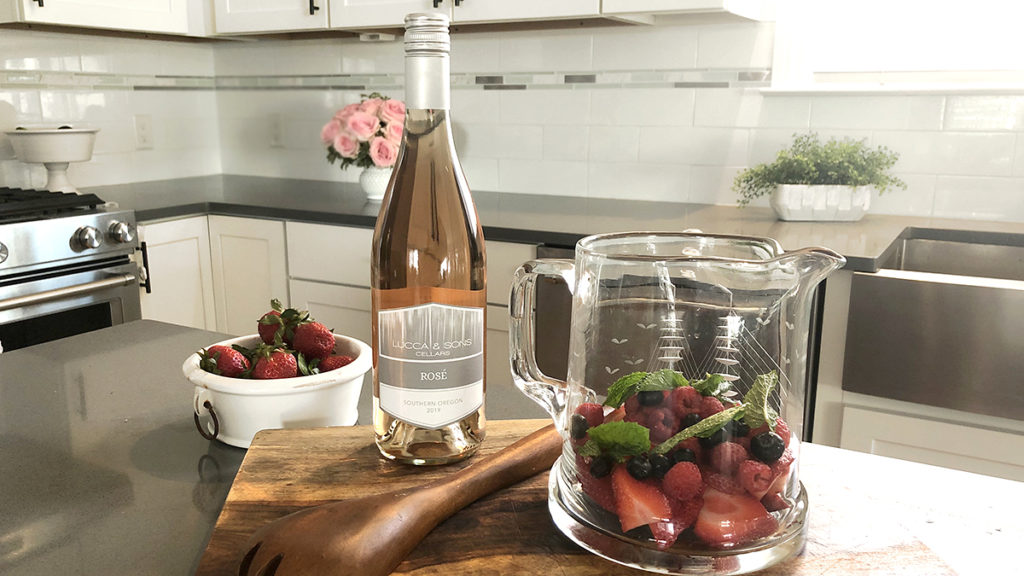
Rosé is extremely versatile and can function as a base for your favorite cocktail, adding lovely flavors like strawberry, raspberry, and citrus. I wanted to create a summer cocktail that was light, with layered flavors, but not sweet. What I came up with is a cross between sangria and a mojito.
This rosé sangria mojito is a more grown-up cocktail. If you prefer your drinks on the sweeter side, you can add some simple syrup to the mix or use a sweetened cranberry juice instead of the flavored seltzer.
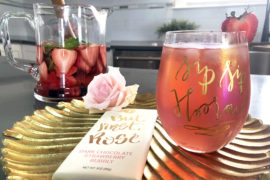
This drink pairs perfectly with the chocolate strawberry bubbly bar or dark chocolate sparkling rosé cordials that come with the Girls Night In Rosé Gift Basket. Just mix it up, pour it into the “Rosé All Day” stemless wine glass, and you’re ready for any celebratory occasion!
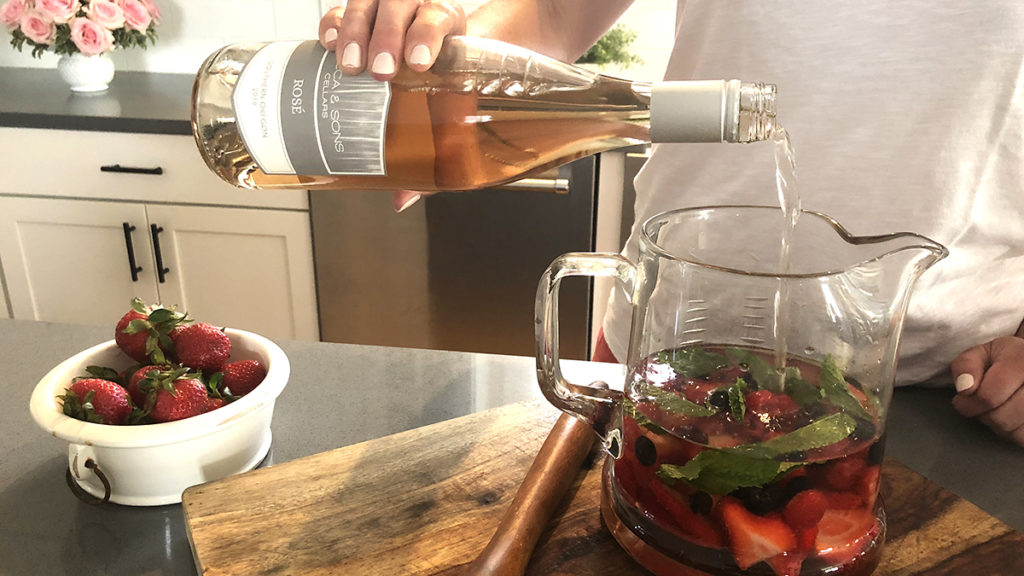
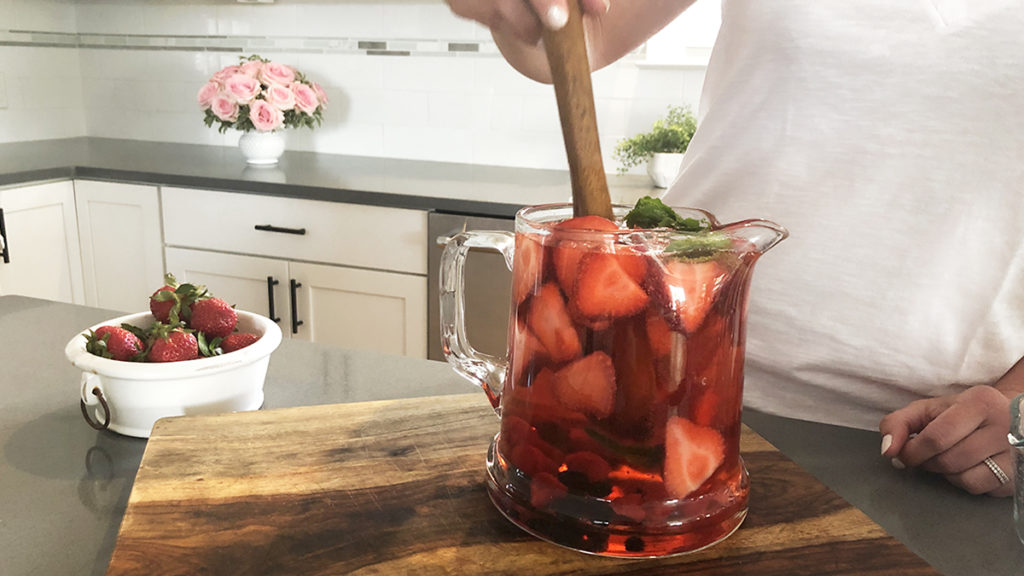
Wash all the berries. Remove the tops of the strawberries and cut into slices.
Add all the fruit to the pitcher, along with a few sprigs of fresh mint.
Add two cups of rum, the bottle of rosé, and a can of cranberry seltzer.
Stir to mix all the ingredients together and refrigerate for about an hour.
When ready to serve, pour in a glass over ice and garnish with a strawberry slice.
DIY roses and rosé wreath
This summer, everything is coming up pink! And that means lots of fabulous party décor in that trendiest of colors. This roses and rosé wreath is a particularly pretty — and pink — way to display your wine while keeping it chilled at the same time.
If you don’t feel like going all out, there’s a version of this you can make with a faux rose wreath. Or, meet in the middle and do a little of both.
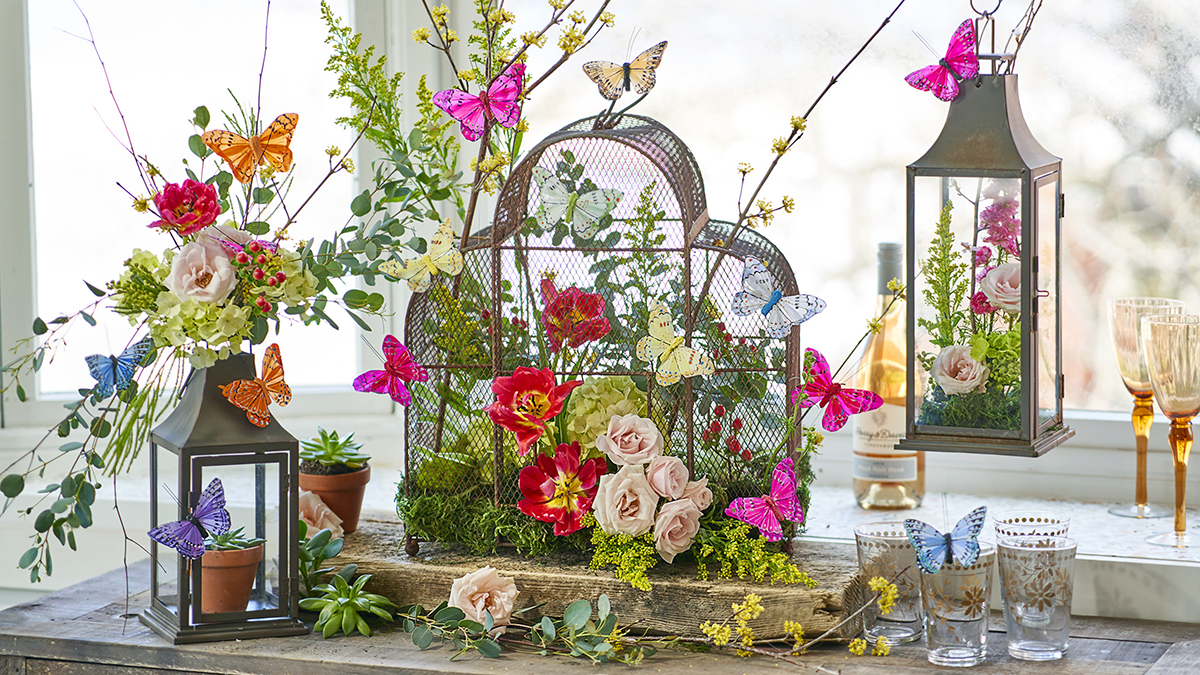
Our series “Get Crafty” gives you the inspiration for creating inventive DIY projects during the holidays and year-round. These DIY crafts combining butterflies and blooms create a spring vibe that will last until summer and are perfect decorations for spring gatherings.
Butterflies and blooms have a lot in common. Alone, each is a symbol of rebirth and resurrection — like spring itself. As the first crocus of spring breaks through the cold, hard ground after many months of winter, we see the triumph of the spirit and soul over the physical world. And then the hyacinth and tulips sprout, and everything turns green and blossoms all around us. This metamorphosis, like the one that occurs when the colorless caterpillar turns into the beautiful winged butterfly, represents transformation and hope.
Butterflies and flowers have what is known as an “ecological relationship.” They are affected by each other; that is, changes in one lead to changes in the other. Butterflies depend on flowers for food, and flowers depend on butterflies to reproduce.
So, the next time you are creating a floral display, why not add a few butterfly touches to your arrangements to complete the look? See how a butterfly placed here and there brings the display to life and makes it feel more alive and whimsical!
You can go all out and create a “Butterflies and Blooms” vignette, like the one here, or take a cue from this rustic garden vibe and add just one of these DIY crafts to your table or bar.
Butterflies
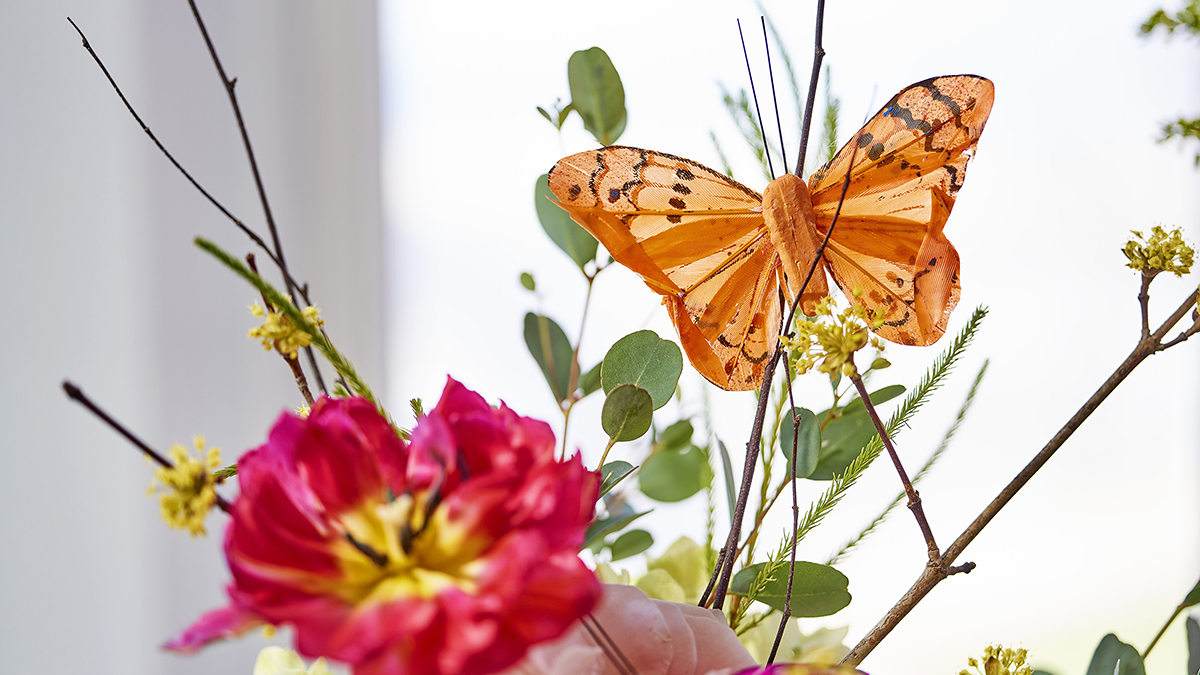
Pretty faux butterflies are inexpensive and easy to find. I ordered a few different sizes and colors online, as well as ones with two kinds of attachments: pre-wired and clip on. You can also use a little adhesive with either version if you need to.
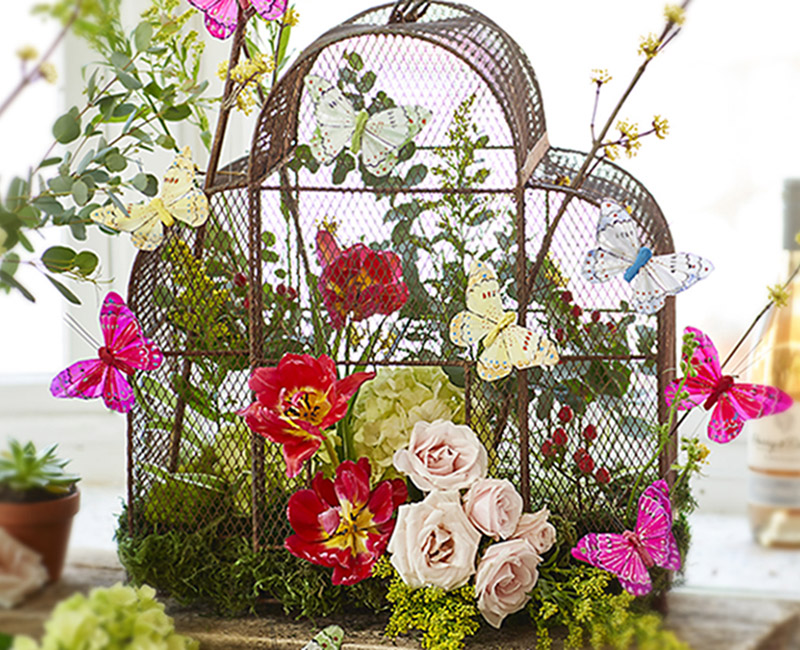
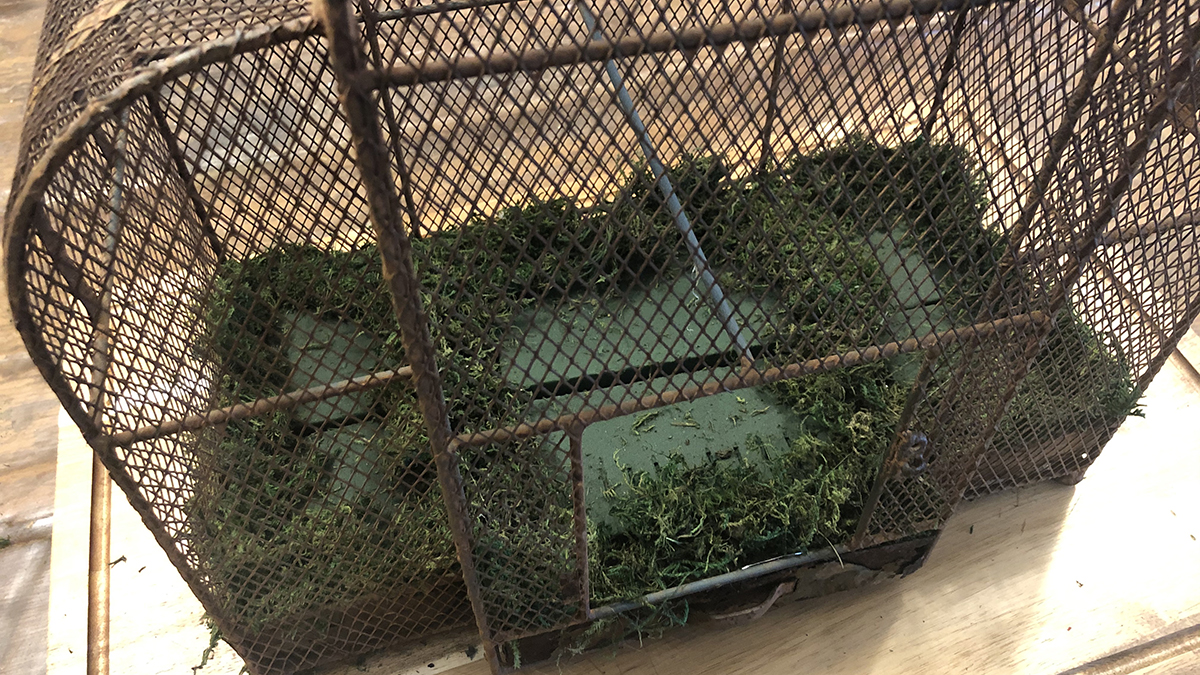
Birdcage
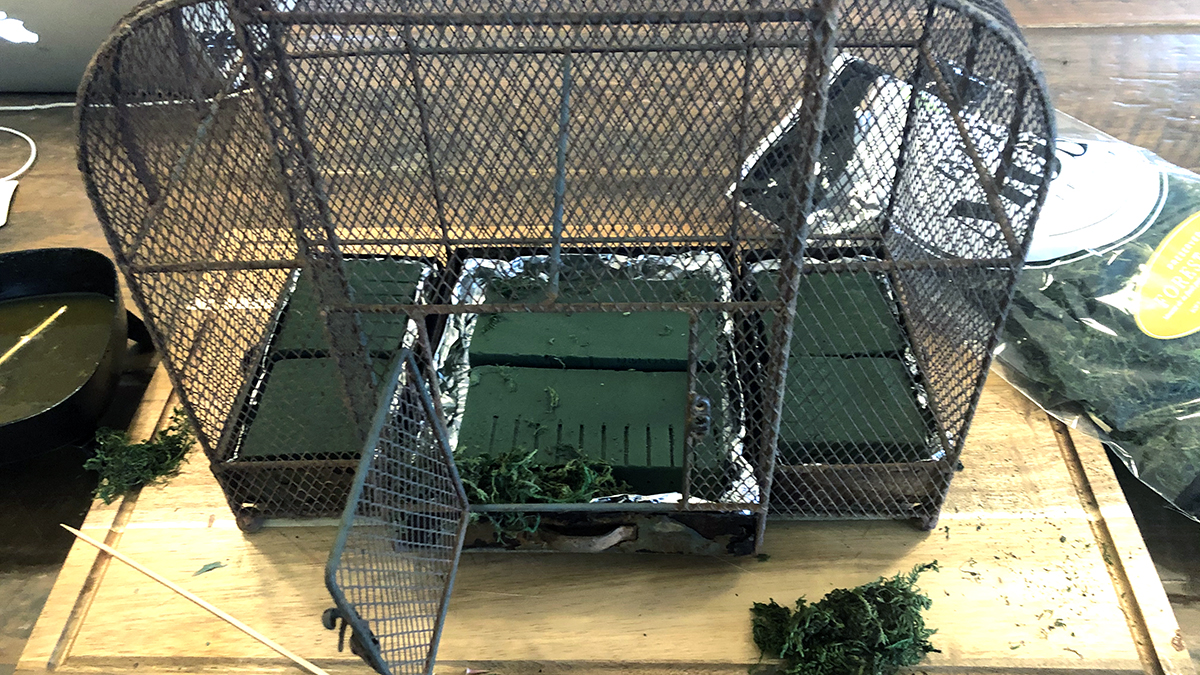
I have a hard time throwing anything out — including this rusty, old birdcage!
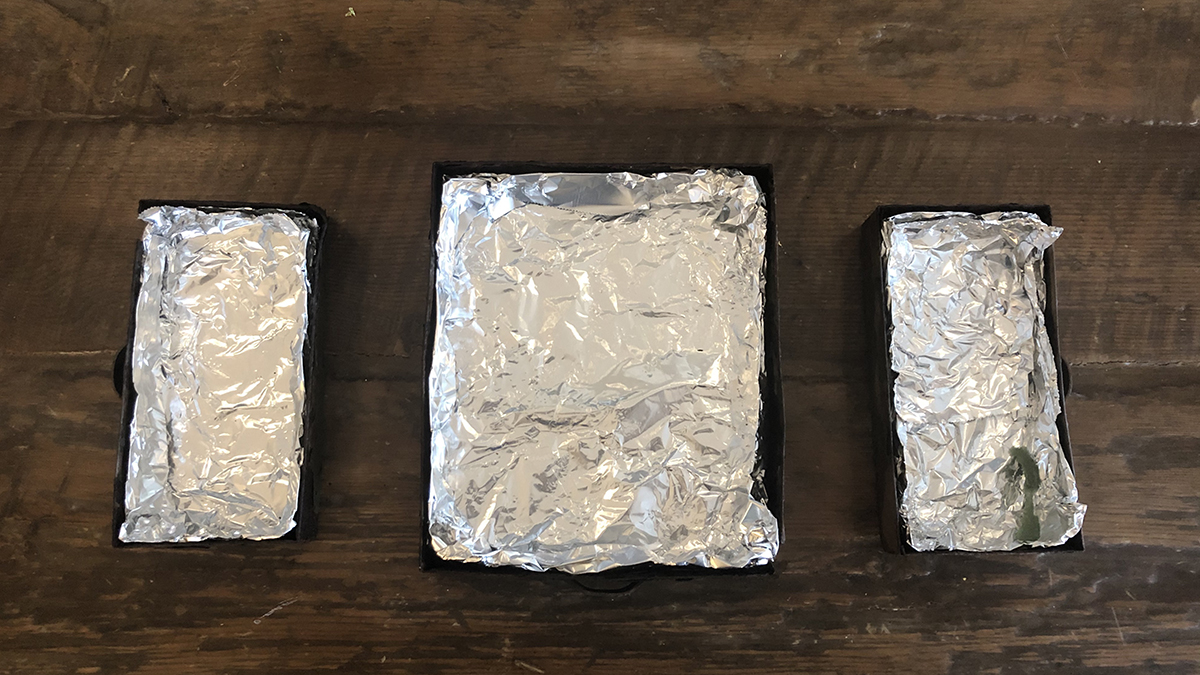
Due to their sitting in my garden all year, the trays have large holes in them. To prep them to hold water and floral foam for the flower arrangement, I lined each one with aluminum foil.
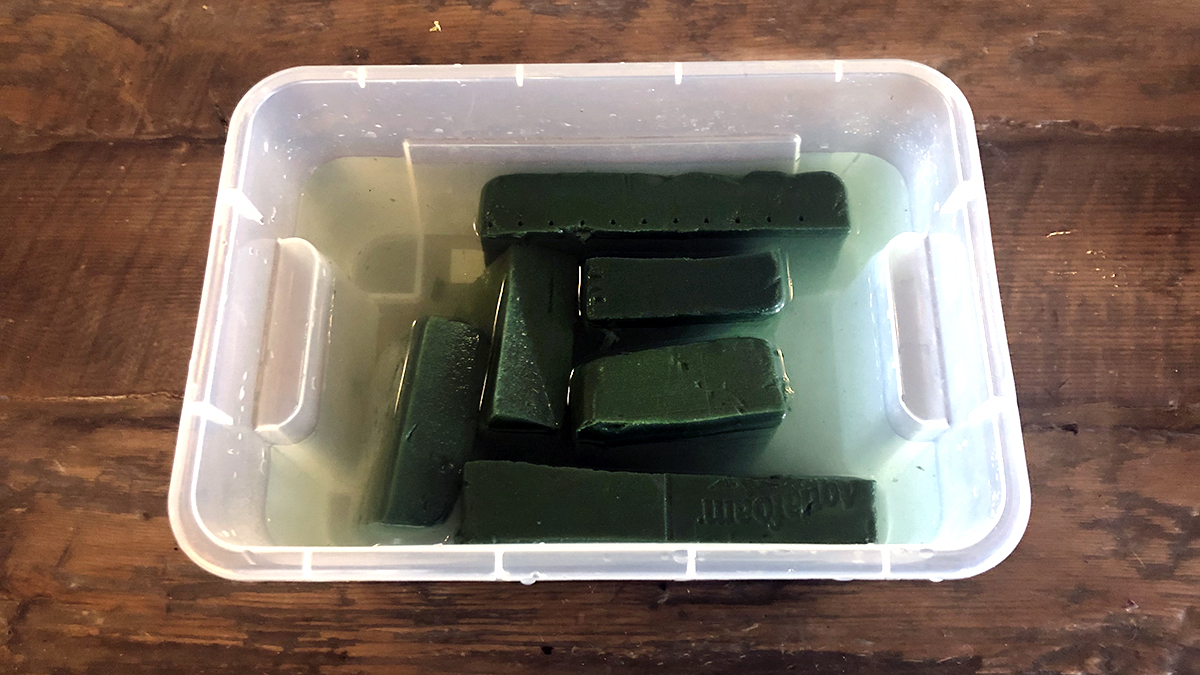
I pre-cut pieces of floral foam, to fit snuggly into the trays, before soaking them in a bucket (or sink).
I placed the trays back in the birdhouse and then added the thoroughly soaked pieces of foam to them by going in through the opening in the front of the cage.
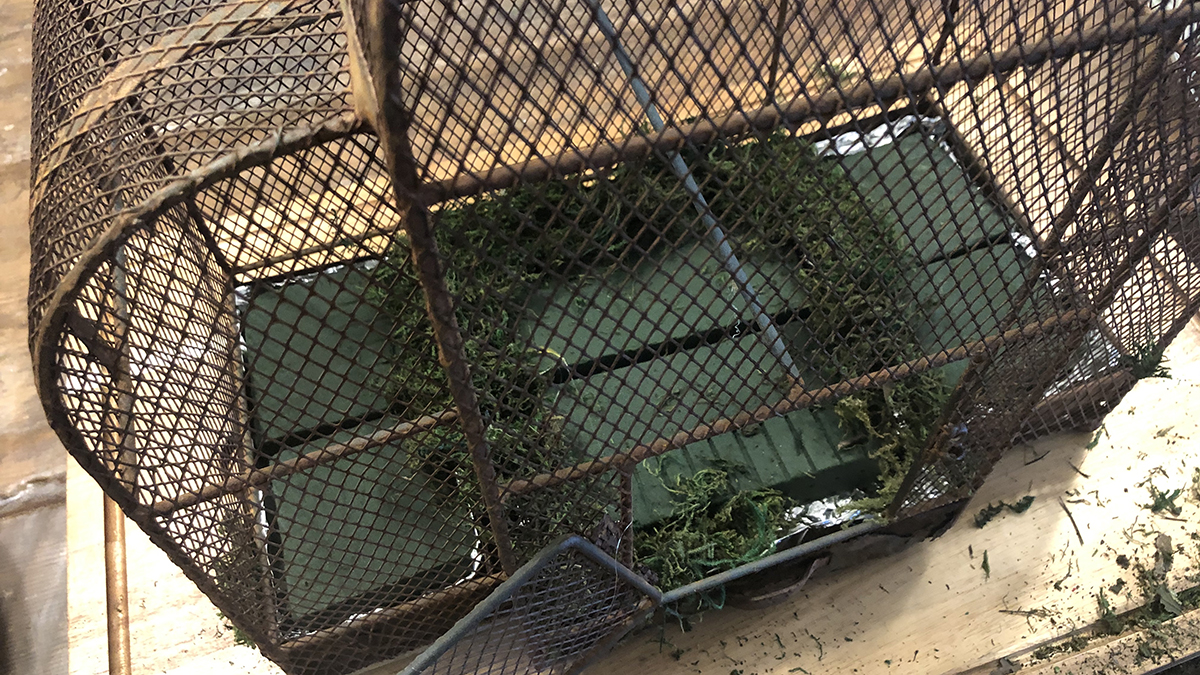
Next, I added some moss to the spaces in between to cover the foil and any openings.
I added all the foliage and cut flowers — eucalyptus, hydrangea, tulips, roses, solidago, and hypericum — through the front opening as well. Then, I inserted forsythia branches and some solidago through the wire grid at the top of the cage, being careful to get the end of each stem and branch into the foam so that it stayed hydrated as long as possible. I created a design that has the look of flowers spilling out of the birdcage, when in reality all the floral is securely anchored in the foam.
I then placed the butterflies as if they were fluttering all around the outside of the cage. Perhaps coming over to have a look and see what’s going on? The butterflies on the thin wires really do look like they are flying around in your little garden.
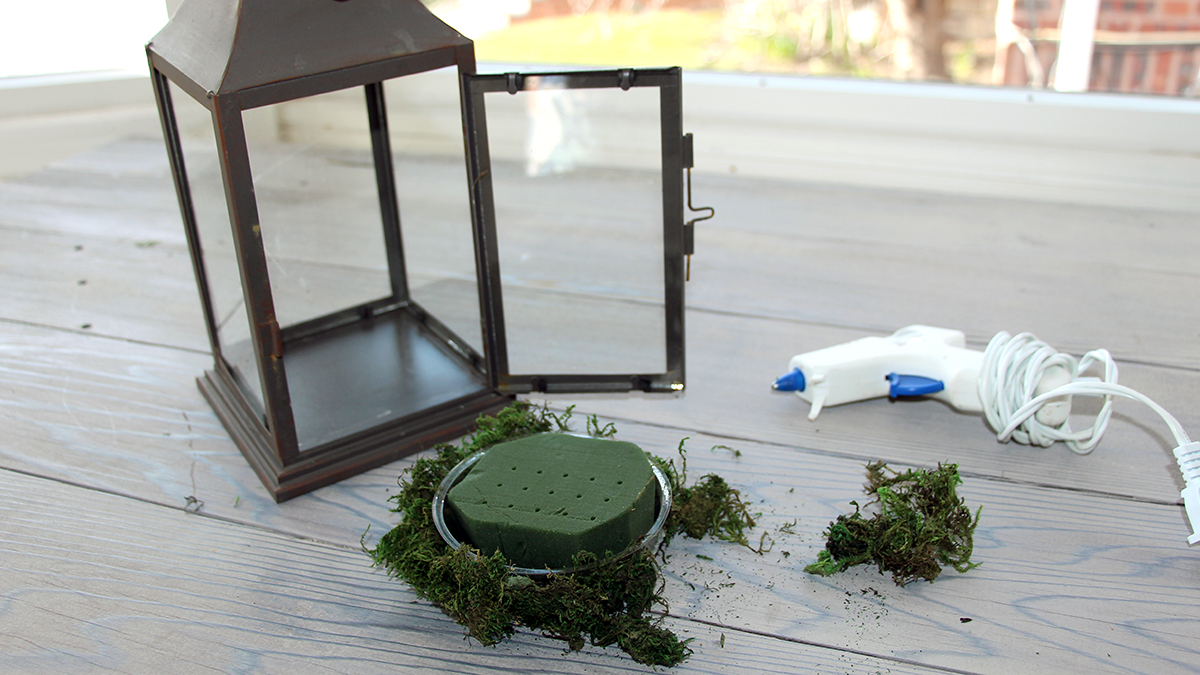
Lanterns
Lanterns have so many different purposes besides just holding a candle, and they can be used to decorate outside as well as inside.
A mini plant or succulent looks great nestled inside the lantern, as does a small arrangement of fresh cut flowers. Basically, all you need to do is follow the same steps as the birdcage but pare it down!
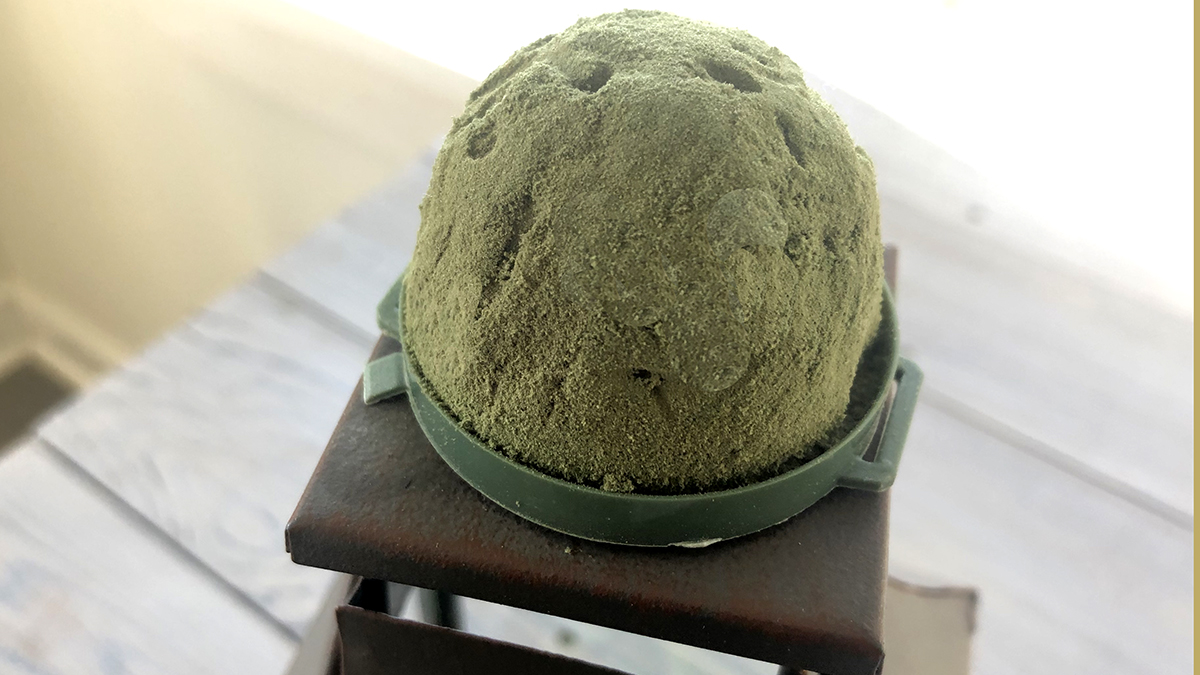
To decorate the top of the lantern with fresh flowers, use a floral igloo. You can find these at your local florist or hobby shop, or online. These are nothing more than small pieces of floral foam attached to a plastic tray. Just think of the possibilities!
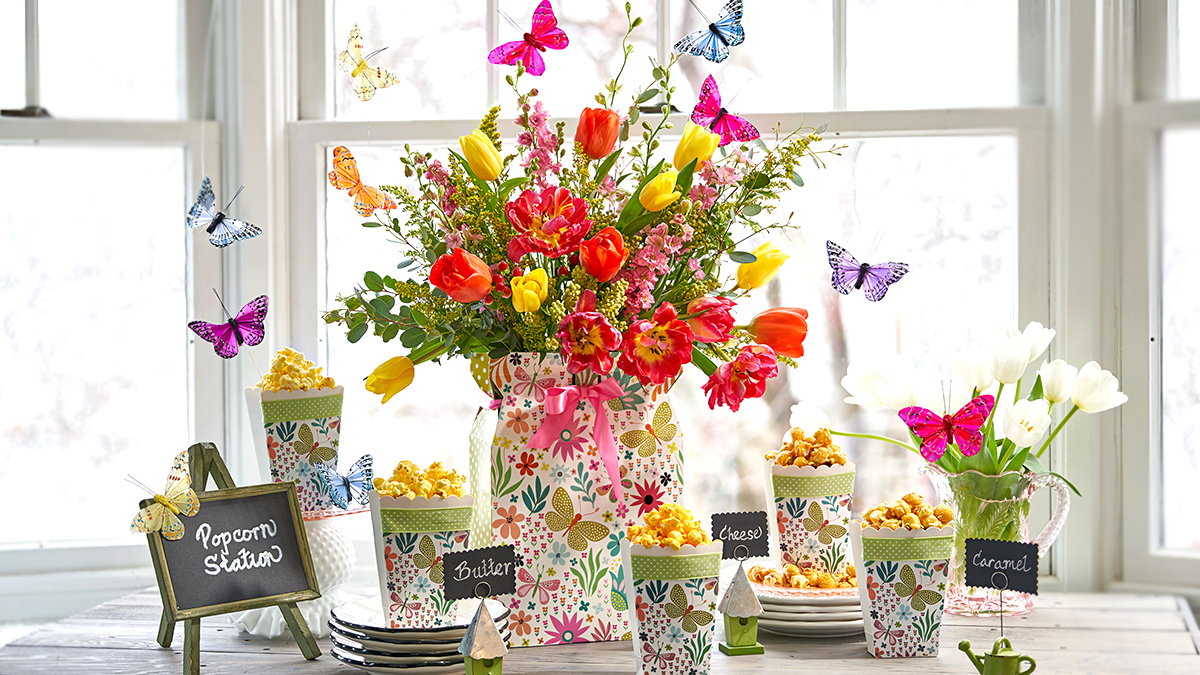
‘Butterflies and Blooms’ popcorn station
With butterflies being such a popular theme right now, The Popcorn Factory has a whole line of Butterflies and Bloom gifts that are perfect for any occasion.
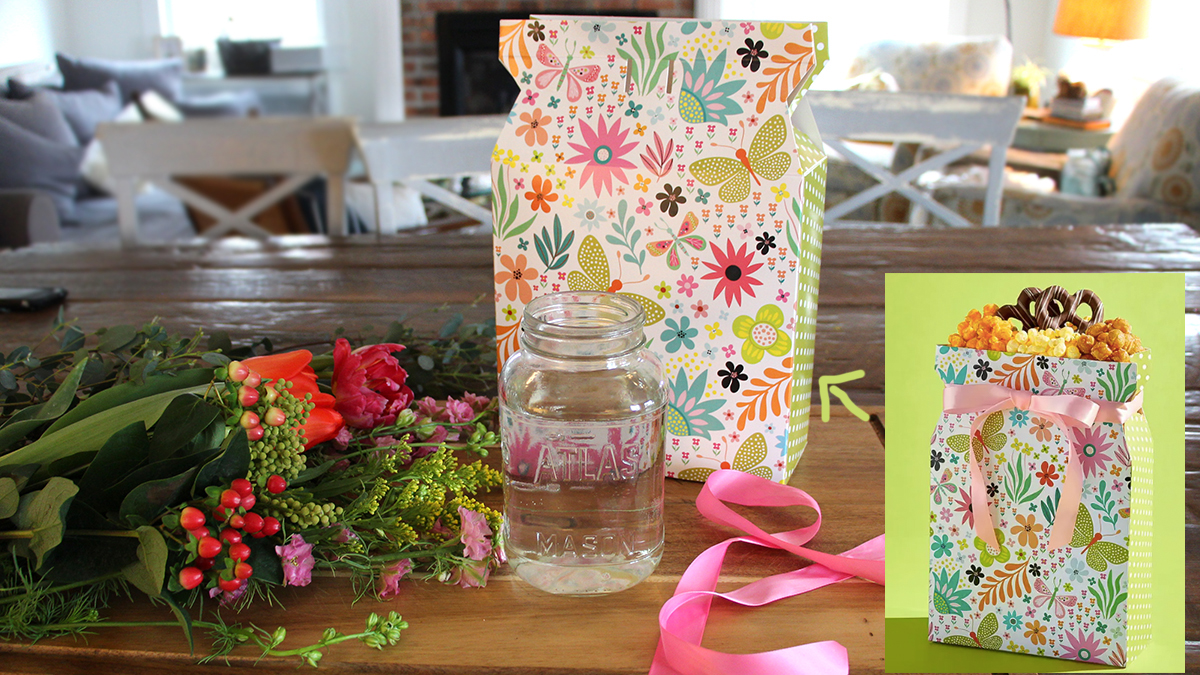
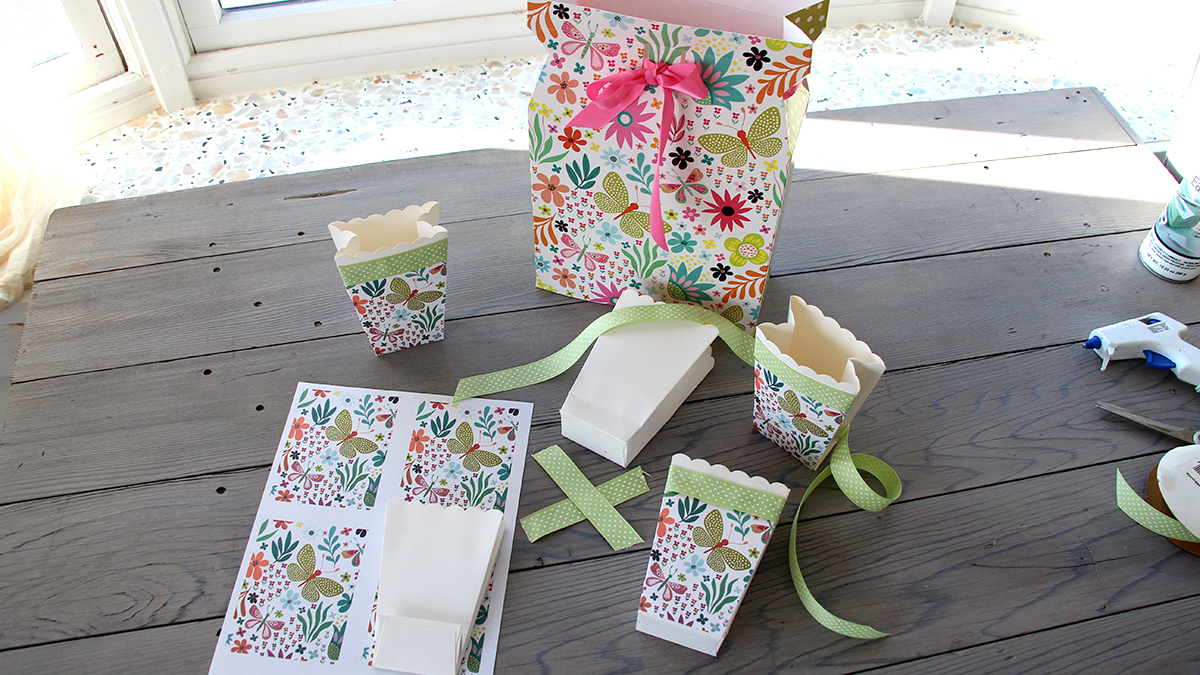
I ordered the Butterflies and Blooms bow box, which is filled with three different flavors of popcorn — butter, cheese, and caramel — and a packet of chocolate-covered pretzels.
I loved the pretty pattern on the box so much that I decided to make it the design for a popcorn station!
I started by emptying the goodies from the box, which I then used as the base for a fresh-cut flower bouquet, picking up all the bright spring colors in the design. All I did to turn the box into a vase was place a mason jar filled with fresh, clean water in the box and arrange the flowers.
I simply took a photo of the front of the box, sized it to fit the front of the popcorn holder, printed it out, and glued it to the container while it was still flat (unfolded or filled). And, as luck would have it — or because I never throw anything away that I might have a use for later — I had a roll of matching green dotted ribbon to use as a finishing touch. Again, I just measured it to size and glued it on.
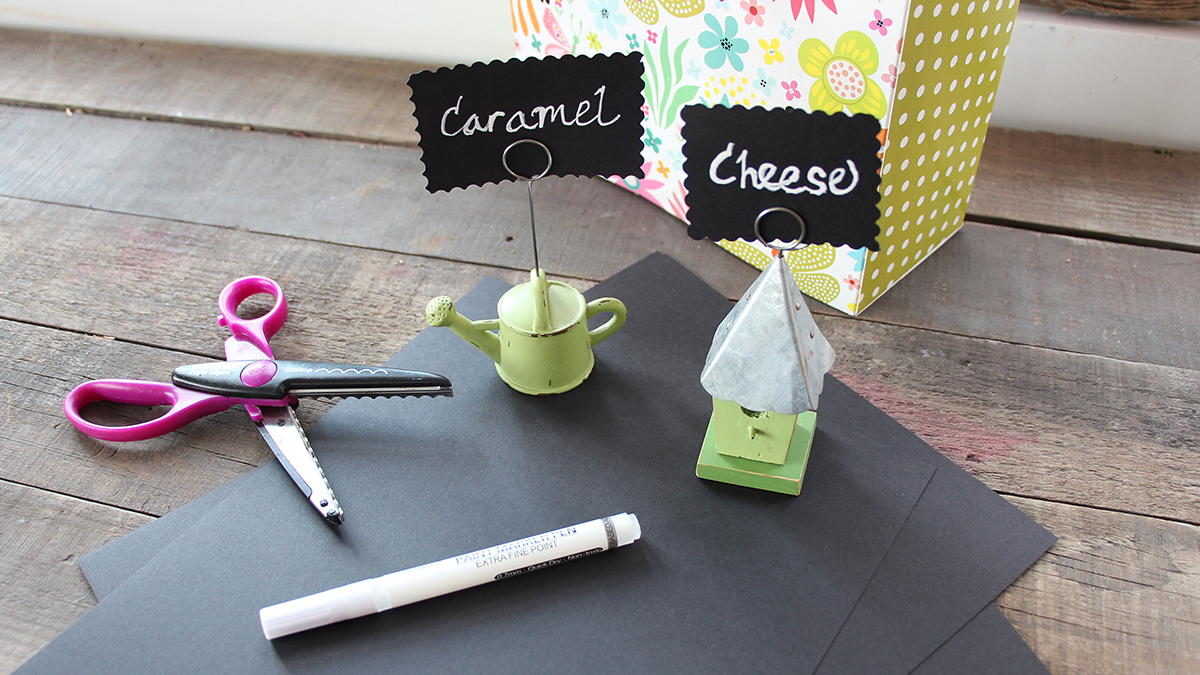
I made signage for the various popcorn flavors using black card stock paper and a white pen.
And that’s it. These DIY crafts are so easy to make, and they’re on trend to boot. Now you’re ready for spring entertaining!
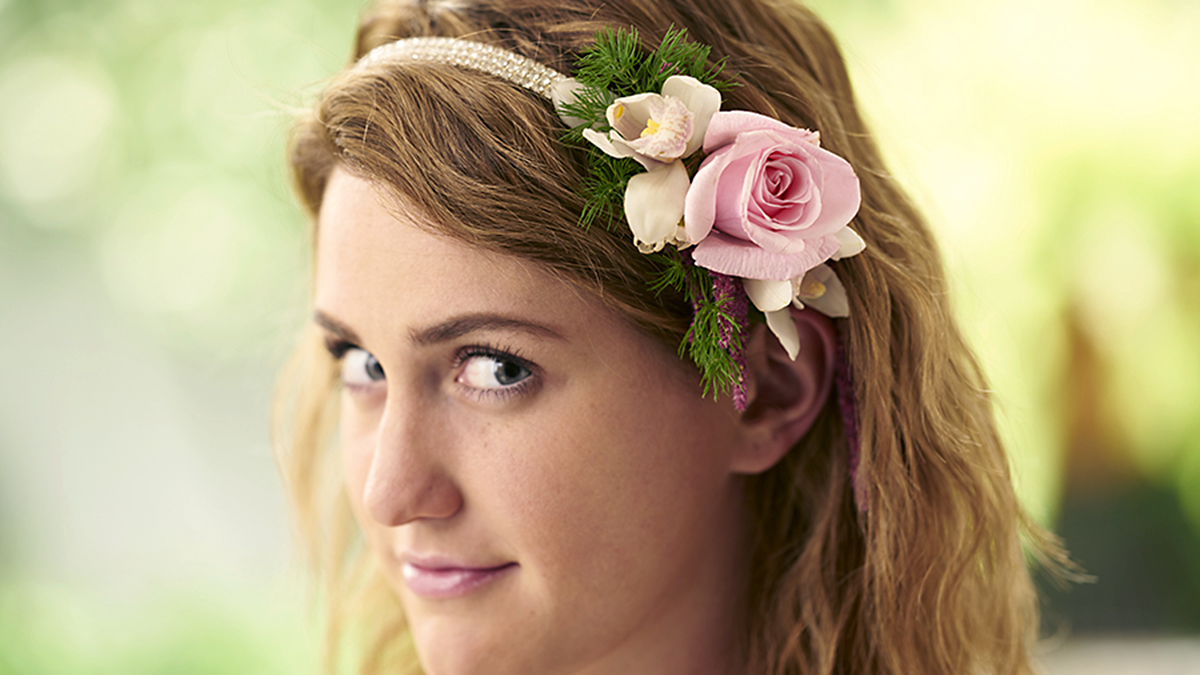
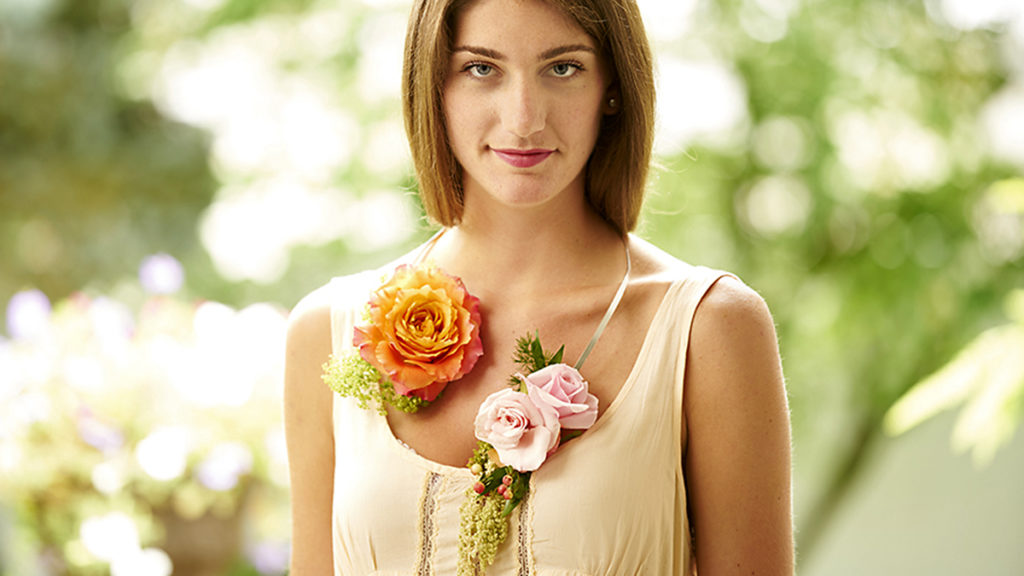
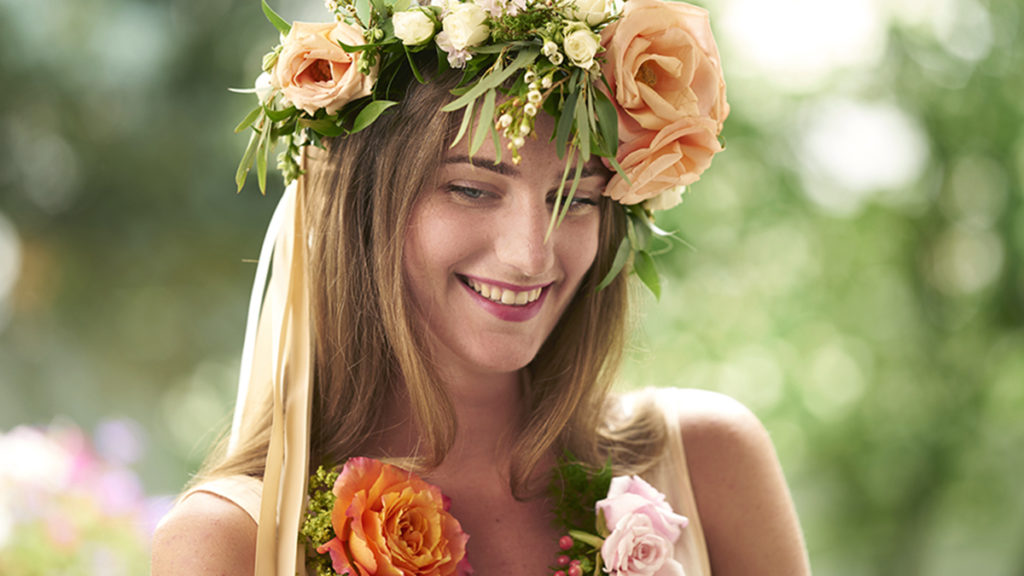
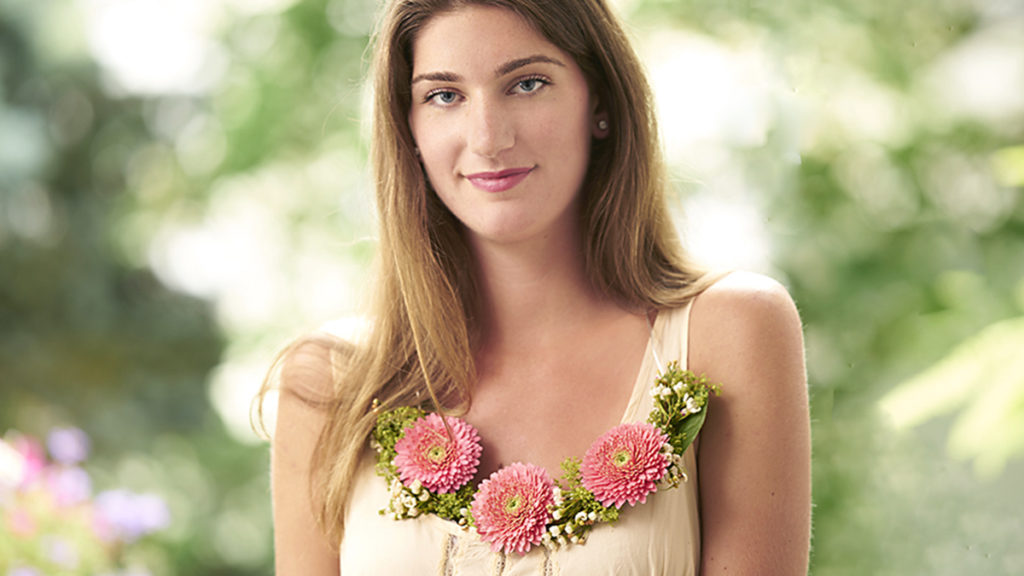
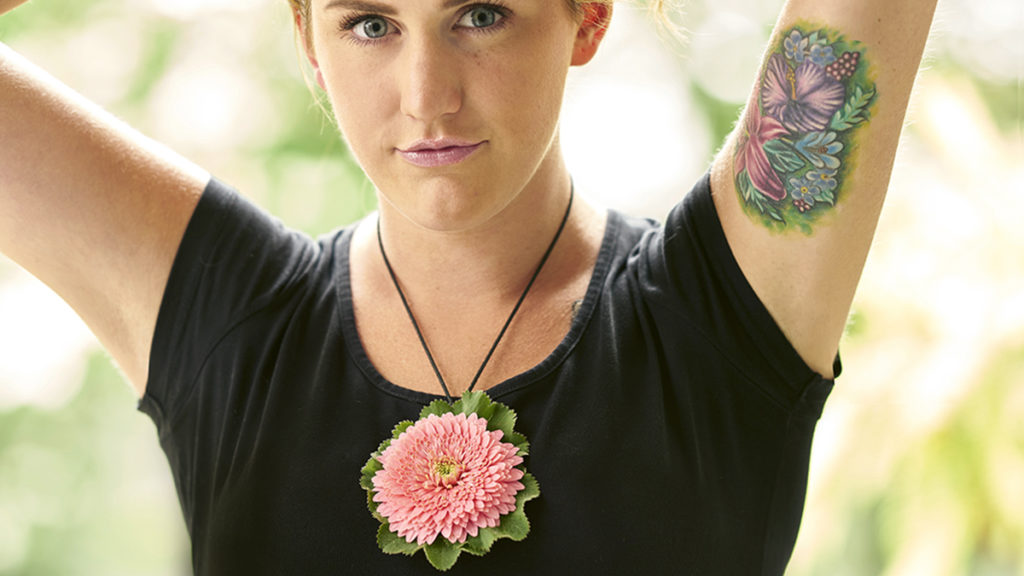
Our series “Get Crafty” gives you the inspiration for creating inventive DIY projects during the holidays and year-round. Floral designer and lifestyle expert Julie Mulligan has a whole host of ideas for DIY prom flowers that will help you turn heads all night long.
Prom season is here, and with it comes the excitement of getting all dressed up and celebrating one of the biggest nights in a young person’s life. With the magnitude of the event, this is not the time to “go small.” Rather, you should be pulling out all the stops. Everything from the dress or tux to shoes, hair, and make-up has to be just right and planned out in advance.
And what about the flowers? Exchanging corsages and boutonnieres has always been a cherished prom tradition, but that doesn’t mean you need to go with the same old, same old.
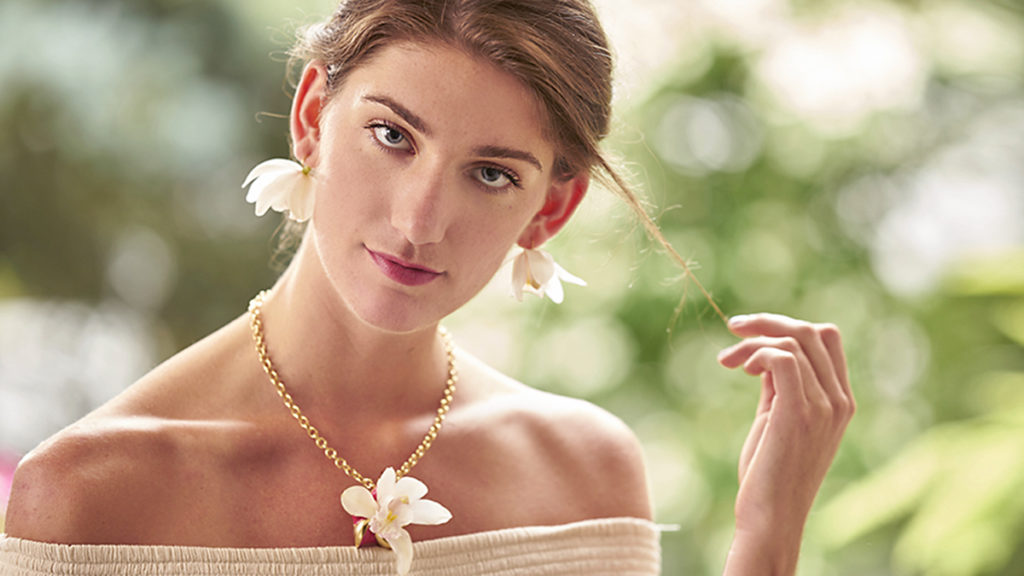
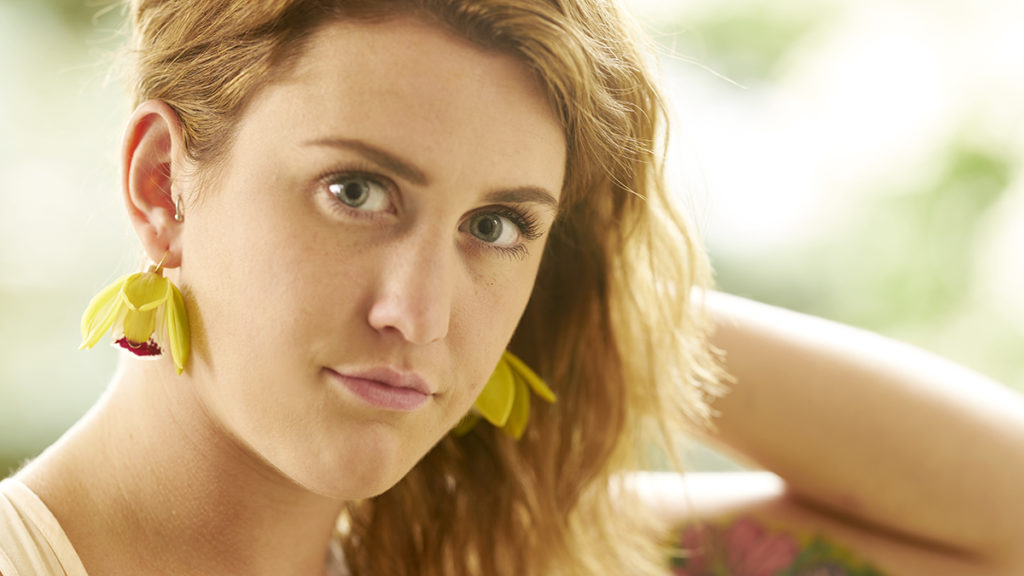
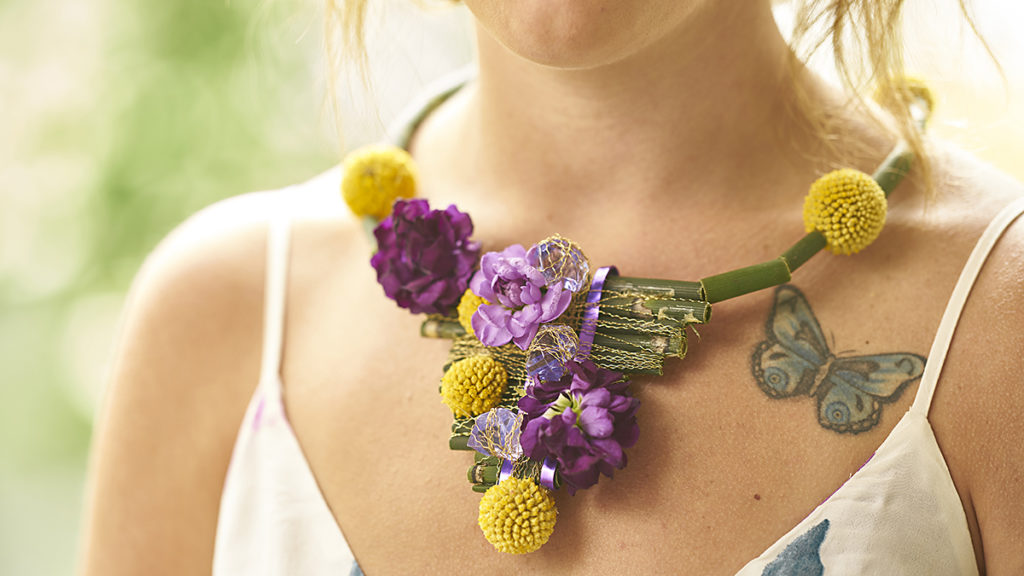
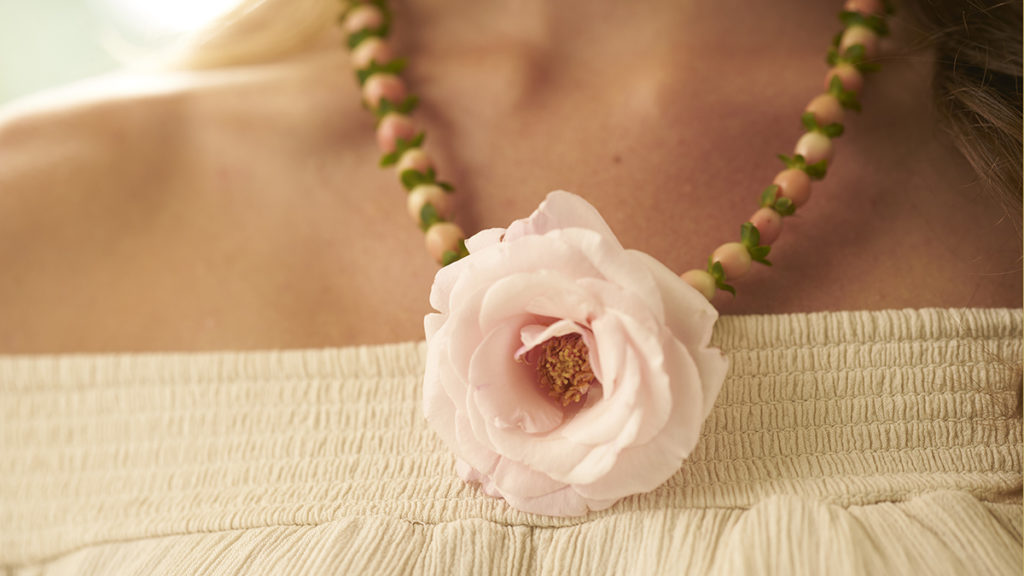
Take the opportunity to make a statement with your flowers. With a little inspiration and a creative floral designer, your floral accent can be the perfect finishing touch of your prom attire. It might be hard to find a dress and/or color that no one else at prom will be wearing, but some fresh flower fashions like these will make you this year’s trend-setter extraordinaire!
Forget wristlets and pin-on corsages with ribbons and bows, and think of your flowers as a true accessory or unique piece of jewelry. Many famous women, from Frida Kahlo to Billie Holiday, have used flowers to set themselves apart from the crowd.
All these are easier to make than they look, so find one you like and give it a try. If you’re not the crafty type but see something you love, bring a picture of it to your local florist. I’m sure they will be more than happy to do the work for you and help make your prom night dreams come true!
Here are a few more inspirational ideas and interesting ways to express your true self and style with prom flowers.
Whatever you wear, and however you choose to style it, just be sure to have the time of your life at prom!
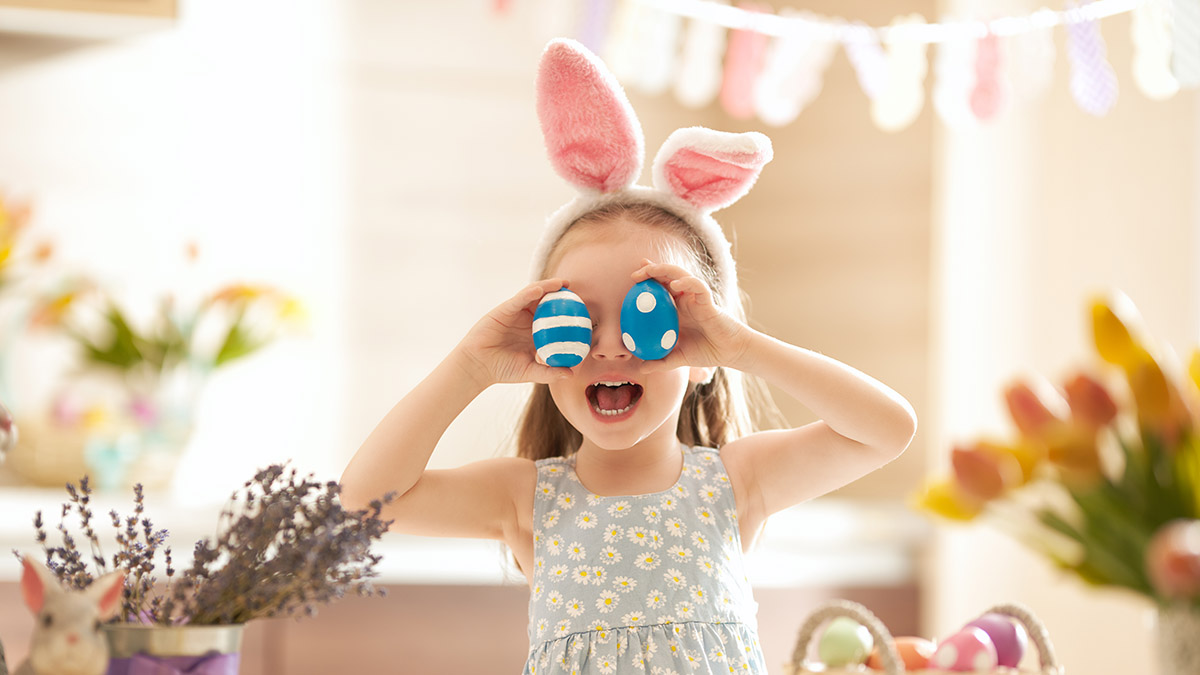
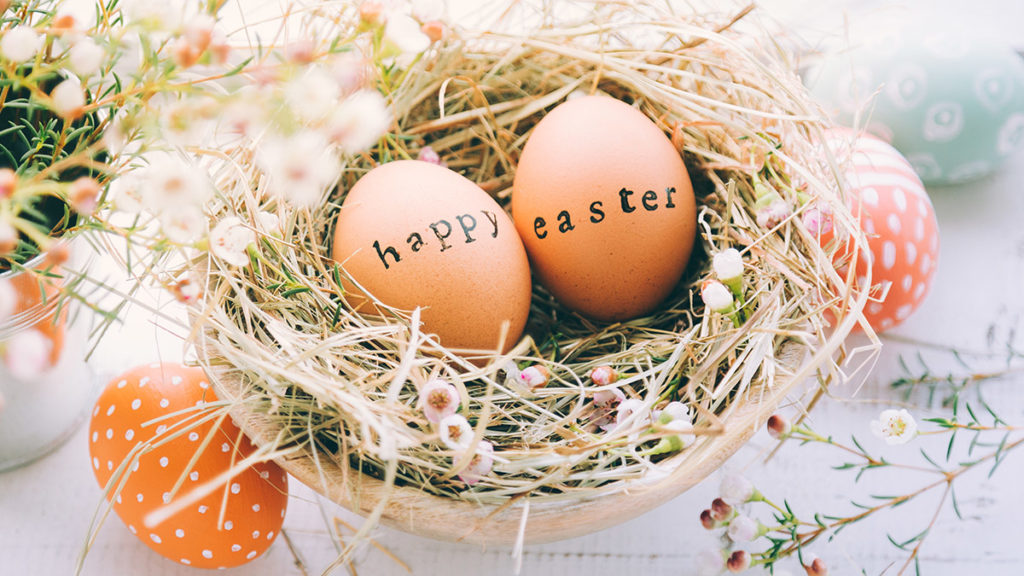
We’ll show you how to tap into your passion for making all kinds of fun and inventive creations in our “Get Crafty” series. Use these Easter egg designs to create the most beautiful Easter eggs you ever did see!
Decorating Easter eggs is a time-honored tradition. This activity is a great way to bond with your family members and spend quality time with the ones you love.
But it doesn’t have to be all fun and games. Add a competitive element to your Easter egg decorating this year by staging a contest to see which member of your household can create the most stunning-looking Easter egg designs. All you need are some eggs (bet you didn’t see that coming) and some everyday household items, such as nail polish, Kool-Aid, stickers, and glitter. When you’re done decorating, vote for your favorites and offer prizes (you can’t go wrong with Easter chocolates!) in different categories, such as most colorful, wackiest, most bedazzled, and most original.
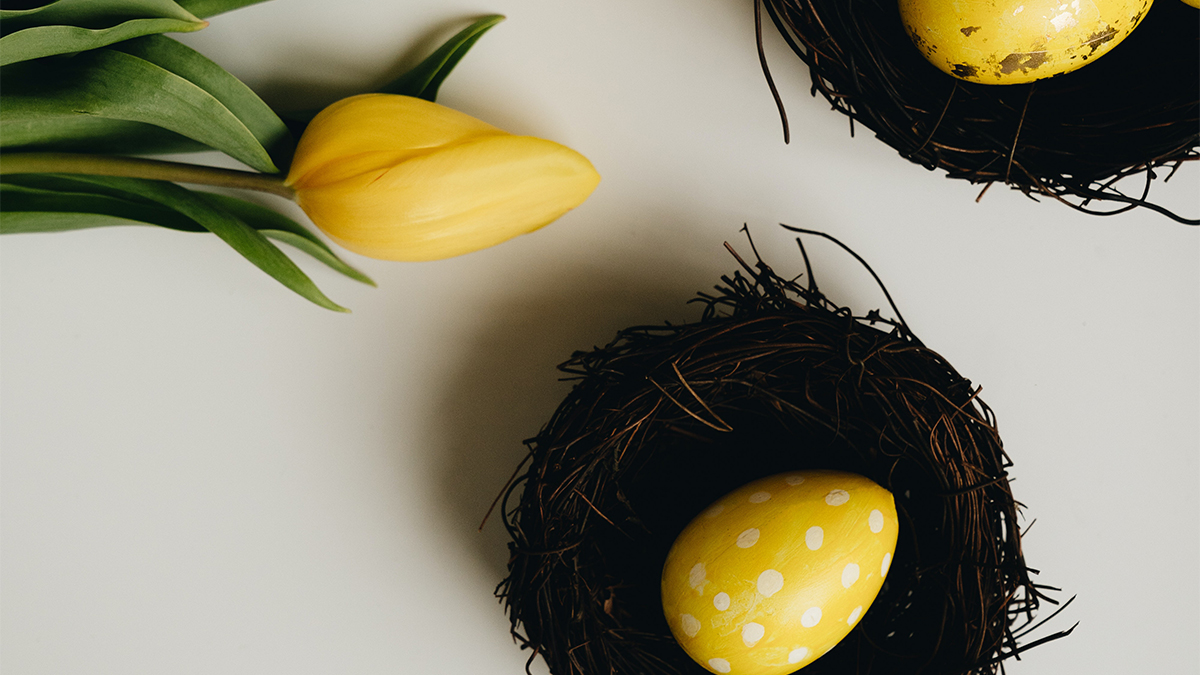
Here are some creative recipes for decorated Easter eggs you can use to wow your family.
Polka dot Easter egg designs
You’ll need:
Hard-boiled eggs at room temperature
Vinegar
White or light-colored crayons
Food coloring dye assortment
Bowls
Tongs or slotted spoon
Rubber gloves
Directions:
Start by drawing polka dots on the hard-boiled eggs with the crayons. Next, mix a half cup boiling water, 1 teaspoon vinegar, and 10 to 20 drops of food color in a cup. Repeat this process until you fill all the cups with the desired colors. Use tongs or a slotted spoon to dip the hard-boiled egg in a cup for 5 minutes. Remove the egg from the dye and allow it to dry completely. Repeat until you have a set of polka dot Easter eggs.
Kool-aid Easter egg designs
You’ll need:
Hard-boiled eggs at room temperature
Containers of Kool-Aid liquid
Paper towels
Baking sheet
Metal cooling rack
Directions:
Line the baking sheet with layers of paper towels, and then place the metal cooling rack on top. Next, arrange the hard-boiled eggs on the cooling rack. Using one flavor of Kool-Aid at a time, gently squeeze the Kool-Aid liquid over the eggs in a random pattern. Let dry for 10 minutes, and then flip the eggs over on the metal rack to add another layer of color as needed. Allow the eggs to dry completely for another 10 to 15 minutes.
Note: If you use powdered Kool-Aid, mix with less water than the package calls for to create a more concentrated dye. Then, use a spoon to drizzle the Kool-Aid mixture over your eggs.
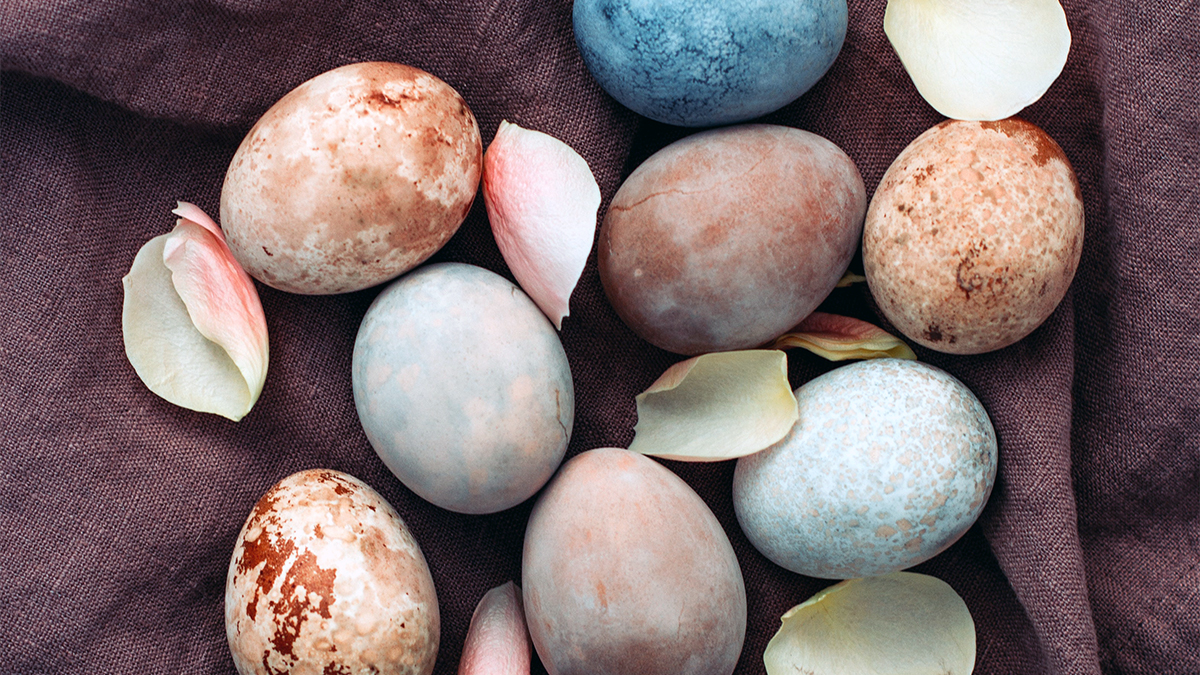
Marbled Easter egg designs
You’ll need:
Hard-boiled eggs at room temperature
Whipped cream
Food coloring dye assortment
Baking sheet
Spatula
Toothpicks
Rubber gloves
Paper towels
Directions:
Start by filling your baking sheet with whipped cream until it’s about 1 inch thick. Smooth it out with a spatula. Next, drip food coloring onto the cream. The more colors you use, the brighter your eggs will be. Using a toothpick, swirl and marble your food coloring droplets across the whipped cream.
Put on rubber gloves, and then take a hard-boiled egg and roll it in the cream, coating it completely. Carefully place the egg on a paper towel to dry for at least 20 minutes. When dry, wipe the remaining cream off with a clean paper towel to reveal your colorful marbled patterns!
Stamped Easter egg designs
You’ll need:
Hard-boiled eggs at room temperature
An assortment of stamps and stamp pads
Rubber gloves
Hair dryer
Floral temporary tattoos
Metallic tattoos or stickers
Easter-themed stickers
Directions:
Start by putting on rubber gloves. Using a plain hard-boiled egg, press a small stamp evenly across the egg’s surface. Repeat as needed for a patterned design. Set the ink by using a hair dryer and blowing it dry on the lowest setting. You can also swap out the stamps for spring-themed temporary tattoos, metallic flash tattoos, or stickers.
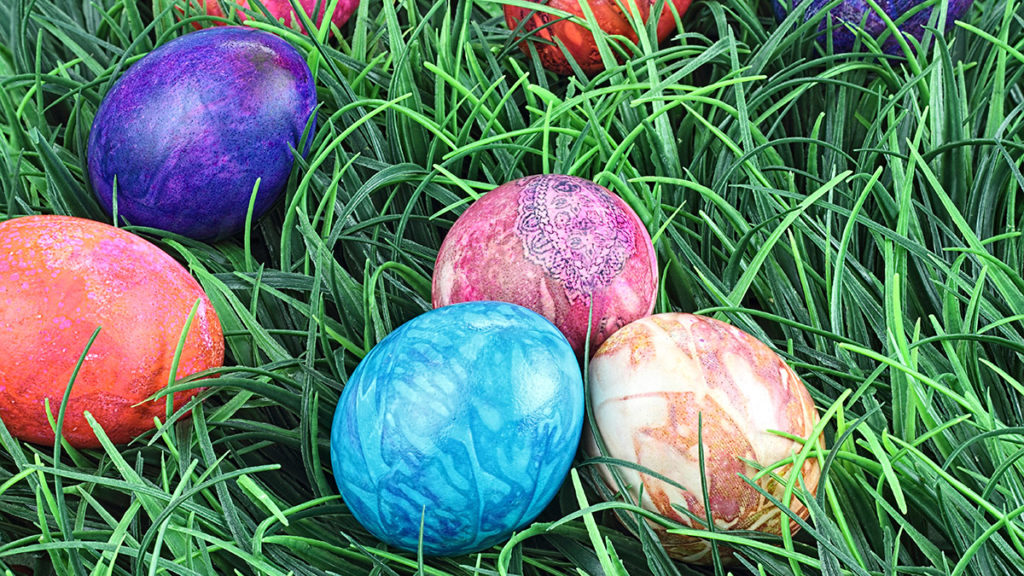
Tie-dye Easter egg designs
You’ll need:
Hard-boiled eggs at room temperature
Disposable coffee filters
Twist ties
Food coloring dye assortment
Spray bottle filled with water
Paper towels
Rubber gloves
Directions:
Start by putting on rubber gloves. Next, wrap a coffee filter around an egg and secure the filter with a twist tie. Drip a few drops of food coloring on the outside of the filter and let them soak for a minute. Repeat with as many colors as you’d like. Using the spray bottle, wet the coffee filter, making sure it fits snugly around the egg. Place on a paper towel for 15 minutes, and then unwrap the egg and rinse with cold water.
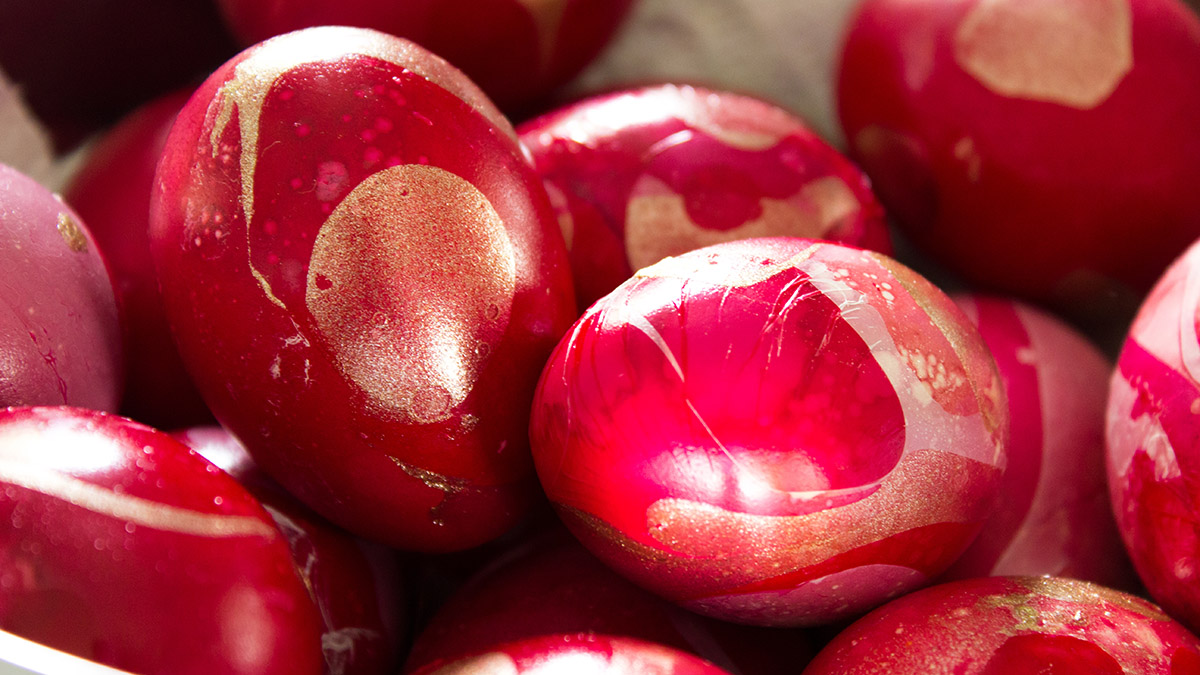
Nail polish Easter egg designs
You’ll need:
Hard-boiled eggs at room temperature
A variety of nail polish colors
Small bowls
Rubber gloves
Drying rack or stand
Glitter (as needed)
Directions:
Start by filling the bowls halfway with water. In each bowl, add a small amount of a single color of nail polish. Put on the rubber gloves, and then take a hard-boiled egg and swirl it around the water/nail polish mixture. Set on a drying rack until dry. You can re-swirl the dried hard-boiled egg into a different nail polish bowl to add another layer of color. Set back on the drying rack until completely dry. If you don’t have glitter nail polish, you can sprinkle glitter on the eggs as they dry for extra sparkle!
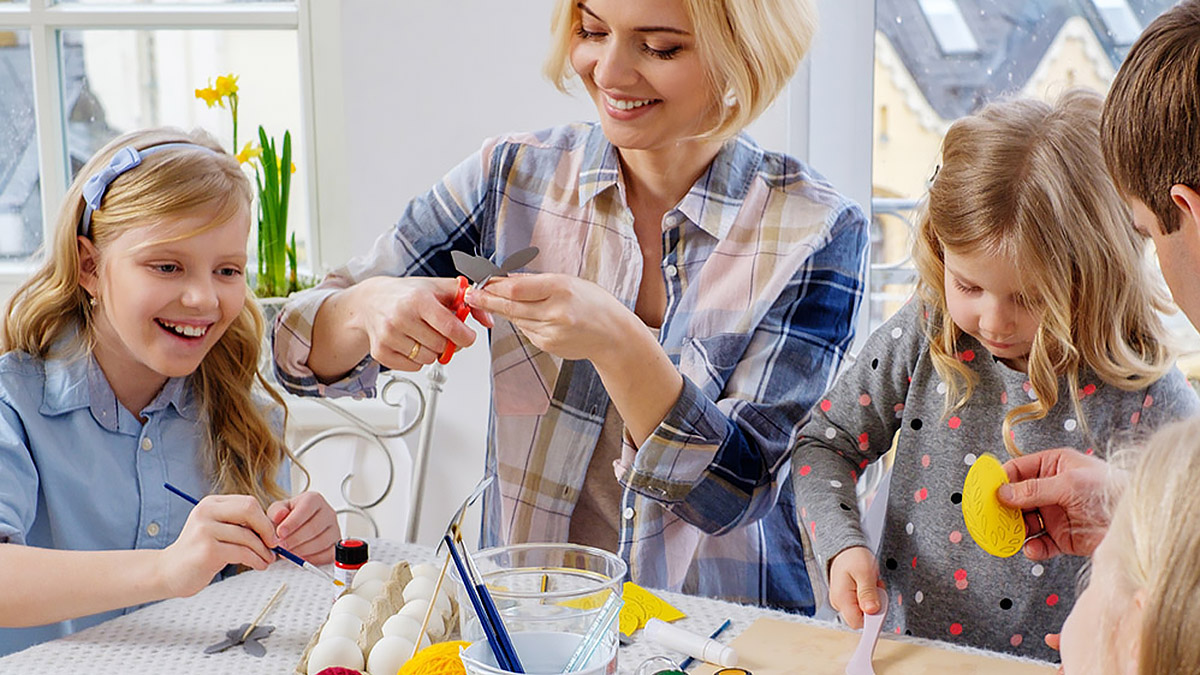
We’ll show you how to tap into your passion for making all kinds of fun and inventive creations in our “Get Crafty” series. These Easter crafts are fun for the whole family and will keep everyone’s spirits up for the egg hunt and other Easter activities.
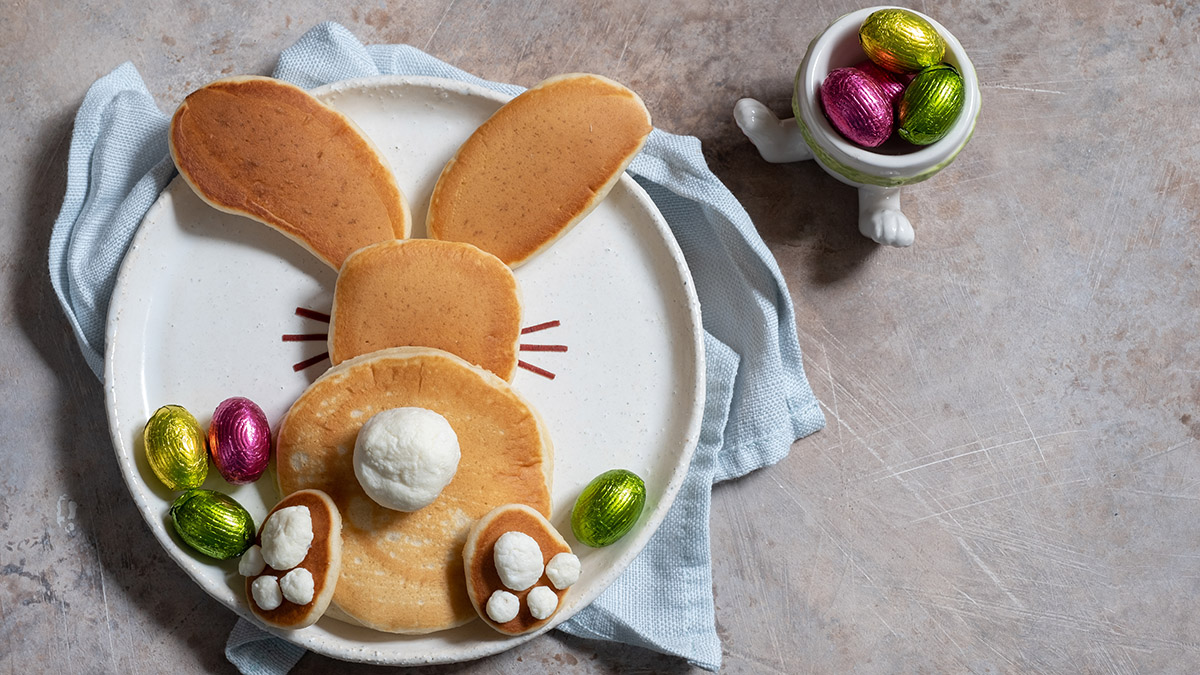
Bunnies are cute, cuddly…and delicious. No, we don’t mean the kind you put in stew (although we’re not going to stop you from making some if that’s the way you like your rabbit) but the kind you fashion out of pancake batter, like the one in the recipe below.
These Easter crafts are a great way to start Easter morning. Give the kids a set of bunny ears to decorate while you cook up yummy Easter Bunny pancakes for the whole family to eat.
What are you waiting for…hop to it!
Make-your-own bunny ears
Dress up like the Easter Bunny by creating your very own bunny ears to wear! Our custom bunny ears template is easy to download and design any way you want. You can even turn this activity into a decorating contest, with prizes for the most ingenious ears.
You’ll need:
A4 printer paper
A home printer
Crayons, markers, or colored pencils
Easters stickers, glitter, and other decorating supplies
Scissors
Scotch tape
Prizes
Directions
Download a copy of our Easter bunny ears template for each member of your family. Decorate the bunny ears and headband strip with crayons, markers, or colored pencils. Add some sparkle with glitter, Easter-themed stickers, and any other decorating supplies you have handy. The only limit is your own creativity!
When you’re finished, carefully cut out your bunny ears and headband along the dotted lines. Wrap the bunny ears around your head like a crown, measuring with the additional headband as needed for extra length. After adjusting the fit of your bunny ears, trim down the headband to the correct length, and then tape it to the bunny ears for a secure it.
Finally, don’t forget to take pictures or videos of you and your family hopping around like the Easter Bunny to post on social media.
‘Ears to a happy Easter!
Easter Bunny pancakes
This recipe for Easter Bunny pancakes is as fun to make as it is to eat. Serve them to the kids on Easter morning or put them out as part of an extravagant Easter brunch.
2tablespoonsmelted and cooled butter, plus unmelted butter for cooking
Whipped cream or butter
Fruit to garnish, such as strawberries or blueberries
Chocolate syrup
Maple syrup
Instructions:
In a bowl, mix together the dry ingredients.
Beat the eggs and 1½ cups milk in a separate bowl.
Add the eggs, milk, and 2 tablespoons of melted cooled butter to the dry ingredients. Mix the batter enough to moisten the flour. If the batter seems thick, add a little more milk.
Heat a skillet to medium heat.
Place 1 to 2 teaspoons of unmelted butter on the skillet.
When the butter starts to foam, ladle the batter onto the skillet, making various pancake shapes for the bunny ears, head, torso, and paws.
Flip pancakes after bubbles rise to the surface, about 2 to 4 minutes. Cook until the other side is lightly browned, about 2 to 4 more minutes.
Drizzle chocolate syrup on the plate to form bunny whiskers.
Arrange the pancakes on a plate to form your bunny, and then top it off with a dollop of whipped cream or whipped butter for the tail and paw pads.
Garnish with fresh fruit, serve with maple syrup, and enjoy your Easter brunch!
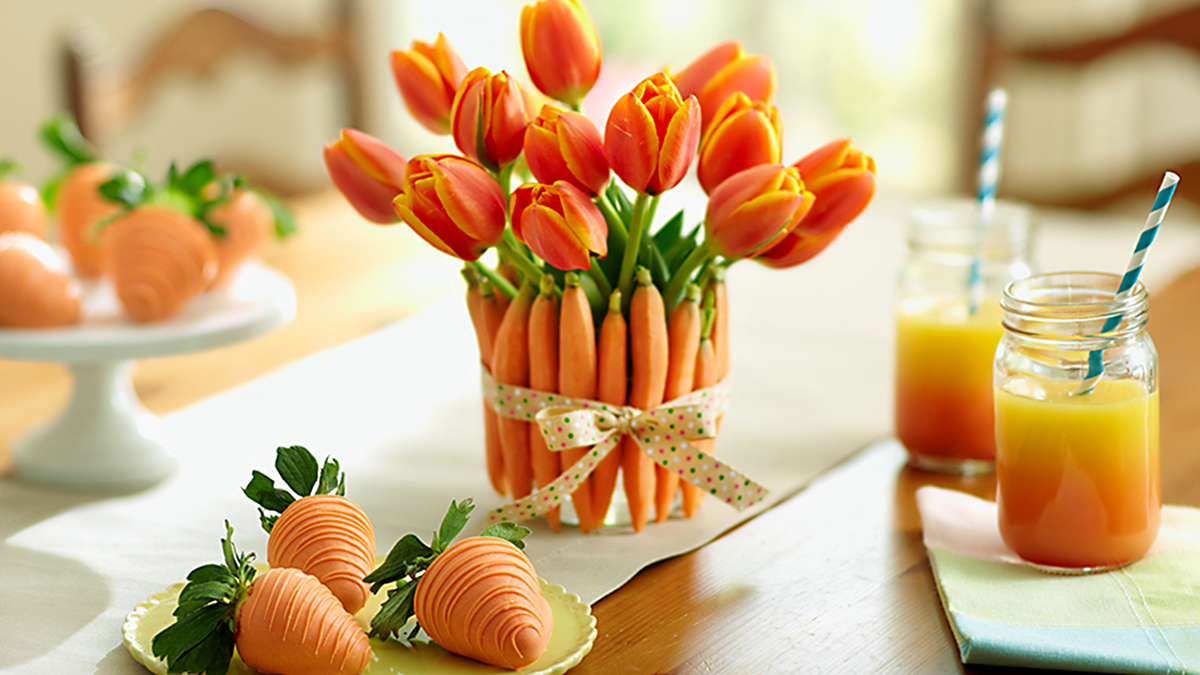
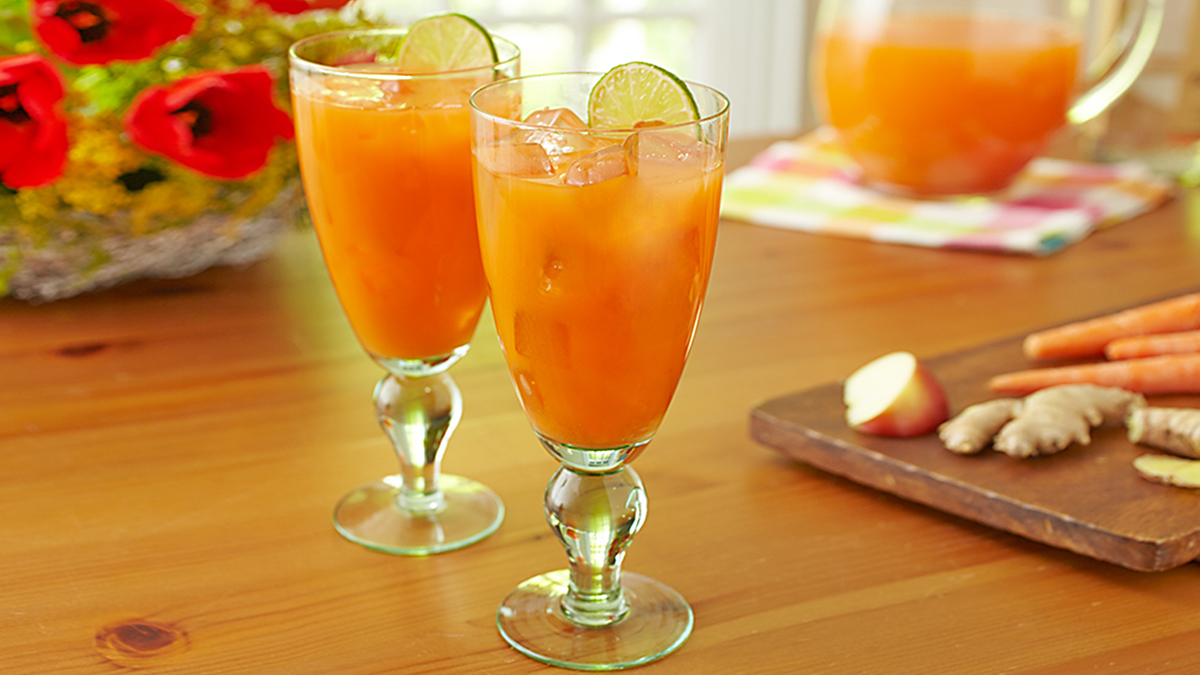
The series “Get Crafty” gives you the inspiration for creating inventive DIY projects during the holidays and year-round.These Easter brunch ideas include a seasonal cocktail, centerpieces made of spring veggies, and chocolate dipped strawberries that look like carrots.
When I think of things that represent Easter, my favorite spring flower, the tulip, comes to mind. Then there’s the Easter bunny’s favorite food, carrots. And what would Easter be without delicious desserts??? Put them all together and what do you get? A fresh, fun, and creative cocktail, centerpiece, and sweet treat that are perfect Easter brunch ideas.
Signature seasonal cocktail
A signature craft cocktail is always on my holiday entertainment menu. This beverage incorporates the fresh vegetables and flavors of the season, making it perfect for your Easter gathering. And with nearly a full day’s serving of carrot juice in each glass, it’s not only delicious but is packed with vitamins and minerals!
Muddle the ginger slices in the bottom of a cocktail shaker.
Add the carrot juice, apple juice, and vodka.
Shake well for about 10 seconds.
Pour over ice.
Garnish with a lime wedge.
Notes:
Note: You can make fresh carrot and apple juice or buy organic prepared juices.
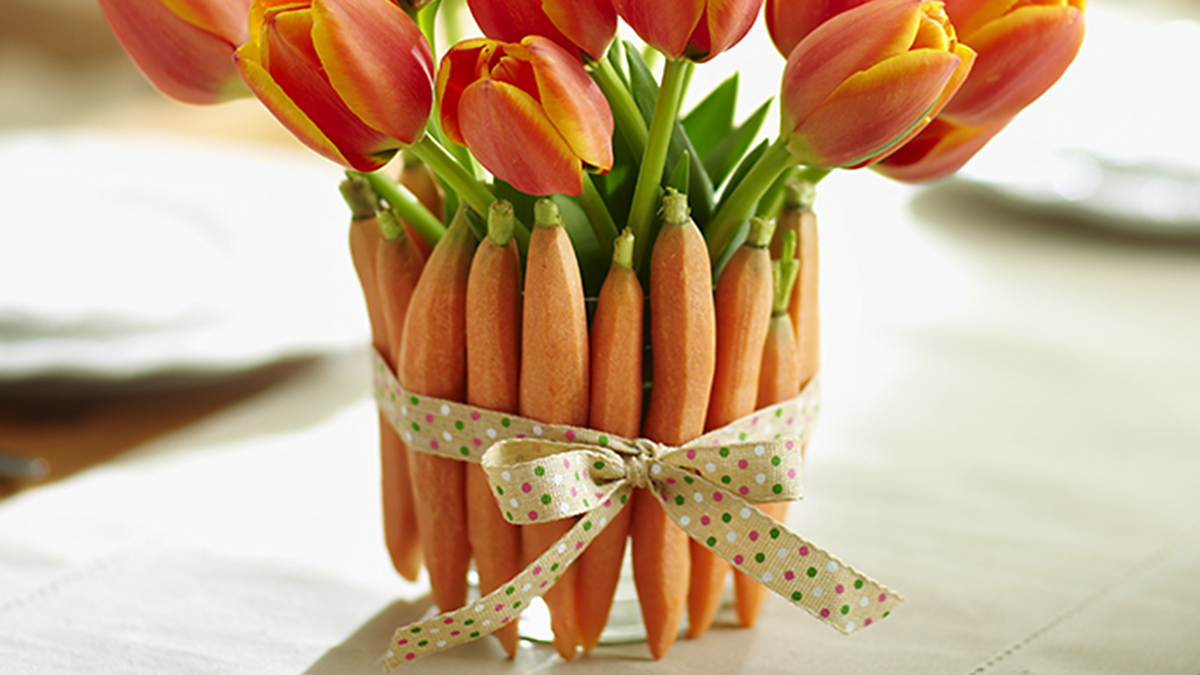
Fresh spring centerpiece
Incorporating seasonal fruits and vegetables into your tablescapes and floral designs takes them from pretty to pretty spectacular! A great starting point is the Baby Vegetable Gift Box or Baby Vegetables Crate from Harry & David. Brimming with the finest seasonal produce available, either one is the perfect gift for the vegetable connoisseur in your life. And if that person is you, get it for yourself!
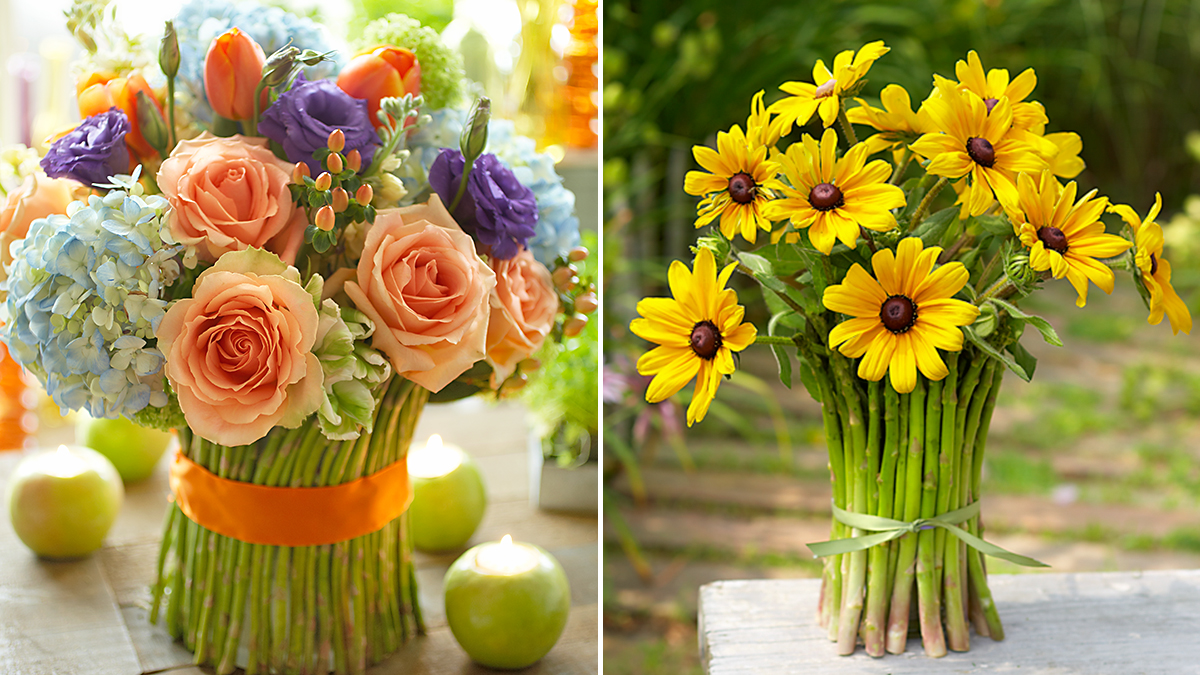
There’s something about miniatures that gets me every time, and these carrots are no exception. They’re the perfect size to fit around a lowball glass to create one-of-a-kind arrangements. Simply put a rubber band around the glass and insert the carrots between the glass and the rubber band, and continue until the glass is completely covered.
Tie a coordinating ribbon around the vase to cover the rubber band. You can also use a piece of fabric, raffia, or twine.
Creating asparagus vases using this same technique is one of my go-tos in the springtime.
Even if you’re pressed for time, you should always have flowers on your table when entertaining. And there is no easier arrangement to make than filling a favorite vase with beautiful, fresh-cut tulips. It’s so easy, it’s almost like the tulips arrange themselves!
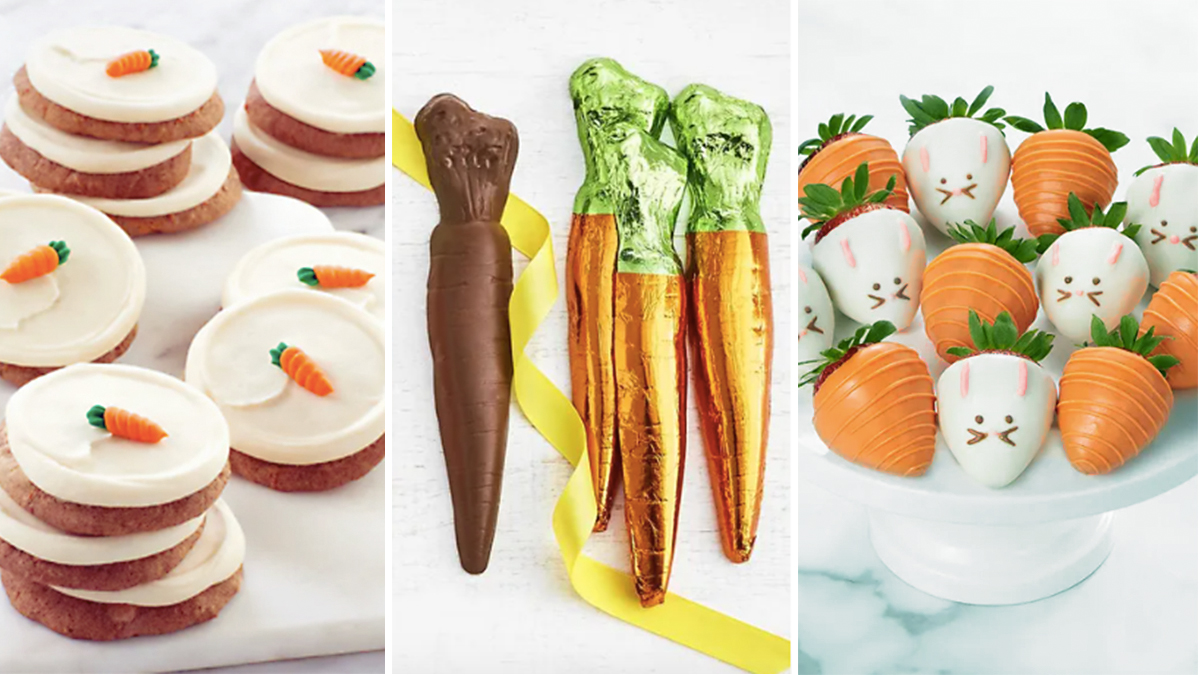
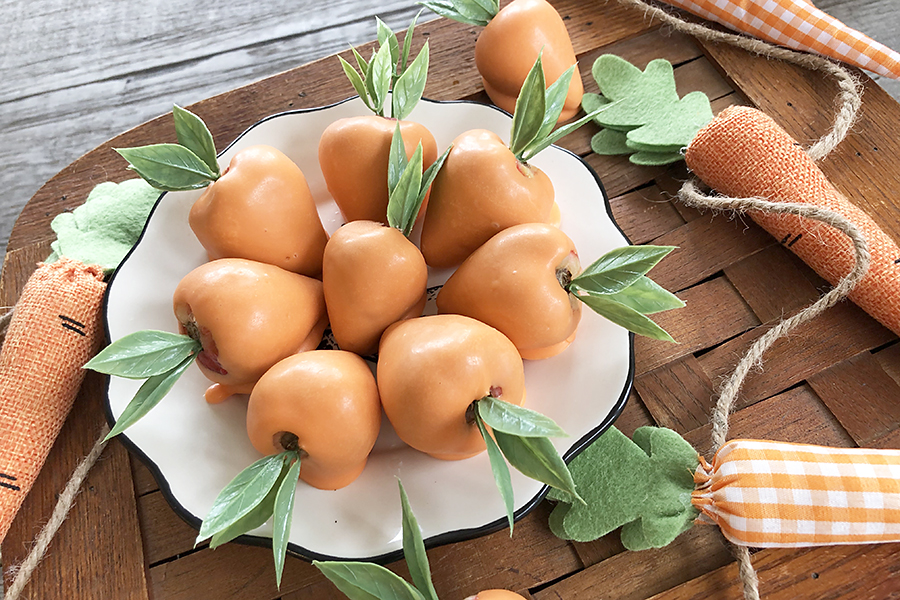
If you have the time and want to make your own chocolate-dipped strawberries, follow my instructions below. Just don’t expect them to turn out as good as the ones from Shari’s Berries! They’ve been perfecting the art of dipping strawberries into melted candy for over 30 years. Still, it is a fun project to do at home.
Prepare the strawberries for dipping by rinsing and thoroughly drying them. Lay the strawberries out on a paper towel and place another towel over them and gently press. Let them sit out for a bit before dipping, as it is important that they are completely dry.
While the strawberries are drying, melt the chocolate in a double boiler, microwave, or candy melting machine.
Start with about a cup of melts, stirring constantly until melted. Turn down or remove from heat and add more candy melts as needed, stirring them in until they are melted. Doing it this way helps to keep your candy from overheating, and breaking down and taking on a thick, chalky consistency.
Remove the stems before dipping. Insert a wood skewer into each strawberry, dip the strawberry in the melted candy, and place it on a piece of parchment paper to cool and set. (Note: If you are not adding the faux leaves, you do not need the skewers. Leave the stems on the berries and use them to hold onto as you dip the strawberries in the melted chocolate with your hands.)
Take a stem of faux greenery that has multiple stems/leaf clusters and use clippers or wire cutter to cut small sprigs.
Once the candy is completely cool, remove the wood skewer and insert a sprig of greenery into the strawberry.
Continue doing this until all the strawberries have a "carrot top."
Our series “Get Crafty” gives you the inspiration for creating inventive DIY projects during the holidays and year-round. Sometimes the best Mother’s Day gift is one that’s homemade. Here are seven Mother’s Day crafts for kids that Mom will cherish forever.
For spouses, grown-up children, and even parents of parents who have celebrated many Mother’s Days, picking out the perfect gift can be easy. But younger children may not be so sure about what to get or do for mom that will have her smiling from ear to ear. Thankfully, we’ve got loads of DIY ideas that the little ones can pull off for Mother’s Day.
Here are seven favorite Mother’s Day crafts that kids can make for mom this year, or any year.
1. Photo vase
Flowers are a popular gift on Mother’s Day, so why not create a personalized vase for Mom to put them in? All you need is some liquid adhesive, a small brush, tissue paper, a photo with Mom, and scissors. Check out our step-by-step instructions for this homemade Mother’s Day craft.
2. Personalized picture frame
If Mom has photos lying around without a frame to put them in, then this is a gift she absolutely needs. First, find a plain wooden frame that fits the photo you’d like her to display. Then, using paint, markers, glitter — anything, really — decorate the frame with Mom’s favorite colors and designs. Children can even write a personalized note around the edges if they’d like.
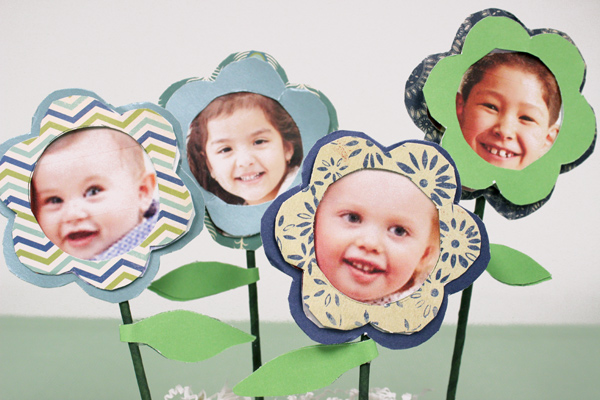
3. Photo flowers
In addition to live flowers, children can also gift Mom another type of flower — a photo flower! This children’s craft is super easy to make and perfect for all ages, and, better yet, we’ve got the templates you need to get started. We know Mom will love any type of flower you give her, but a flower with her child’s face in the center is sure to be a huge hit!
4. Candle holders
Candles are another popular gift for moms, which makes this DIY candle holder an excellent craft for Mother’s Day. All you’ll need is a glass cylinder for the candle to sit in, a photo or two with Mom, and some tape. After printing out your photo(s) on vellum paper, simply wrap them around the exterior of the glass cylinder and tape them down securely.
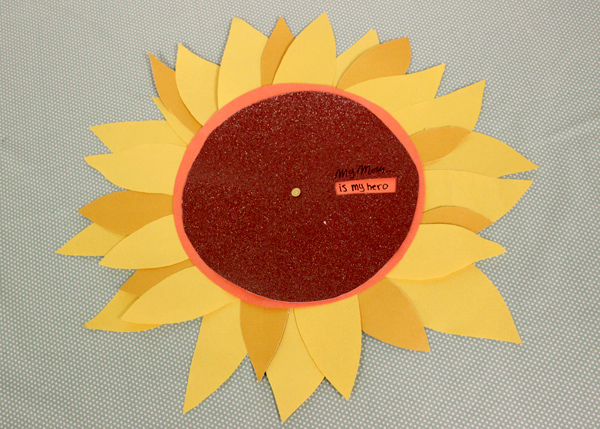
5. DIY sunflower wheel of appreciation
Call out all the things that make Mom special with this DIY Wheel of Appreciation craft. This tutorial shows you how to create one in the shape of a sunflower for some cheery inspiration.
6. ‘Do Not Disturb’ door hanger
Moms are so involved in our everyday lives that when Mother’s Day rolls around they definitely deserve some time to relax. Help Mom make sure she isn’t interrupted during her “me” time by making a “Do Not Disturb” sign she can hang on her doorknob. All you need to make it is a blank sign and some arts and crafts supplies. You can bet she’ll love this on those mornings when she needs a little extra beauty rest.
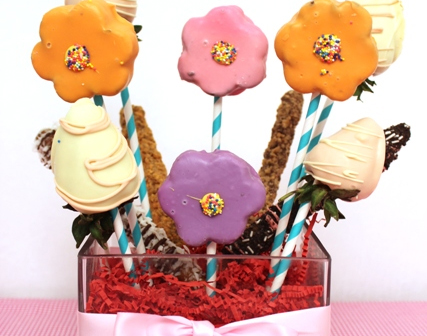
7. Sweet candy bouquet
Create a colorful arrangement out of Mom’s favorite treats with this DIY Candy Bouquet. Patterned paper straws add a colorful touch to the arrangement.